Adding buttons to the main layout file
Here we will add a couple of button widgets to the screen and we will then see a fast way to make them actually do something. We will add a button in two different ways, firstly using the visual designer and secondly by adding to and editing the XML code directly.
Adding a button via the visual designer
To get started with adding our first button, fragment_first.xml, open it in the editor and switch back to the design view by clicking the Design tab (shown next):

Figure 2.7 – Design tab
Notice to the left-hand side of the layout we have a window that is called the Palette and is shown next:
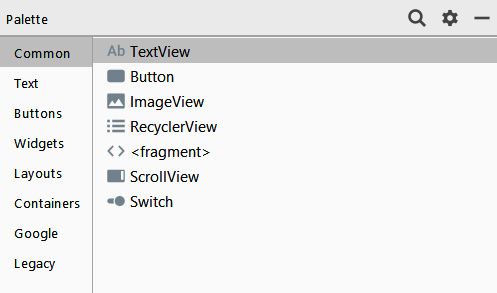
Figure 2.8 – Palette window
The palette is divided into two parts. The left-hand list has the categories of UI elements and allows you to select a category, and then the right-hand side shows you all the available UI elements from the currently selected category.
Make sure that the Common category is selected as shown in the previous figure. Now, left-click and hold on the Button widget and then drag it onto the layout somewhere near the top center.
It doesn't matter if it is not exact. It is good to practice getting it right, however. So, if you are not happy with the position of your button, then you can left-click it to select it on the layout and then tap the Delete key on the keyboard to get rid of it. Now you can repeat the previous step until you have a new neatly placed button that you are happy with, as here:
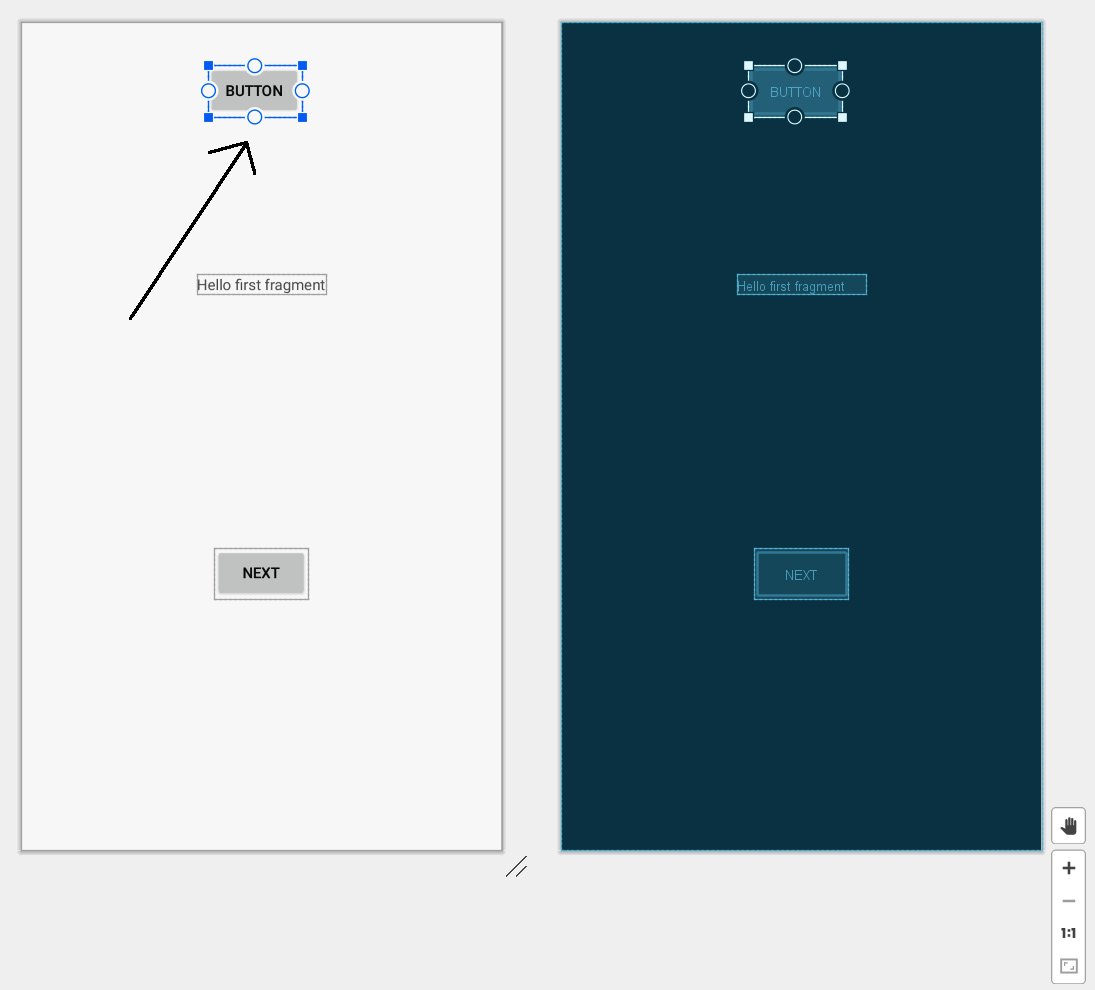
Figure 2.9 – Updating the layout
At this point, we could run the app on the emulator or on a real device and the button would be there – kind of. If we clicked it, there would even be a simple animation to represent the button being pressed and released. Feel free to try this now if you like. If you do, you will notice that the button isn't positioned as you expect it to be:
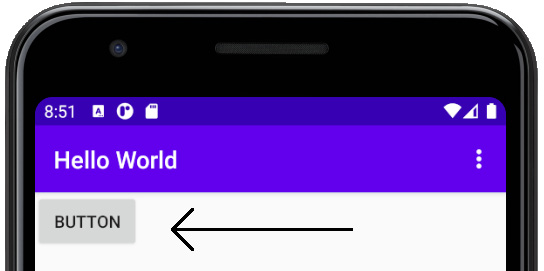
Figure 2.10 – Button not positioned correctly
Don't concern yourself with this apparent anomaly for now; we will look into this over the next few sections.
Next, we are going to edit the attributes of our button in the Attributes window.
Editing the button's attributes
Make sure the button is selected by left-clicking it. Now find the Attributes window to the right of the editing window as shown next:

Figure 2.11 – Attributes window
In the previous figure, you can see that we have access to a wide selection of attributes from the currently selected UI element. To reveal more of the attributes, we click the different categories of attributes and scroll through them using the scrollbar to the right. If they are not open already by default, left-click on the Common Attributes and All Attributes sections' arrows to reveal their options.
Now you can see the full details of the button and we can set about editing it. It might seem surprising the substantial number of attributes that something as simple as a button has. This is a sign of the versatility and power that the Android API provides for UI manipulation.
As you can see, there is a large array of different attributes that we can edit right here in the UI designer. In Chapter 13, Anonymous Classes – Bringing Android Widgets to Life, we will also edit and manipulate these attributes using our Java code.
For now, we will edit just one attribute. Scroll the Attributes window until you see the onClick attribute in the Common Attributes section and then left-click it to select it for editing, as shown here:
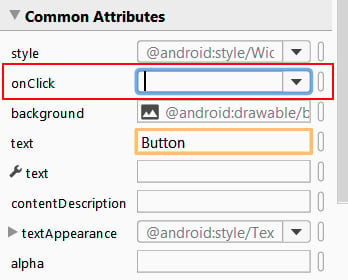
Figure 2.12 – Common Attributes section
Note
If you ever have trouble finding an attribute, you can always find it in the All Attributes section, where attributes are arranged in alphabetical order. Therefore, the onClick attribute can also be found about two-thirds of the way down the lengthy list of the All Attributes section.
Type topClick in the onClick attribute's edit box and press Enter on the keyboard. Be sure to use the same case, including the slightly counterintuitive lowercase t and uppercase C.
The Attributes window will look like this when you are done:

Figure 2.13 – onClick option
What we have done here is named the Java method in our code that we want to call when this button is clicked by the user. The name is arbitrary but as this button is in the top part of the screen, the name seems meaningful and easy to remember. The odd casing that we used is a convention that will help us keep our code clear and easy to read. We will see the benefits of this as our code gets longer and more complicated.
Of course, the topClick method doesn't exist yet. Android Studio is very helpful, but there are some things we need to do ourselves. We will write this method using Java code after we have added another button to our UI. You could run the app at this point and it would still work. But if you click the button, it will crash, and you will get an error because the method does not exist. Android Studio is forewarning us of this impending crash by outlining the onClick attribute in red, as shown in the previous figure. If you hover the mouse cursor over this red outline, you will see the details of the problem: Corresponding method handler… Not found.
Examining the XML code for the new button
Before we add our final button for this project. Click the Code tab to switch back to seeing the XML code that makes our UI.
Notice that there is a new block of code among the XML that we examined earlier. Here is an image of the new block of code:
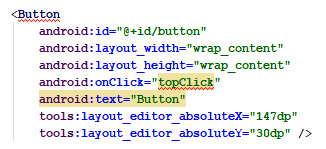
Figure 2.14 – New block of code among the XML
Also, notice the following details, which should correspond to what we know about XML and Android UI elements:
- The new code starts with the text
<Buttonand ends with/>. - The code has a range of attributes that define the button, including
layoutWidthandlayoutHeight. - The code includes the
onClickattribute that we just added with a value of"topClick". - The
topClickvalue of theonClickattribute is underlined in red, showing the missing method error. - The start and end of the code representing the button are enclosed within the
ConstraintLayoutelement.
As in the design view, you can hover the mouse cursor over the red-underlined topClick code to reveal the details of the problem: Corresponding method handler… Not found.
Note
During the writing of this book, Android Studio updated the way it shows errors in XML. Currently, it highlights the error in red, not underlining in red as shown in the figures and descriptions. The underlining is clearer in black and white print so they have been left as they are.
We can see that the issue is that Android Studio expects a method called topClick to be implemented within our Java code. We will do this as soon as we have added that second button.
Adding a button by editing the XML code
Just for variety and to prove that we can, we will now add another button using only XML code, not the UI designer. Most of the time, we will use the UI designer, but this quick exercise should cement in your mind the relationship between the UI designer and the underlying XML code.
We will achieve this by copying and pasting the code for the existing button. We will then make some minor edits to the pasted code.
Left-click just before the button code that starts <Button. Notice that the beginning and end of the code now have a slight highlight:
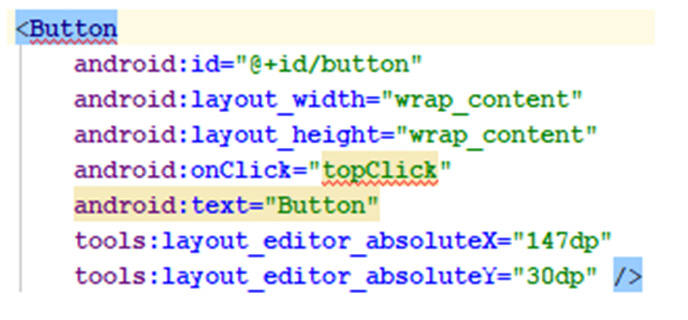
Figure 2.15 – Button code
This has identified the part of the code we want to copy. Now left-click and drag to select all the button code, including the highlighted start and end, as shown in this next figure:
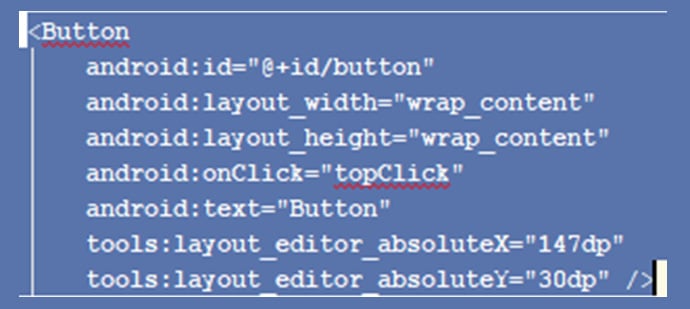
Figure 2.16 – Select all the button code
Press the Ctrl + C keyboard combination to copy the highlighted text. Place the keyboard cursor below the existing button code and tap the Enter key a few times to leave some spare empty lines.
Press the Ctrl + V keyboard combination to paste the button code. At this point, we have two buttons. There are a couple of problems, however:
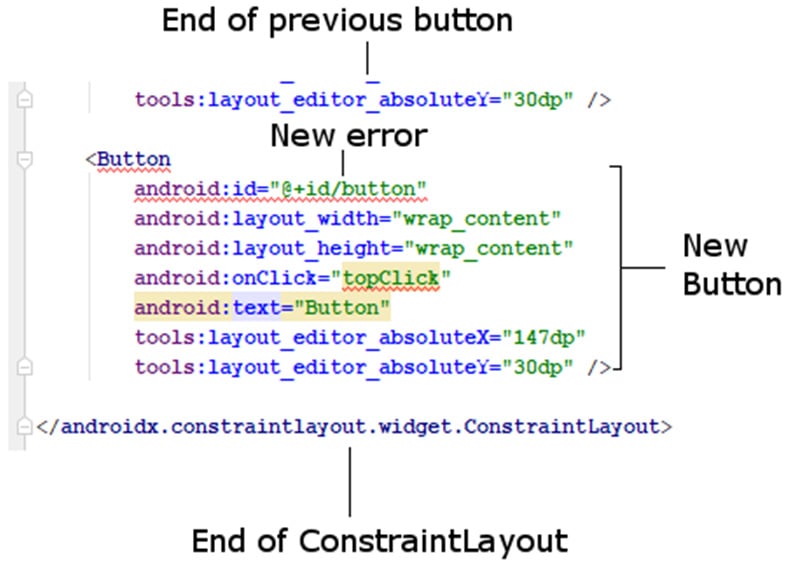
Figure 2.17 – Additional error
We have an additional error in both blocks of code that represent our buttons. The id attribute (in both blocks) is underlined in red. The reason for this error is that both buttons have an id attribute that is the same. The id attribute is supposed to distinguish a UI element from all other UI elements. Let's fix that.
Giving the buttons unique id attributes
We could solve the problem by calling the second button, button2, but it would be more meaningful to change them both. Edit the code in the first button to give it an ID of buttonTop. To do so, find the following line of code (in the first button):
android:id="@+id/button"
Change it to this:
android:id="@+id/buttonTop"
Note
Notice the lowercase b in button and the uppercase T in Top.
Now identify this line of code in the second button:
android:id="@+id/button"
Change it to this:
android:id="@+id/buttonBottom"
The errors on the id attribute lines are gone. At this point, you might think we can move on to solve our missing method problem.
However, if you run the app and take a quick glance at it, you will see we only appear to have one button. Not only that but (as alluded to previously) the buttons are not in the place we expected them to be either:
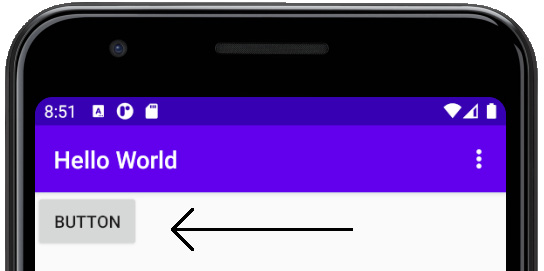
Figure 2.18 – Single button
The reason for this is we haven't explicitly positioned them, so they have defaulted to the top left. The position we see on the Design tab is just a design-time position. Let's change that now.
Positioning the two buttons in the layout
The reason we can only see one button is that both buttons are in the same position. The second button is exactly covering the first button. And even in the Design tab (feel free to have a look), the buttons are still sat on top of each other, although they are in the middle of the screen.
Note
You might be wondering why the UI layout tool was designed in this apparently counterintuitive way. The reason is flexibility. As we will see in the next two chapters, not only is it possible to position UI elements differently at design time to when the app is running but there is also a whole bunch of different layout schemes that the app designer (that's you) can choose from to suit their plans. This flexibility results in a little awkwardness while learning about Android but great design power once you have got past the awkwardness. Don't worry: we will move a step at a time until you have this thing beaten.
We will make Android Studio solve the problem for us automatically by first adding to our code and then using the UI designer. First, let's get the design-time layout right. In the code for the second button, find this line of code:
tools:layout_editor_absoluteY="30dp" />
Edit it to be the same as this:
tools:layout_editor_absoluteY="100dp" />
This subtle change will move the second button down a little, but only for design time. If you look in the Design tab, the button is positioned neatly underneath the first button, but if you run the app on the emulator, they are both still in the top-left corner and on top of one another.
Note
It is possible, even likely, that the exact dp measurements in your layout will be slightly different to those shown in the book. As long as the second button's layout_editor_absoluteY attribute is about 70dp greater than the first, then all will be neat and tidy. Feel free to play with this attribute on both buttons while switching between the Code and Design tabs until the buttons are positioned to your liking.
When you are satisfied with the position of the buttons, switch to the Design tab and find the Infer constraints button, shown next:

Figure 2.19 – Infer constraints button
Click the Infer constraints button. Android Studio will edit the XML. Let's take a brief look at what has happened behind the scenes. From the end of both of the buttons, the following lines of code were removed.
If the constraints aren't being applied, hit the Clear All Constraints button, which is to the left of Infer constraints; sometimes Android Studio can get confused and needs to reset the existing constraints before inferring the rest:
tools:layout_editor_absoluteX="147dp"
tools:layout_editor_absoluteY="30dp" />
These two lines of code were what positioned the buttons horizontally (…absoluteX) and vertically (…absoluteY).
Android Studio also added four lines of code to the first button and three to the second. Here is the code added near the start of the first button:
android:layout_marginTop="30dp"
This code causes the button to have a margin of 30 at the top. But at the top relative to what exactly? Look at these three lines of code that were added at the end of the first button:
app:layout_constraintEnd_toEndOf="parent"
app:layout_constraintStart_toStartOf="parent"
app:layout_constraintTop_toTopOf="parent" />
Notice the new attributes of layout_constraintEnd_toEndOf, layout_constraintStart_toStartOf, and layout_constraintTop_toTopOf. The value assigned to each of these attributes is "parent". This causes the first button to be positioned relative to the parent UI element. The parent is the containing layout: the ConstraintLayout element.
Now look at the three lines of code added to the second (bottom) button.
Near the start of the code, we see this:
android:layout_marginTop="22dp"
And at the end of the code for the second button, we see these two extra lines:
app:layout_constraintStart_toStartOf="@+id/buttonTop"
app:layout_constraintTop_toBottomOf="@+id/buttonTop" />
This means that the second button is positioned with a margin of 22 relative to the buttonTop widget.
Note
The dp code is a unit of measurement/distance and will be discussed in more depth in Chapter 5, Beautiful Layouts with CardView and ScrollView. The precise values for the dp measurement will likely vary slightly on your layout.
Now run the app and you will see we have two distinct buttons. One has an id attribute of buttonTop and it is above the other button, with an id attribute of buttonBottom:
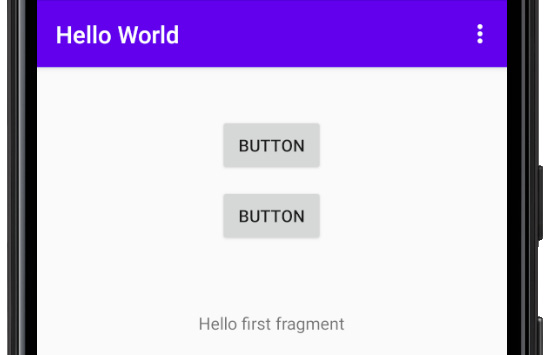
Figure 2.20 – Two button options
Clearly, there is more to layouts than I have alluded to so far, but you have had your first glance at one of the options we have to design the UI of our apps. We will be taking a closer look at the ConstraintLayout layout element as well as exploring more layout options in Chapter 4, Getting Started with Layouts and Material Design.
We want to make one more change in our XML code.
Making the buttons call different methods
Switch back to the Code tab and identify this next line of code in the second (buttonBottom) button:
android:onClick="topClick"
Edit the code to this:
android:onClick="bottomClick"
Now we have two buttons, one above the other. The top one has an id attribute of buttonTop and an onClick attribute with a value of topClick. The other has an id attribute of buttonBottom and an onClick attribute with a value of bottomClick.
These last XML code changes now mean we need to code two methods (topClick and bottomClick) in our Java code.
Note
It is OK for two buttons to call the same method when they are clicked; it is not a syntax error. However, most buttons do have distinct purposes, so this exercise will be more meaningful if our buttons do different things.
We will do that soon, but before we do, let's learn a little bit more about Java comments and look at some Java code we can write to send messages. We will learn to send messages to the user to keep them informed and to ourselves for debugging purposes.


