Search icon CANCEL
Subscription
0
Cart icon
Your Cart (0 item)
Close icon
You have no products in your basket yet
Save more on your purchases! discount-offer-chevron-icon
Savings automatically calculated. No voucher code required.
Arrow left icon
Explore Products
Best Sellers
New Releases
Books
Videos
Audiobooks
Learning Hub
Free Learning
Arrow right icon
Arrow up icon
GO TO TOP
Godot 4 Game Development Projects

You're reading from   Godot 4 Game Development Projects Build five cross-platform 2D and 3D games using one of the most powerful open source game engines

Arrow left icon
Product type Paperback
Published in Aug 2023
Publisher Packt
ISBN-13 9781804610404
Length 264 pages
Edition 2nd Edition
Languages
Tools
Arrow right icon
Author (1):
Arrow left icon
Chris Bradfield Chris Bradfield
Author Profile Icon Chris Bradfield
Chris Bradfield
Arrow right icon
View More author details
Toc

Table of Contents (10) Chapters Close

Preface 1. Chapter 1: Introduction to Godot 4.0 FREE CHAPTER 2. Chapter 2: Coin Dash – Build Your First 2D Game 3. Chapter 3: Space Rocks: Build a 2D Arcade Classic with Physics 4. Chapter 4: Jungle Jump – Running and Jumping in a 2D Platformer 5. Chapter 5: 3D Minigolf: Dive into 3D by Building a Minigolf Course 6. Chapter 6: Infinite Flyer 7. Chapter 7: Next Steps and Additional Resources 8. Index 9. Other Books You May Enjoy

Project setup

Create a new project in Godot to get started. As you’ve done before, download the project assets and unzip them in the new project folder. Once you’ve created the project, you’ll start by configuring the inputs and Godot settings needed for the game.

Inputs

You’ll control the plane with up, down, left, and right inputs. You can add them in Input Map in the same way you’ve done with other projects. Name the four inputs pitch_up, pitch_down, roll_left, and roll_right. You can add the arrow keys and/or the W, A, S, and D keys to these, but if you have a game controller, you can also use a joystick for more precise control. To add joystick inputs, you can select Joypad Axes after pressing the + button. The values are labeled, such as Left Stick Up, so you can easily keep track of them:
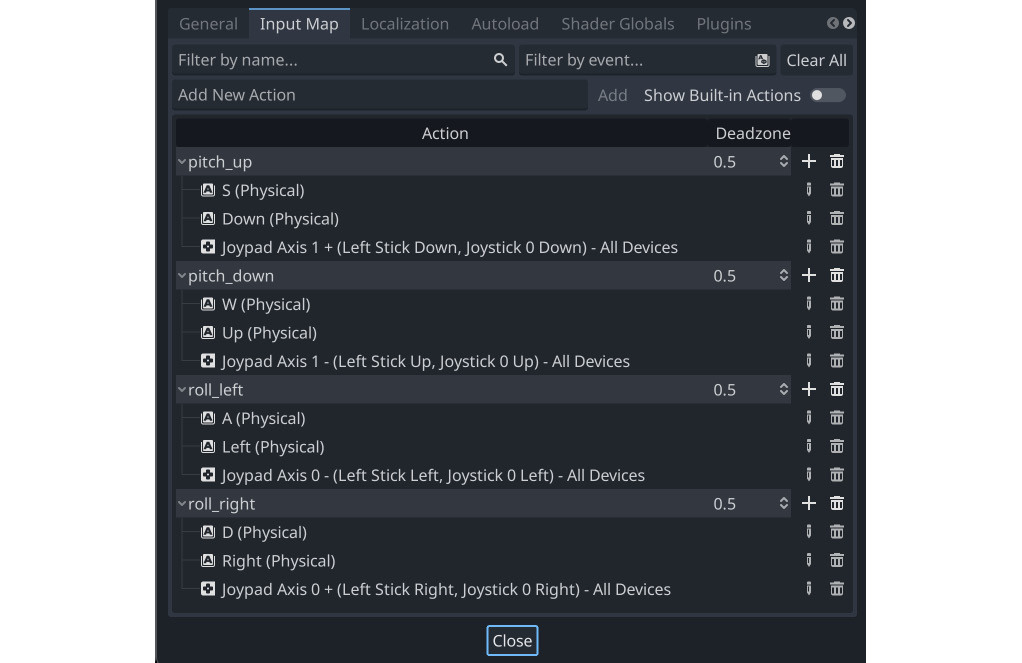
Figure 6.2: Input configuration

Figure 6.2: Input configuration

The nice part about this setup is that your code won’t have to be any different...

lock icon The rest of the chapter is locked
Register for a free Packt account to unlock a world of extra content!
A free Packt account unlocks extra newsletters, articles, discounted offers, and much more. Start advancing your knowledge today.
Unlock this book and the full library FREE for 7 days
Get unlimited access to 7000+ expert-authored eBooks and videos courses covering every tech area you can think of
Renews at $19.99/month. Cancel anytime
Banner background image