Managing OneDrive
OneDrive is the online file storage area that you can access once you have signed up for a Microsoft account. It provides you with a means to access services and devices and was previously known as Windows Live ID. You can use OneDrive if you have a Microsoft account or Microsoft 365 Work/School account access. OneDrive is free to use if you are happy to only have 5 GB of storage space. If not, you can choose from a range of paid plans.
OneDrive is important as the service allows you to add (save) documents directly from within the Microsoft Office 2021 applications to the online storage facility.
Many features within the new version of Office will only be activated once you've done this. Previously, we could upload files to OneDrive and/or save them directly to OneDrive. This feature is now integrated so that we can move files and see version history directly within the Office applications, instead of having to open OneDrive to achieve this.
Like many other plans, OneDrive offers Home and Business plan options. The differences between them relate to the amount of storage quota, your monthly or annual subscription, whether you need the storage free for personal use or Microsoft 365 apps, or whether you want business use with access to Office apps.
In the next section, we will learn how OneDrive is integrated into Word 2021.
Saving documents to OneDrive
As we mentioned previously, for the AutoSave feature to be enabled within Office 2021 applications, you need to ensure that your file is saved to OneDrive. One of the pros of using OneDrive as the preferred storage location for documents is that you will not lose any work as the document is updated constantly in the background. Having files stored in the OneDrive app also means that you can access them at any time on any device that's logged into the Office 365 service.
Follow these steps to save documents to OneDrive:
- Click the File tab.
- Choose Save As from the list on the left.
- If you are connected to OneDrive, you will see your accounts already listed here. We are already associated with OneDrive – Personal, as shown in the following screenshot:

Figure 1.18 – The Save As options in Word 2021 showing the connection to OneDrive – Personal
- If the OneDrive connection is not readily available, click the Add a Place option:
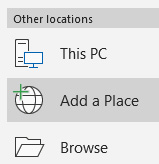
Figure 1.19 – Available locations when saving documents
- Finally, choose from either the OneDrive or OneDrive for Business option:
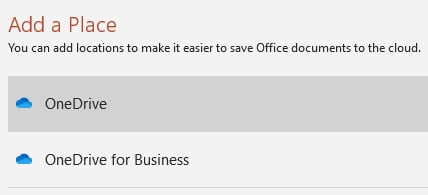
Figure 1.20 – Selecting OneDrive or OneDrive for Business as a document location
- After selecting the location, you may be asked to sign in to your OneDrive account if you have not already done so:
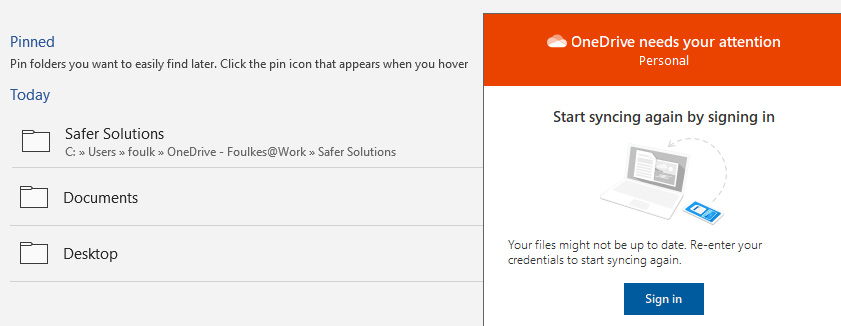
Figure 1.21 – Dialog box prompting you to sign in to OneDrive to sync files
- Add or amend the File name: description, if necessary:
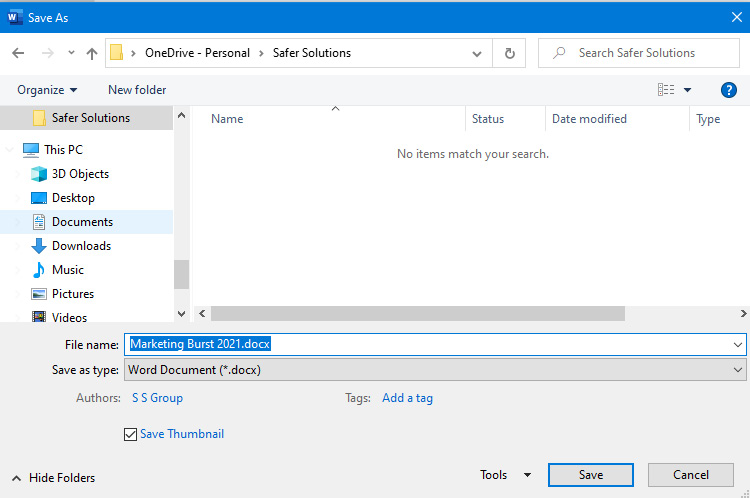
Figure 1.22 – Adding or amending the File name: description
- Click the Save button to confirm your choice.
The document will now be saved to the cloud and the title bar will display Saved… just after the description of the file. Every couple of seconds, the filename area will refresh to display Saving…. This will happen when OneDrive updates (syncing) any amendments you've made to the cloud automatically:
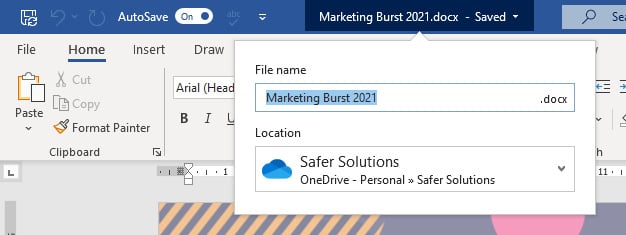
Figure 1.23 – The title bar indicating when the document is updated and saved to the cloud
Note
When a document is saved to an online location, as shown in the preceding screenshot, the Save button to the left of the QAT will display a double arrow to the bottom right of the button. Click that button to refresh the document with amendments from other authors.
Note that documents will not sync automatically to the cloud, nor from the cloud to your devices, unless the following is true:
- Sync is activated on your device.
- You have an active internet connection.
- You have set up your OneDrive account and you are signed in.
- A document is currently open and reporting a sync error.
Next, we will learn how to sync documents to OneDrive and learn about the various status icons in File Explorer for your OneDrive connections.
Syncing a document to OneDrive
When we create documents in Office 365, they are stored in OneDrive's online storage area. These documents are only available online if you're not synced to other devices. The same would happen to documents that have been created locally within Microsoft Word 2021, for instance. Although documents exist in the OneDrive location on the local computer's File Explorer area, they may not be available online until certain sync conditions have been met.
To sync documents to the cloud or from the cloud to a OneDrive-connected folder location, you will need to set up OneDrive and have sync active. To understand this better, let's look at a scenario.
The following screenshot shows an example of the contents of the Safer Solutions folder on OneDrive online:
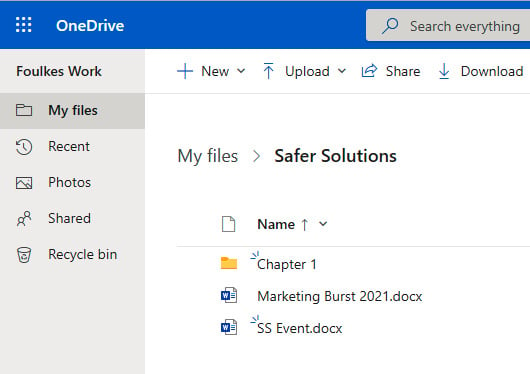
Figure 1.24 – The contents of the Safer Solutions folder on OneDrive
Tip
The three blue stripes at the top left of the filename (as shown in the preceding screenshot) indicate that the file has recently been updated.
Now, let's go to the same OneDrive folder that exists in File Explorer on our local computer. Notice the Status column in the following screenshot. Not all the status icons are the same. The SS Event document's status indicates that it only exists online, although we can see the file in the OneDrive-connected folder locally. This means that we can see the file in OneDrive and that on opening the file from this area, it will only open in the browser.
The Marketing Burst 2021 document was saved locally and synced to OneDrive online (which means that the document can be accessed online and locally). We will discuss why the folder and document are pending sync here:

Figure 1.25 – OneDrive folder connection showing the status of documents
Next, we will discuss the different statuses so that you know how to manage your online and local environments better.
Understanding OneDrive icons
In the previous section, the OneDrive-connected folder on my local computer indicates that two of the folder items are pending sync. We can check the status of a document by placing our cursor over the status icon in the Status column (see the following screenshot). There are several status icons, so it is important to recognize the differences between them:

Figure 1.26 – Explorer showing the OneDrive sync pending status
The following table outlines the most common status icons:
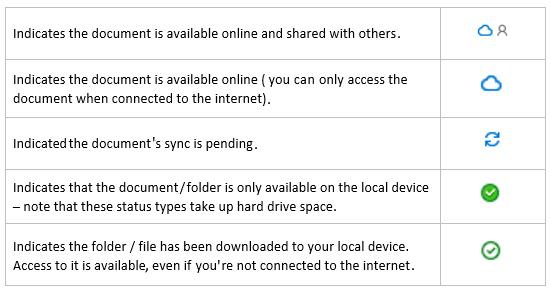
Figure 1.27 – OneDrive-connected folder status meanings
To ensure that a file/folder remains only on the local device, right-click on the file/folder in the OneDrive folder on the computer and select Always keep on this device. The status icon will display a green circle with a white checkmark:
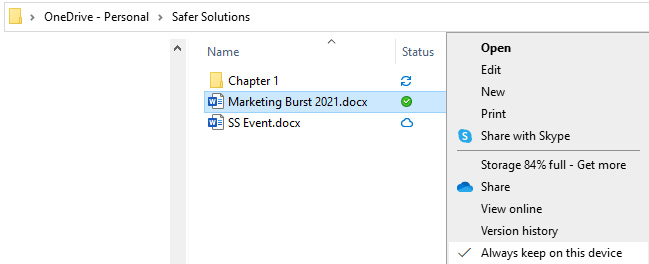
Figure 1.28 – The Always keep on this device option after right-clicking a document
There are several reasons why we may receive sync errors when working with the OneDrive folder locally. Let's learn how to troubleshoot such sync issues.
Troubleshooting sync errors
Once you have set up OneDrive on your computer, you can check its status by clicking the OneDrive icon to the right of the Windows taskbar. This icon will indicate whether you are online, offline, or if sync has been paused:

Figure 1.29 – The OneDrive taskbar's icons displaying paused, offline, and online
When you visit the OneDrive folder location within your File Explorer area, you will notice the sync status next to the document or folder. It is important to keep an eye on both these status areas so that you can ensure your documents are being synced, are accessible on all devices, and contain the latest amendments.
Depending on several factors, OneDrive could slow down your system considerably if you're syncing all the time. You can change this setting so that you only sync manually or pause syncing for a certain period.
To pause syncing
Follow these steps to learn how to pause syncing:
- Click the OneDrive icon on the Windows taskbar.
- Select Help & Settings.
- Click the Pause syncing drop-down arrow:
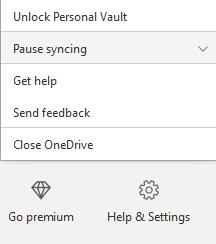
Figure 1.30 – OneDrive's Pause syncing option
- Choose to pause for 2, 8, or 24 hours.
- The OneDrive icon on the taskbar will indicate that OneDrive is paused.
Now, let's learn how to specify which online folders are available on your computer.
Choosing folders
Folders from OneDrive's online storage can be made available on your local computer. If we use OneDrive as our primary storage area, we may need to make a few of these folders accessible locally:
- Click the OneDrive icon on the Windows taskbar.
- Select Help & Settings.
- Click Settings.
- Be sure to select the Account tab at the top of the dialog box that populates.
- Click the Choose folders button (sign in to OneDrive if required), then select the folders by clicking on them:
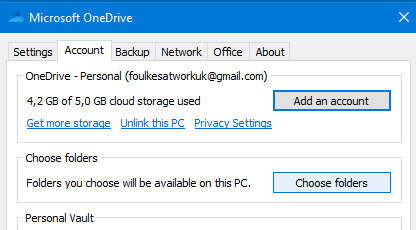
Figure 1.31 – The Account settings dialog box for OneDrive
- Select OK to confirm this.
Note
OneDrive accounts can also be unlinked from your PC using the respective Unlink this PC option on the Account tab. Go to the Settings tab to choose options related to starting OneDrive and customizing notifications.


