Unity's 2D features
In 2013, with the release of Unity 4.3, Unity made 2D game development significantly simpler by adding native support for 2D development to the Unity editor environment. Since then, 2D game development has been on the rise among the indie and hobbyist developers. This section will give a general overview the various 2D features and terms as they appear in Unity 5.3.
2D mode versus 3D mode
When creating a new Unity project, you can choose between 3D mode and 2D mode, as shown in the following screenshot:

The main differences in the two modes are the way assets will be imported into your project and the default camera view and position. If you select 2D, the default camera will be set to Orthographic projection, the camera's position will be set to (0, 0, -10), your scene will be in 2D view, and your and images will be imported as sprites rather than textures.
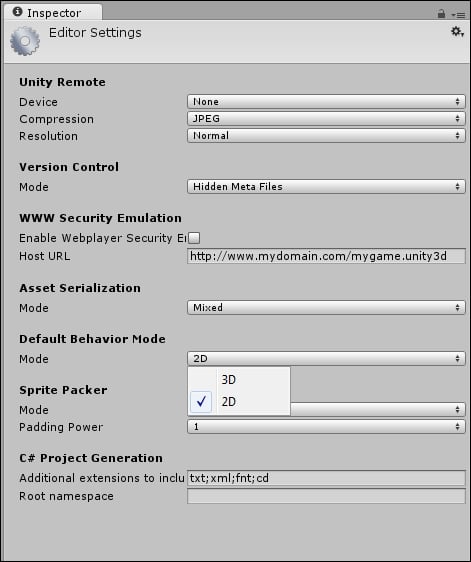
You can easily swap between the two modes at any time during development by navigating to Edit | Project Settings | Editor and changing the Default Behavior Mode option, as shown in the following screenshot:

Changing the Default Behavior Mode will not affect how your game runs. This setting really only makes the process of importing new assets and creating new cameras quicker, because you will not have to manually change the texture type of images and change the projection of camera.
Note
There are a few other items that are handled differently in 2D mode versus 3D mode, such as lighting, and you can find a list of all the differences at http://docs.unity3d.com/Manual/2DAnd3DModeSettings.html.
Working with sprites
Sprites are 2D images. Sprites can be images that depict a single object (for example, a character) or an entire scene (for example, a background). Several sprites can also be combined to create a single object, as shown in the following screenshot:

A character created by combining multiple sprites; example from Unity's platformer sample
When your project is set to 2D mode, any image you import in to your project folder will automatically be assigned a Sprite (2D and UI) texture type. This means that the image is assumed to represent a 2D object or scene rather than an image that will applied to a 3D object.
When a sprite image is dragged from the Assets folder to the Scene view, a 2D Object-Sprite will be added to your scene. This object will automatically be given the Sprite Renderer component (refer to the following section), making the sprite visible in your game; no additional lighting or work is required.
Note
It's important to note that if your sprite has transparencies, you want to import your sprite texture as a .png formatted image file.
By default, each image is imported as a single sprite; however, by using the Sprite Editor (refer to the Sprite Editor section), you can change this in various ways.
Note
While your sprite textures can be any dimension, it is highly recommended that the texture be a perfect square with a power of two pixel height and width (that is 64 px by 64 px, 128 px by 128 px, and so on).
Sprite Renderer
The Sprite Renderer is the component that allows a 2D object to be displayed as a Sprite on the screen. Refer to the following screenshot:

The Sprite property selects the image that will be displayed. Any image that is assigned a Sprite (2D and UI) texture type can be placed in this property. The Color property allows you to change the vertex color of the rendered image as well as the transparency (through the alpha).
Flip is a property new to Unity 5.0. This will allow you to flip the sprite in the X or Y planes without having to use Scale properties in the transform, as was necessary in previous versions of Unity.
The Sprite Renderer component automatically sets the Material property of the object to Sprites-Default, which uses the default Shader property as Sprite/Default. The Sprites/Default shader does not interact with lights in the scene, so lights are not required to view Sprites with these default settings.
Sprite Editor
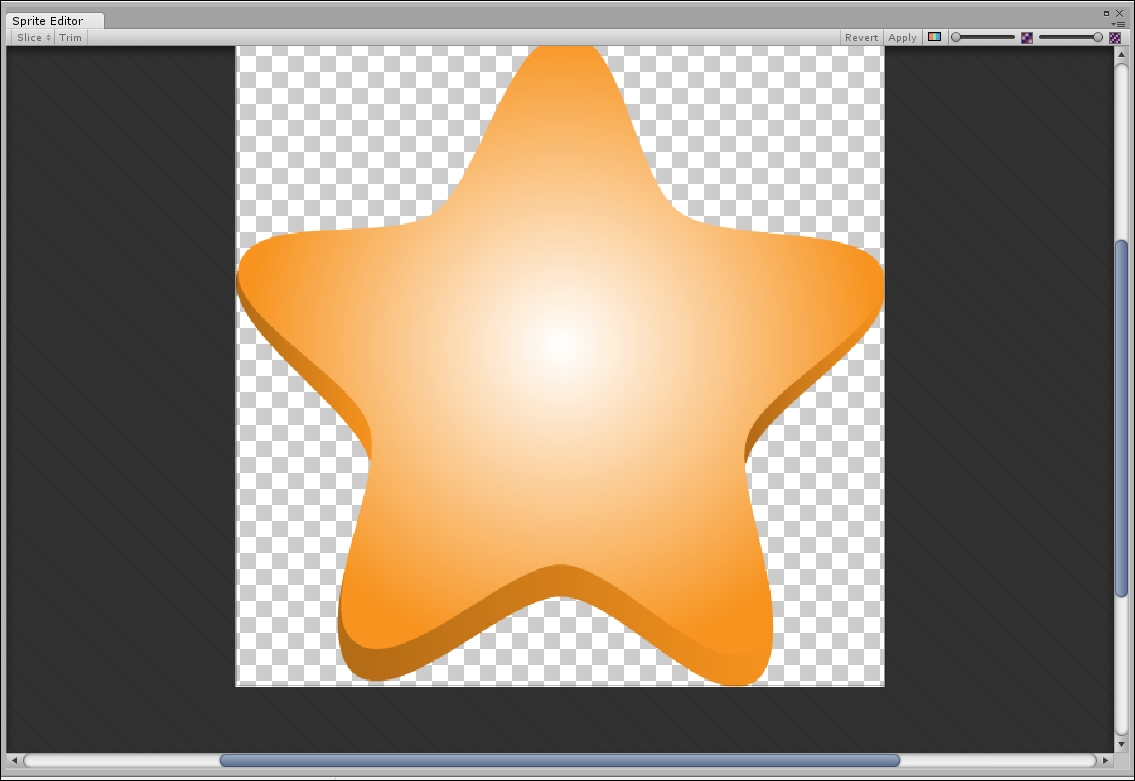
The Sprite Editor allows you to manipulate a sprite once it has been imported in to Unity. The Sprite Editor is only available for graphics with Texture Type set to Sprite (2D and UI). The following is the screenshot of the Sprite Editor window showing a single sprite:

The editor allows some basic manipulations to happen to a sprite, for example:
- Changing the sprite's pixilation (mipmap)
- Altering the sprite's pivot position
- Splicing the texture to identify the sprite region (this is also used for sprite sheets; refer to the next section)
Sprite sheets
Sprite sheets are a core part of any 2D animation system. Sprite sheets are a single texture that contains multiple images that represent individual frames of a 2D animation. Unifying all textures into a single larger texture means greater performance when sending the sprites to the graphic cards, which is a lot faster than sending lots of smaller files. Refer to the following screenshot:

Sprite Editor window showing multiple sprites in a grid
The traditional way of forming sprite sheets is to put sprites into specific regions on a single image and then identify the box regions where the individual sprites lie. These regions form individual frames in the sprite animation. As you can see in the preceding screenshot, nine sprites are arranged in three rows to form a character's walking animation. The sprites could have also been arranged in a single row or a single column; it doesn't matter. It's just how the artist best packs the sprite sheet for the animation. Unity can handle just about any arrangement you wish to throw at it. Just set the width and height of each texture region and the Unity Sprite Editor will do the rest. If your individual sprites are non-disjoint images, all of the same size, Unity can also automatically slice the texture in to the appropriate regions.
Texture atlases
Akin to sprite sheets, texture atlases are a more efficient way of packing textures into a single texture. It can contain various parts of a character (as follows), or a set of weapons, or a set of buttons to be used in your UI—anything really.

A selection of separate textures that have been automatically packed; example from Unity's platformer sample
Unity has added a very clever texture cutting and edge detection to make this work very well and identify specific regions on the texture for each sprite. You can also change the selection areas if Unity is too optimistic when selecting the texture regions.
The Sprite Packer utility provided by Unity can combine all of your sprite textures in to a single tightly packed atlas to help improve the performance of your game.
Physics 2D
The inclusion of a 2D physics system in Unity 4.3 has made 2D game creation easier than ever. Before the inclusion, these physics had to be either programmed by the developer or faked using 3D physics. However, now, with the use of the RidgidBody2D component, the various 2D colliders, physics materials, effectors, and joints, making a 2D game with physics can be achieved with a few simple clicks.
Note
Physics plays an important role in many 2D games. This is particularly true for platformers and certain puzzle games such as Tsum Tsum, Angry Birds, and Cut the Rope.
The RigidBody2D component can be added to any object that you want to be affected by the physics engine. For example, you can add the RigidBody 2D component to a sprite you want affected by gravity. The various 2D colliders, such as the Box Collider 2D and Polygon Collider 2D, can be added to any object that you want to check collision on. This can be used to keep objects from passing through one another (refer to the following screenshot) or can be used to check when two objects touch each other.

Example of 2D colliders used in the Unity platformer to surround walkable elements
You can also apply physics materials to your 2D objects using Physics Material 2D. This allows greater control over an object's physics interactions, such as friction and bounciness.
An effector is essentially a component that applies a type of force to sprites that interact with the 2D object that has an effector component attached to it. Unity 5 added four effector components to the Physics 2D library: Area Effector 2D, Point Effector 2D, Platform Effector 2D, and Surface Effector 2D. When Unity 5.3 released, the Buoyancy Effector 2D component was added. Constant Force 2D was also included in the Unity 5 update, which allows you to apply a constant force to a sprite.
Joints are also included in the Unity Physics 2D package. Joints allow various 2D game objects to join together in distinct ways. Four new joints were added with Unity 5.3. There are nine joints now included in Unity: Distance Joint 2D, Fixed Joint 2D, Friction Joint 2D, Hinge Joint 2D, Relative Joint 2D, Slider Joint 2D, Spring Joint 2D, Target Joint 2D, and Wheel Joint 2D.


