Cascading Style Sheets
Cascading Style Sheets (CSS) is the language for defining the styles of web pages. It is possible to change color, font, and so on using CSS. While the HTML describes the structure of a web page, CSS describes what the page will look like on various devices and screen types.
Nowadays, it is very common to use a CSS framework because it contains some presets to make the web pages compatible across browsers, and offers a number of tools, such as a grid system, to make the creation of page layout easier and to implement responsiveness.
One such framework is Bootstrap, and using it is as simple as including the generated and minified CSS file in the HTML document:
<link href="https://stackpath.bootstrapcdn.com/bootstrap/4.3.1/css/bootstrap.min.css" rel="stylesheet">
Including the CSS file in the original HTML document will make the browser render the page a bit differently:

Figure 1.8: Rendering the web page
As you can see, the font is different, but no other major changes are visible. This is because the CSS rules from the linked file do not match any of the elements to decorate. The Bootstrap documentation (https://packt.live/2N1LHJU) shows what it is capable of. Usually, the class attributes are used to match the target HTML elements. Therefore, by simply adding class="btn btn-primary" to the submit input, we will get the button formatted according to the defined style:

Figure 1.9: Adding CSS to a button
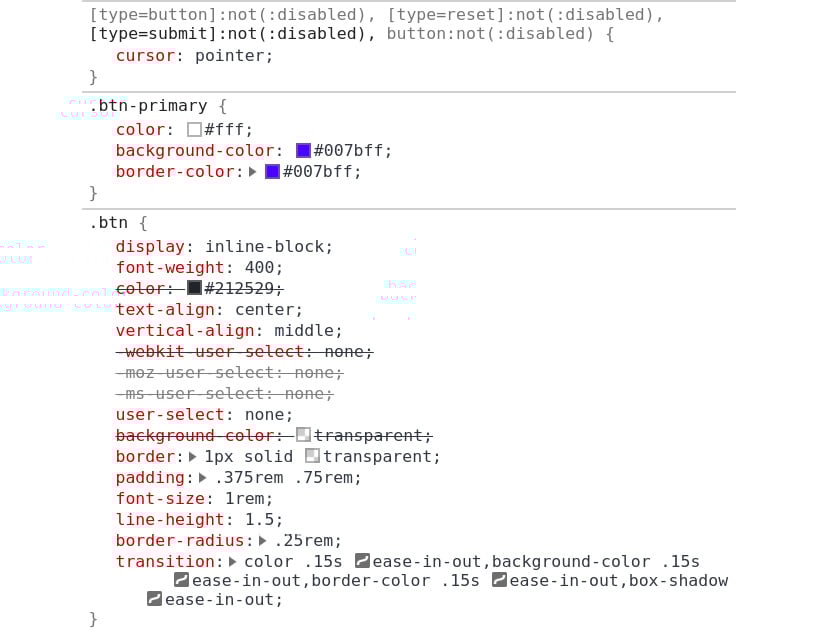
We didn't need to define a single CSS rule. The button was rendered according to the already-defined rules from the Bootstrap framework. If we inspect the submitted input styles in Developer Tools (Chrome), we will see the following cascade that is applied to the HTML element:

Figure 1.10: Inspecting the submit input styles in Developer Tools
Of course, we can create an additional CSS file and link it to the HTML document, overwriting some of the Bootstrap declarations.
Exercise 1.5: Creating a Login Form Page Using Bootstrap
You are required to create a simple login page using the Bootstrap framework. Follow these steps:
- Create a file called
login-form.html. - Declare the document type as HTML5 and open the root HTML element:
<!DOCTYPE html>
<html lang="en">
- Add the head block containing the page title, the link to the Bootstrap CSS framework, and the meta tag required by the CSS framework:
<head>
    <title>Login form</title>
    <link href="https://stackpath.bootstrapcdn.com/bootstrap/4.3.1/css/      bootstrap.min.css" rel="stylesheet">
    <meta content="width=device-width, initial-scale=1, shrink-to-fit=no"       name="viewport">
</head>
- Open the
bodyelement and add the containerdiv, aligning the contents to thecenter:<body> <div class="container d-flex justify-content-center">
- Open the form element and add the form title – an H1 centered text heading:
    <form method="post">
        <div class="text-center mt-4">
            <h1 class="h3 mb-3 font-weight-normal">Authenticate</h1>
        </div>
- Add the first form label and input group for the username:
        <div class="form-label-group mb-3">
            <label for="inputUser">Username</label>
            <input class="form-control" id="inputUser" name="username"               placeholder="Username" type="text">
        </div>
- Add the password-related label and input tags:
        <div class="form-label-group mb-3">
            <label for="inputPassword">Password</label>
            <input class="form-control" id="inputPassword" name="password"                placeholder="Password" type="password">
        </div>
- Add the button that will submit the form:
<button class="btn btn-lg btn-primary btn-block" type="submit">Login</button>
- Close all opened tags.
Note
The final file can be referred at https://packt.live/2MBLNZx.
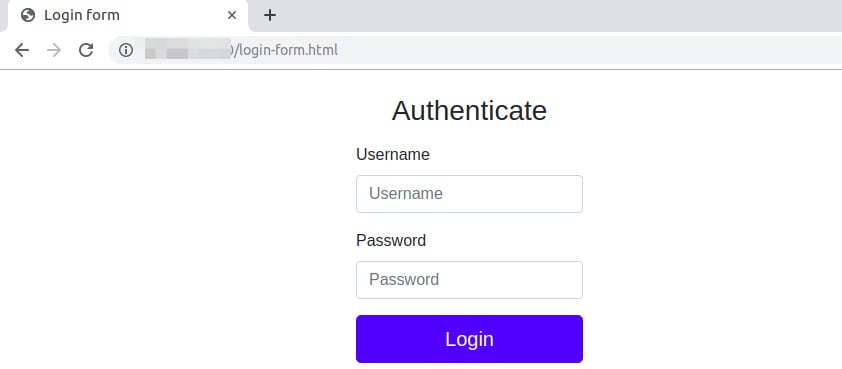
Open the file in the browser. The expected output is as follows:

Figure 1.11: The login page
The form is rendered using the default styles of Bootstrap, which are far richer than the browser's defaults.
In this exercise, you rendered an HTML page, including some of the most widely used HTML elements, such as the form element, and you used the Bootstrap CSS file:
<h1>Hello <?php echo $name; ?></h1>
In this case, the Packt string is stored in the $name variable, and the output Hello Packt will be printed in heading 1 (in the biggest font size).
Note
The file extension will be .php.
This is possible because PHP scans the script file and will only run the code between the opening tag (<?php or <?=) and the closing tag (?>) when the closing tag is present, replacing it with the code output, if any.
Exercise 1.6: Printing PHP Code Output between HTML Tags
In this exercise, we will use the built-in server to print Hello Packt using the companyName=Packt query string. Follow these steps:
- Reopen the
hello.phpfile using your favorite code editor. - Replace the code with the following code and save the file:
<h1><?php echo "Hello ". $_GET['companyName'];?>!</h1>
<hr>
- Now, open the browser and enter the following in the address bar and hit Enter:
http://localhost:8085/hello.php?companyName=Packt
You will see the following output on your screen:

Figure 1.12: Printing output to the browser
As we can see, PHP has such a degree of flexibility that it allows us to use parts of PHP code inside other types of content.
Let's now have a look at other predefined variables available in PHP.


