About the Book
Do you want to develop reliable and secure applications that stand out from the crowd, rather than spending hours on boilerplate code? If so, the Django framework is where you should begin. Often referred to as a "batteries included" web development framework, Django comes with all the core features needed to build a standalone application.
Web Development with Django takes this philosophy and equips you with the knowledge and confidence to build real-world applications using Python.
Starting with the essential concepts of Django, you'll cover its major features by building a website called Bookr – a repository for book reviews. This end-to-end case study is split into a series of bitesize projects that are presented as exercises and activities, allowing you to challenge yourself in an enjoyable and attainable way.
As you progress, you'll learn various practical skills, including how to serve static files to add CSS, JavaScript, and images to your application, how to implement forms to accept user input, and how to manage sessions to ensure a reliable user experience. Throughout this book, you'll cover key daily tasks that are part of the development cycle of a real-world web application.
By the end of this book, you'll have the skills and confidence to creatively tackle your own ambitious projects with Django.
About the Authors
Ben Shaw is a software engineer based in Auckland, New Zealand. He has worked as a developer for over 14 years and has been building websites with Django since 2007. In that time, his experience has helped many different types of companies, ranging in size from start-ups to large enterprises. He is also interested in machine learning, data science, automating deployments, and DevOps. When not programming, Ben enjoys outdoor sports and spending time with his partner and son.
Saurabh Badhwar is an infrastructure engineer who works on building tools and frameworks that enhance developer productivity. A major part of his work involves using Python to develop services that scale to thousands of concurrent users. He is currently employed at LinkedIn and works on infrastructure performance tools and services.
Andrew Bird is the data and analytics manager of Vesparum Capital. He leads the software and data science teams at Vesparum, overseeing full-stack web development in Django/React. He is an Australian actuary (FIAA, CERA) who has previously worked with Deloitte Consulting in financial services. Andrew also currently works as a full-stack developer for Draftable Pvt. Ltd. He manages ongoing development of the donation portal for the Effective Altruism Australia website on a voluntary basis. Andrew has also co-written one of our bestselling titles, "The Python Workshop".
Bharath Chandra K S lives in Sydney, Australia, and has over 10 years of software industry experience. He is very passionate about software development on the Python stack, including frameworks such as Flask and Django. He has experience of working with both monolithic and microservice architectures and has built various public-facing applications and data processing backend systems. When not cooking up software applications, he likes to cook food.
Chris Guest started programming in Python 20 years ago, when it was an obscure academic language. He has since used his Python knowledge in the publishing, hospitality, medical, and academic sectors. Throughout his career, he has worked with many Python web development frameworks, including Zope, TurboGears, web2py, and Flask, although he still prefers Django.
Who This Book Is For
Web Development with Django is designed for programmers who want to gain web development skills with the Django framework. To fully understand the concepts explained in this book, you should have basic knowledge of Python programming, as well as familiarity with JavaScript, HTML, and CSS.
About the Chapters
Chapter 1, Introduction to Django, starts by getting a Django project set up almost immediately. You'll learn how to bootstrap a Django project, respond to web requests, and use HTML templates.
Chapter 2, Models and Migrations, introduces Django data models, the method of persisting data to a SQL database.
Chapter 3, URL Mapping, Views, and Templates, builds on the techniques that were introduced in Chapter 1, Introduction to Django, and explains in greater depth how to route web requests to Python code and render HTML templates.
Chapter 4, Introduction to Django Admin, shows how to use Django's built-in Admin GUI to create, update, and delete data stored by your models.
Chapter 5, Serving Static Files, explains how to enhance your website with styles and images, and how Django makes managing these files easier.
Chapter 6, Forms, shows you how to collect user input through your website by using Django's Forms module.
Chapter 7, Advanced Form Validation and Model Forms, builds upon Chapter 6, Forms, by adding more advanced validation logic to make your forms more powerful.
Chapter 8, Media Serving and File Uploads, shows how to further enhance sites by allowing your users to upload files and serve them with Django.
Chapter 9, Sessions and Authentication, introduces the Django session and shows you how to use it to store user data and authenticate users.
Chapter 10, Advanced Django Admin and Customization, continues on from Chapter 4, Introduction to Django Admin. Now that you know more about Django, you can customize the Django admin with advanced features.
Chapter 11, Advanced Templating and Class-Based Views, lets you see how to reduce the amount of code you need to write by using some of Django's advanced templating features and classes.
Chapter 12, Building a REST API, gives you a look at how to add a REST API to Django, to allow programmatic access to your data from different applications.
Chapter 13, Generating CSV, PDF, and Other Binary Files, further expands the capabilities of Django by showing how you can use it to generate more than just HTML.
Chapter 14, Testing, is an important part of real-world development. This chapter shows how to use the Django and Python testing frameworks to validate your code.
Chapter 15, Django Third-Party Libraries, exposes you to some of the many community-built Django libraries, showing how to use existing third-party code to quickly add functionality to your project.
Chapter 16, Using a Frontend JavaScript Library with Django, brings interactivity to your website by integrating with React and the REST API that was created in Chapter 12, Building a REST API.
Chapter 17, Deployment of a Django Application (Part 1 – Server Setup), begins the process of deploying the application by setting up your own server. This is a bonus chapter and is downloadable from the GitHub repository for this book.
Chapter 18, Deploying a Django Application (Part 2 – Configuration and Code Deployment), finishes up the project by showing you how to deploy your project to a virtual server. This is also a bonus chapter and is downloadable from the GitHub repository for this book.
Conventions
Code words in text, database table names, folder names, filenames, file extensions, pathnames, dummy URLs, and user input are shown as follows: "It is created and scaffolded by running the django-admin.py command on the command line with the startproject argument."
Words that you see on screen, for example, in menus or dialog boxes, also appear in the text like this: "In the Preferences List pane on the left, open the Project: Bookr item and then click Project Interpreter."
A block of code is set as follows:
urlpatterns = [path('admin/', admin.site.urls),\
               path('', reviews.views.index)]
In cases where inputting and executing some code gives an immediate output, this is shown as follows:
>>> qd.getlist("k")
['a', 'b', 'c']
In the preceding example, the code entered is qd.getlist("k") and the output is ['a', 'b', 'c'].
New terms and important words are shown like this: "Django models define the data for your application and provide an abstraction layer to SQL database access through an Object Relational Mapper (ORM)."
Lines of code that span multiple lines are split using a backslash ( \ ). When the code is executed, Python will ignore the backslash, and treat the code on the next line as a direct continuation of the current line.
For example:
urlpatterns = [path('admin/', admin.site.urls), \
               path('', reviews.views.index)]
Long code snippets are truncated and the corresponding names of the code files on GitHub are placed at the top of the truncated code. The permalinks to the entire code are placed beneath the code snippet. It should look as follows:
settings.py
INSTALLED_APPS = ['django.contrib.admin',\
                  'django.contrib.auth',\
                  'django.contrib.contenttypes',\
                  'django.contrib.sessions',\
                  'django.contrib.messages',\
                  'django.contrib.staticfiles',\
                  'reviews']
The full code can be found at http://packt.live/2Kh58RE.
Before You Begin
Each great journey begins with a humble step. Before we can do awesome things with Django, we need to be prepared with a productive environment. In this section, we will see how to do that.
Installing Python
Before using Django version 3 or later, you will need Python 3 installed on your computer. Mac and Linux operating systems usually have some version of Python installed, but it's best to make sure you're running the latest version. On Mac, for Homebrew users, you can just type the following:
$ brew install python
On Debian-based Linux distributions, you can check which version is available by typing the following:
$ apt search python3
Depending on the output, you can then type something along the lines of the following:
$ sudo apt install python3 python3-pip
For Windows, you can download the Python 3 installer here: https://www.python.org/downloads/windows/. Once you have the installer, click on it to run, and then follow the instructions. Be sure to select the Add Python 3.x to PATH option.
Once installed, from Command Prompt, you can run python to launch a Python interpreter.
Note that on macOS and Linux, depending on your configuration, the python command might launch Python version 2 or Python version 3. To be sure, make sure to specify python3. On Windows, you should just run python as this will always launch Python version 3.
Similarly with the pip command. On macOS and Linux, specify pip3; on Windows, just pip.
Installing PyCharm Community Edition
In Web Development with Django, we will be using PyCharm Continuity Edition (CE) as our Integrated Development Environment (IDE) for editing our code as well as running and debugging it. It can be downloaded from https://www.jetbrains.com/pycharm/download/. Once you have the installer, follow the instructions to install it in the usual way for your operating system.
You can find detailed installation instructions for macOS, Linux, and Windows at this link: https://www.jetbrains.com/help/pycharm/installation-guide.html#standalone. The system requirements for PyCharm can be found here: https://www.jetbrains.com/help/pycharm/installation-guide.html#requirements. For more information on accessing PyCharm after installation, you can follow this link: https://www.jetbrains.com/help/pycharm/run-for-the-first-time.html.
virtualenv
Though not required, we recommend using a Python virtual environment, which will keep the Python packages for Web Development with Django separate from your system packages.
First, we'll look at how to set up a virtual environment on macOS and Linux. The virtualenv Python package needs to be installed, and this can be done with pip3:
$ pip3 install virtualenv
Then we can create a virtual environment in the current directory:
$ python3 -m virtualenv <virtualenvname>
Once the virtual environment has been created, we need to source it so that the current terminal knows to use that environment's Python and packages. This is done like this:
$ source <virtualenvname>/bin/activate
On Windows, we can use the built-in venv library, which works in a similar manner. We don't need to install anything. To create a virtual environment in the current directory, we can run the following command:
> python -m venv <virtualenvname>
Once it has been created, activate it with the activate script inside the Scripts directory, which is inside the new virtual environment:
> <virtualenvname>\Scripts\activate
In macOS, Linux, and Windows, you will know that the virtual environment has been activated because its name, in brackets, will precede the prompt. For example:
(virtualenvname) $
Installing Django
After activating your virtual environment, you can install Django using pip3 or pip (depending on your operating system). At the time of writing this book, the latest version of Django was 3.1. All the code used in this book is compatible with both Django 3.0 and 3.1. More information on these two different versions is given in the next section. To install Django 3.1, use the following command:
(virtualenvname)$ pip3 install django==3.1
If you want to install Django 3.0, use the following command:
(virtualenvname)$ pip3 install django==3.0
As long as your virtual environment has been activated, it will use the version of pip in that environment and install packages in that environment too.
Django 3.0 and Django 3.1
From Django 3.1 onward, the authors of Django changed the method by which paths are joined together in the Django settings file. We'll explain the settings file in depth in Chapter 1, Introduction to Django, but for now you just need to know that this file is called settings.py.
In earlier versions, the BASE_DIR setting variable (the path to your project on disk) was created as a string, like this:
BASE_DIR = os.path.dirname(os.path.dirname(os.path.abspath(__file__)))
The os package was imported into settings.py, and paths joined with the os.path.join function. For example:
STATIC_ROOT = os.path.join(BASE_DIR, "static") # Django 3.0 and earlier
In Django 3.1, BASE_DIR is now a pathlib.Path object. It is assigned like this:
BASE_DIR = Path(__file__).resolve().parent.parent
Path objects and strings can be joined using the / (divide) operator that pathlib.Path overloads:
STATIC_ROOT = BASE_DIR / "static" # Django 3.1+
The os.path.join function can also be used to join pathlib.Path objects, provided that it has been imported into settings.py first.
Since most Django projects in production today use versions of Django prior to 3.1, we've chosen to use the os.path.join function to join paths throughout this book. If you're using Django 3.1, then you just need to make sure that you add a line to import the os module at the start of settings.py, like so:
import os
Once added, you can follow the instructions throughout the book without modification. We'll remind you to make this change when you start working with settings.py, too.
Apart from this minor addition, no modifications need to be done to the code examples, exercises, and activities throughout this book to support Django 3.0 or 3.1. We cannot guarantee that all the code examples in this book will be 100% compatible with later versions of Django, and so we strongly recommend that you use either version 3.0 or 3.1 as you work your way through the book.
DB Browser for SQLite
This book uses SQLite as an on-disk database when developing your projects. Django provides a command-line interface for accessing its data using the text command, but GUI applications are also available to make data browsing friendlier.
The tool we recommend is DB Browser for SQLite, or just DB Browser for short. It is a cross-platform (Windows, macOS, and Linux) GUI application.
Installing on Windows
- Download the installer for the correct architecture of Windows (32-bit or 64-bit) from https://sqlitebrowser.org/dl/.
- Run the downloaded installer and follow the Setup Wizard instructions:

Figure 0.1: Setup Wizard page
- After accepting
End-User License Agreement, you'll be asked to select shortcuts for the application. It is recommended that you enableDesktopandProgram Menushortcuts for DB Browser so that once installed, the application is easier to find:
Figure 0.2: Page where you can select shortcuts for the application
- You should be fine to follow the defaults by just clicking
Nextat each screen throughout the installation. - If you didn't add
Program MenuorDesktopshortcuts in step 3, then you'll need to find DB Browser inC:\Program Files\DB Browser for SQLite.
Installing on macOS
- Download the application disk image for macOS from https://sqlitebrowser.org/dl/.
- Once the download has finished, open the disk image. You'll see a window like this:

Figure 0.3: Disk image
Drag and drop the
DB Browser for SQLiteapplication to theApplicationsfolder to install it. - Once installed, you can launch
DB Browser for SQLitefrom inside yourApplicationsfolder.
Installing on Linux
The installation instructions for Linux will depend on which distribution you're using. You can find the instructions at https://sqlitebrowser.org/dl/.
Using DB Browser
Here are a few screenshots illustrating a couple of the features of DB Browser. The screenshots were taken on macOS, but the behavior is similar on all platforms. The first step after opening is to select your SQLite database file:
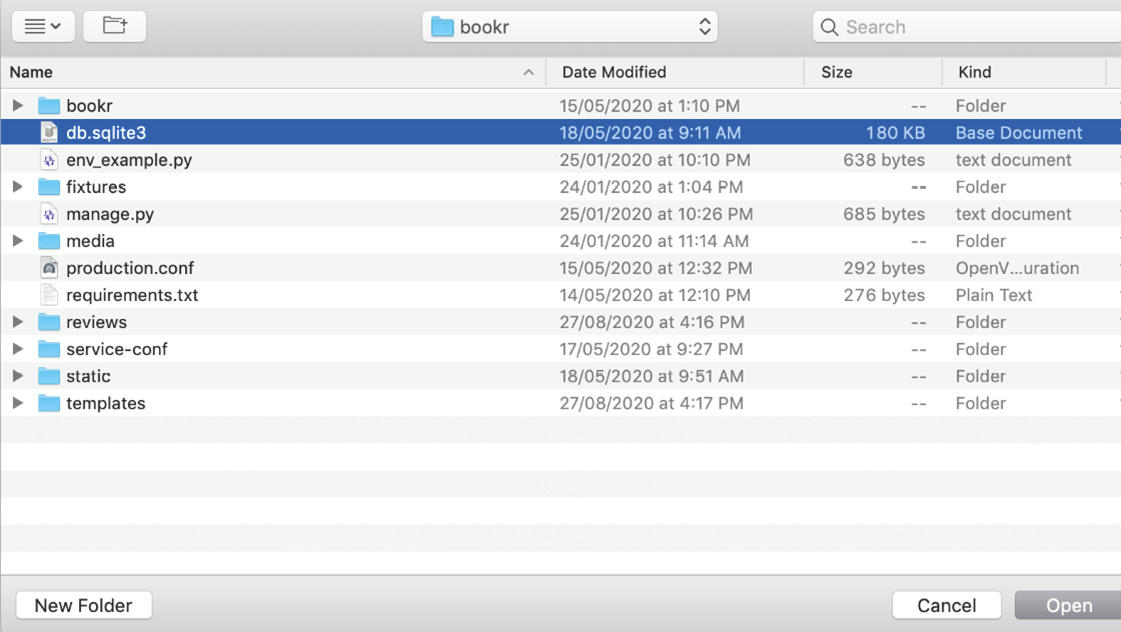
Figure 0.4: Database open dialogue
Once a database file is open, we can explore its structure in the Database Structure tab. Figure 0.5 demonstrates this:
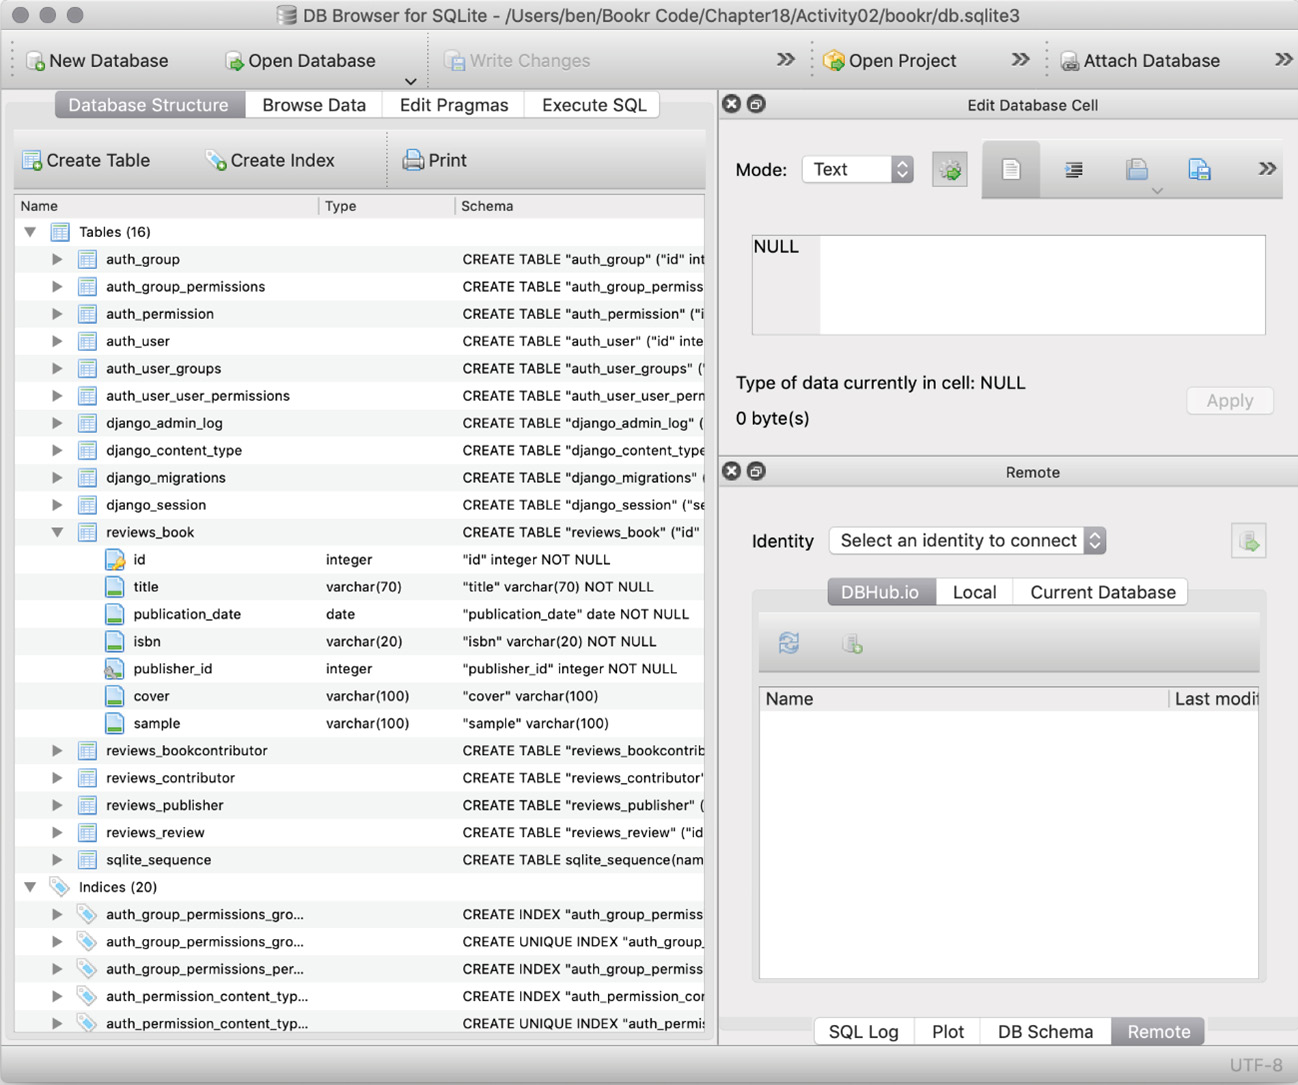
Figure 0.5: Database Structure with one table expanded
The reviews_book table has been expanded in the preceding screenshot so that we can see its table structure. We can also browse the data inside tables by switching to the Browse Data tab:
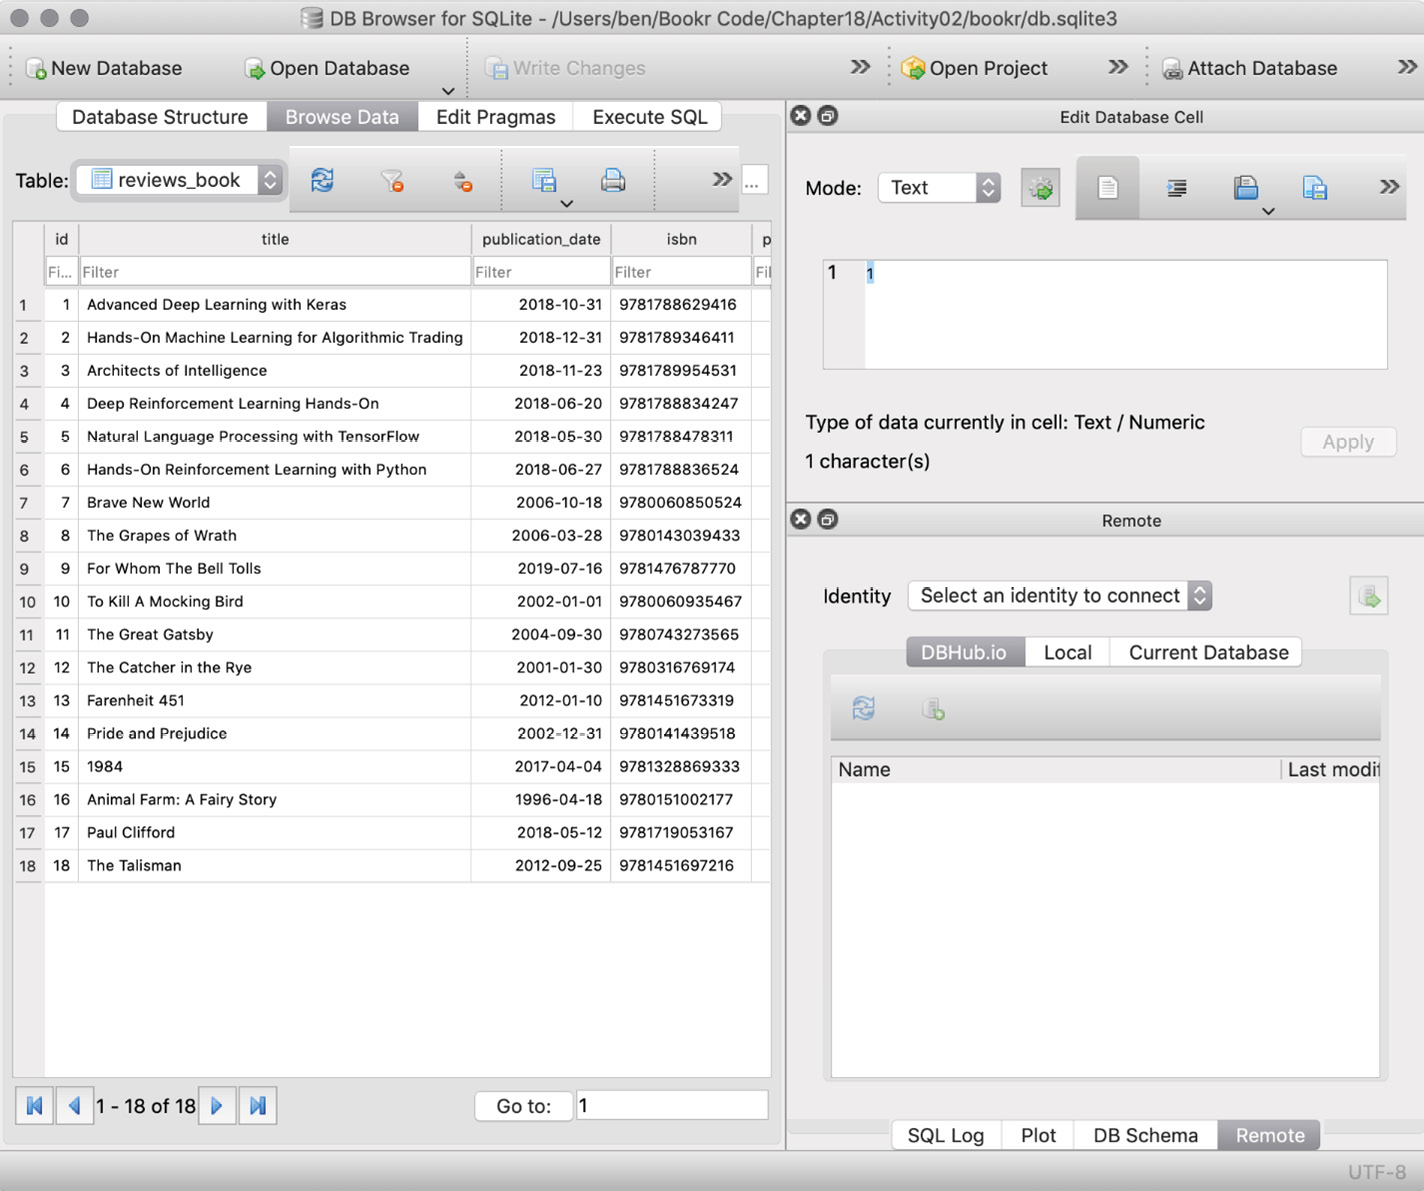
Figure 0.6: Data in the reviews_book table
The final thing we might want to do is execute SQL commands (you'll learn about these in Chapter 2, Models and Migrations). This is done inside the Execute SQL tab:
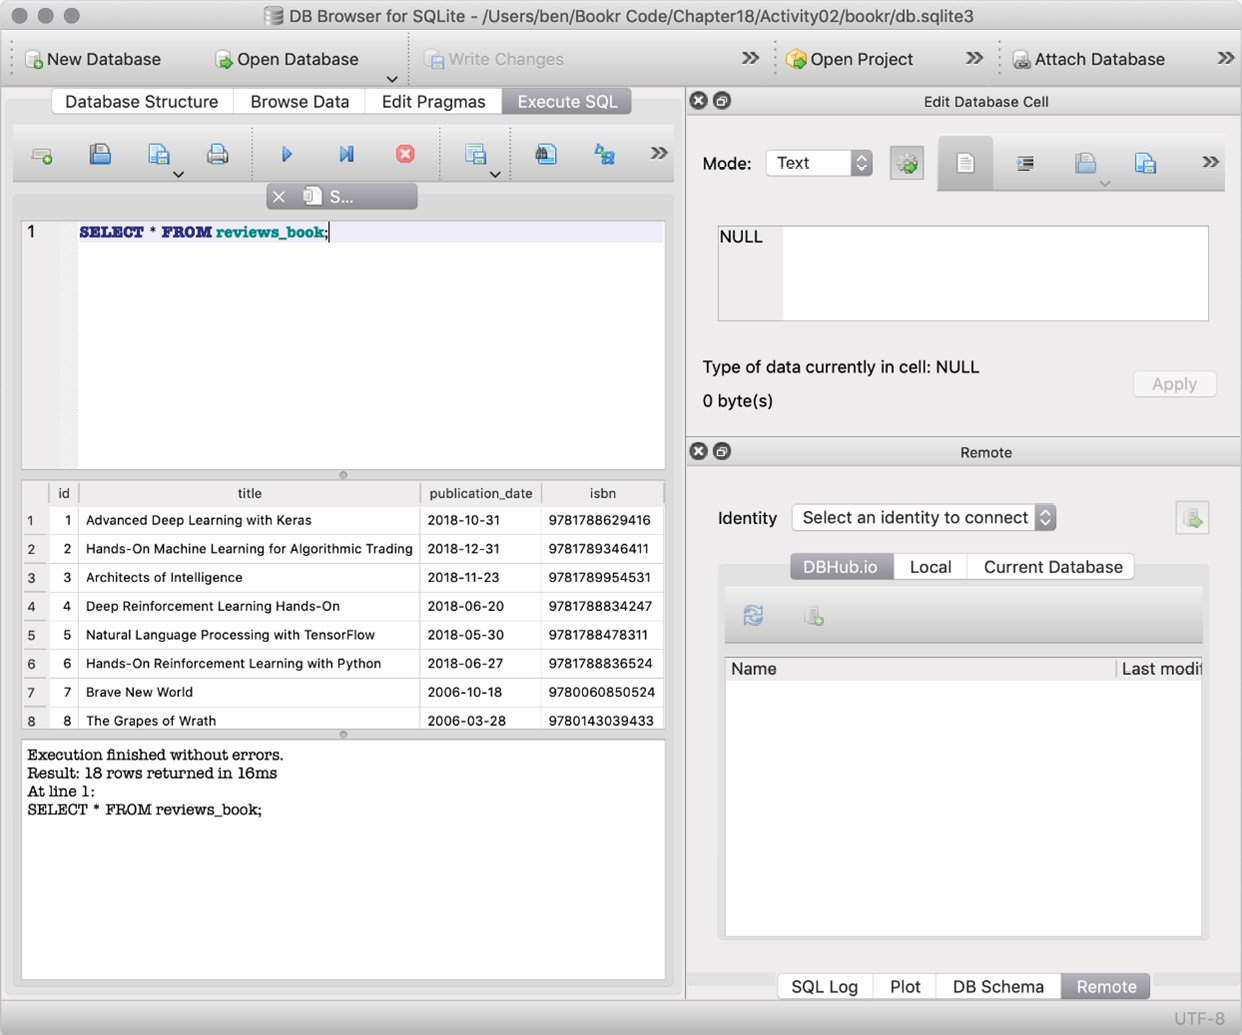
Figure 0.7: SQL command executed with the results showing
Figure 0.7 shows the results of executing the SQL statement SELECT * FROM reviews_book.
Don't worry if you're not sure what this all means yet (at this point you don't even have an SQLite file to try this out on). It will make more sense once you start learning about Django models, databases, and SQL queries as you progress through the book. Chapter 2, Models and Migrations, is where you'll start working with DB Browser.
The Bookr Project
Throughout this book, you'll be progressively building an app called Bookr. It is designed to let users browse and add book reviews (and books as well). As you complete the exercises and activities in each chapter, you'll be adding more features to the application. The GitHub repository for this book contains individual folders for the exercises and activities. These folders will usually include the files where the code of the app has changed.
The Final Directory
Each chapter's code will also have a directory called final. This directory will include all the code written for the app through to the end of that chapter. So, for example, the final folder for Chapter 5, Serving Static Files, will contain the full code for the Bookr app until the end of that chapter. That way, if you lose progress, you can use the code in the final folder of, say, Chapter 5, to start Chapter 6.
The following screenshot shows how the directory structure would appear for a chapter after downloading the code from the GitHub repo to disk (refer to the Installing the Code Bundle section for more details on how to download the code from the repo):
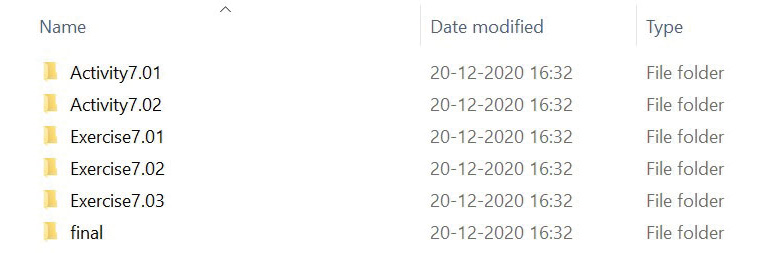
Figure 0.8: Chapter-level directory structure for Bookr
Populating the Data
When you reach Chapter 2, Models and Migrations, it is recommended that you populate your database with the list of sample books we have provided so that your end result remains more or less similar to ours. Make sure you don't skip the section entitled Populating the Bookr Database in Chapter 2, Models and Migrations, wherein we have provided a tiny script that lets you quickly populate the database.
Installing the Code Bundle
Download the code files from GitHub at http://packt.live/3nIWPvB. Refer to these code files for the complete code bundle. The files here contain the exercises, activities, activity solutions, bonus chapters, and some intermediate code for each chapter.
On the GitHub repo's page, you can click the green Code button and then click the Download ZIP option to download the complete code as a ZIP file to your disk (refer to Figure 0.9). You can then extract these code files to a folder of your choice, for example, C:\Code:
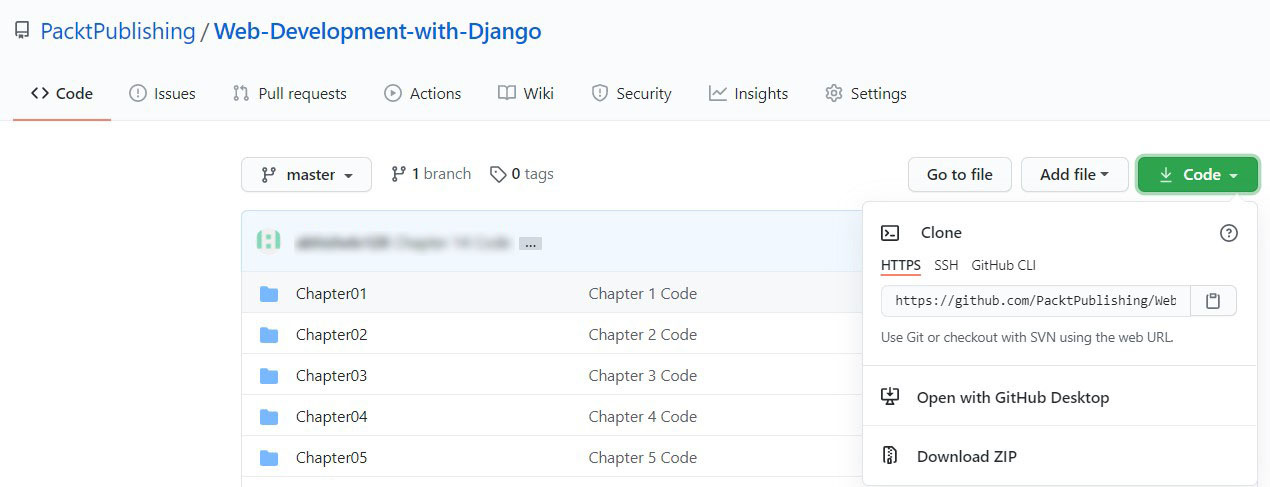
Figure 0.9: Download ZIP option
Get in Touch
Feedback from our readers is always welcome.
General feedback: If you have any questions about this book, please mention the book title in the subject of your message and email us at [email protected].
Errata: Although we have taken every care to ensure the accuracy of our content, mistakes do happen. If you have found a mistake in this book, we would be grateful if you could report this to us. Please visit www.packtpub.com/support/errata and complete the form.
Piracy: If you come across any illegal copies of our works in any form on the internet, we would be grateful if you could provide us with the location address or website name. Please contact us at [email protected] with a link to the material.
If you are interested in becoming an author: If there is a topic that you have expertise in, and you are interested in either writing or contributing to a book, please visit authors.packtpub.com.
Please Leave a Review
Let us know what you think by leaving a detailed, impartial review on Amazon. We appreciate all feedback – it helps us continue to make great products and help aspiring developers build their skills. Please spare a few minutes to give your thoughts – it makes a big difference to us. You can leave a review by clicking the following link: https://packt.link/r/9781839212505.