Exploring Django ORM
Web applications constantly interact with databases, and one of the ways to do so is by using SQL. If you decide to write a web application without a web framework such as Django and instead use Python alone, Python libraries such as psycopg2 (for PostgreSQL ) could be used to interact directly with the databases using SQL commands. But while developing a web application with multiple tables and fields, SQL commands can easily become overly complex and thus difficult to maintain. For this reason, popular web frameworks such as Django provide a level of abstraction that allows us to easily work with databases. The part of Django that helps us do this is called ORM.
Django ORM converts object-oriented Python code into actual database constructs, such as database tables with data type definitions, and facilitates all the database operations via simple Python code. Because of this, we do not have to deal with SQL commands while performing database operations. This helps in faster application development and ease in maintaining the application source code.
Django supports relational databases such as SQLite, PostgreSQL, Oracle Database, and MySQL. Django’s database abstraction layer ensures that the same Python/Django source code can be used across any of these relational databases with very little modification to the project settings. Since SQLite is part of the Python libraries and Django is configured by default to SQLite, for the scope of this chapter, we will use SQLite while we learn about Django models and migrations. Next, we will understand how database configuration is done with Django.
Database configuration and creating Django applications
As we have already seen in Chapter 1, An Introduction to Django, when we create a Django project and run the Django server, the default database configuration is SQLite3. The database configuration will be present in the project directory, in the settings.py file.
Note
Make sure you go through the settings.py file for the bookr app. Going through the entire file once will help you understand the concepts that follow. You can find the file here: https://github.com/PacktPublishing/Web-Development-with-Django-Second-Edition/blob/main/Chapter02/final/bookr/bookr/settings.py.
So, for our example project, the database configuration will be present at the following location: bookr/settings.py. The default database configuration present in this file when a Django project is created is as follows:
DATABASES = {
    'default': {
        'ENGINE': 'django.db.backends.sqlite3',
        'NAME': BASE_DIR / 'db.sqlite3',
    }
}
The DATABASES variable is assigned a dictionary containing the database details for the project. Inside the dictionary, there is a nested dictionary with a default key. This holds the configuration of a default database for the Django project. The reason we have a nested dictionary with default as a key is that a Django project could potentially interact with multiple databases, and the default database is the one used by Django for all operations unless explicitly specified. The ENGINE key represents which database engine is being used; in this case, sqlite3.
The NAME key defines the name of the database, which can have any value. But for SQLite3, since the database is created as a file, NAME can have the full path of the directory where the file needs to be created. The full path of the db file is processed by joining (or concatenating) the previously defined path in BASE_DIR with db.sqlite3. Note that BASE_DIR is the project directory as already defined in the settings.py file.
If you are using other databases, such as PostgreSQL, MySQL, and so on, changes will have to be made in the preceding database settings as shown here:
DATABASES = {
    'default': {
        'ENGINE': 'django.db.backends.postgresql',
        'NAME': 'bookr',
        'USER': <username>,
        'PASSWORD': <password>,
        'HOST': <host-IP-address>,
        'PORT': '5432',}}
Here, changes have been made to ENGINE to use PostgreSQL. The host IP address and port number of the server need to be provided for HOST and PORT, respectively. As the names suggest, USER is the database username, and PASSWORD is the database password. In addition to changes in the configuration, we will have to install the database drivers or bindings along with the database host and credentials. This will be covered in detail in later chapters, but for now, since we are using SQLite3, the default configuration will be sufficient. Note that the preceding code is just an example to show the changes you’ll need to make to use a different database such as PostgreSQL, but since we are using SQLite, we will use the database configuration that exists already, and there is no need to make any modifications to the database settings. Next, we will briefly read about Django apps and some of the default apps present in Django.
Django apps
A Django project can have multiple apps that often act as discrete entities. That’s why, whenever required, an app can also be plugged into a different Django project. For example, if we develop an e-commerce web application, the web application can have multiple apps, such as a chatbot for customer support or a payment gateway to accept payments as users purchase goods from the application. These apps, if needed, can also be plugged into or reused in a different project.
Django comes with the following apps enabled by default. The following is a snippet from a project’s settings.py file:
  INSTALLED_APPS = [
      'django.contrib.admin',
      'django.contrib.auth',
      'django.contrib.contenttypes',
      'django.contrib.sessions',
      'django.contrib.messages',
      'django.contrib.staticfiles',
      ]
These are a set of installed or default apps used for the admin site, authentication, content types, sessions, messaging, and an application to collect and manage static files. In the upcoming chapters, we shall study this in depth. For the scope of this chapter, though, we shall understand why Django migration is needed for these installed apps in the following section.
Django migration
As we learned before, Django’s ORM helps make database operations simpler. A major part of the operation is transforming the Python code into database structures, such as database fields with stated data types and tables. In other words, the transformation of Python code into database structures is known as migration. For example, instead of creating database tables by running SQL commands, you would write models for them in Python; something you’ll learn to do in the upcoming Creating models and migrations section. These models will have fields that form the blueprints of database tables. The fields, in turn, will have different field types giving us more information about the type of data stored there (recall how we specified the data type of our field as TEXT in step 4 of Exercise 2.01 – creating a book database).
Since we have a Django project set up, let’s perform our first migration. Although we have not added any code yet to our project, we can migrate the applications listed in INSTALLED_APPS. This is necessary because Django’s installed apps need to store the relevant data in the database for their operations, and migration will create the required database tables to store the data in the database. The following command should be entered in the terminal or shell to do this:
python manage.py migrate
Note
For macOS, you can use python3 instead of python in the preceding command.
Here, manage.py is a script that was automatically created when the project was created. It is used for carrying out managerial or administrative tasks. By executing this command, we create all the database structures required by the installed apps.
As we are using DB Browser for SQLite to browse the database, let’s take a look at the database for which changes have been made after executing the migrate command.
The database file will be created in the project directory under the db.sqlite3 name. Follow these steps to verify that migration has been successful and database tables have been created:
- Open DB Browser, click Open Database, navigate until you find the
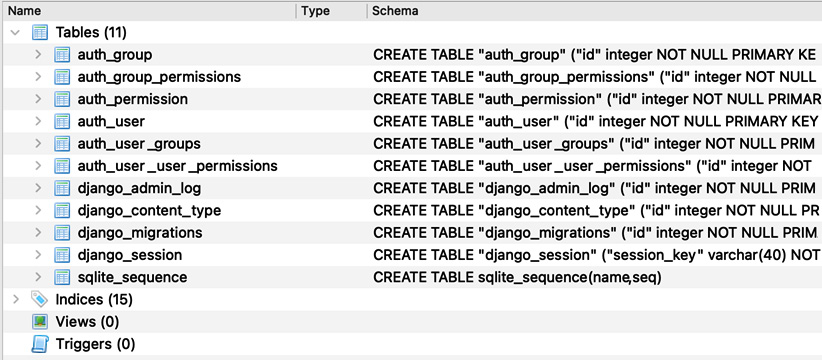
db.sqlite3file, and open it. You should see a set of newly created tables created by the Django migration. It will look as follows in DB Browser:

Figure 2.9: Contents of the db.sqlite3 file
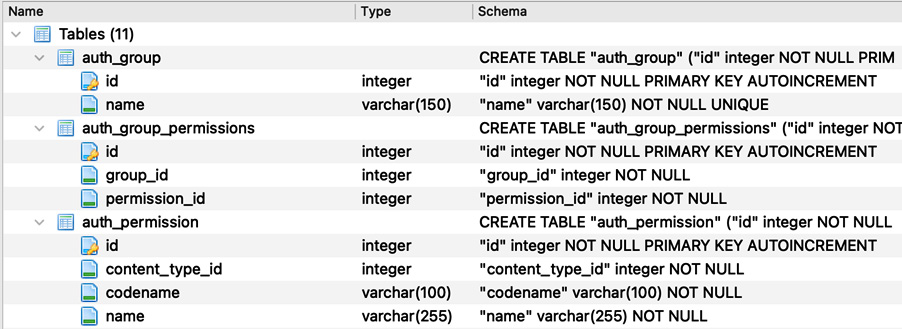
- Now, browse through the newly created database structure by clicking the database tables, and we should see the following:

Figure 2.10: Browsing through the newly created database structure
- Notice that the database tables created have different fields, each with their respective data types. Click on the Browse data tab in DB Browser and select a table from the drop-down menu. For instance, after clicking the
auth_group_permissionstable, you should see something like this:

Figure 2.11: Viewing the auth_group_permissions table
You will see that there is no data available for these tables yet because Django migration only creates the database structure or the blueprint, and the actual data in the database is stored during the operation of the application. Now that we have migrated the built-in or default Django apps, let’s try to create an app and perform a Django migration.
In this section, we learned about Django’s ORM and how it can simplify database operations for a web application. Later, we learned about how Django’s database configuration settings. We also briefly covered Django migrations, which we will go deeper into in the next section by creating models and migrations for our Bookr application.


