How to build a Power Platform solution
A Power Platform solution consists of a package that stores all the pieces that compose the solution you’ve created to solve your business need. It aids in deployment, distribution, and management. Examples of these pieces can be Power Automate cloud flows, model-driven apps, Power BI reports, or Dataverse tables.
Creating a solution is a straightforward process, but that doesn’t mean you don’t need to follow specific steps to include best practices for your solutions.
For example, if you need to interact with a particular service, the platform uses a connection reference. When working with solution components such as cloud flows, the platform will try to help you by creating connection references for you but using random naming. It becomes even more complicated if multiple solutions exist within a specific environment. One component from one solution might use a connection reference from another without you noticing.
Setting up the connection references before creating components can solve these issues easily. This way, the platform will automatically use the solution’s connection references and the naming pattern you decide.
Getting ready
After creating the solution, we will need to choose a data source to define the steps required to configure a connection reference. For this example, we will use SharePoint.
How to do it…
- Go to the Power Apps maker portal, https://make.powerapps.com, select Solutions from the left pane, and click + New solution from the toolbar.
- Before describing the solution, click + New publisher and enter the display name and name in the Display name and Name fields respectively. Enter a meaningful two-to-eight-letter Prefix value that will be used for all the elements you will create. Check the Preview of new object name for an example of how a component will be named. Keep the default Choice value prefix and click on Save.
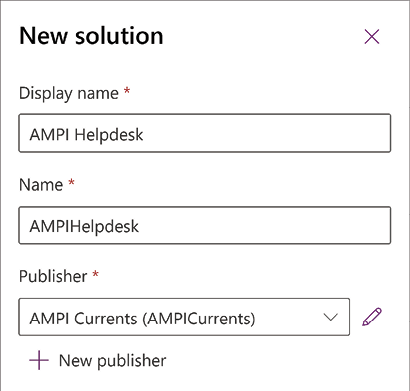
- Back in the New solution pane, enter the desired Display name and Name for the solution, select your newly created Publisher, and click on Create:

Figure 1.1: Solution settings
- Once the solution is created, from the toolbar, click New | More | Connection Reference.
- From the panel that opens, set the Display name to
AMPI-SharePoint, leave the Name as it is, and choose SharePoint from the Connector dropdown. If you already have a connection, select it. If not, create one with your credentials by selecting New connection. - Repeat Steps 4 and 5 for any other service your solution might require.
How it works…
This creation process will prepare the solution and open it automatically. The SharePoint connection reference will be available to every component that can use it, such as a cloud flow or a canvas app. This way, we will get a more organized solution for our projects.
Regarding the publishers, from the left pane, click More, Discover all, and then on Publishers inside the App Management section to see the list of all publishers included in the current environment.


