Building and running Flutter
The way an application is built is fundamental to how it will perform on the target platform. This is an important step regarding performance. Even though you do not necessarily need to know this for every kind of application, knowing how the application is built helps you to understand and measure possible improvements.
As we have already pointed out, Flutter relies on the AOT compilation of Dart for release mode and the JIT compilation of Dart for development/debug mode. Dart is one of only a few languages that are capable of being compiled to both AOT and JIT, and Flutter makes the most of this advantage. Let's look at the different build options available, why you would use each one, and how the capabilities of Dart lead to an optimal developer and user experience.
Debug mode
During development, Flutter uses JIT compilation in debug mode. Debug mode compilation is optimized for fast feedback, and therefore sacrifices execution speed and binary size. However, due to the power of Dart's compiler, interactions between the code and the simulator/device are still fast, and debugging tools allow developers to step into the source code and analyze the widget layout.
Release mode
In release mode, debugging information is not necessary, and the focus is performance. Flutter uses a technique that is common to game engines. By using AOT mode, Dart code is compiled to native code, and the app loads the Flutter library and delegates rendering, input, and event handling to it through the Skia engine.
Skia graphics library
Skia is an open source library that provides APIs for 2D graphics. It is used in Flutter as well as Google Chrome, Android, Firefox, and many others. It is also backed by Google, like Dart and Flutter.
Profile mode
Sometimes you need to analyze the performance of your app. Profile mode retains just enough debugging ability to create a profile or your app's performance, while attempting to be a true reflection of your app's real-world performance. This mode is only available on physical devices because emulators will not have representative characteristics.
Supported platforms
Currently, Flutter supports ARM Android devices running at least on API 19 (Android 4.4 or KitKat) , and iOS devices on iOS 9 or later (which includes iPhone 4S and later). As you would expect, Flutter apps can be run on device emulators, and debugging works equally well on physical and emulated devices.
Additionally, Flutter Web is in the beta channel, and desktop support (Windows, macOS, and Linux) are available on the Alpha channel. As you can see, the vision for Flutter is to allow developers to have a single code base for mobile, web, and desktop!
We are not going to go into more detail on Flutter's compilation aspects as they are beyond the scope of this book. For more information, you can read https://flutter.dev/docs/resources/faq#how-does-flutter-run-my-code-on-android and https://flutter.dev/docs/resources/faq#how-does-flutter-run-my-code-on-ios.
The pubspec.yaml file
The pubspec.yaml file in Flutter is actually a file that is used to define Dart packages. Besides that, it contains an additional section for configurations specific to Flutter. Let's see the pubspec.yaml file's contents in details:
name: hello_flutter
description: A new Flutter project.
version: 1.0.0+1
The beginning of the file is simple. As we already know, the name property is defined when we execute the pub create command. Next is the default project description; feel free to change this to something more interesting. Note that if you do so, your IDE may suddenly run the flutter pub get command. We'll see why in a bit.
Description during create
Like many parts of the pubspec.yaml file, you can specify the description during the flutter create command by using the –description argument.
The version property follows the Dart package conventions: the version number, plus an optional build version number separated by +. In addition to that, Flutter allows you to override these values during the build. We will take a more detailed look at that in Chapter 12, Releasing Your App to the World.
Then we have the dependencies section of the pubspec file:
environment:
  sdk: ">=2.12.0 <3.0.0"
dependencies:
  flutter:
    sdk: flutter
  cupertino_icons: ^1.0.1
dev_dependencies:
  flutter_test:
    sdk: flutter
We start with the environment property. This specifies the version of Dart that your code will work with. This entry is specifying that your code will need version 2.12.0 of Dart or above, but will not run on Dart 3.0.0. As per standard versioning, you would expect that if Dart 3.0.0 is released, it will have some backward-incompatible changes that may stop your code from compiling. This happened when Dart was updated from 1.x.x to 2.x.x. By restricting your allowed Dart versions, this means your code will not need to support Dart 3.x.x until you are ready to do so. Note that Dart 2.12 is a significant milestone for Dart because it introduced the concept of null safety. We will explore null safety in Chapter 2, An Introduction to Dart.
Then we have the dependencies property. This starts with the main dependency of a Flutter application, the Flutter SDK itself, which contains many of Flutter's core packages.
As an additional dependency, the generator adds the cupertino_icons package, which contains icon assets used by the built-in Flutter Cupertino widgets (there's more on that in the next chapter).
As you add other dependencies (and I would bet my hat that you will add a lot of dependencies), they will also appear here.
The dev_dependencies property contains only the flutter_test package dependency provided by the Flutter SDK itself, which contains Flutter-specific extensions to the Dart test package. We will explore this in Chapter 11, Testing and Debugging
In the final block of the file, there's a dedicated flutter section:
flutter:
  uses-material-design: true
# To add assets to your application, add an assets section, like this:
# assets:
#     - images/a_dot_burr.jpeg
#     - images/a_dot_ham.jpeg
# ...
# To add custom fonts to your application, add a fonts section here,
# fonts:
#     - family: Schyler
#     fonts:
#     - asset: fonts/Schyler-Regular.ttf
#     - asset: fonts/Schyler-Italic.ttf
#     style: italic
This flutter section allows us to configure resources that are bundled in the application to be used during runtime, such as images, fonts, music, sound effects, and videos.
Let's have a closer look:
uses-material-design: We will see the Material widgets provided by Flutter in the next chapter. In addition to them, we can use also Material Design icons (https://material.io/tools/icons/?style=baseline), which are in a custom font format. For this to work properly, we need to activate this property (set it totrue) so the icons are included in the application.assets: This property is used to list the resource paths that will be bundled with the final application. Theassetsfiles and folders can be organized in any way; what matters for Flutter is the path to the files. You specify the path of the file relative to the project's root. This is used later in Dart code when you need to refer to an asset file. Here's an example of adding a single image:assets: images/home_background.jpeg
Often you will want to add many images, and listing them individually would be onerous. An alternative is to include a whole folder:
assets:
  images/
You add the
/character at the end of the path that is used to specify that you want to include all files in that folder. Note that this doesn't include subfolders; they would need to be listed as well:assets: images/ images/icons/
fonts: This property allows us to add custom fonts to the application.
We will be checking how to load different assets in the course of the book whenever we need to. Also, you can read more on asset specification details on the Flutter docs website: https://flutter.io/docs/development/ui/assets-and-images.
Running the generated project
The default application that we created earlier has a counter to demonstrate the React style of programming in Flutter. We will look in more detail at Dart code in the next chapter, but let's look at the main.dart file a little bit more before we try running the application.
The lib/main.dart file
We explored the main.dart file earlier to look at a widget. This file is also the entry point of the Flutter application:
void main() => runApp(MyApp());
The main function is the Dart entry point of an application; this is where the execution of your app will start. Flutter then takes over the execution in the runApp function, which is called by passing your top-level (or root) widget as a parameter. This is the widget we saw earlier, the MyApp widget.
Flutter run
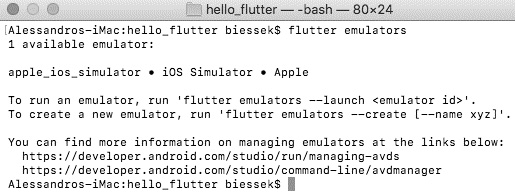
To execute a Flutter application, we must have a connected device or simulator. The check is done by using the flutter doctor tool we have explored before, and the flutter emulators tool, which will run an emulator/simulator on your system. The following command lets you know the existing Android and iOS emulators that can be used to run the project:
flutter emulators
You will get something similar to the following screenshot:

Figure 1.7 – Output from the flutter emulators command
You can check how to manage your Android emulators on https://developer.android.com/studio/run/managing-avds. For iOS device simulators, you should use the Xcode Simulator developer tool.
Emulator versus simulator
You will notice that Android has emulators and iOS has simulators. The Android emulator mimics the software and hardware of an Android device. In contrast, the iOS simulator only mimics the software of an iOS device. It is therefore highly recommended that you test your app on a true iOS device before releasing it to the world to ensure there are no hardware issues such as excessive memory consumption.
Alternatively, you can choose to run the app on a physical device. You will need to set up your device for development, so for the moment it is probably easier to use an emulator or simulator.
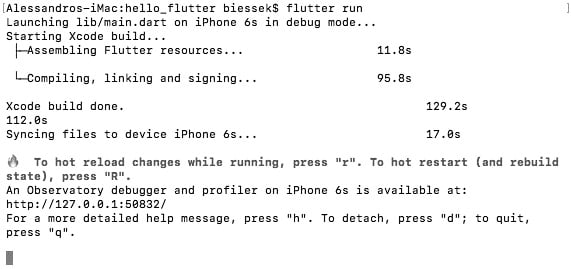
After asserting that we have a device connected that can run the app, we can use the following command:
flutter run
You will see output similar to the following:

Figure 1.8 – Output from the flutter run command
This command starts the debugger and makes the hot reload functionality available, as you can see. The first run of the application will generally take a little longer than subsequent executions.
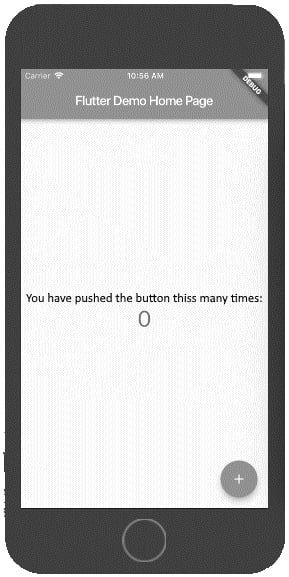
The emulator or simulator should start up and, after a pause to load the operating system, it should run your Flutter application. If you see the following screen, then congratulations. You have just run your first ever Flutter application and should be proud of yourself!

Figure 1.9 – Emulator displaying the Flutter app
The application is up and running; you can see a debug mark in the top-right corner. That means it's not a release version running; the app is in debug mode, which means you have all the debug mode goodies available to you, such as hot reload and code debug facilities.
The preceding example was run on an iPhone 6s simulator. The same result would be achieved by using an Android emulator, or an Android virtual device (AVD).


