XML stands for Extensible Markup Language (http://en.wikipedia.org/wiki/XML) and is designed to represent, transport, and store hierarchical data in a trees of nodes. You can use XML to communicate with different systems and store configuration files, complex entities, and so on. They all use a standard and powerful format. Delphi has had good support for XML for more than a decade now.
Manipulating and transforming XML documents
Getting ready
All the basic XML-related activities can be summarized with the following points:
- Generate XML data
- Parse XML data
- Parse XML data and modify it
In this recipe, you will see how to carry out all these activities.
How to do it...
Let's have a look at the following steps:
- Create a new VCL application and drop three TButton and a TMemo. Align all the buttons as a toolbar at the top of the form and the memo on the remaining form client area.
- From left to right, name the buttons btnGenerateXML, btnModifyXML, btnParseXML, and btnTransformXML.
- The real work on the XML will be done by the TXMLDocument component. So, drop one instance of the form and set its DOMVendor property to Omni XML.
- We will use static data as our data source. A simple matrix is enough for this recipe. Just after the implementation section of the unit, write the code that follows:
type
  TCarInfo = (
  Manufacturer = 1,
  Name = 2,
  Currency = 3,
  Price = 4);

var
  Cars: array [1 .. 4] of
     array [Manufacturer .. Price] of string = (
      (
        'Ferrari','360 Modena','EUR', '250,000'
      ),
      (
        'Ford', 'Mustang', 'USD', '80,000'
      ),
      (
        'Lamborghini', 'Countach', 'EUR','300,000'
      ),
      (
        'Chevrolet', 'Corvette', 'USD', '100,000'
      )
    );
- We will use a TMemo to display the XML and the data. To keep things clear, create a public property called Xml on the form and map its setter and getter to the Memo1.Lines.Text property. Use the following code:
//...other form methods declaration
private
  procedure SetXML(const Value: String);
  function GetXML: String;
public
  property Xml: String read GetXML write SetXML;
end;

//...then in the implementation section
function TMainForm.GetXML: String;
begin
  Result := Memo1.Lines.Text;
end;

procedure TMainForm.SetXML(const Value: String);
begin
  Memo1.Lines.Text := Value;
end;
- Now, create event handlers for each button. For btnGenerateXML, write the following code:
procedure TMainForm.btnGenerateXMLClick(Sender: TObject);
var
  RootNode, Car, CarPrice: IXMLNode;
  i: Integer;
  s: String;
begin
  XMLDocument1.Active := True;
  try
    XMLDocument1.Version := '1.0';
    RootNode := XMLDocument1.AddChild('cars');
    for i := Low(Cars) to High(Cars) do
    begin
      Car := XMLDocument1.CreateNode('car');
      Car.AddChild('manufacturer').Text :=
         Cars[i][TCarInfo.Manufacturer];
      Car.AddChild('name').Text :=
         Cars[i][TCarInfo.Name];
      CarPrice := Car.AddChild('price');
      CarPrice.Attributes['currency'] :=
         Cars[i][TCarInfo.Currency];
      CarPrice.Text := Cars[i][TCarInfo.Price];
      RootNode.ChildNodes.Add(Car);
    end;
    XMLDocument1.SaveToXML(s);
    Xml := s;
  finally
    XMLDocument1.Active := False;
  end;
end;
- Now, we have to write the code to change the XML. In the btnModifyXML click event handler, write the following code:
procedure TMainForm.btnModifyXMLClick(Sender: TObject);
var
  Car, CarPrice: IXMLNode;
  s: string;
begin
  XMLDocument1.LoadFromXML(Xml);
  try
    Xml := '';
    Car := XMLDocument1.CreateNode('car');
    Car.AddChild('manufacturer').Text := 'Hennessey';
    Car.AddChild('name').Text := 'Venom GT';
    CarPrice := Car.AddChild('price');
    CarPrice.Attributes['currency'] := 'USD';
    CarPrice.Text := '600,000';
    XMLDocument1.DocumentElement.ChildNodes.Add(Car);
    XMLDocument1.SaveToXML(s);
    Xml := s;
  finally
    XMLDocument1.Active := False;
  end;
end;
- Write the following code under the btnParseXML click event handler:
procedure TMainForm.btnParseXMLClick(Sender: TObject);
var
  CarsList: IDOMNodeList;
  CurrNode: IDOMNode;
  childidx, i: Integer;
  CarName, CarManufacturer, CarPrice, CarCurrencyType:
     string;
begin
  XMLDocument1.LoadFromXML(Xml);
  try
    Xml := '';
    CarsList := XMLDocument1.
       DOMDocument.getElementsByTagName('car');
    for i := 0 to CarsList.length - 1 do
    begin
      CarName := '';  CarManufacturer := '';
      CarPrice := '';  CarCurrencyType := '';
      for childidx := 0 to
         CarsList[i].ChildNodes.length - 1 do
      begin
        CurrNode := CarsList[i].ChildNodes[childidx];
        if CurrNode.nodeName.Equals('name') then
          CarName := CurrNode.firstChild.nodeValue;
        if CurrNode.nodeName.Equals('manufacturer') then
          CarManufacturer := CurrNode.firstChild.nodeValue;
        if CurrNode.nodeName.Equals('price') then
        begin
          CarPrice := CurrNode.firstChild.nodeValue;
          CarCurrencyType :=
             CurrNode.Attributes.
             getNamedItem('currency').nodeValue;
        end;
      end;
      Xml := Xml +
         'Name = ' + CarName + sLineBreak +
         'Manufacturer = ' + CarManufacturer + sLineBreak +
         'Price = ' +
         CarPrice + CarCurrencyType + sLineBreak +
         '-----' + sLineBreak;
    end;
  finally
    XMLDocument1.Active := False;
  end;
end;
- Write the following code under the btnTransformXML click event handler:
procedure TMainForm.btnTransformClick(Sender: TObject);
var
  LXML, LXSL: string;
  LOutput: string;
begin
  LXML := TFile.ReadAllText('..\..\..\cars.xml');
  LXSL := TFile.ReadAllText('..\..\..\cars.xslt');
  LOutput := Transform(LXML, LXSL);
  TFile.WriteAllText('..\..\..\cars.html', LOutput);
  ShellExecute(0, PChar('open'),
     PChar('file:///' +
     TPath.GetFullPath('..\..\..\cars.html')), nil,
     nil, SW_SHOW);
end;
- Now, add the following function in your form implementation section:
function Transform(XMLData: string; XSLT: string): String;
var
  LXML, LXSL: IXMLDocument;
  LOutput: WideString;
begin
  LXML := LoadXMLData(XMLData);
  LXSL := LoadXMLData(XSLT);
  LXML.DocumentElement.TransformNode(LXSL.DocumentElement,
     LOutput);
  Result := String(LOutput);
end;
- Run the application by hitting F9 (or by going to Run | Run).
- Click on the btnGenerateXML button, and you should see some XML data in the memo.
- Click on the btnModifyXML button, and you should see some more XML in the memo.
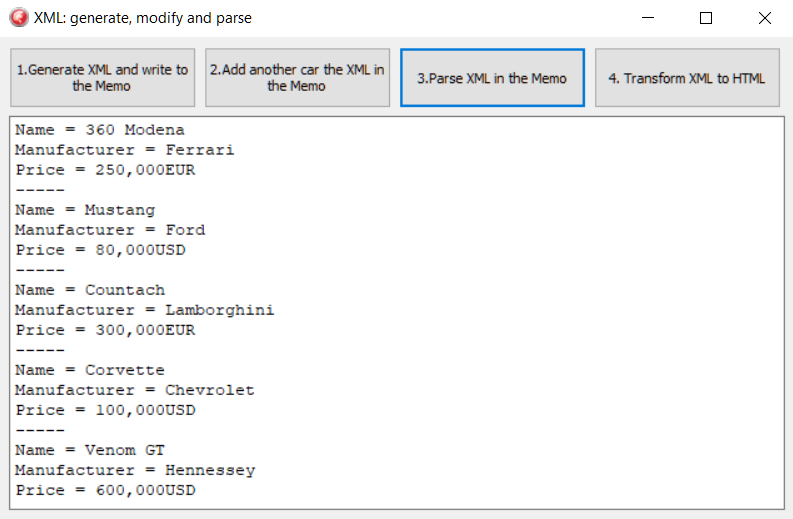
- Click on btnParseXML, and you should see the same data as before, but with normal text representation.
- After the third click, you should see something similar to the following screenshot:

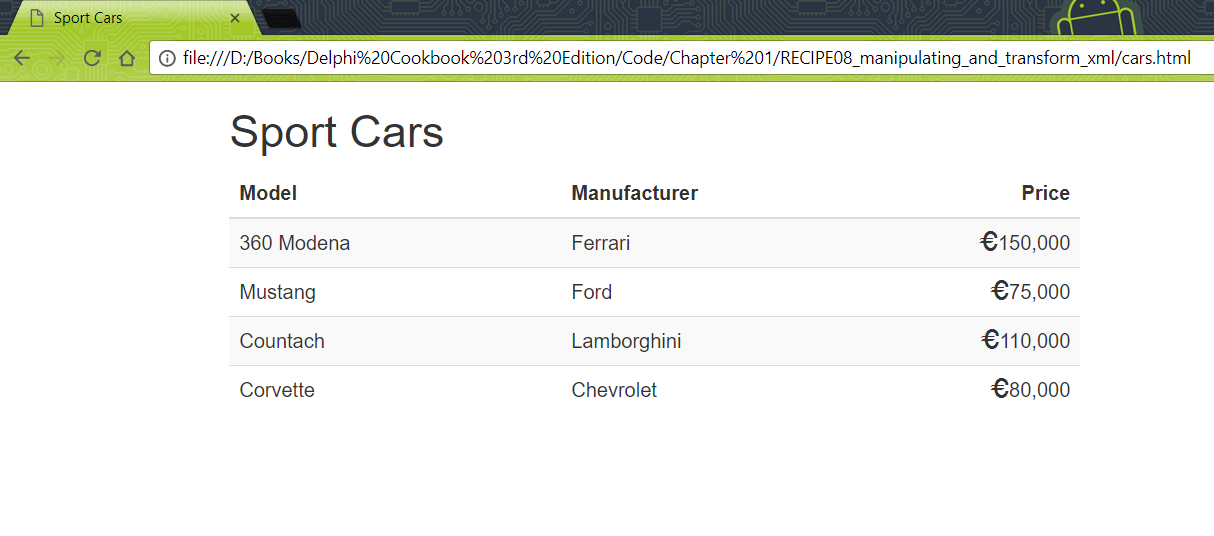
- Now, copy the cars.xml and cars.xslt files from the respective recipe folder to the parent folder of your project folder and click on the btnTransformXML button.
- The system default browser should appear, showing something like the following screenshot:

How it works...
Let's look at these steps now:
- The first button generates the XML representation of the data in our matrix. We've used some car information as sample data.
- To create an XML attribute, there are three fundamental TXMLDocument methods:
- XMLNode := XMLDocument1.CreateNode('node');
- XMLNode.AddChild('childnode');
- XMLNode.Attributes['attrname'] := 'attrvalue';
There are other very useful methods, but these are the basics of XML generation.
- The btnModifyXML button loads the XML into the memo and appends some other data (another car) to the list. Then, it updates the memo with the new updated XML. These are the most important lines to note:
//Create a node without adding it to the DOM
Car := XMLDocument1.CreateNode('car');

//fill Car XMLNode... and finally add it to the DOM
//as child of the root node
XMLDocument1.DocumentElement.ChildNodes.Add(Car);
- The code under the btnParseXMLClick event handler allows us to read the display as normal text as the XML data navigating through XML tree.
- The code under the btnTransformXMLClick event handler uses the XSLT transformation in cars.xslt and the data in cars.xml to generate a brand new HTML page. The XSLT code is as follows:
<?xml version="1.0" encoding="UTF-8"?>
<xsl:stylesheet version="1.0"
  xmlns:xsl="http://www.w3.org/1999/XSL/Transform">
    <xsl:output method="html" version="5.0"
       encoding="UTF-8" indent="yes"/>
  <xsl:template match="cars">
    <html>
      <head>
        <link href="https://maxcdn.bootstrapcdn.com/
           bootstrap/3.3.4/css/bootstrap.min.css"
           rel="stylesheet"/>
        <title>
          Sport Cars
        </title>
      </head>
      <body>
        <div class="container">
        <div class="row">
        <h1>Sport Cars</h1>
          <table class="table table-striped table-hover">
            <thead>
              <tr>
                <th>Model</th>
                <th>Manufacturer</th>
                <th class="text-right">Price</th>
              </tr>
            </thead>
            <tbody>
              <xsl:for-each select="car">
              <tr>
                <td>
                  <xsl:value-of select="name"/>
                </td>
                <td>
                  <xsl:value-of select="manufacturer"/>
                </td>
                <td class="text-right">
                  <span class="glyphicon glyphicon-euro">
                  </span>
                  <xsl:value-of select="price"/>
                </td>
              </tr>
            </xsl:for-each>
          </tbody>
        </table>
      </div>
      </div>
    </body>
  </html>
</xsl:template>
</xsl:stylesheet>
There's more...
There are many things to say about the XML ecospace. There are XML engines that provide facilities to search data in an XML tree (XPath), to validate XML using other XML (XML Schema or DTD), to transform an XML into another kind of format using another XML (XSLT), and many others (http://en.wikipedia.org/wiki/List_of_XML_markup_languages). The good thing is that just like XML, the DOM object is also standardized. So, every library that is compliant with the standard has the same methods, from Delphi to JavaScript and from Python to C#.
TXMLDocument allows you to select the DOMVendor implementation. By default, there are three implementations available:
- MSXML:
- From Microsoft; implemented as COM objects
- Supports XML transformations
- Available only on Windows (so no Android, iOS, or Mac OS X)
- Omni XML:
- Much faster than ADOM and based on the Open Source Project.
- It is cross-platform, so is available on all the supported Delphi platforms. If you plan to write XML handling code on mobile or Mac, this is the way to go.
- ADOM XML:
- A quite old open source Delphi implementation
- Does not support transformations
- Available on all supported Delphi platforms
- For backward compatibility, consider Omni XML instead in Delphi
TXMLDocument uses a Windows-only vendor by default. If you are designing a FireMonkey application that is intended to run on other platforms than Windows, select a cross-platform DOM vendor.
XSLT allows you to transform XML to something else, using other XML as a stylesheet. As we saw in this recipe, you can use an XML file and an XSLT file to generate an HTML page that shows the data contained in the XML, using XSLT to format the data.
The following function loads one XML and one XSLT document from two string variables. Then, we use the XSLT document to transform the XML document. The code that follows shows this in detail:
function Transform(XMLData: string; XSLT: string): String;
var
  LXML, LXSL: IXMLDocument;
  LOutput: WideString;
begin
  LXML := LoadXMLData(XMLData);
  LXSL := LoadXMLData(XSLT);
  LXML.DocumentElement.TransformNode(
    LXSL.DocumentElement, LOutput);
  Result := String(LOutput);
end;
This function doesn't know about the output format because it is defined by the XSLT document. The result could be XML, HTML, CSV, plain text, or whatever the XSLT defines, but the code does not change.
XSLT can be really useful. I recommend that you go and visit http://www.w3schools.com/xml/xsl_languages.asp for further details on the language.


