


Performing Bulk Operations
Bulk Microsoft Entra ID operations refer to the ability to perform a single action or update across multiple users, groups, or other objects in Microsoft Entra ID. This can be especially useful for larger organizations with hundreds or thousands of users, where manual updates to each individual object would be time-consuming and inefficient. Bulk operations in Microsoft Entra ID can be performed using PowerShell, Graph API, or other supported methods. Common bulk operations include adding or removing users from groups, updating user attributes, and managing device settings. We will explore more about the bulk operations you can perform and how they work in the following section.
Some of the popular operations you will learn about in this book perform bulk updates, such as the following:
- Bulk user creation
- Bulk user invitation
- Bulk user deletion
- Bulk user downloads
Performing Bulk Updates Using the Azure Portal
Performing bulk user updates is like managing single users (such as internal and guest users). The only property that can’t be set for multiple users is resetting a password, which must be done for a single user.
Azure has also improved its bulk user settings by adding a drop-down menu that enables you to perform updates via the downloadable CSV template, which you then re-upload.
Downloading a User List
To download a user list, you can follow the given steps:
- Navigate to the
Usersoverview blade again in Microsoft Entra ID. You should automatically go into theAll usersblade; if not, select that option. - Click
Download usersfrom the top menu.

Figure 2.30: Bulk operations – clicking Download users
- Enter a desired filename and click
Start. This will be saved as a.csvfile, which can be opened in Microsoft Excel if you desire for easy editing. A free version can be used with Microsoft 365 Office online. You can read more about this at this link: https://www.microsoft.com/en-us/microsoft-365/free-office-online-for-the-web. Being a comma-separated file type, where each value is separated by a comma, you can use any text editor, such as Windows Notepad.

Figure 2.31: Bulk operations – Download users
- Once complete, the option to download the file will appear. Click the blue text to download.

Figure 2.32: Downloading the user’s CSV file
When opening the file, if you are presented with what looks like gibberish, you can do the following in Excel to format it neatly for yourself:
- Click the
Acolumn to select all the data:
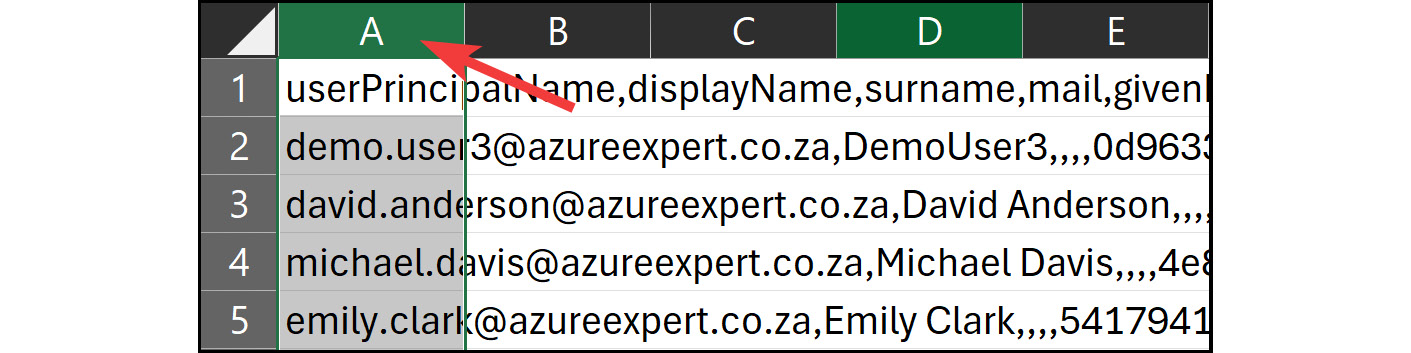
Figure 2.33: Bulk operations – selecting the A column in Excel
- Then, select the
Datatab from the top menu bar, and then selectText to Columnsfrom theDataToolscontext.

Figure 2.34: Bulk operations – selecting Text to Columns in Excel
- On the screen that pops up, click
Delimitedand thenNext.
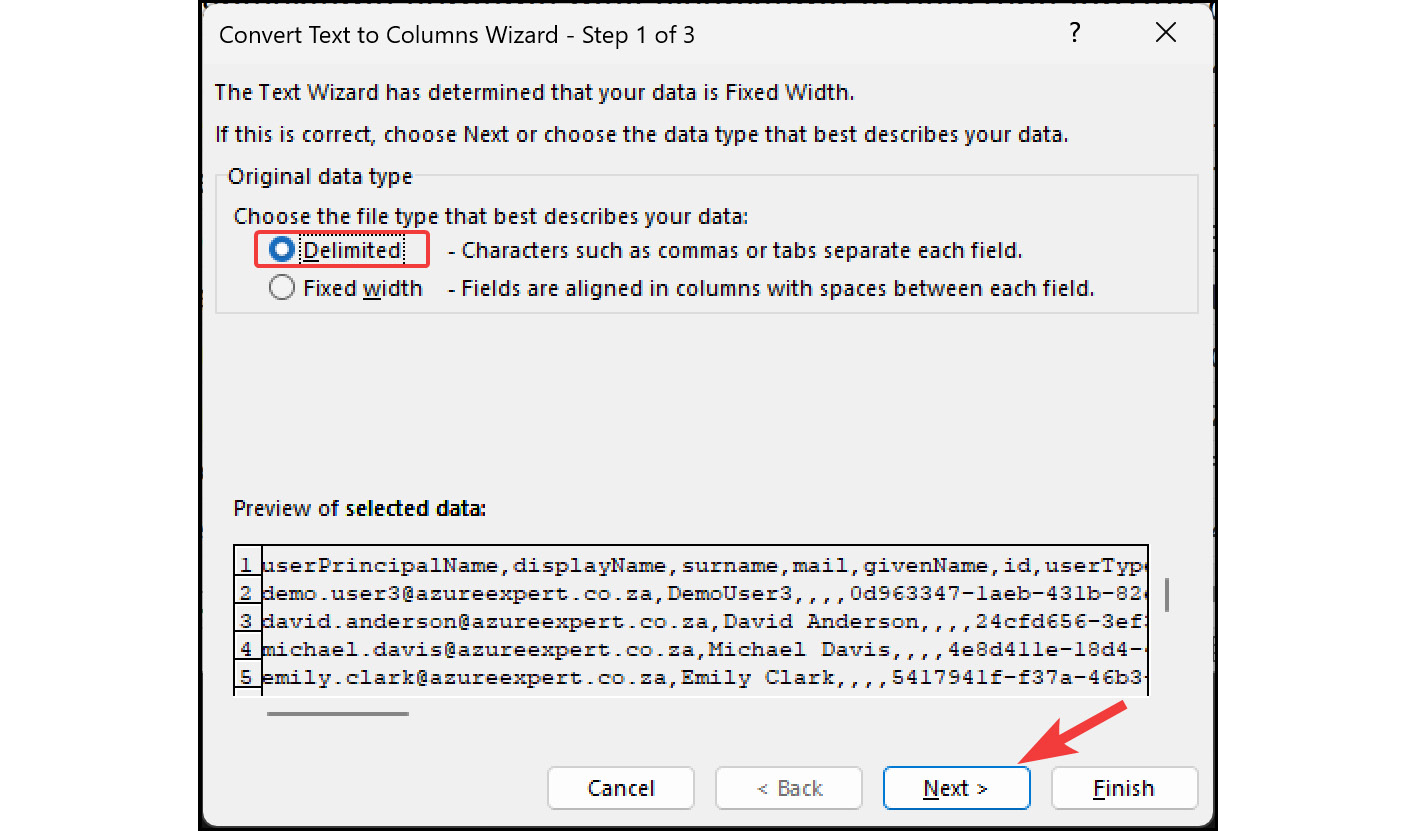
Figure 2.35: Bulk Operations – Delimited in Excel
- Select
Comma, and then clickNext >.
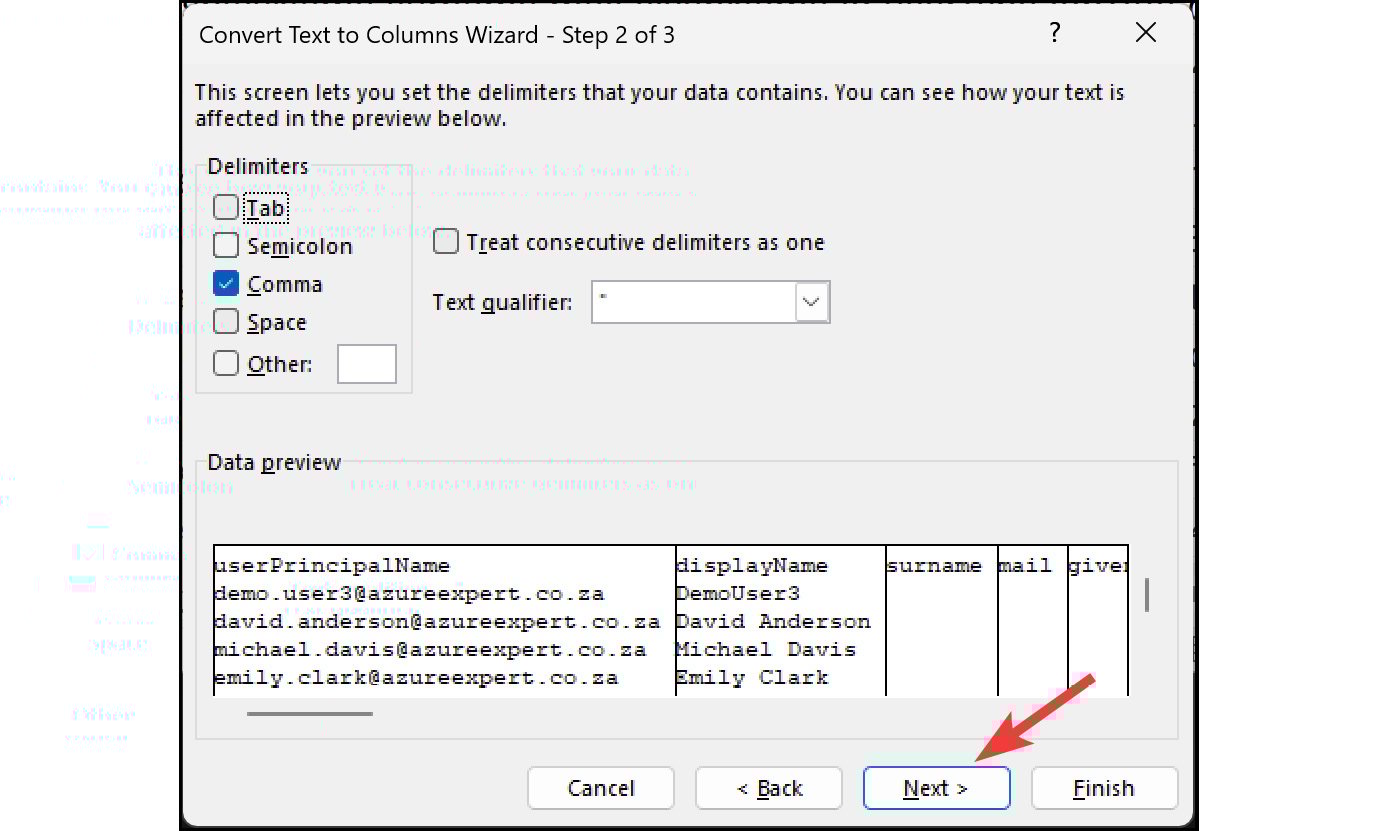
Figure 2.36: Bulk operations – selecting Comma
- Click
GeneralforColumn data format, and then clickFinish.
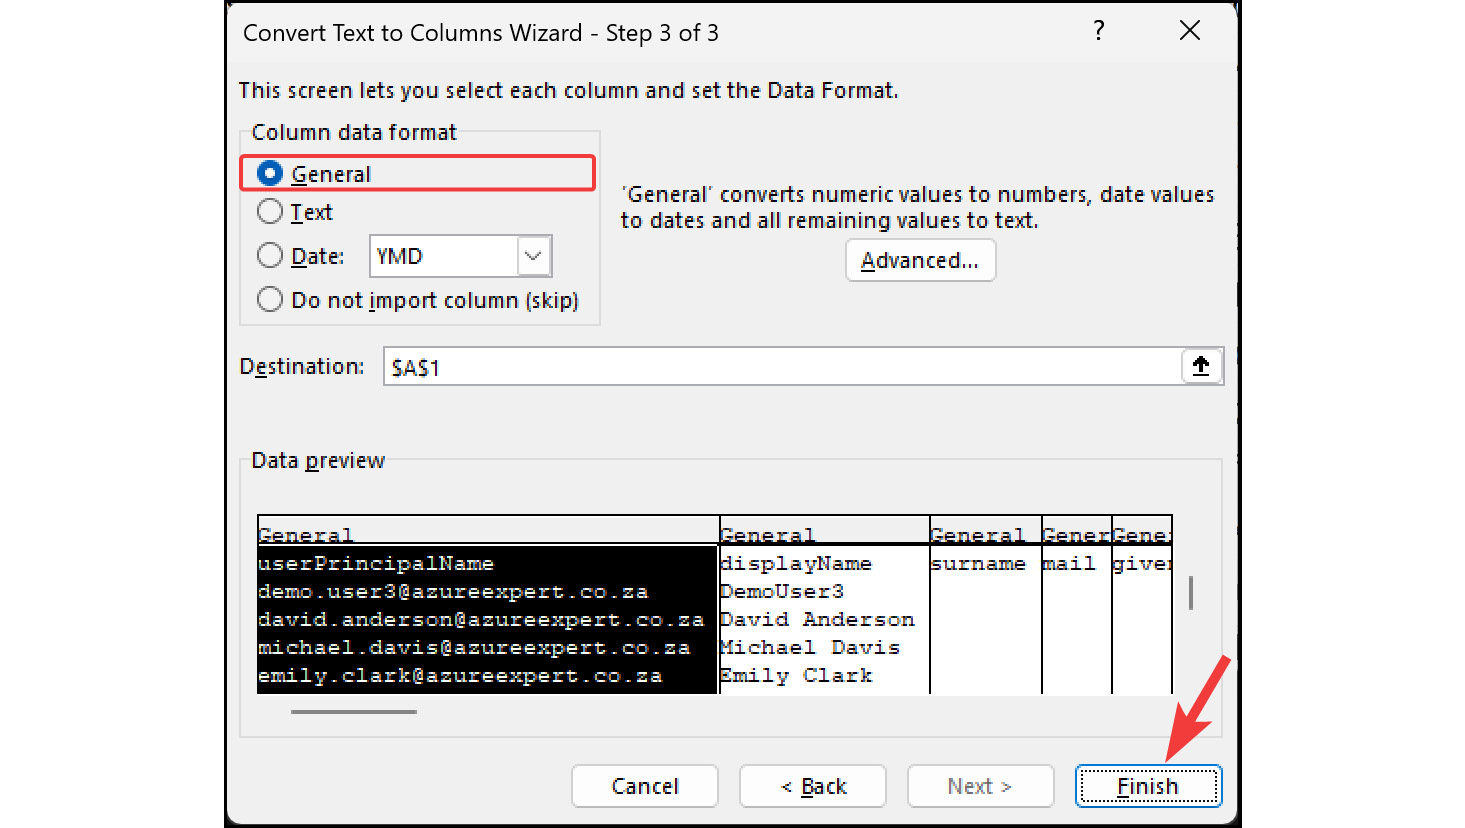
Figure 2.37: Bulk Operations – selecting the column data format in Excel
Now, your data will be organized neatly into columns. Next, you will learn how to use this sheet to perform bulk deletion operations in Microsoft Entra ID.
Bulk User Deletion Operations
To demonstrate a bulk deletion, you will select and keep the users you want to retain in the sheet and delete the rows with the remaining users:
- Navigate back to the
Usersblade and selectAll users. - Click
Bulk operationsand thenBulk delete.
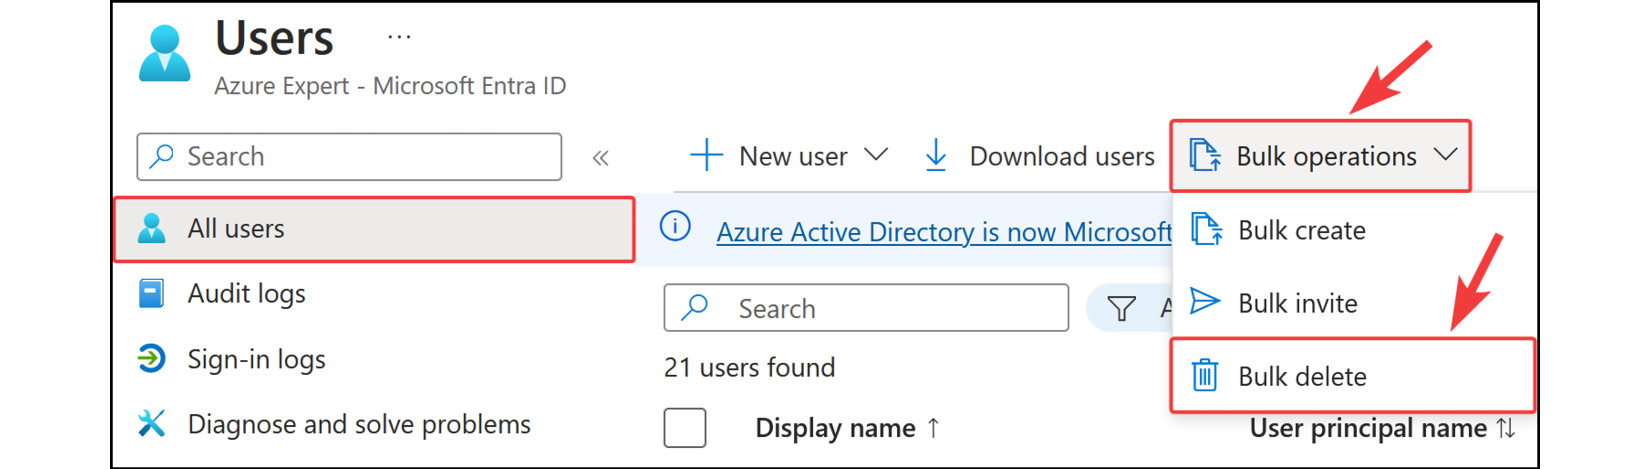
Figure 2.38: Microsoft Entra ID – Bulk delete
- Click
Download.
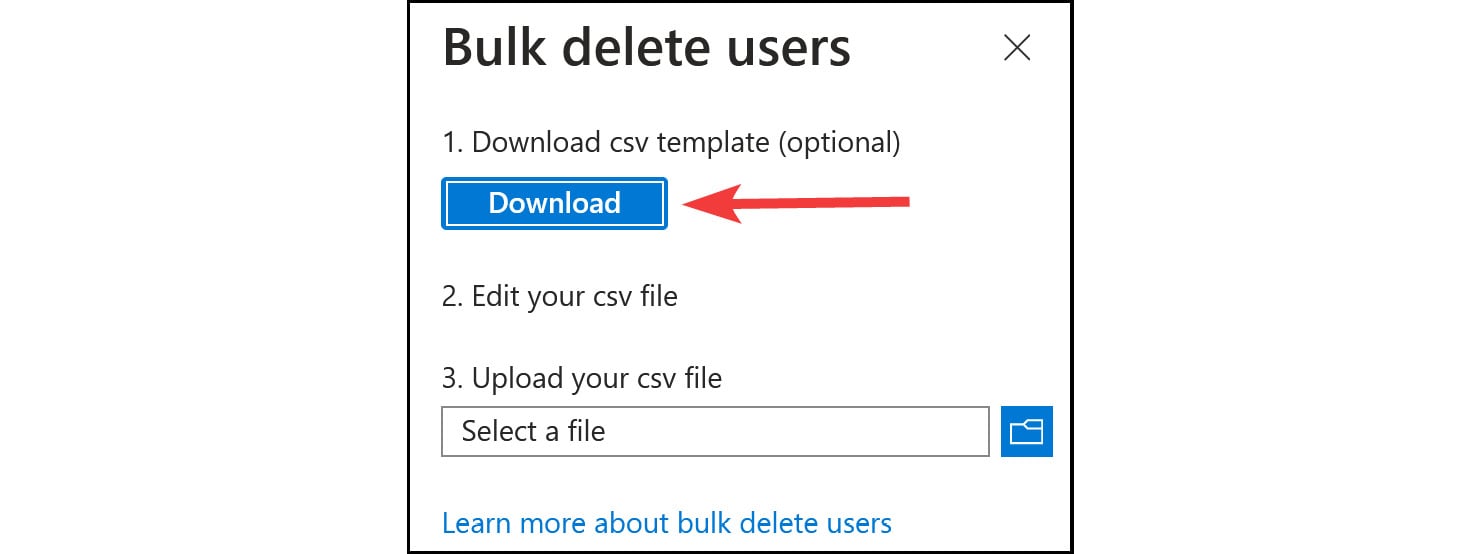
Figure 2.39: Microsoft Entra ID – the bulk delete template
- Modify the sheet and paste in the user principal name for each user, from row 3 downward. You can copy these users from the sheet you downloaded in the last exercise. Click
Saveonce you are finished and close the Excel sheet.

Figure 2.40: Bulk Operations – selecting users to delete in Excel
- Back in the Azure portal, click the
Select a fileoption from the previous screen. From the open file dialog that pops up, navigate to your file, and then clickOpen. - In the Azure portal, select
Yesfor theAre you sure you want to perform the delete operation?option, and then clickSubmit. You will be presented with a success notification once completed successfully. - That concludes the bulk user delete operation demonstration. Next, you will briefly explore other possible ways to modify Microsoft Entra ID user accounts.
Updating Multiple Users
You can also update multiple users by selecting them and choosing to delete them, or you can configure MFA for each user from the Azure portal in the Users blade:
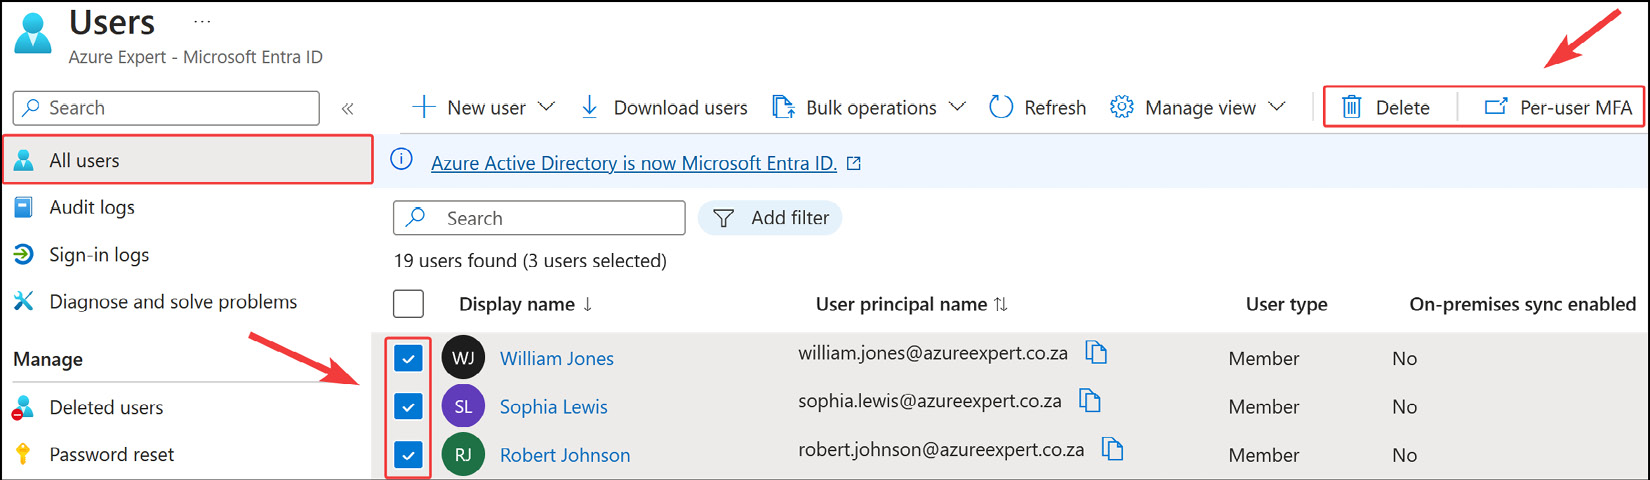
Figure 2.41: An alternative bulk user delete method
This concludes our demonstration of how to perform bulk user deletion operations using the Azure portal. Next, we will take a look at a PowerShell script that I think can help you achieve bulk user creation.
Performing Bulk Creations Using PowerShell
You will now experience running a PowerShell script to enable you to create Microsoft Entra ID users quickly and programmatically in your environment. The following script will create several demo users with a predefined password for you:
- Start by opening your favorite code editor or notepad; I recommend VS Code, which you can download from here: https://code.visualstudio.com/download.
- Paste the following code and save the file as a
.ps1file, with whatever name prefix you want. To follow this exercise, it is advised that you save the file inC:\Scriptson your computer and name itCreate_AzureAD_Users.ps1. You will need to populate the$TenantIdand$DomainSuffixdetails in between the inverted commas on the right.
Create_AzureAD_Users.ps1
# Enter the Tenant ID for your Azure AD
$TenantId = ""
# Populate your Domain Suffix
$DomainSuffix = ""
# List of usernames to create
$UserNames = @(
    "John Smith",
    "Jane Doe",
    "Robert Johnson",
The complete code is available at https://packt.link/CEwga
- Note the location of your script (e.g.,
C:\Scripts), and then open PowerShell. - Type in
cdand the path to your script, and then press the Enter key.

Figure 2.42: Changing the directory on PowerShell
- Now, to run the script, enter
.\and start typing your script name. The.\notation means that you will look in the path that you are currently in – in my example,C:\Scripts. Click Enter once you have your script.

Figure 2.43 – Launching the Create_EntraID_Users script
- A prompt will pop up, asking you to authenticate; enter your details and sign in.

Figure 2.44: Azure’s Sign in prompt
- Return to the Azure portal and navigate to
Microsoft Entra ID, and then theUsersblade. You should see your new users there.
This concludes our demonstration on how to perform bulk user creations using a PowerShell script, helping you to achieve a consistent deployment methodology that can also save you time.
Note
You are encouraged to read further by using the following links, which look at adding bulk users:
https://learn.microsoft.com/en-us/entra/identity/users/users-bulk-add
https://learn.microsoft.com/en-us/entra/identity/users/groups-bulk-import-members
In the next section, we are going to cover how you can manage guest accounts.


