Search icon CANCEL
Subscription
0
Cart icon
Your Cart (0 item)
Close icon
You have no products in your basket yet
Arrow left icon
Explore Products
Best Sellers
New Releases
Books
Videos
Audiobooks
Learning Hub
Free Learning
Arrow right icon
Arrow up icon
GO TO TOP
Learn Clip Studio Paint

You're reading from   Learn Clip Studio Paint Create impressive comics and Manga art in world-class graphics software

Arrow left icon
Product type Paperback
Published in Dec 2018
Publisher
ISBN-13 9781789347036
Length 448 pages
Edition 2nd Edition
Arrow right icon
Author (1):
Arrow left icon
Liz Staley Liz Staley
Author Profile Icon Liz Staley
Liz Staley
Arrow right icon
View More author details
Toc

Table of Contents (21) Chapters Close

Preface 1. Installing Clip Studio Paint, Recommended Systems, and Interface Basics 2. Preferences, Shortcuts, and Other Commands FREE CHAPTER 3. Clip Studio Paint Brushes: an Introduction 4. Pencilling: Layer Properties 5. Erasers, Selections, and the Subview Palette 6. All About Rulers 7. Using 3D Figures and Objects 8. Vector Layers and the Material Palette 9. Using Text and Balloon Tools 10. Creating Sound Effects 11. Making Layer Masks and Screentones 12. Making Comic Panels 13. Auto Actions and Your Workflow 14. Inking Tools 15. Inking Special Effects 16. Color Palettes 17. Using CSP to Color Your Comics 18. Exporting and Printing Your Comic 19. What Is the Clip Studio App and Getting Animated 20. Other Books You May Enjoy

Creating a textured inking brush

This exercise will get us familiar with creating and saving a custom brush tip, and adjusting some of the brush tip settings in the Sub Tool Detail palette. Complete the following steps to make this textured inking brush:

  1. On a new canvas, create a new raster layer. Make sure that the Color Expression is set to Gray.
  2. Select the Airbrush tool and the Droplet sub tool. On the gray layer, make a circular shape with the Droplet tool, using pure black as the active color. Don't make this too precise, we want some variation to it. Your shape should look something like the following screenshot:
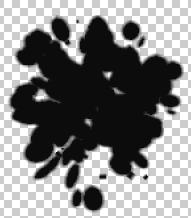
  1. Turn off any layers, other than the one with the shape we created in step two. This includes any paper layers! We only want to see our new brush tip shape before completing the next step.
  2. In the File Menu, click on Edit - Register Material(J) | Image...
lock icon The rest of the chapter is locked
Register for a free Packt account to unlock a world of extra content!
A free Packt account unlocks extra newsletters, articles, discounted offers, and much more. Start advancing your knowledge today.
Unlock this book and the full library FREE for 7 days
Get unlimited access to 7000+ expert-authored eBooks and videos courses covering every tech area you can think of
Renews at $19.99/month. Cancel anytime
Banner background image