Creating an incident tracking solution – setting up the data source
Tracking processes is a necessity for customers everywhere. As in any development process, the first step is to gather all the requirements needed to fulfill the business need; this will then help us design the data structure to support our application.
As for the data source, this recipe will set up the required fields in a SharePoint list while also applying certain settings to make it as performant as it should be.
Getting ready
Before diving into developing solutions with Power Apps, you will need a Microsoft 365 subscription. Please refer to the Preface section for suggestions on getting a playground to build your apps.
We will use SharePoint as the data source for this recipe, so we will start by creating a list. The actual list creation process is pretty straightforward, leaving plenty of time for our application design.
SharePoint Online performance considerations
When working with SharePoint Online, you need to remember that we are working on a web application with specific response and performance levels to provide the best user experience. To meet this, Microsoft has set a view threshold of 5,000 elements per list. Even though a list can hold up to 30 million items, querying data exceeding this limit will result in platform errors, making the list unresponsive.
These are a few recommendations to keep your lists performant:
- Set an index for the columns you wish to filter. Remember to do this beforehand since you cannot change it if you have exceeded the threshold.
- Prepare views for lists that might carry a large number of items by segment. Examples can be categories, years, and departments.
- Build your views with fewer than 12 People, Lookup, or Managed metadata fields to avoid performance issues.
For reference on this subject, check out the following links:
- https://support.microsoft.com/en-us/office/manage-large-lists-and-libraries-in-sharepoint-b8588dae-9387-48c2-9248-c24122f07c59
- https://support.microsoft.com/en-us/office/use-filtering-to-modify-a-sharepoint-view-3d8efc52-0808-4731-8f9b-3dfaeacea3d4
How to do it…
- Go to your SharePoint site. We will need to create two lists.
- Select + New and then List. This action will open a dialog with several list templates for you to select. Click on Blank list, input
Clientsas the Name, leave the Description field blank, and click on Create. This action will create a list with a default structure:

Figure 1.1: List creation procedure
- To add and update columns, click on the gear icon in the top-right corner and select List settings. This action will open all the configuration options for this list, but we will be focusing on the Columns section.
- First, click on the Title column to edit it. We are doing this for user interface reasons. This field lets you open the selected record quickly from the list view, so we will set it as the client’s name. Once it opens, rename the column name to
Nameand click OK. - To add the rest of the fields, click Create column and set the column name and type as seen in the following table:
|
Column name |
Column data type |
Required |
|
Name |
Single line of text |
Yes |
|
Address |
Multiple lines of text |
No |
|
Phone |
Single line of text |
No |
|
|
Single line of text |
No |
Table 1.1: Clients list columns
- When adding the Address column, specify the type of text to be Plain text to prevent formatting issues later when designing your app. We need to make this change because, otherwise, SharePoint will store this data in HTML to maintain the formatting and will make the text look different from the rest of the app.
- Repeat steps 2 and 3 for the
Incidentslist. Rename the Title column toIncidentand set the columns as seen in the following table:Column name
Column data type
Required
Incident
Single line of text
Yes
Customer Name
Lookup
Yes
Date
Date and Time
Yes
Priority
Choice
Yes
Comments
Multiple lines of text
No
Table 1.2: Incident list columns
The Choice type means that it will use a list of items to choose from, and the Lookup type indicates that this column will link to another list that holds another set of data. In this case, we will use this column to relate the incidents to the clients.
- To add the Customer Name column, select the Lookup type and from the Get information from dropdown, choose the Clients list we created before. Leave the rest of the options as the default.
- For the Priority column, select the Choice type and replace the choices with
High,Medium, andLow. Set the Default value asLow - Lastly, change the text type to Plain text for the Comments column.
Now that we have our lists in place, let’s see how this list and its relationships come together.
How it works…
After setting up our data source, we can now start entering some test data to use in our app.
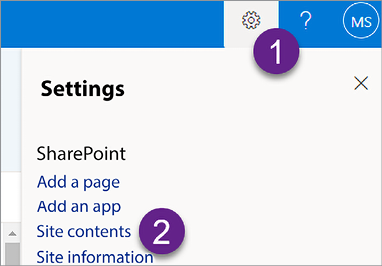
- Click on the gear icon in the top-right corner, select Site contents, and select the Clients list:

Figure 1.2: Site contents option
- Now, let’s click on + New to add some random test data:
- Name:
Yennu Enterprises - Address:
One Yennu road - Phone:
+1 555 800 5555 - Email:
[email protected]
- Name:
- Add as much data as you like. Repeat the same steps with the Incidents list by clicking on the gear icon and selecting the list from Site contents.
- For Customer Name, you will see data loaded from the Clients list, and the Priority column will let you choose from the previously defined elements:
- Incident:
Failure in the programming of the executive elevator - Customer Name:
Yennu Enterprises (link) - Date:
11/17/2020 - Priority:
High - Comments:
The elevator returns itself to the last floor when idle.
- Incident:
- Again, add as much data as you want. And now, we are moving forward to the next section, where we will build an app from this data structure.


