Preparing tables in Dataverse
Tables are essential to every data source since they represent the backbone of the data structure. Their designs include column definitions, indexing mechanisms, relationship configurations, and more.
Almost every Power Platform solution requires related tables to support the business process, and that’s why Microsoft Dataverse is a compelling choice. It was created as a business-oriented relational database.
To discover more about the distinctive features that set Microsoft Dataverse apart, please visit https://learn.microsoft.com/en-us/power-apps/maker/data-platform/why-dataverse-overview.
In this recipe, we will learn how to build tables for this database. This will become a standard task for many projects, such as the one showcased in Chapter 3, Building from Data with Model-Driven Apps, where we will create a help desk solution based on Dataverse.
Getting ready
Each table on a database serves a specific purpose. For this example, we will create a table that will hold the data of all the members of a girls’ youth basketball team.
Team players
|
Display name |
Data type |
Format |
|
Full name |
Text | Plain text (Single line of text) |
Text |
|
Jersey number |
Number | Whole number |
None |
|
Position |
Choice | Choice |
- |
|
Gear size |
Single line of text |
Text |
|
Emergency contact information |
Multiple lines of text |
Text |
Table 1.1: Team players table columns
How to do it…
- Go to the Power Apps maker portal and open a solution from the list of solutions for the current environment.
- From the toolbar, click New | Table | Table. Set the Display name to
Team player. The Plural name will change toTeam playersautomatically. Depending on your table’s needs, you might want to Enable attachments, for example, including extra information about the team player, such as parental consent or team enrollment. - Click on the Primary column tab. Enter
Full nameas the Display name. Remember to choose something your end users can use to select the records when listing them. - Once you have entered all the required information, click Save. The system will start creating the table with the specified primary column and the rest of the business-oriented columns. The table will open automatically once finished.
- Click on New | Column from the toolbar. For the Display name field, enter
Jersey number, set the Data type to Number | Whole number, and click Save. - Click New | Column again to include the
Positioncolumn. For Data type, select Choice | Choice. Under the Sync this choice with dropdown, click on New choice:- Set
Positionas the Display name, and under the Choices section, add the termPoint Guard. - Click on New choice to add each of these items:
Shooting Guard,Small Forward,Power Forward,Center. - Click Save.
- Set
- Back on the column configuration, select the previously created choice from the Sync this choice with dropdown, and click Save to continue.
Using global choices is a great way to reuse a Choice column for different tables if they are going to hold the same elements.
- Repeat Step 5 to add the
Gear sizecolumn using Single line of text as the Data type and Text as the Format. - Repeat Step 5 to include the
Emergency contact informationcolumn using Text | Plain text from the Multiple lines of text section of the Data type dropdown. Leave Text as the Format.
How it works…
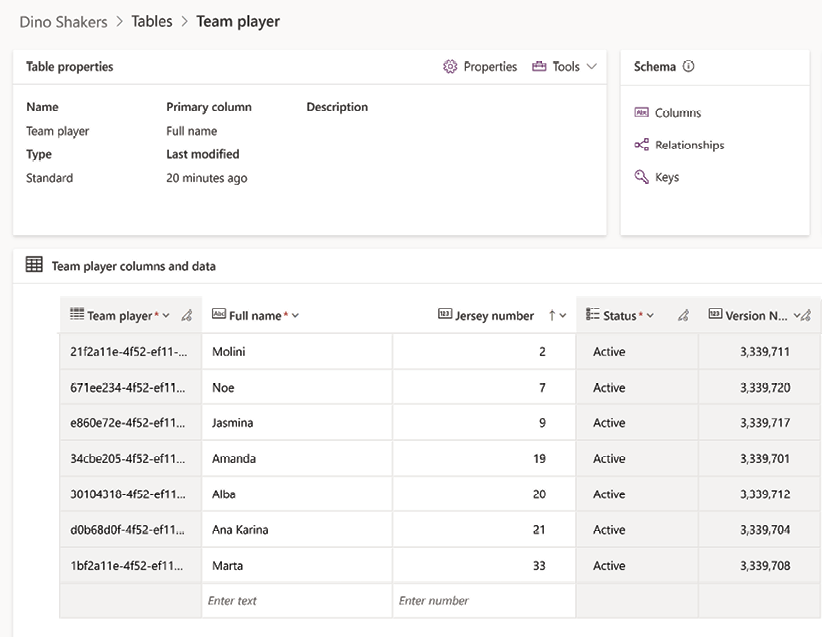
Now that we have added all the required columns, the table can be used in our solutions. The following is an example of the Team player table:

Figure 1.2: Team player table base structure


