Configuring and Managing Devices
In Microsoft Entra, a device represents any physical or virtual device that is registered with the directory. This can include devices such as laptops, desktops, mobile phones, and tablets. When a device is registered with Microsoft Entra, it can be managed and secured using policies and configurations defined in the directory. By managing devices in Microsoft Entra, IT administrators can ensure that devices accessing corporate resources meet an organization’s security and compliance requirements. In the following sections, you will explore device management in more detail and discuss how Microsoft Entra enables device management at scale.
Configuring Device Identities
When it comes to managing your devices through Microsoft Entra, you have several services available to you. You may want to support Bring Your Own Device (BYOD) scenarios or opt for a more traditional management style through Microsoft Entra joined devices. Joining is the typical approach for larger organizations that have established control and management structures for their IT infrastructure. For this course, you need to only be aware of how to register or join your devices to Microsoft Entra. This topic is worth much more exploration and research before you decide to adopt a certain approach.
Microsoft Entra Device Registration
A Microsoft Entra ID Registered Device is one that is registered within the Microsoft Entra ID directory but not added as a member of an organization:
- The device is then granted access to resources through an attachment to a Microsoft account in Microsoft Entra ID.
- It provides users with a Single Sign-On (SSO) experience across their devices, including app authentication.
- It enables Conditional Access policy enforcement.
- It is recommended for personally owned devices or devices not used exclusively for business purposes. Personally owned devices are also defined as BYOD, which are devices that can be used for work purposes.
- It offers a streamlined process with minimal administrative overhead.
- The device can be managed through tools such as Microsoft Intune.
The following diagram illustrates a device’s connection to Microsoft Entra ID and the relationship flow.

Figure 2.1: Microsoft Entra ID – device registration
For more details, refer to https://learn.microsoft.com/en-us/entra/identity/devices/concept-device-registration.
Microsoft Entra Join
A Microsoft Entra ID joined device is one that is added to an organization’s Microsoft Entra ID directory, providing additional benefits and control to the organization:
- It is fully managed by the organization with access to on-premises Active Directory resources. It is, therefore, suitable for dedicated, organization-owned devices that need full access to organizational resources.
- It is explicitly tied to an organizational user account and managed as part of the directory.
- It offers better management capabilities and integration and can use Conditional Access policies.
The following diagram illustrates a device-to-Microsoft Entra ID join connection, demonstrating how the connection is made from the device to Microsoft Entra ID. Entra ID can then form a hybrid connection to an on-premises Active Directory system, with synchronization occurring between the platforms through the Microsoft Entra Connect service.

Figure 2.2: Microsoft Entra ID – a device join
For more details, refer to https://learn.microsoft.com/en-us/entra/identity/devices/concept-directory-join.
Microsoft Entra Hybrid Join
A Microsoft Entra ID hybrid joined device is a device that is joined to both the on-premises Active Directory (AD) and Entra ID, for organizations with a blended infrastructure. It is designed to support Windows 10 and 11 devices:
- It retains the benefits of local on-premises AD while leveraging cloud features, such as enabling the continued use of Group Policy in Entra ID
- It combines cloud authentication with on-premises resources and devices
- It facilitates seamless transitions and secure access to resources in hybrid environments
- It is ideal for organizations that have a mix of cloud and on-premises infrastructure deployments
The following diagram illustrates a device connection to Microsoft Entra ID and the relationship flow for a Microsoft Entra ID hybrid join connection, demonstrating how the connection is made from the device to Microsoft Entra ID as a registration and to an Active Directory for a domain join. Entra ID will then have a hybrid connection to an on-premises Active Directory system, with synchronization occurring between the platforms through the Microsoft Entra Connect service.
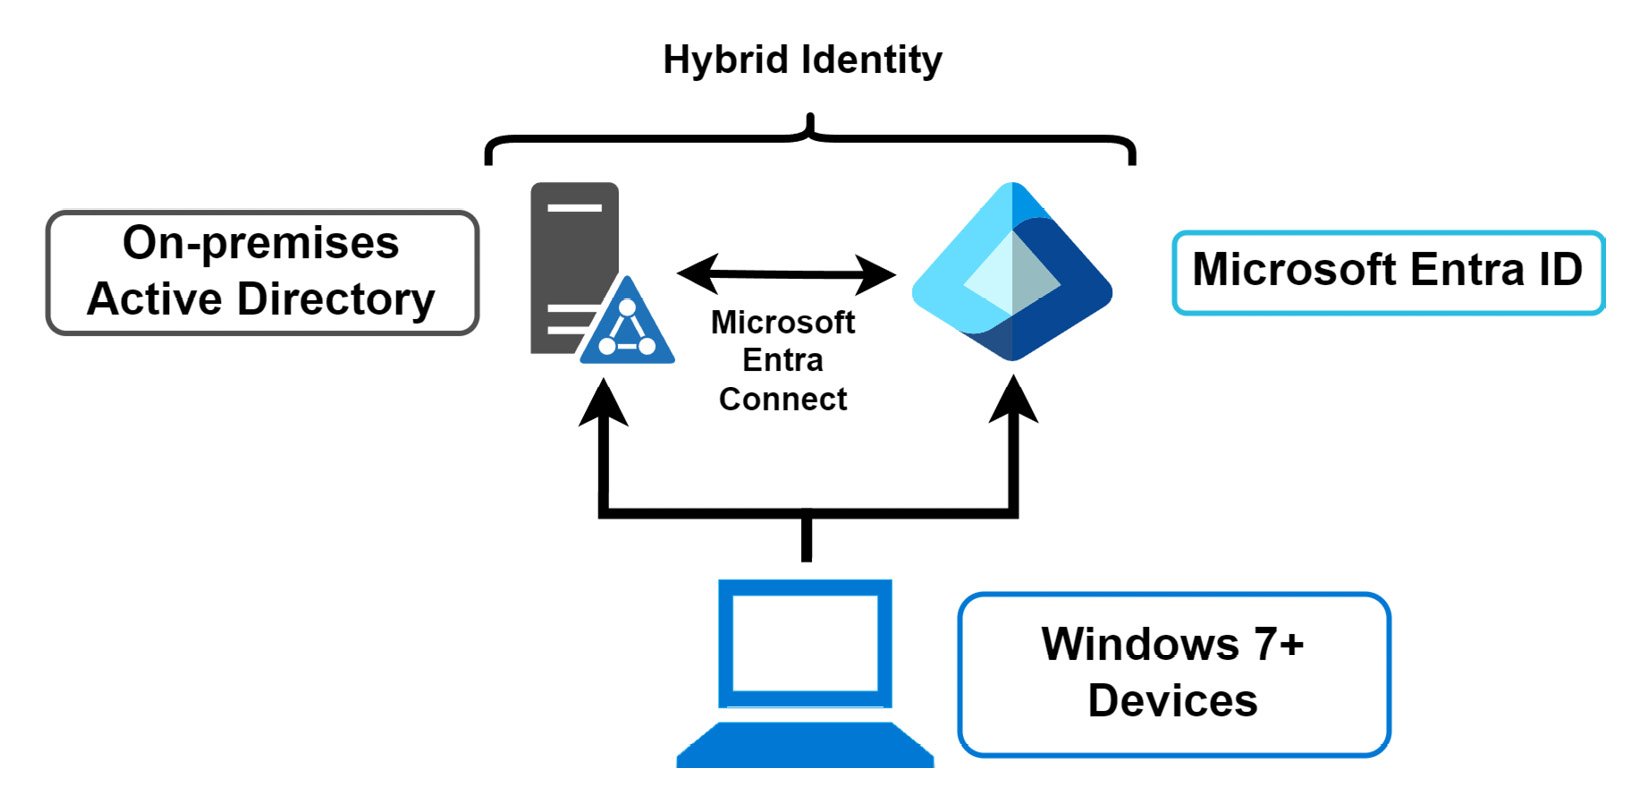
Figure 2.3: Microsoft Entra ID – a device hybrid join
For more details, refer to https://learn.microsoft.com/en-us/entra/identity/devices/concept-hybrid-join.
Next, we will explore what device settings you can manage in Microsoft Entra.
Device Settings
Microsoft Entra enables organizations to ensure that their users access Azure resources from devices that comply with their security and compliance policies. Device management is a crucial component of device-based Conditional Access, where access to corporate resources is restricted only to managed devices.
Device settings can be easily managed from the Azure portal, provided the device is registered or joined to Microsoft Entra. To access Devices, you need to select it from the Manage context from the left-hand menu under Microsoft Entra ID. On the Devices blade, you can select Device settings from the left menu. The following device settings are available for configuration in Microsoft Entra ID:
Users may join devices to Microsoft Entra: This setting lets administrators specify which users can join their Windows 10 devices to Entra ID. This setting is only applicable to Microsoft Entra Join on Windows 10. TheSelectedoption allows you to specify which members are allowed to join their devices to Entra ID.

Figure 2.4: Device settings – Users may join devices to Microsoft Entra
Users may register their devices with Entra ID: This setting needs to be configured to allow devices to be registered with Entra ID. There are two options here –None, which means that devices are not allowed to register when they are not Microsoft Entra-joined or hybrid Microsoft Entra-joined, andAll, which means that all devices are allowed to register.

Figure 2.5: Device settings – Users may register their devices with Microsoft Entra
Note
In order for you to enroll with Microsoft Intune or Mobile Device Management (MDM) for Microsoft 365, you will be required to register. If you have configured either of these services, the All option is selected by default and None is not available for selection.
Require Multi-Factor Authentication to register or join devices with Microsoft Entra: This setting adds another layer of security by requiring users to authenticate with Multi-factor Authentication (MFA) when registering or joining their devices to Microsoft Entra. Before you can enable this setting, MFA needs to be configured for the users who register their devices.

Figure 2.6: Device settings – requiring MFA
Maximum number of devices per user: This setting allows you to select the maximum number of devices that a user can have in Microsoft Entra. Reaching this quota will prevent additional devices from being added until either existing devices are removed or the quota limit is changed.Manage Additional local administrators on all Microsoft Entra joined devices: This setting allows you to add additional local administrators for Microsoft Entra joined devices. A local administrator is a user who has administrative privileges on a specific device or computer.

Figure 2.7: Device settings – Local administrator settings
Enable Microsoft Entra Local Administrator Password Solution (LAPS): Local Administrator Password Solution (LAPS) is a secure method for managing and retrieving built-in local admin passwords on Windows devices, supporting both Microsoft Entra and Microsoft Entra hybrid join configurations. You can read more about it here: https://learn.microsoft.com/en-gb/entra/identity/devices/howto-manage-local-admin-passwords.

Figure 2.8: Device settings – Microsoft Entra LAPS
Restrict users from recovering the BitLocker key(s) for their owned devices: Restricting users from recovering BitLocker keys for their owned devices is a security measure that prevents non-admin users from accessing their device’s BitLocker key(s) for self-service recovery. By setting this restriction toYes, only admin users can retrieve the keys, ensuring an additional layer of security and control over the devices. Conversely, setting it toNoallows all users to recover their BitLocker key(s), enabling self-service access but potentially reducing security.

Figure 2.9: Device settings – BitLocker key(s)
Enterprise State Roaming
Enterprise State Roaming is a feature in Microsoft Entra ID that allows users to synchronize their application and system settings across their Windows devices. This means that when a user sets up a new Windows device, their familiar settings and preferences will be applied to the new device automatically. This feature is especially useful for organizations that provide employees with multiple Windows devices, or for users who switch between devices frequently. With Enterprise State Roaming, users can have a more seamless and consistent experience across all their Windows devices. The synchronization is achieved through Microsoft Entra ID, and all data is encrypted to ensure security and privacy.
This setting now has its own blade and can be accessed by clicking Enterprise State Roaming from the left menu of the Device blade, under the Manage context.
Selecting All will enable all users in your organization to take advantage of this feature, Selected allows you to specify users, and None will disallow all users from using the feature.

Figure 2.10: Enterprise State Roaming
You can read more about Enterprise State Roaming here: https://learn.microsoft.com/en-us/entra/identity/devices/enterprise-state-roaming-enable.
You now have a basic understanding of what Enterprise State Roaming is and the features and benefits it offers. Next, you will learn about device management settings.
Managing Device Settings
To manage the device settings from the Azure portal, you need to perform the following steps:
- Navigate to the Azure portal by opening https://portal.azure.com.
- From the left-hand hamburger menu or the main search bar, select
MicrosoftEntra ID. - From the left-hand menu, select
Devicesunder theManagecontext, as follows:
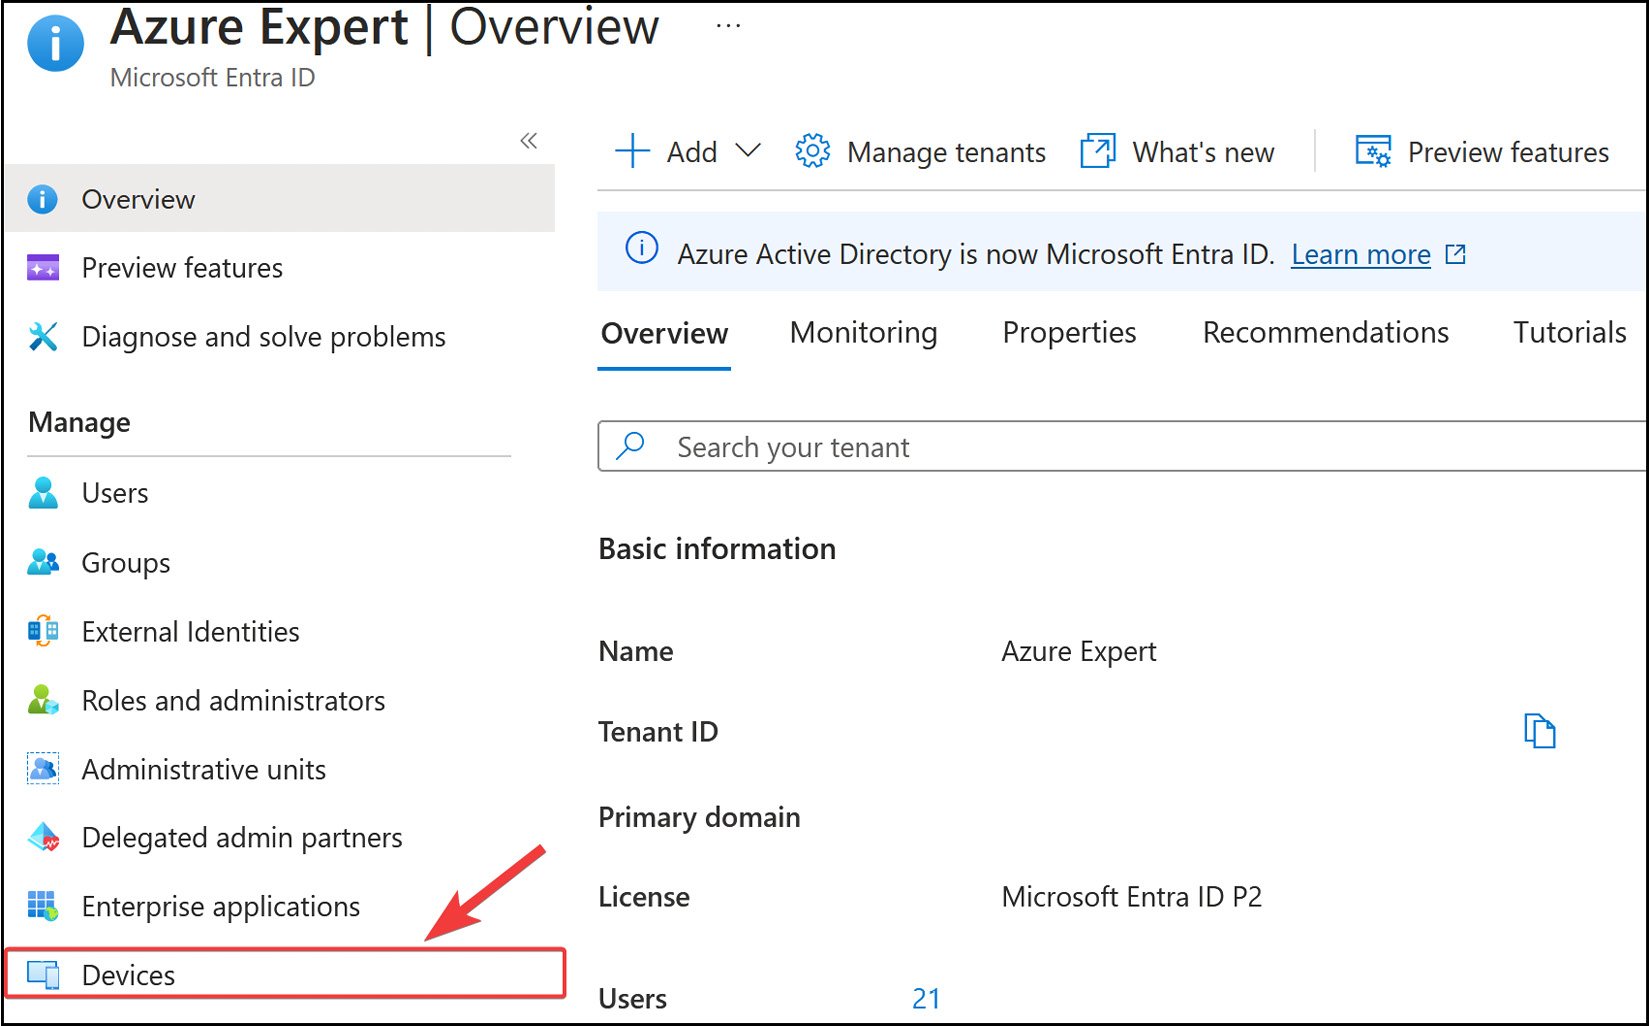
Figure 2.11: The Microsoft Entra ID Devices blade
- The device management blade will open. Here, you can configure your device management settings, locate your devices, perform device management tasks, and review the device management-related audit logs.
- To configure the device settings, select
Device settingsfrom the left-hand menu. From here, you can configure the following settings, which are shown in Figure 2.12:Users may join devices to MicrosoftEntra:AllRequire Multifactor Authentication to register or join devices with MicrosoftEntra:No
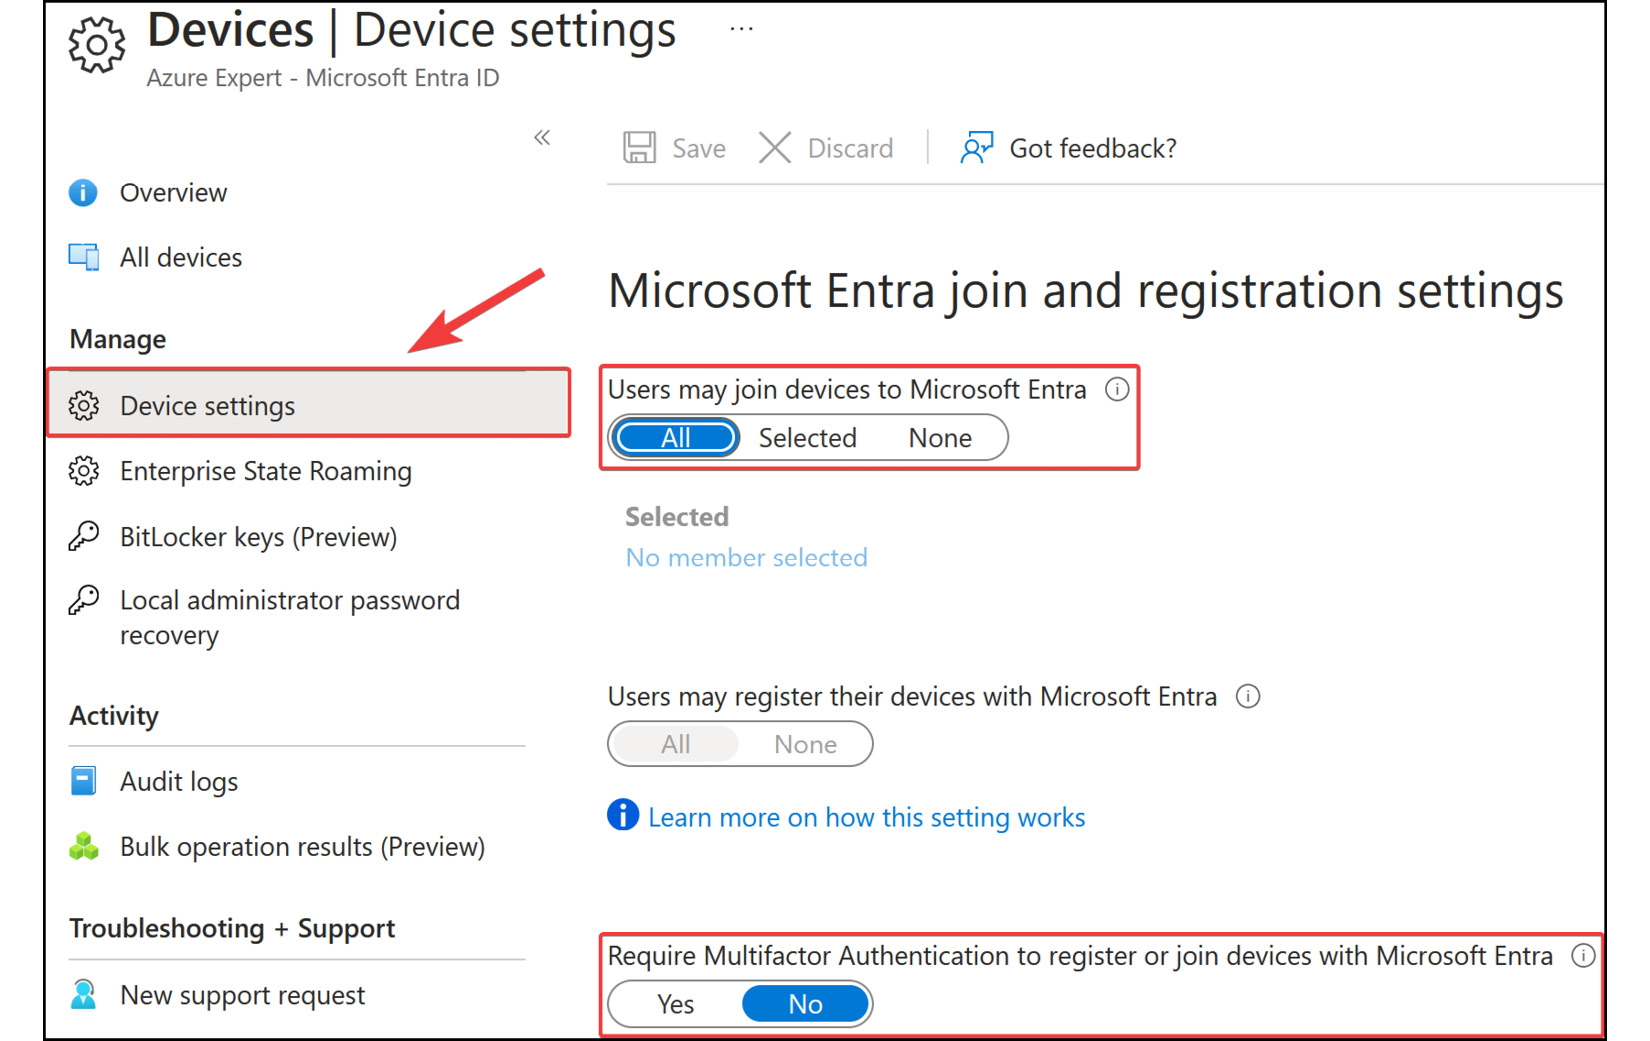
Figure 2.12: Microsoft Entra ID – the Device settings blade
- To locate your devices, select
All devicesfrom the left menu. In this pane, you will see all the joined and registered devices, as follows:
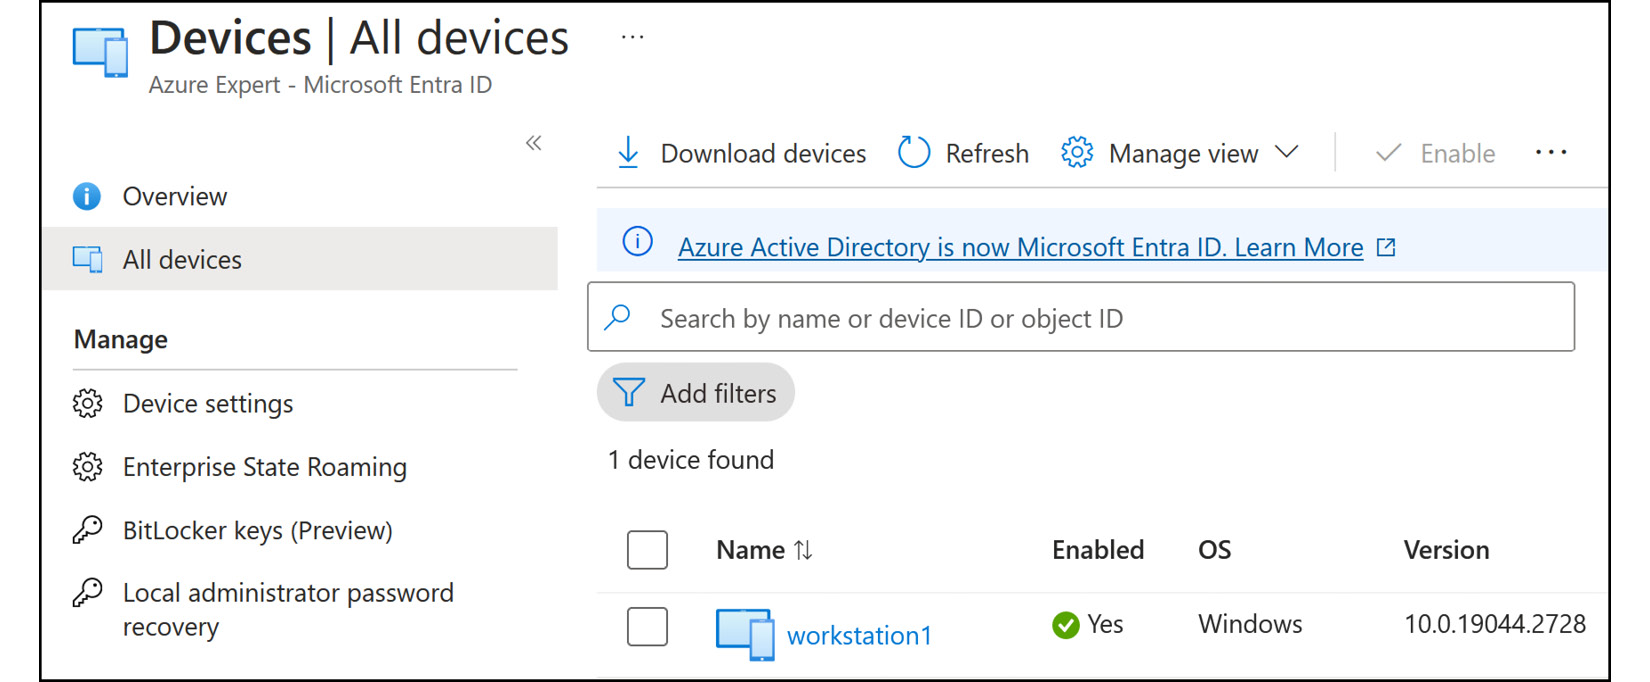
Figure 2.13: Microsoft Entra ID – All devices
- Additionally, you can select the different devices from the list to get more detailed information about a device. From here, global administrators and cloud device administrators can disable or delete the device:
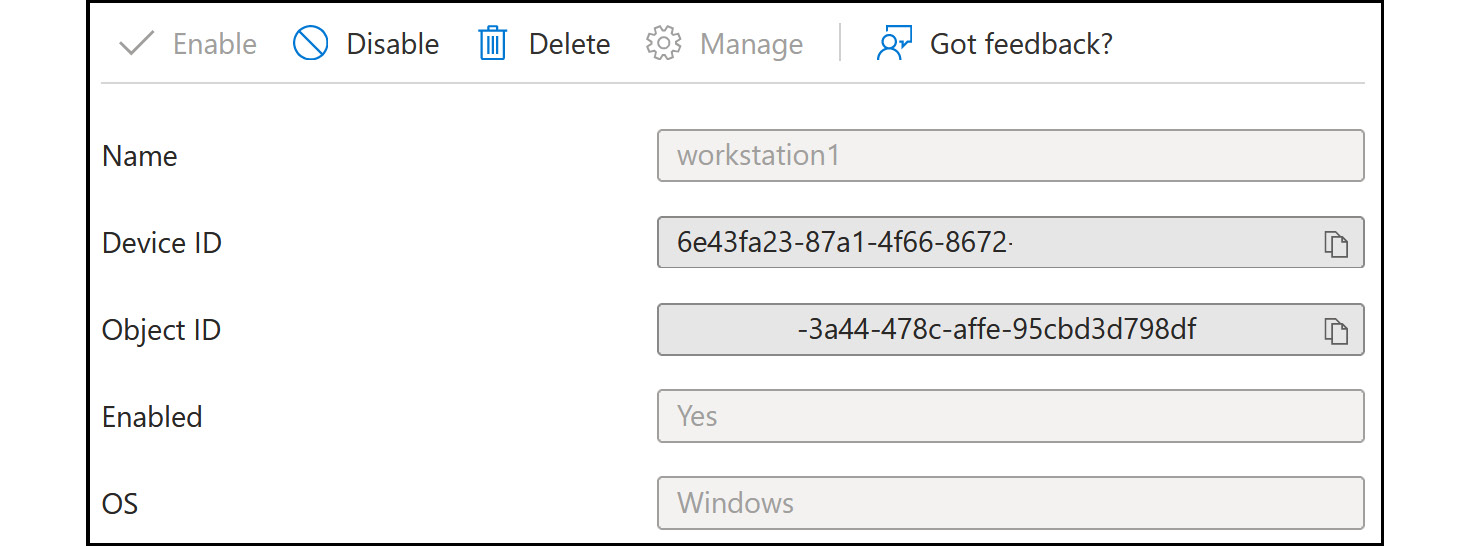
Figure 2.14: Microsoft Entra ID – workstation 1 details
You now have experience managing a device on Microsoft Entra. The next topic you will learn about is audit logs, under the Devices blade.
Device Audit Logs
The audit logs section under Devices in Microsoft Entra ID contains a record of all activities related to device management. Audit logs provide detailed information on events and actions performed within the system. These logs offer valuable insights for administrators looking to monitor security, troubleshoot issues, and maintain compliance.
Using device audit logs, administrators can track changes made to device properties, registration and deletion events, and other relevant activities performed by either the users or the system itself. Information stored in the logs typically includes event timestamps, target(s) (affected devices), user details, and the specific category of the activity and actions/changes made during an event. Microsoft Entra offers a user-friendly interface to view and analyze device audit logs, allowing administrators to filter and sort records based on specific criteria, such as event type or date range. This enables you to quickly identify and investigate suspicious activities or potential sources of issues within the device management environment.
By regularly reviewing and analyzing device audit logs, organizations can proactively detect anomalies and maintain regulatory compliance, thus ensuring a secure and efficient device management process within your Microsoft Entra ecosystem. Additionally, the audit logs can be exported to third-party security information and event management (SIEM) systems for further analysis and correlation with other security events. In this exercise, you will explore how to view audit logs in the Azure portal. Complete the following steps:
- To view audit logs, navigate to the
Devicesblade from Microsoft Entra ID. - From the left menu of the
Devicesblade, under theActivitycontext, selectAudit logs. This is where you can view and download the different log files for your devices. Additionally, you can create filters to search through the logs, as per the following example:
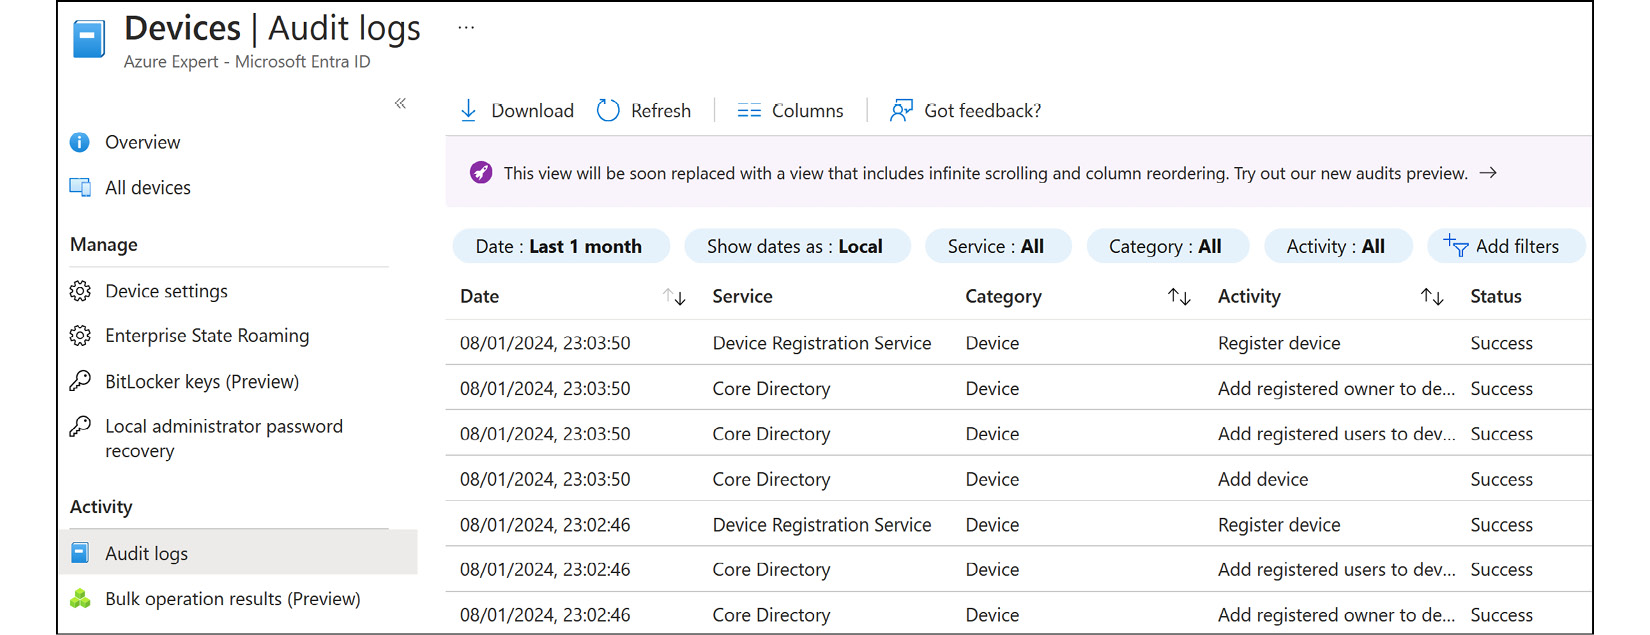
Figure 2.15: Microsoft Entra ID – the Audit logs blade
This concludes the section on how to manage your device settings via the Azure portal.
Note
You are encouraged to read up further by using the following links:
https://learn.microsoft.com/en-us/entra/identity/devices/manage-device-identities.
https://learn.microsoft.com/en-us/entra/identity/monitoring-health/howto-stream-logs-to-event-hub.
https://learn.microsoft.com/en-us/entra/architecture/security-operations-devices.
In the next section, you will explore the licensing options behind Microsoft Entra.
Licensing
Microsoft Entra offers a range of licensing options to meet your organizational requirements, whether small or large businesses. These licensing options determine which features and functionalities are available to users. Some of the key features of Microsoft Entra include SSO, MFA, and device management. In the following section, you will explore the different pricing plans available for Microsoft Entra and what each plan includes.
Microsoft Entra ID offers the following pricing plans:
- Microsoft Entra ID Free: This offers the most basic features, such as support for SSO across Azure, Microsoft 365, and other popular Software as a Service (SaaS) applications, Azure Business-to-Business (B2B) for external users, support for Microsoft Entra Connect synchronization, self-service password change, user and group management, and standard security reports.
- Microsoft Entra ID P1: Previously known as Azure Active Directory P1. In addition to the Free license features, this license offers a service-level agreement, advanced reporting, Conditional Access, Microsoft Entra Connect Health, advanced administration such as dynamic groups, self-service group management, and Microsoft Identity Manager.
- Microsoft Entra ID P2: Previously known as Azure Active Directory P2. In addition to the Free and Microsoft Entra ID P1 license features, the Microsoft Entra ID P2 license includes Identity Protection, Privileged Identity Management (PIM), access reviews, and entitlement management.
- Microsoft Entra ID Governance: For users of Microsoft Entra ID P1 and P2, Microsoft Entra ID Governance provides a sophisticated suite of identity governance features that can be added at a premium. These capabilities include automated user and group provisioning, HR-driven provisioning, terms of use attestation, basic and advanced access certifications and reviews, basic and advanced entitlement management, life cycle workflows, identity governance dashboard, and PIM.
- Microsoft Entra Verified ID: Microsoft Entra Verified ID is a license currently included free within any Microsoft Entra ID subscription, such as Microsoft Entra ID Free. This service enables organizations to verify and issue credentials based on unique identity attributes, granting individuals control over their digital credentials and improving visibility. The benefits of Verified ID include reduced organizational risk, simplified audit processes, and seamless integration for developers to create user-centric serverless applications. Organizations can enable Verified ID for free in the Microsoft Entra admin center.
- Microsoft Entra Permissions Management: This is a set of identity governance features tailored for Microsoft Entra ID P1 and P2 subscribers. These capabilities include automated user and group provisioning, HR-driven provisioning, terms of use attestation, basic and advanced access certifications and reviews, basic and advanced entitlement management, life cycle workflows, identity governance dashboard, and PIM.
- Microsoft Entra Workload ID: With the standalone Microsoft Entra Workload ID product, organizations can reduce risk exposure from compromised or lost identities or credentials, regulate workload identity access with adaptive policies, and obtain a thorough workload identity health-check view. The monthly pricing for Workload ID is based on the workload identity.
Note
For a detailed overview of the different Microsoft Entra licenses and all the features that are offered in each plan, refer to https://www.microsoft.com/en-us/security/business/microsoft-entra-pricing.
Now that you have a basic understanding of what Microsoft Entra ID is and the licensing models involved, you will learn how to implement a license.
Try/Buy License Products for Microsoft Entra
In this exercise, you are going to learn how to try or buy a license that can be associated with your Microsoft Entra instance. To do so, follow the following steps:
- Navigate to the Azure portal by opening a web browser and browsing to https://portal.azure.com.
- From the left-hand hamburger menu or the main search bar, select
MicrosoftEntra ID.

Figure 2.16: Selecting Microsoft Entra ID
- Click on the
Licensessetting under theManagecontext from the left menu.

Figure 2.17: Microsoft Entra ID – Licenses
- From the
Licensesblade on the left menu, selectAll products, and then clickTry / Buyfrom the blade screen that is presented.
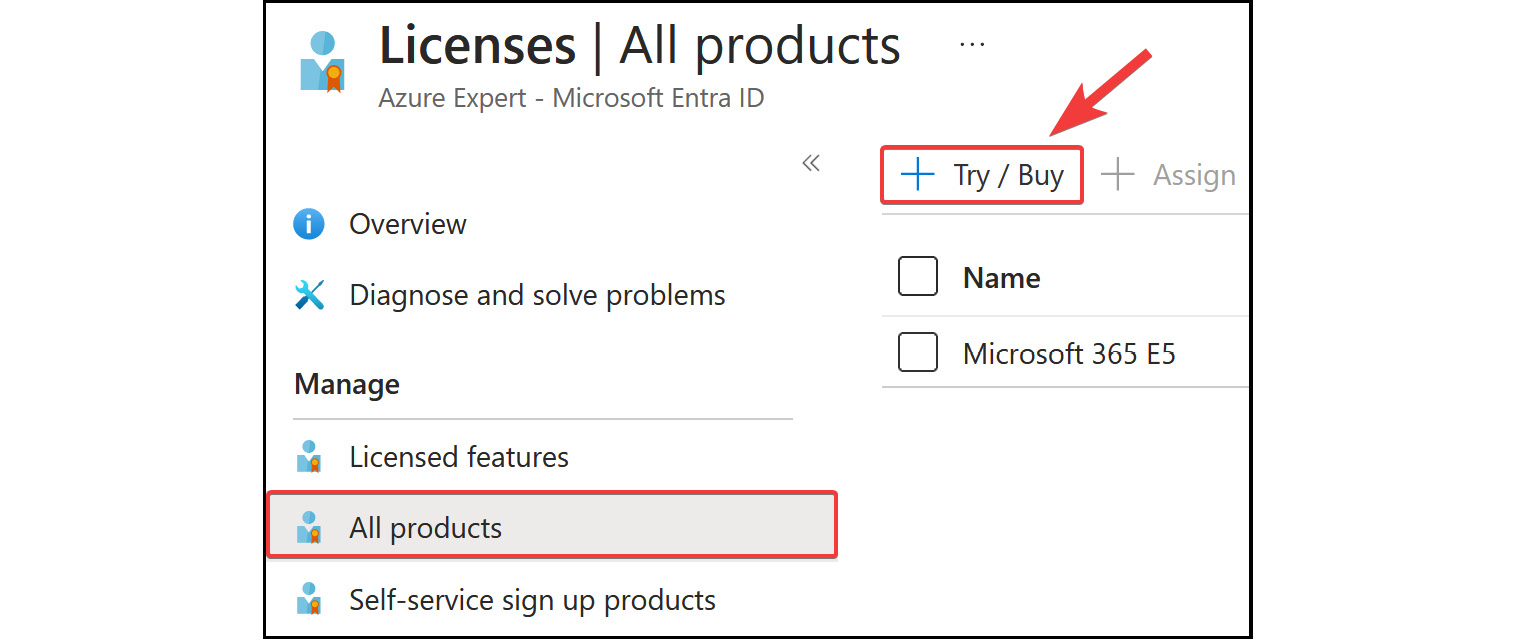
Figure 2.18: Microsoft Entra ID – Licenses | All products
- An
Activatepop-up screen will appear. To select a product for trial, you can click theFree trialdrop-down option and thenActivateto activate the license for the service offering you want to try, such as the following screenshot for Microsoft Entra ID P2.
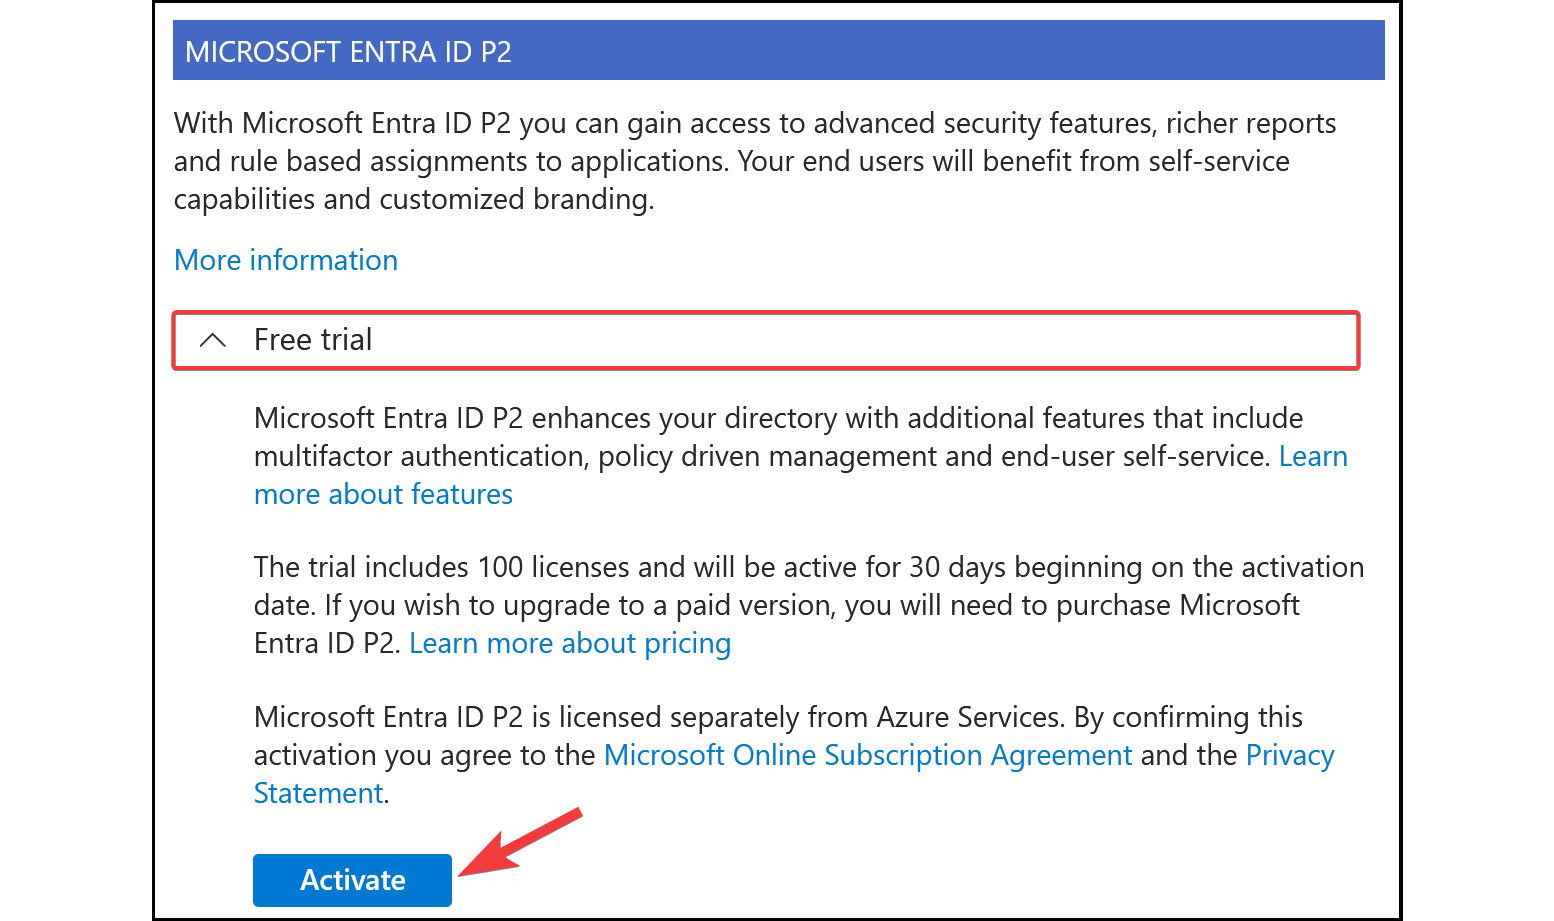
Figure 2.19: Microsoft Entra ID – activating a trial license
You have now seen how to try a licensed product using the Azure portal. Next, you will learn about assigning a license to one of your users or groups.
Assigning a License
In this exercise, you are going to assign an active licensed product to a user to demonstrate the assignment of licenses from within Microsoft Entra ID:
- Just as you did in the previous exercise, you will navigate back to the
All productssettings screen under theLicensesblade. - Select the license you are looking to assign; in this instance, we will assign the
Microsoft 365 E5 Developerlicense. Then, clickAssignfrom the top menu.
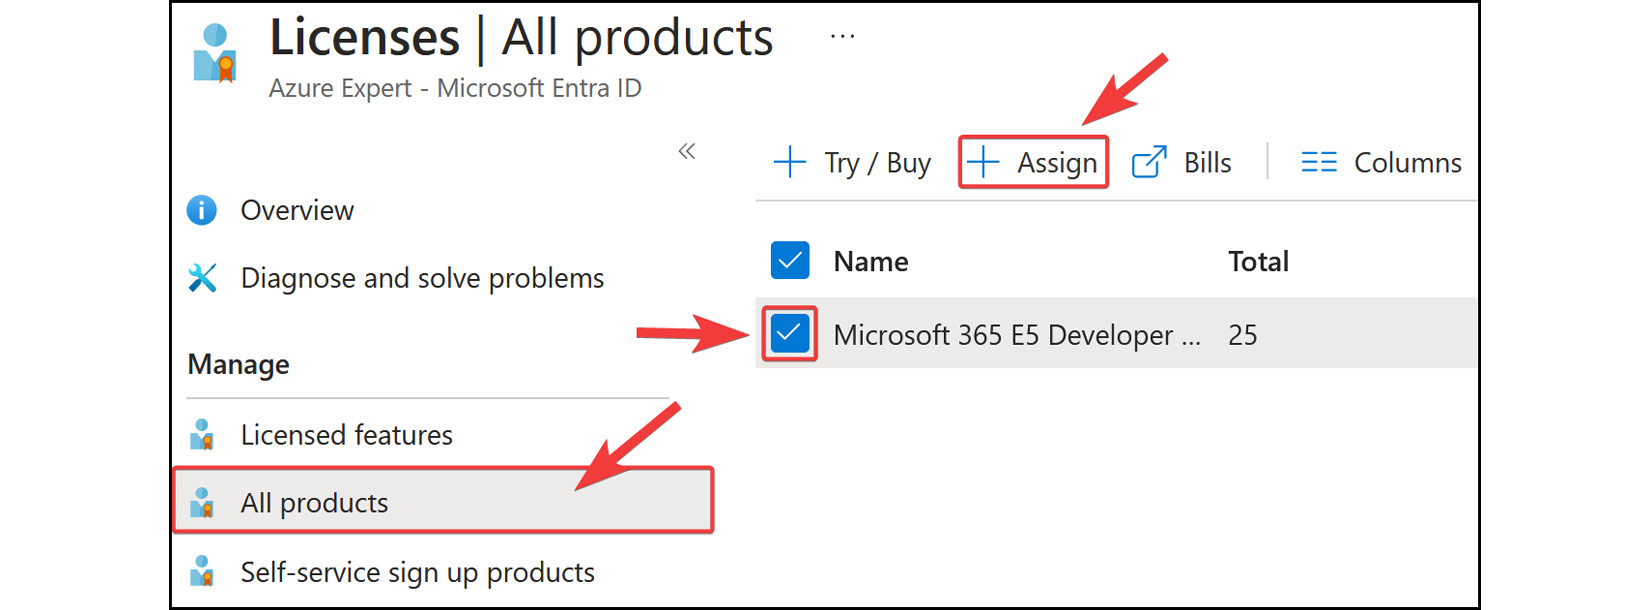
Figure 2.20: Microsoft Entra ID licensing – assigning a license
- Click
+ Add usersand groups.

Figure 2.21: Microsoft Entra ID licensing – Add users and groups
- From the screen that pops up, create a filter to search for the relevant name you are looking for – in this case,
Demo. SelectDemoUser1andDemoUser2.
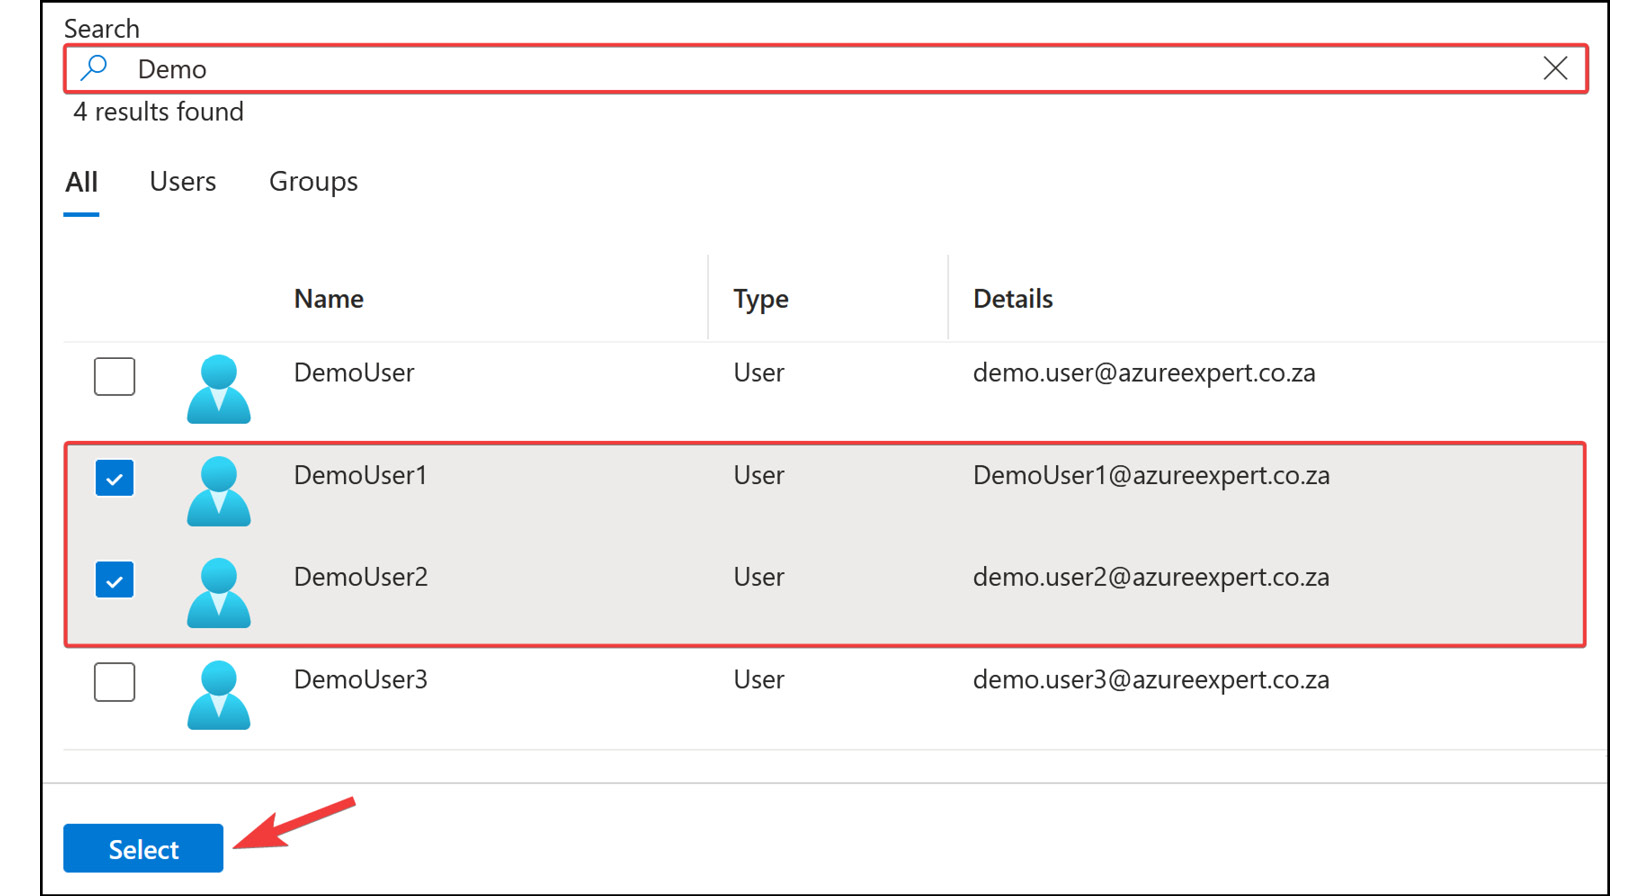
Figure 2.22: Microsoft Entra ID licensing – selecting users
- Once you have chosen your users, click
Select. - Click
Review + assign, and then, on the final screen, clickAssign.
You have now seen how to not only add product licenses but also assign them. Although there are several license types, the basic principles still apply, and the licenses are just as easy to assign. In the next section, we will look at what Microsoft Entra Join is and how to configure it for Windows 10 devices.


