Building metadata-enabled storage – SharePoint lists and libraries
SharePoint Online, included in Microsoft 365, provides the perfect platform for secure content management, collaboration, and communication through dedicated sites.
This platform is commonly used as a data source for Power Apps solutions since it provides Microsoft Lists. This feature allows you to build a table-like storage with rich metadata columns. It’s not comparable to a full-fledged relational database, but it’s simple to use and comes included on most Microsoft 365 licenses. Please refer to Chapter 4, Choosing the Right Data Source for Your Applications, where we will perform a data source performance comparison, including SharePoint.
It also provides document libraries, which are file containers that inherit the same capabilities as Microsoft Lists, enhancing categorization and organization of the file storage, which helps improve business processes.
Getting ready
Since we are using SharePoint as our data source, there are no additional requirements besides a regular Microsoft 365 license. We will create a document library with some metadata columns to improve the library’s categorization.
Player documents
Here are the metadata columns to be added to the document library:
|
Type |
Name |
|
Choice: Photo ID, Medical certificate, Enrollment form |
Document type |
|
Date and time |
Expiration date |
|
Yes/No |
Requires signature |
Table 1.2: Library columns
How to do it…
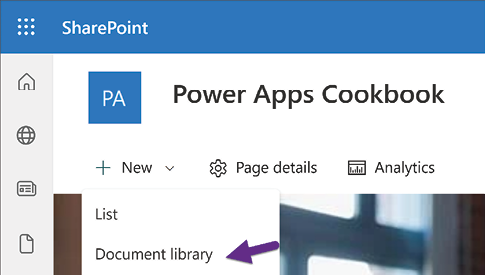
- Go to the SharePoint site, which will hold the document library. On the main site page, click on New | Document library, as seen in the following screenshot:

Figure 1.3: Document library creation
This action will open a dialog with options to create the library. Click Blank library and then enter the name and description of the library. Enter Player documents for the name, leave the rest as default, and click Create.
Whether creating lists or document libraries, the platform will try to help you when designing them. Providing options such as From existing list/library, From Excel/CSV will allow you to speed up the creation process.
Templates is another capability that provides metadata examples gathered from many business scenarios.
- Once the library opens, click on the + Add column link at the end of the column header, as seen in the following screenshot:

Figure 1.4: The + Add column option
- Select the Choice data type from the open dialog and click Next. Enter
Document typefor Name and click each of the choice examples to replace them forPhoto ID,Medical certificate, andEnrollment form. Once completed, click Save. - Repeat Step 2 to add another column. Select Date and time and click Next. Enter
Expiration datefor the Name and leave the rest as default. Click Save to finish. - Again, repeat Step 2 to add the last column. Select Yes/No and click Next. Enter
Requires signaturefor the Name and click Save to complete the process. - Back in the document library, reorder the columns as you see fit by dragging them. You can also hide columns by clicking on a particular column and selecting Columns settings | Show/hide columns.
- Add files to the library by selecting Upload | Files from the toolbar or by dragging them. Once the upload is complete, click Edit in grid view to update the file’s metadata in bulk, like when working with an Excel spreadsheet. Click on Exit grid view when finished.
How it works…
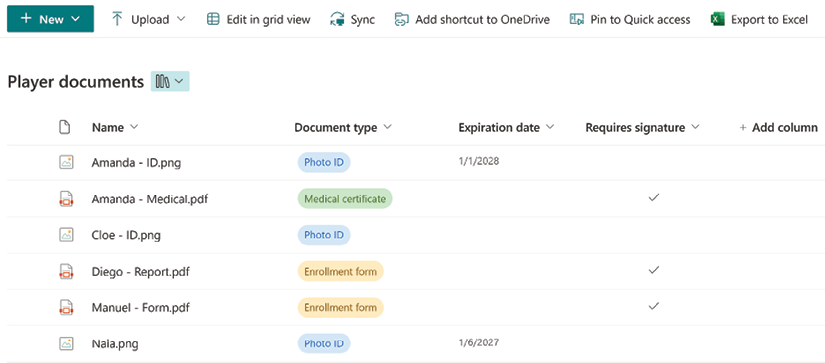
The document library creation process is now complete. If you upload some files, your library should look like the one in the following figure:

Figure 1.5: Player documents library


