Setting up a cloud data source – Azure SQL Database
Azure SQL is a suite of SQL database services on the Azure cloud. It offers automated backups, high availability, and advanced security, making it ideal for traditional SQL database needs with cloud scalability and integration.
While Azure SQL provides extensive control for database management, Dataverse offers a higher level of abstraction for faster and easier development. Depending on the needs of your project, sometimes having granular control of your database is a must.
This recipe will help you build an Azure SQL database that might be needed for an app.
Getting ready
To start working with Azure SQL databases, you will need an Azure subscription. You can request a free version with credit for 30 days to test all the services available on this cloud platform. Apply for it at https://azure.microsoft.com/en-us/free.
How to do it…
- Go to the Azure portal at https://portal.azure.com and click Create a resource. This action will take you to Azure Marketplace. Using the search field, enter
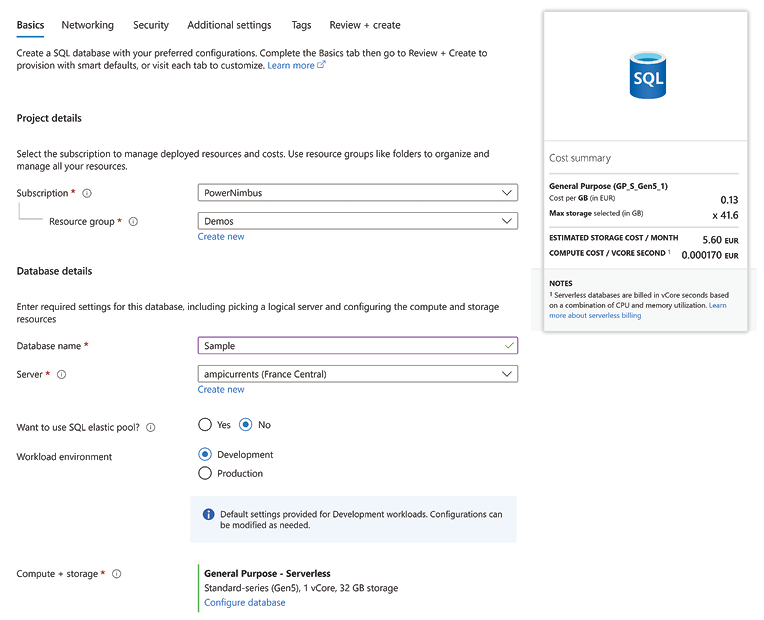
SQL Databaseand hit Enter. - From the list of services, select SQL Database and then click Create. This action will open the Create SQL Database page, as seen in the following screenshot:

Figure 1.9: Creating an SQL database from the Azure portal
- Select your subscription and a resource group (create a new resource group if necessary). Enter the database name in the Database name field and select a server.
If you don’t have an existing server, click the Create new link below the servers list and enter the required information: a server name and a location close to you for better response times. Leave the default Use Microsoft Entra-only authentication as the Authentication method and click Set admin to look for one user, group, or enterprise application to act as the database administrator. After choosing one, click Select and then OK to create the server.
- Select No for the elastic pool setting and choose Development for the Workload environment setting. Click Configure database on the Compute + storage section, change the Service tier to Basic (For less demanding workloads), and click Apply. The Estimated storage cost/month in the Cost summary section on the right should be around USD 5.
- Select Locally-redundant backup storage in the Backup storage redundancy section.
- Go to the Networking tab and select Yes to Add current client IP address.
- Click the Additional settings tab and select Sample from the Use existing data section. Click OK on the dialog that appears.
- Select the Review + create tab and then click on Create. This action will start the provisioning of the database.
How it works…
Once the provisioning process is completed, you will be able to access your database.
You can use Azure Data Studio at https://learn.microsoft.com/en-us/azure-data-studio/download-azure-data-studio or the Azure portal itself.
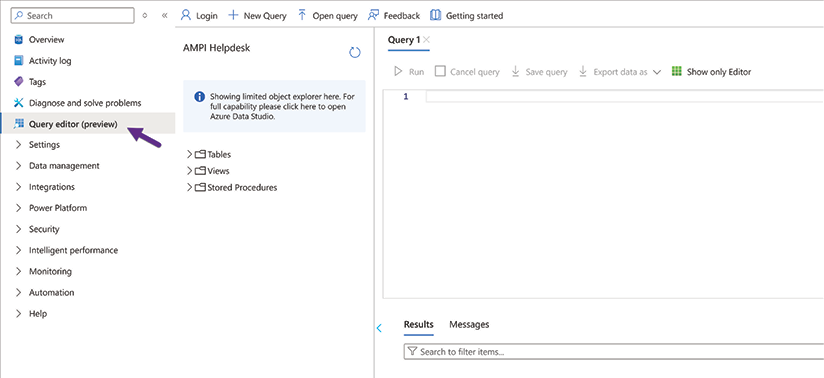
Accessing it through the portal is straightforward as you don’t need to install any software. Just navigate to your database, and from the left pane, click Query editor (preview) and select Continue as <your username> from the Microsoft Entra authentication section.
After authentication, you will be able to interact with the database, as seen in the following figure:

Figure 1.10: Query editor from the Azure portal
This editor will allow you to run scripts from the Query tab or upload scripts using the Open query option from the toolbar.
Join our community on Discord
Join our community’s Discord space for discussions with the authors and other readers:


