Where can I buy a Raspberry Pi?
Element14 and RS Components are the most common distributors of the Raspberry Pi in the United States. The Raspberry Pi model A was roughly priced at 25 USD, while its successor model A+ was priced at 20 USD. The model B was priced at 35 USD and the model B+ is priced at 40 USD. There are also an ever increasing number of local distributors such as Adafruit and Fry's Electronics in the US that sell the Raspberry Pi for a margin. Please check the Raspberry Pi Foundation website and other sources for more vendors.
Requirements to get started with the Raspberry Pi
In this section, we will discuss the items required to get started with the Raspberry Pi. We will need all the same things that are required to use a computer/laptop. They are:
- Display
- Keyboard
- Mouse
- Wi-Fi Adapter / Ethernet cable
Note
It is possible to use the Raspberry Pi via remote login using a secure shell. This might seem difficult to those who are new to the Linux environment. The setup of the Raspberry Pi for remote login is explained in Project 13, Tips and Tricks.
The Raspberry Pi eLinux wiki (http://elinux.org/RPi_Hub) has listed peripherals that have been tested and confirmed to have worked on the Raspberry Pi. You have the freedom to choose peripherals according to your choice.
- Display: The Raspberry Pi is provided with an HDMI output and an RCA output. It is possible to connect a monitor that has an HDMI input. It is also possible to connect monitors that have a DVI input with an HDMI to the DVI cable.
- Power supply: Since the Raspberry Pi consumes 700 mA for its operation, it is recommended that the reader uses powered USB hubs to use devices such as Wi-Fi adapters as opposed to plugging in devices such as the Wi-Fi adapters directly to the USB port of the Raspberry Pi to avoid the device resetting itself.
Operating systems on the Raspberry Pi
The Raspberry Pi foundation recommends the following operating systems on the Raspberry Pi. They are:
- Raspbian
- Arch Linux ARM
- RISC OS
You are welcome to choose any operating system of your choice. For beginners, we strongly recommend the Raspbian OS for projects. The Raspbian is equipped with tools to get started easily. The Raspberry Pi's firmware is implemented such that the operating system is loaded from an SD card.
Getting started with Raspbian
In this section, we will download an image from the Raspberry Pi Foundation's webpage to a computer, flash an SD card with the image, and set up the operating system on the Raspberry Pi. We will also try to write and execute our first example.
Downloading Raspbian
The latest Raspbian image is hosted on the Raspberry Pi Foundation's webpage (http://www.raspberrypi.org/downloads/). The latest image at the time of writing this book was Raspbian wheezy. We need to download the image and extract it to the folder of our choice.

Raspbian wheezy on the Raspberry Pi Foundation's website
Flashing image on to the SD card
We will discuss flashing the SD card with the Raspbian image on both Windows and Linux machines.
Windows
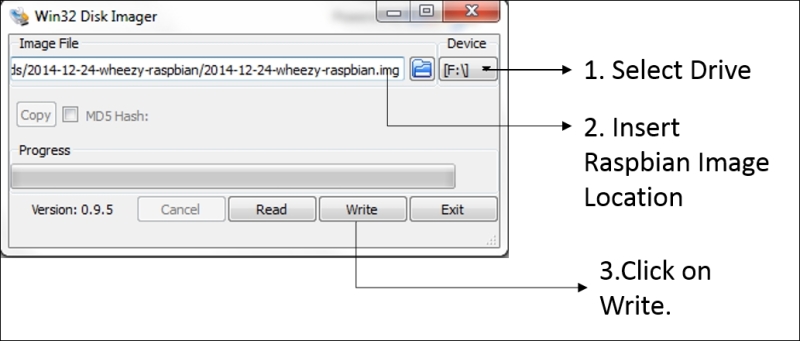
Extract the files to a location of your choice. The Win32DiskImager tool is required to prepare the SD card with the Raspbian image.
Tip
A standard Raspbian image is about 1.8 GB big. It is strongly recommended that you use an SD card that is at least of 4 GB big.

The Win32DiskImager tool
We can flash the SD card in three simple steps (as shown in the preceding screenshot):
- Select the SD card that needs to be flashed.
- Select the Raspbian image location.
- Click on Write.
- Click on Yes to confirm.

Confirm overwriting the SD card
- It can take a while before the write cycle is completed.

Linux
There are two identical methods to flash an SD card on a Linux machine. The two approaches include:
- A GUI-based approach
- A command-line interface-based approach
A command-line interface-based approach
The SD card can be flashed in three simple steps using a command-line interface. These steps are as follows:
- Identify the SD card mount point.
- Unmount the SD card.
- Flash the SD card.
Identifying the SD card mount point
As soon as we insert the SD card into a USB card reader or an SD card slot found on a laptop, we need to open a terminal on our Linux machine. We need to identify our device's mount point on the machine using the following command:
df –h
The devices enumerated on the machine will be listed as shown in the following screenshot:

Storage devices identified by the operating system
Unmount the SD card
In the previous example, the /dev/sdb5 path is the storage device of interest. There may be more than one storage device that might be connected to a machine. We need to make sure that we have identified the right device. Once we have identified the device, it has to be unmounted using the following command:
umount /dev/sdb
Flash the SD card
Now, we will flash our SD card using the following command:
dd bs=4M if=~/2012-09-18-wheezy-raspbian.img of=/dev/sdb
The if= argument points to the location of the image and of= refers to the SD card mount point. The write operation takes a while to complete and it is ready for use on the Raspberry Pi upon completion.
GUI-based approach
On a Debian Linux-based operating system, there is a package called usb-imagewriter. The
ImageWriter package performs the same operations required to flash an SD card.

A USB ImageWriter on Ubuntu
Setting up the Raspberry Pi
Now that the image is flashed, let's get started with setting up the Raspberry Pi for the first time. We will have to insert the SD card slot found on the other side of the Raspberry Pi.

A flashed SD card in the slot
When the keyboard and the mouse are connected, we can get started by powering up the Raspberry Pi!
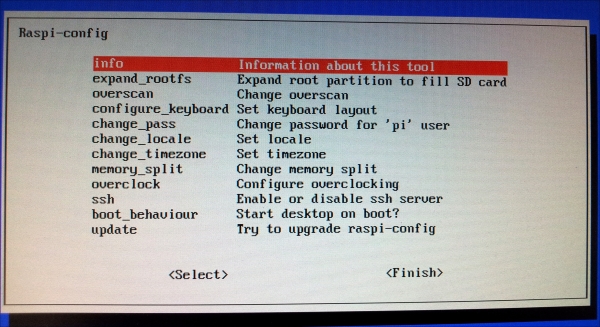
Once the Raspberry Pi is powered up, the operating system boots up to Raspi-config. The raspi-config is the tool used to set up desktop options, keyboard settings, storage settings, and so on. The Raspi-config screen is shown in the following screenshot:

The Raspi-config screen
In this section, we will discuss each feature of the raspi-config tool:
info: As the name suggests, this section gives the general information about the tool.expand_rootfs: While the SD card is flashed with the operating system image, the SD card is partitioned just about the size of the image. This command aids to expand the partition so that the remaining space can be used for file storage.overscan: This is an option used when the Raspberry Pi is connected to the television.configure_keyboard: This option is used to configure thechange_typeoption of the keyboard.change_pass: The default password is raspberry, and if necessary, this option lets you switch to a stronger password.change_locale: The option lets you change the language preferences.change_timezone: We can set our current time zone using this option.memory_split: This option lets us split the memory between the ARM processor's CPU and the graphics processor.overclock: The default clock speed is 700 MHz. This option lets you set the clock speed to 1 GHz. This might vary for Raspberry Pi 2.ssh: This option enables the secure shell server. This is required to remotely log in the Raspberry Pi and control devices remotely. It is enabled by default on Raspbian.boot_behaviour: This option enables you to boot directly into the desktop.Tip
It is important that you enable this option on as the default option boots into a normal text-based console.
update: If the Raspberry Pi is connected to the Internet using an Ethernet cable, theraspi-configtool downloads any package that might be available.
Once we complete the setup process by selecting Finish, the Raspberry Pi reboots and expands the filesystem if necessary.


