Search icon CANCEL
Subscription
0
Cart icon
Your Cart (0 item)
Close icon
You have no products in your basket yet
Save more on your purchases! discount-offer-chevron-icon
Savings automatically calculated. No voucher code required.
Arrow left icon
Explore Products
Best Sellers
New Releases
Books
Videos
Audiobooks
Learning Hub
Free Learning
Arrow right icon
Arrow up icon
GO TO TOP
Lumion3D Best Practices

You're reading from   Lumion3D Best Practices Explore the best practices to build architectural visualizations efficiently in Lumion 3D

Arrow left icon
Product type Paperback
Published in Jun 2015
Publisher
ISBN-13 9781783550852
Length 166 pages
Edition 1st Edition
Concepts
Arrow right icon
Author (1):
Arrow left icon
Ciro Cardoso Ciro Cardoso
Author Profile Icon Ciro Cardoso
Ciro Cardoso
Arrow right icon
View More author details
Toc

Table of Contents (11) Chapters Close

Preface 1. Getting Ready with Lumion 3D FREE CHAPTER 2. Importing and Handling 3D Models 3. Creating an Interior Scene with Lumion 4. Creating an Exterior Scene with Lumion 5. Working with Physically Based Materials 6. Animation Techniques in Lumion 7. Producing a Still Image with Lumion 8. Producing a Movie with Lumion 9. Exporting and Post Production Index

Curved paths with the Advanced move effect


Don't let the name of this effect deceive you. The difference between the Move effect and the Advanced move effect is that, with the latter, you can use keyframes to create more complex animations, as shown in the following screenshot:
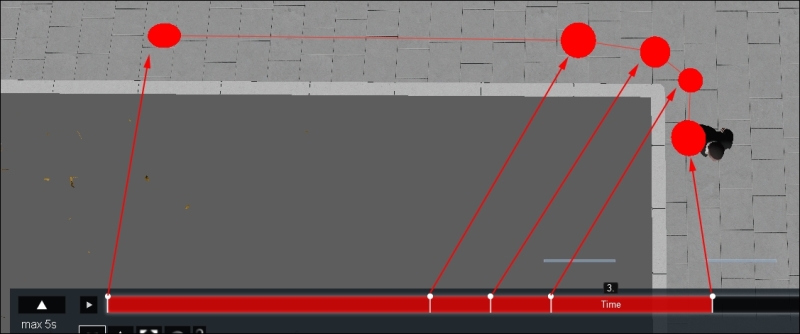
Although the effect seems great, what is the best way to use it? Have a look at the following list:

  • Start by creating a keyframe for the initial position, move the time bar to the end and create another keyframe by simply moving the 3D model to the desired position.

  • The time bar represents the length of your clip, so use this to avoid creating an animation that ends in a loop.

  • Add a third keyframe where you want the 3D model to change direction.

  • As shown in the previous screenshot, keep adding additional keyframes to create a smooth turn.

  • Use the Time offset if you want to delay the animation in relation to the clip. This is a great way to avoid that look when the animation starts exactly with the clip. A few seconds of...

lock icon The rest of the chapter is locked
Register for a free Packt account to unlock a world of extra content!
A free Packt account unlocks extra newsletters, articles, discounted offers, and much more. Start advancing your knowledge today.
Unlock this book and the full library FREE for 7 days
Get unlimited access to 7000+ expert-authored eBooks and videos courses covering every tech area you can think of
Renews at $19.99/month. Cancel anytime
Banner background image