WebRTC through WebSocket signaling servers
Signaling is a crucial activity to establish any kind of network-based communication. It lets the endpoints share the session description and media information before setting up the path to actually exchange media. For a simple WebRTC client, there are JavaScript-based WebSocket servers that can provide such signaling in a permanent, full duplex, real-time manner. Node.js is one such server.
Node.js
Node.js is an asynchronous, server-side JavaScript server powered by Chrome's V8 JS engine. There are many WebSocket libraries, such as Socket.io and SockJS, that can run over it. Why are they used? They are used because the WebSocket server will do the WebSocket signaling between WebRTC clients and the server without using other protocols such as XMPP or SIP.
Let's see how we can use Node.js signaling server through the following simple steps:
- On a Windows machine, install
nodejs.exefrom the official download site, http://www.nodejs.org. - To check whether Node.js is properly installed and working, check the version using the following command lines
node -vThe output in my case is
v0.10.26. - Open the command prompt, and type
node <name of the JS file>in the window. Consider the following command line as an example:node signaler.js
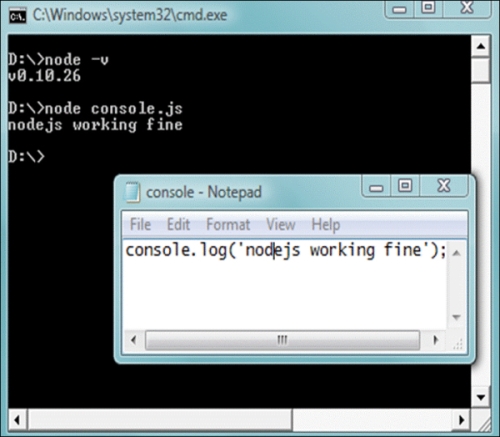
To write and run a simple server-side program, open Notepad, make a sample JS file with a name, say, console, and add some content to the console.log('node.js running fine') file. Run this file using the following Node.js command from the command prompt:
node console.js
The following screenshot shows the output of the preceding command line:

Let's now look at the overview of steps using Node.js to set up the signaling environment for a WebRTC client.
- First, we need a JavaScript library to support WebRTC signaling operations. We can use
signaller.jsfor this. Downloadsignaller.jsfrom https://github.com/muaz-khan/WebRTC-Experiment/blob/master/websocket-over-nodejs/signaler.js. - Next, we should run the JavaScript library using the Node.js server. We can do so by executing the following command in the terminal window:
node signaler.js - Specify the address of the Node.js server machine in the WebRTC client.
Now, we can make inter-browser WebRTC audio/video calls, where the signaling is handled by the Node.js WebSocket signaling server. The following diagram depicts how Node.js is used as a signaling server:

The preceding diagram denotes signaling across WebRTC clients over the Node.js WebSocket-based server. The media flows from peer to peer.
Making a peer-to-peer audio call using Node.js for signaling
We have seen how a JavaScript program is hosted on a Node.js signaling server. Now, let's study the process of making an audio/video call using this setup. The following code references Muaz Khan WebRTC experiments, which is under the MIT license. The library used is PeerConnection.js. The following are the CSS descriptions for the audio and video content on a page:
audio, video {
  vertical-align: top;
}
.setup {
  border-bottom-left-radius: 0;
  border-top-left-radius: 0;
  margin-left: -9px;
  margin-top: 8px;
  position: absolute;
}
.highlight { color: rgb(0, 8, 189); }
Next, we will look at the JavaScript functions that define the behavior of the WebRTC client. This is a modified version of code from one-to-one-peerconnection.html under the WebRTC experiments master from Muaz Khan. For better clarity and easy understanding, I have removed the functions of unique ID, rotate video, and scale video, and have minimal CSS styling.
The following code defines the websocket.onopen and websocket.send operations:
var channel = location.href.replace( /\/|:|#|%|\.|\[|\]/g, '');
var websocket = new WebSocket('ws://' + document.domain + ':12034');
websocket.onopen = function() {
  websocket.push(JSON.stringify({
    open: true, channel: channel
  }));
};
websocket.push = websocket.send;
websocket.send = function(data) {
  websocket.push(JSON.stringify({
    data: data, channel: channel
  }));
};
The following code is for the creation of a new peer connection and for every user who joins a session:
  var peer = new PeerConnection(websocket);
  peer.onUserFound = function(userid) {

    if (document.getElementById(userid)) return;

    /* adding the name of room to room list */
    var tr = document.createElement('tr');
    var td1 = document.createElement('td');
    var td2 = document.createElement('td');
    td1.innerHTML = userid + ' video call';

    /* creating element button to room list */
    var button = document.createElement('button');
    button.innerHTML = 'Join';
    button.id = userid;
    button.style.float = 'right';

    /* add the user to session on button click */
    button.onclick = function() {
      button = this;
      getUserMedia(function(stream) {
      // get user media
      peer.addStream(stream);
      // add the stream

      peer.sendParticipationRequest(button.id);
      });
      button.disabled = true;
    };

    td2.appendChild(button);
    tr.appendChild(td1);
    tr.appendChild(td2);
    roomsList.appendChild(tr);
  };
The following code adds streaming to the video element of HTML and sets its characteristics:
    peer.onStreamAdded = function(e) {
      if (e.type == 'local')
        document.querySelector('#start-broadcasting').disabled = false;
      var video = e.mediaElement;
      video.setAttribute('width', 400);
      video.setAttribute('height', 400);
      video.setAttribute('controls', true);
      videosContainer.insertBefore(video, videosContainer.firstChild);
      video.play();
    };
The following code is to close the streaming session:
    peer.onStreamEnded = function(e) {
    var video = e.mediaElement;
    if (video) {
      video.style.opacity = 0;
      setTimeout(function() {
        video.parentNode.removeChild(video);
        scaleVideos();
      }, 1000);
    }
  };

  document.querySelector('#start-broadcasting').onclick = function() {
    this.disabled = true;
    getUserMedia(function(stream) {
    peer.addStream(stream);
    peer.startBroadcasting();
    });
  };
  document.querySelector('#your-name').onchange = function() {
    peer.userid = this.value;
  };

  var videosContainer = document.getElementById('videos-container') || document.body;
  var btnSetupNewRoom = document.getElementById('setup-new-room');
  var roomsList = document.getElementById('rooms-list');

  if (btnSetupNewRoom) btnSetupNewRoom.onclick = setupNewRoomButtonClickHandler;
The following code is to capture the user media:
  function getUserMedia(callback) {
    var hints = {
      audio: true,
      video: {
        optional: [],
        mandatory: {
          minWidth: 200, minHeight:200, maxWidth: 400, maxHeight: 400, minAspectRatio: 1.77
        }
      }
    };
    navigator.getUserMedia(hints, function(stream) {
      var video = document.createElement('video');
      video.src = URL.createObjectURL(stream);
      video.controls = true;
      video.muted = true;
      peer.onStreamAdded({
        mediaElement: video,
        userid: 'self',
        stream: stream
      });
      callback(stream);
  });
}
The following is the web page's HTML content to add a button to start transmitting the media, a video element to display the media, a text field to add a user's name, and a table to list the existing available sessions:
<input type="text" id="your-name" placeholder="your-name">
<button id="start-broadcasting" class="setup">
Start Transmitting Yourself!</button>

<!-- list of all available conferencing rooms -->
<table id="rooms-list" style="width: 100%;"></table>

<!-- local/remote videos container -->
<div id="videos-container"></div>
The following screenshot depicts a user, Alice, creating a new session named alice. Here, the user Alice creates a session for broadcasting video, which will be added to the room list.

Alice's media is streamed on the session space, as shown in the next screenshot:

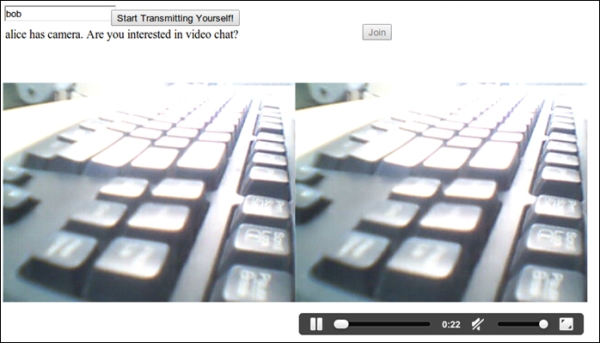
A new user, Bob, views the list of ongoing sessions from his remote computer, and clicks on the Join button, as shown in the following screenshot, to join Alice's session:

The following screenshot displays a two-way audio and video session in progress between Bob and Alice:

Bob and Alice are in an audio/video sharing session. Using other WebRTC APIs, we can also add file sharing, text chat, screen sharing capabilities, and so on to this simple demonstration to turn it into a multifeatured communication tool.


