Search icon CANCEL
Subscription
0
Cart icon
Your Cart (0 item)
Close icon
You have no products in your basket yet
Arrow left icon
Explore Products
Best Sellers
New Releases
Books
Videos
Audiobooks
Learning Hub
Free Learning
Arrow right icon
Arrow up icon
GO TO TOP
Blender 3D Incredible Machines

You're reading from   Blender 3D Incredible Machines Design, model, and texture complex mechanical objects in Blender

Arrow left icon
Product type Paperback
Published in Feb 2016
Publisher
ISBN-13 9781785282010
Length 392 pages
Edition 1st Edition
Tools
Arrow right icon
Authors (2):
Arrow left icon
Allan Brito Allan Brito
Author Profile Icon Allan Brito
Allan Brito
Christopher Kuhn Christopher Kuhn
Author Profile Icon Christopher Kuhn
Christopher Kuhn
Arrow right icon
View More author details
Toc

Table of Contents (11) Chapters Close

Preface 1. Sci-Fi Pistol - Creating the Basic Shapes 2. Sci-Fi Pistol - Adding Details FREE CHAPTER 3. Texturing and Rendering Your Sci-Fi Pistol 4. Spacecraft – Creating the Basic Shapes 5. Spacecraft - Adding Details 6. Spacecraft – Materials, Textures, and Rendering 7. Modeling Your Freestyle Robot 8. Robot - Freestyle Rendering 9. Low-Poly Racer – Building the Mesh 10. Low-Poly Racer – Materials and Textures

Adding decals with UV maps


Next, let's add a few decals. Most large vehicles tend to have words, symbols, or logos on them. We can do this easily using UV maps.

Note

UV mapping tells Blender how to apply a two-dimensional image to three-dimensional objects.

Later in the book, we'll use UV mapping to unwrap and texture an entire model, and we'll look at the different settings and options. In this case, however, we're just using it selectively to apply a few decals to the model.

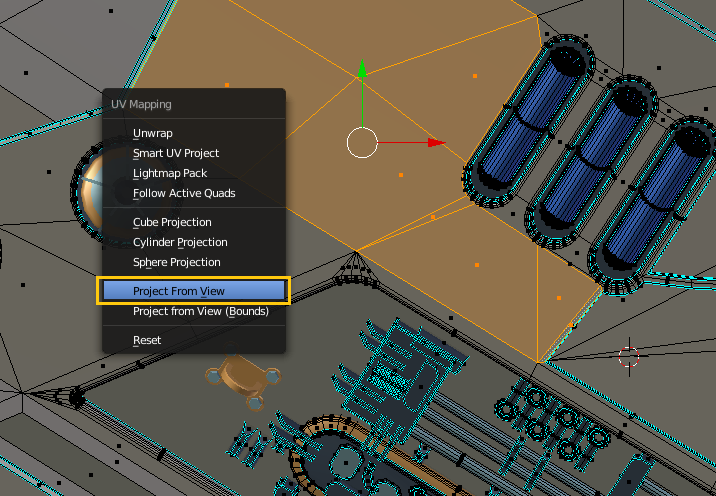
We can pick an area of the ship where we'd like to have writing or a decal. The easiest way to unwrap areas for decal use is to line up the faces so that they're roughly flat in the 3D viewport (you can also use Shift7 to precisely align the view to your faces). Then, you can press U to bring up the Unwrap menu; select Project from View:
In the UV/Image Editor, you can now align those faces with an image of your choice:
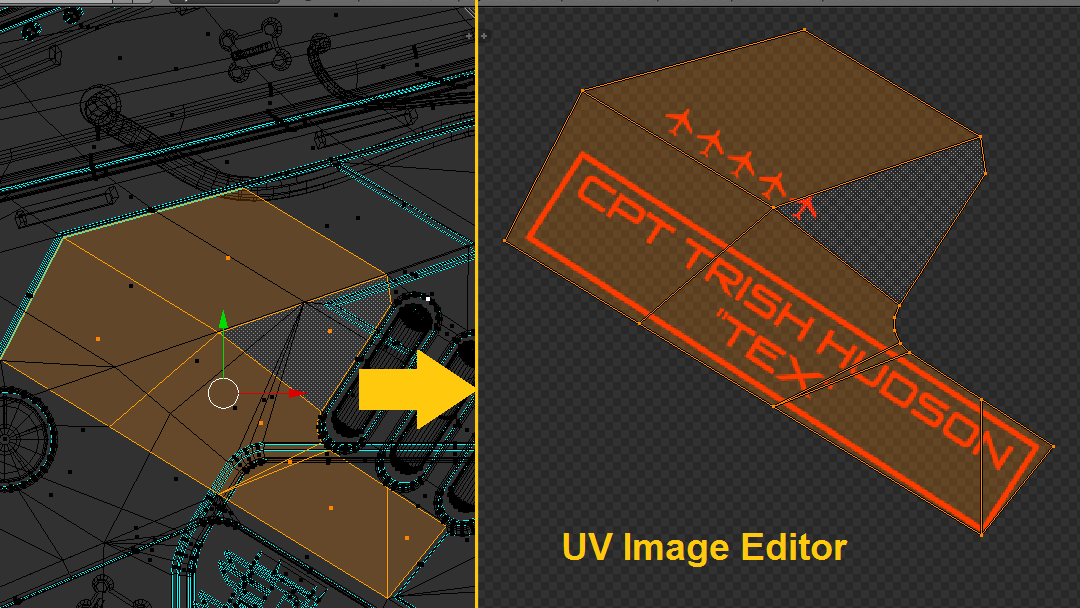
You can assign multiple parts of the model to the same area of an image. If a decal is repeated...

lock icon The rest of the chapter is locked
Register for a free Packt account to unlock a world of extra content!
A free Packt account unlocks extra newsletters, articles, discounted offers, and much more. Start advancing your knowledge today.
Unlock this book and the full library FREE for 7 days
Get unlimited access to 7000+ expert-authored eBooks and videos courses covering every tech area you can think of
Renews at $19.99/month. Cancel anytime
Banner background image