Configuring routing for our application
The header component that we created in the previous section contains two links:
- Articles: Displays a list of blog articles
- Contact: Displays personal information about the blog owner
The previous links will also become the main features of our application. So, we need to create an Angular module for each one.
When you design your website and need to decide upon the Angular modules that you will use, check out the main menu of the website. Each link of the menu should be a different feature and, thus, a different Angular module.
By convention, Angular modules that contain functionality for a specific feature are called feature modules.
Creating the contact page
Let’s begin by creating our contact feature:
- Create a module that will be the home for our contact feature:
ng generate module contact - Create a component that will be the main component of the
contactmodule:ng generate component contact --path=src/app/contact --module=contact --export --flatWe pass the
--flatoption to thegeneratecommand so that the Angular CLI will not create a separate folder for our component, as in previous cases. Thecontactcomponent will be the only component in our module, so there is no point in having it separately.
- Open the
contact.component.htmlfile and add the following HTML content:<div class="card mx-auto text-center border-light" style="width: 18rem;"> <img src="assets/angular.png" class="card-img-top" alt="Angular logo"> <div class="card-body"> <h5 class="card-title">Angular Projects</h5> <p class="card-text"> A personal blog created with the Angular framework and the Scully static site generator </p> <a href="https://angular.io/" target="_blank" class="card-link">Angular</a> <a href="https://scully.io/" target="_blank" class="card-link">Scully</a> </div> </div>
In the preceding code, we used the angular.png image, which you can find in the src\assets folder of the project from the accompanying GitHub repository.
The assets folder in an Angular CLI project is used for static content such as images, fonts, or JSON files.
We have already created our contact feature. The next step is to add it to the main page of our Angular application:
- Open the
app-routing.module.tsfile and add a new route configuration object in theroutesproperty:import { NgModule } from '@angular/core'; import { RouterModule, Routes } from '@angular/router'; import { ContactComponent } from './contact/contact.component'; const routes: Routes = [ { path: 'contact', component: ContactComponent } ]; @NgModule({ imports: [RouterModule.forRoot(routes)], exports: [RouterModule] }) export class AppRoutingModule { }The preceding code indicates that when the URL of the browser points to the
contactpath, our application will activate and displayContactComponenton the screen. Theroutesproperty of a routing module contains the routing configuration of the respective feature module. It is an array of route configuration objects where each one defines the component class and the URL path that activates it.
- Add
ContactModulein theimportsarray of the@NgModuledecorator ofAppModuleto be able to use it:@NgModule({ declarations: [ AppComponent ], imports: [ BrowserModule, AppRoutingModule, CoreModule, SharedModule, ContactModule ], providers: [], bootstrap: [AppComponent] })Do not forget to add the respective
importstatement forContactModuleat the top of the file.
- Routed components, just like
ContactComponent, need a place where they can be loaded. Open theapp.component.htmlfile and add the<router-outlet>directive:<app-header></app-header> <div class="container"> <router-outlet></router-outlet> </div> <app-footer></app-footer>
Now, we need to wire up the route configuration that we created with the actual link on the header component:
- Open the
header.component.htmlfile and add therouterLinkdirective to the respective anchor HTML element:<li class="nav-item"> <a routerLink="/contact" routerLinkActive="active" class="nav-link">Contact</a> </li>
In the preceding snippet, the routerLink directive points to the path property of the route configuration object. We have also added the routerLinkActive directive, which sets the active class on the anchor element when the specific route is activated.
Notice that the value of the routerLink directive contains a leading /, whereas the path property of the route configuration object that we defined does not. According to the case, omitting the / would give a different meaning to the route.
- The
routerLinkandrouterLinkActivedirectives are part of the Angular Router package. We need to importRouterModulein thecore.module.tsfile to use them:import { NgModule } from '@angular/core'; import { CommonModule } from '@angular/common'; import { HeaderComponent } from './header/header.component'; import { RouterModule } from '@angular/router'; @NgModule({ declarations: [ HeaderComponent ], imports: [ CommonModule, RouterModule ], exports: [ HeaderComponent ] }) export class CoreModule { }
We are now ready to preview our new contact page! If we run the application using ng serve and click on the Contact link, we should see the following output:

Figure 2.3 – Contact page
In the following section, we will build the functionality for the Articles link of the header in our blog.
Adding the articles page
The feature that is responsible for displaying articles in our blog will be the articles module. It will also be the module that connects the dots between Angular and Scully. We will use the generate command of the Angular CLI to create that module:
ng generate module articles --route=articles --module=app-routing
In the previous command, we pass some additional routing options:
--route: Defines the URL path of our feature--module: Indicates the routing module that will define the route configuration object that activates our feature
The Angular CLI performs additional actions, instead of just creating the module, upon executing the command:
- It creates a routed component in the
src\app\articlesfolder that will be activated by default from a route navigation object. It is the landing page of our feature, and it will display a list of blog posts, as we will see in the Displaying blog data on the home page section. - It creates a routing module named
articles-routing.module.tsthat contains the routing configuration of our module. - It adds a new route configuration object in the route configuration of the main application module that activates our module.
The articles-routing.module.ts file contains the routing configuration for the articles module:
import { NgModule } from '@angular/core';
import { RouterModule, Routes } from '@angular/router';
import { ArticlesComponent } from './articles.component';
const routes: Routes = [{ path: '', component: ArticlesComponent }];
@NgModule({
  imports: [RouterModule.forChild(routes)],
  exports: [RouterModule]
})
export class ArticlesRoutingModule { }
It imports RouterModule using the forChild method to pass the routing configuration to the Angular router. If we take a look at the main routing module of the application, we will see that it follows a slightly different approach:
app-routing.module.ts
import { NgModule } from '@angular/core';
import { RouterModule, Routes } from '@angular/router';
import { ContactComponent } from './contact/contact.component';
const routes: Routes = [
  { path: 'contact', component: ContactComponent },
  { path: 'articles', loadChildren: () => import('./articles/articles.module').then(m => m.ArticlesModule) }
];
@NgModule({
  imports: [RouterModule.forRoot(routes)],
  exports: [RouterModule]
})
export class AppRoutingModule { }
The forChild method is used in feature modules, whereas the forRoot method should be used only in the main application module.
The route configuration of the articles module contains only one route that activates ArticlesComponent. The path of the route is set to an empty string to indicate that it is the default route of the routing module. It essentially means that ArticlesComponent will be activated whenever that module is loaded. But how is the articles module loaded in our application?
The second route of the main routing module contains a route configuration object that does not activate a component but rather a module. It uses the loadChildren method to load ArticlesModule dynamically when navigation triggers the articles path.
The import function in the loadChildren property accepts the relative path of the TypeScript module file without the extension.
The previous approach is called lazy loading and improves the startup and the overall performance of an Angular application. It creates a separate bundle for each lazy-loaded module, which is loaded upon request, reducing the final bundle size and the memory consumption of your application. Let’s wire up the new route to our header component:
- Open the
header.component.htmlfile and add the followingrouterLinkandrouterLinkActivedirectives to theArticlesanchor HTML element:<li class="nav-item"> <a routerLink="/articles" routerLinkActive="active" class="nav-link">Articles</a> </li> - Run
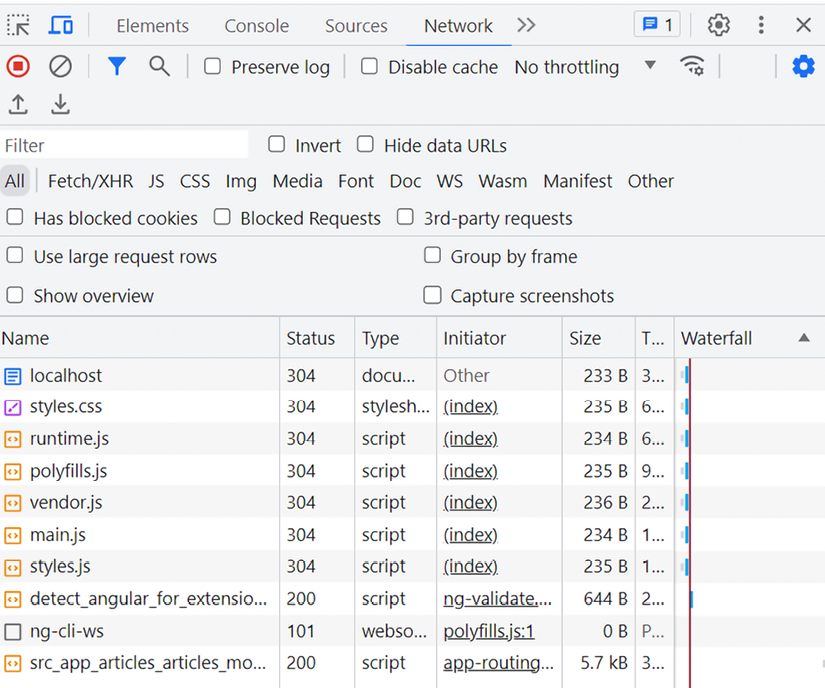
ng serveand use your favorite browser to preview your application. - Open the developer tools of your browser, click on the Articles link, and inspect the Network tab:

Figure 2.4 – Lazy loading Angular module
Among other requests, you should see one named src_app_articles_articles_module_ts.js. It is the bundle of the lazy-loaded articles module that was loaded when you clicked on the Articles link.
We are now ready to convert our amazing Angular application into a professional blog website.
Before we move on, let’s add some additional routes to the app-routing.module.ts file:
const routes: Routes = [
  { path: 'contact', component: ContactComponent },
  { path: 'articles', loadChildren: () => import('./articles/articles.module').then(m => m.ArticlesModule) },
  { path: '', pathMatch: 'full', redirectTo: 'articles' },
  { path: '**', redirectTo: 'articles' }
];
We added a default route to automatically redirect our blog users to the articles path upon visiting the blog. Additionally, we created a new route configuration object with its path set to ** that also navigates to the articles path. The ** syntax is called the wildcard route, and it is triggered when the router cannot match a requested URL with a defined route.
Define the most specific routes first and then add any generic ones, such as the default and the wildcard routes. The Angular router parses the route configuration in the order that we define and follows a first-match-wins strategy to select one.
We have already enabled and configured routing in our Angular application. In the following section, we will establish the infrastructure needed to add blogging capabilities to our application.


