Creating a new project in Visual Studio 2022
As setting up a project is a fiddly process, we will go through it step by step so that we can start getting used to it:
- Start Visual Studio in the same way you start any app: by clicking on its icon. The default installation options will have placed a Visual Studio 2022 icon in the Windows Start menu. You will see the following window:
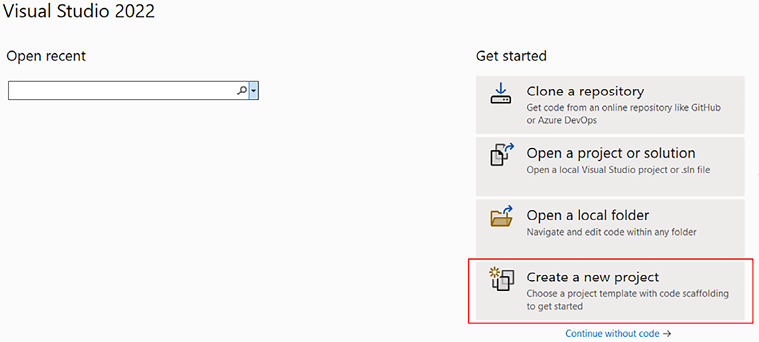
Figure 1.9: Starting a new project in VS 2022
- Click on the Create a new project button, as highlighted in the preceding screenshot. You will see the Create a new project window, as shown in the following screenshot:
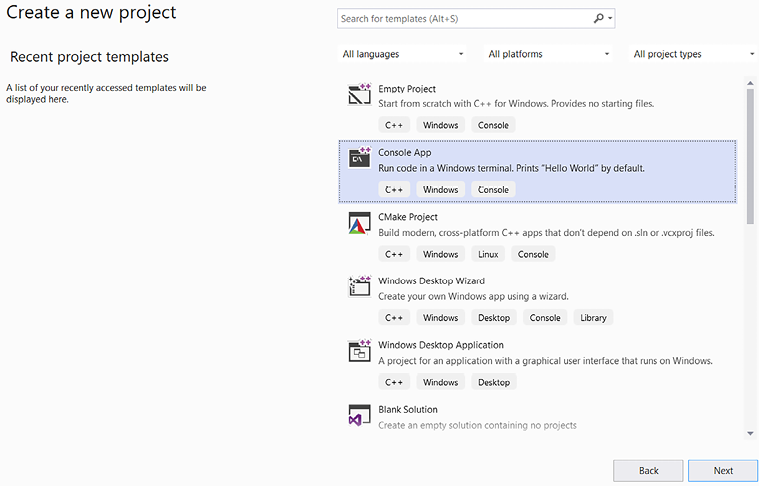
Figure 1.10: Create a new project screen
- In the Create a new project window, we need to choose the type of project we will be creating. We will be creating a console application that has no Windows-related things like menus, selection boxes, or other Windows paraphernalia, so select Console App, as highlighted in the preceding screenshot, and click the Next button. You will then see the Configure your new project window. The following screenshot shows the Configure your new project window after the next three steps have been completed:
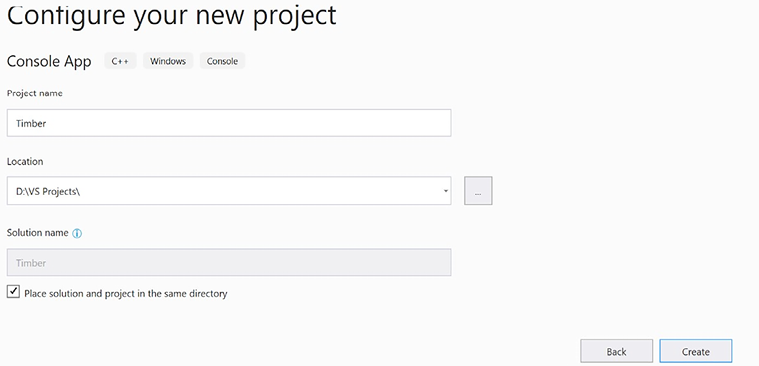
Figure 1.11: Configuring your new project
- In the Configure your new project window, type
Timberin the Project name field. Note that this causes Visual Studio to automatically configure the Solution name field to the same name. - In the Location field, browse to the
VS Projectsfolder that we created in the previous tutorial. This will be the location where all our project files will be kept. - Check the option to place the solution and project in the same directory.
- Note that the preceding screenshot shows what the window looks like when the previous three steps have been completed. When you have completed these steps, click Create. The project will be generated, including some C++ code. The following screenshot shows where we will be working throughout this book:

Figure 1.12: Visual Studio code editor
- We will now configure the project to use the SFML files that we put in the
SFMLfolder. From the main menu, select Project | Timber properties…. You will see the following window:
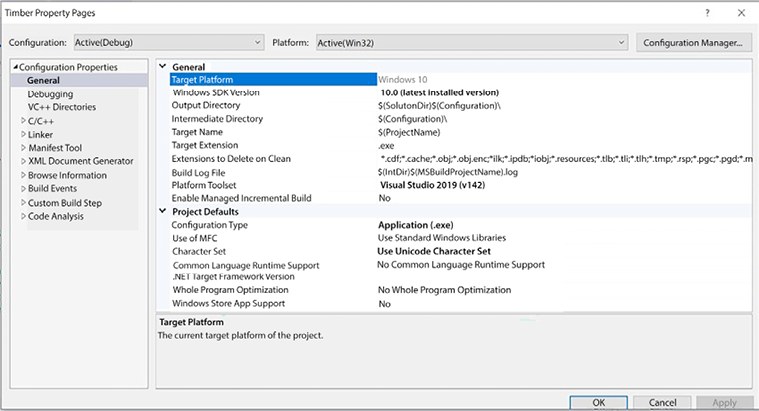
Figure 1.13: Timber Property page
In the preceding screenshot, the OK, Cancel, and Apply buttons are not fully formed. This is likely a glitch with Visual Studio not handling my screen resolution correctly. Yours will hopefully be fully formed. Whether your buttons appear like mine do or not, continuing with the tutorial will be the same.
Next, we will begin to configure the project properties. As these steps are quite intricate, I will cover them in a new list of steps.
Configuring the project properties
At this stage, you should have the Timber Property Pages window open, as shown in the preceding screenshot at the end of the previous section. Now, we will begin to configure some properties while using the following annotated screenshot for guidance:

Figure 1.14: Configuring the project properties
We will add some intricate and important project settings in this section. This is the laborious part, but we will only need to do this once per project and it will get easier and faster each time you do it. What we need to do is tell Visual Studio where to find a special type of code file from SFML. The special type of file I am referring to is a header file. Header files are the files that define the format of the SFML code so that when we use the SFML code, the compiler knows how to handle it. Note that the header files are distinct from the main source code files, and they are contained in files with the .hpp file extension. All this will become clearer when we eventually start adding our own header files in the second project. In addition, we need to tell Visual Studio where it can find the SFML library files. To achieve these things, on the Timber Property Pages window, perform the following three steps, which are numbered in the preceding screenshot:
- First (1), select All Configurations from the Configuration dropdown and check that Win32 is selected in the Platform dropdown to the right.
- Second (2), select C/C++ then General from the left-hand menu.
- Third (3), locate the Additional Include Directories edit box and type the drive letter where your
SFMLfolder is located, followed by\SFML\include. The full path to type, if you located yourSFMLfolder on your D drive, is as shown in the preceding screenshot – that is,D:\SFML\include. Vary your path if you put SFML on a different drive. - Click Apply to save your configurations so far.
- Now, still in the same window, perform these steps, which refer to the following annotated screenshot. First (1), select Linker and then General.
- Now, find the Additional Library Directories edit box (2) and type the drive letter where your
SFMLfolder is, followed by\SFML\lib. So, the full path to type if you located yourSFMLfolder on your D drive is, as also shown in the following screenshot,D:\SFML\lib. Vary your path if you put SFML on a different drive:
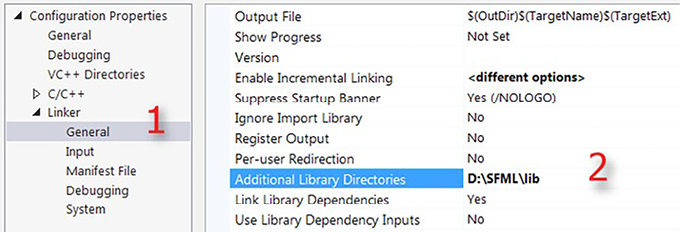
Figure 1.15: Additional Library Directories
- Click Apply to save your configurations so far.
- Finally for this stage, still in the same window, perform these steps,which refers to the following annotated screenshot. Switch the Configuration dropdown (1) to Debug as we will be running and testing our games in Debugging mode.
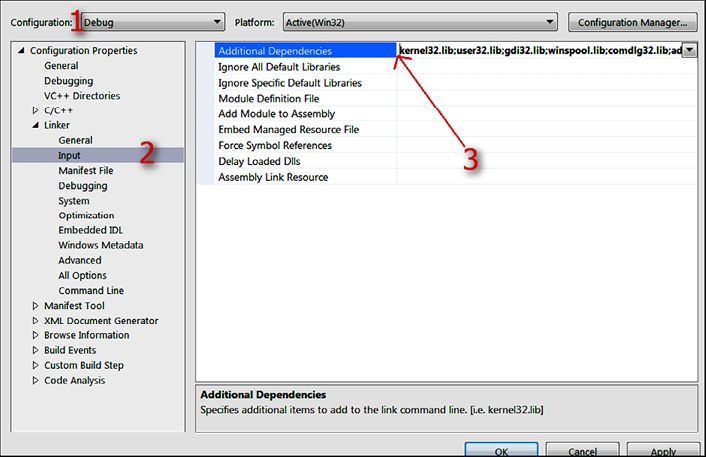
Figure 1.16: Linker input configuration
- Select Linker and then Input (2).
- Find the Additional Dependencies edit box (3) and click on it at the far left-hand side. Now, copy and paste/type the following:
sfml-graphics-d.lib;sfml-window-d.lib;sfml-system-d.lib;sfml-network-d.lib;sfml-audio-d.lib; at the indicated place. Be extra careful to place the cursor exactly in the right place and not overwrite any of the text that is already there. - Click OK.
- Click Apply and then OK.
Phew; that’s it! We have successfully configured Visual Studio and can move on to planning the Timber!!! project.


