Upgrading Cacti involves several steps, one of which is backing up the database. Since you created a symbolic link to the Cacti directory, you don't need to backup any files but instead we copy or move them from the old version over to the new one.
Upgrading Cacti
Time for action - upgrading Cacti
- Create a backup of the database. The following command will back up the Cacti database to a file called cacti_backup.sql. You will be asked for the MySQL root password:
mysqldump -u root -p --lock-tables --add-drop-table cacti > /root/cacti_backup.sql
- Change to the /var/www/html directory. From http://www.cacti.net, download the source for the version you want to upgrade to.
- Create the CACTIVERSION variable and set it to the current Cacti version:
export NEWCACTIVERSION=1.1.28
- Extract the file. This will create a new directory named cacti-1.1.28:
    cd /var/www/html
    wget https://www.cacti.net/downloads/spine/cacti-
    spine-$NEWCACTIVERSION.tar.gz
    tar -xzvf cacti-spine-$NEWCACTIVERSION.tar.gz
- Change to the newly-created directory and edit include/config.php. Change the database entries in there to match your installation.
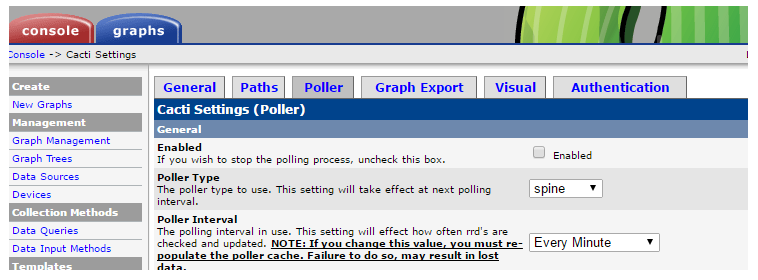
- Before copying any files, you should stop the poller using the web interface. Go to Configuration | Settings and change to the Poller tab. Disable the poller by unchecking it:

- Copy some files from your existing installation to the new one:
cp /var/www/html/cacti/rra/* /var/www/html/cacti-$NEWCACTIVERSION/rra/
cp -u /var/www/html/cacti/scripts/* /var/www/html/cacti-$NEWCACTIVERSION/scripts/
cp -u -R /var/www/html/cacti/resource/* /var/www/html/cacti-$NEWCACTIVERSION /resource/
- Set the permissions on the log and rra folders:
cd /var/www/html/cacti-$NEWCACTIVERSION/
chown -R cactiuser.apache /var/www/html/cacti-$NEWCACTIVERSION/
chmod -R 775 rra/ log/ resource/ scripts/ cache/
setfacl -d -m group:apache:rw /var/www/html/cacti/rra
setfacl -d -m group:apache:rw /var/www/html/cacti/log
- Change the symbolic link to point to the new directory:
cd /var/www/html/
ln -fs cacti-$NEWCACTIVERSION cacti
- As Cacti 1.x requires the timezone data to be present in the MySQL/MariaDB database, you will have to import it here as well when upgrading from the 0.8.8 version of Cacti:
mysql_tzinfo_to_sql /usr/share/zoneinfo > /tmp/mysql_timezone.sql
mysql -u root -p mysql < /tmp/mysql_timezone.sql
- You will also have to grant access to the timezone tables using the following SQL statement:
GRANT SELECT ON mysql.time_zone_name TO cactiuser@localhost IDENTIFIED BY 'MyV3ryStr0ngPassword';
- The final upgrade process is done using the web interface. Point your browser to http://<yourserver>/cacti/install and follow the steps. Make sure you select Upgrade on the second page.
- If you are upgrading from 0.8.8 to 1.x, the upgrade process will take some time to complete depending on your Cacti installation size.
- You can now enable the poller again using the Cacti web interface.
- Once you have checked that everything is working fine, you can remove or archive the original Cacti directory.
What just happened?
You upgraded Cacti to a newer version. As a safety net, you created a backup of the database so you can revert back to the old version in case of an error. You copied the RRD files and other resources to the new installation and switched over by changing the symbolic link to point to the new location. You finished the upgrade process by going to the install URL, which provides the final web-based upgrade process.


