Basic implementation of H2O using Python
Python is one of the most popular languages in the ML field of computer programming. It is widely used in all industries and has tons of actively maintained ML libraries that provide a lot of support in creating ML pipelines.
We will start by installing the Python programming language and then installing H2O using Python.
Installing Python
Installing Python is very straightforward. It does not matter whether it is Python 2.7 or Python 3 and above as H2O works completely fine with both versions of the language. However, if you are using anything older than Python 2.7, then you will need to upgrade your version.
It is best to go with Python 3 as it is the current standard and Python 2.7 is outdated. Along with Python, you will also need pip, Python’s package manager. Now, let’s learn how to install Python on various operating systems:
- On Linux (Ubuntu, Mint, Debian):
- For Python 2.7, run the following command in the system Terminal:
sudo apt-get python-pip
- For Python 3, run the following command in the system Terminal:
sudo apt-get python3-pip
- For Python 2.7, run the following command in the system Terminal:
- On macOS: macOS version 10.8 comes with Python 2.7 pre-installed. If you want to install Python 3, then go to https://python.org, go to the Downloads section, and download the latest version of Python 3 for macOS.
- On Windows: Unlike macOS, Windows does not come with any pre-installed Python language support. You will need to download a Python installer for Windows from https://python.org. The installer will depend on your Windows operating system – that is, if it is 64-bit or 32-bit.
Now that you know how to install the correct version of Python, let’s download and install the H2O Python module using Python.
Installing H2O using Python
H2O has a Python module available in the Python package index. To install the h2o Python module, all you need to do is to execute the following command in your Terminal:
pip install h2o
And that’s pretty much it.
To test if it has been successfully downloaded and installed, follow these steps:
- Open your Python Terminal.
- Import the
h2omodule by running the following command:import h2o
- Initialize H2O to spin up a local
h2oserver by running the following command:h2o.init()
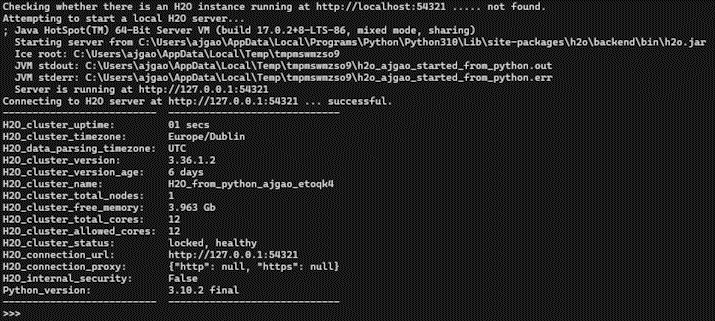
The following screenshot shows the results you should get after initializing h2o:

Figure 1.1 – H2O execution using Python
Let’s have a quick look at the output we got. First, it ran successfully, so mission accomplished.
After executing h2o.init() by reading the output logs, you will see that H2O checked if there is already an H2O server instance running on localhost with port 54321. In this scenario, there wasn’t any H2O server instance running previously, so H2O attempted to start a local server on the same port. If it had found an already existing local H2O instance on the port, then it would have reused the same instance for any further H2O command executions.
Then, it used Java version 16 to start the H2O instance. You may see a different Java version, depending on which version you have installed in your system.
Next, you will see the location of the h2o jar file that the server was started from, followed by the location of the Java Virtual Machine (JVM) logs.
Once the server is up and running, it shows the URL of the H2O server locally hosted on your system and the status of the H2O Python library’s connection to the server.
Lastly, you will see some basic metadata regarding the server’s configuration. This metadata may be slightly different from what you see in your execution as it depends a lot on the specifications of your system. For example, by default, H2O will use all the cores available on your system for processing. So, if you have an 8-core system, then the H2O_cluster_allowed_cores property value will be 8. Alternatively, if you decide to use only four cores, then you can execute h2o.init(nthreads=4) to use only four cores, reflecting the same in the server configuration output.
Now that you know how to implement H2O using Python, let’s learn how to do the same in the R programming language.


