Exploring the Financial History Features in the Dataset
We are ready to explore the rest of the features in the case study dataset. We will first practice loading a DataFrame from the CSV file we saved at the end of the last section. This can be done using the following snippet:
df = pd.read_csv('../Data/Chapter_1_cleaned_data.csv')Note that if you are continuing to write code in the same notebook, this overwrites the value held by the df variable previously, which was the DataFrame of raw data. We encourage you to check the .head(), .columns, and .shape of the DataFrame. These are good things to check whenever loading a DataFrame. We don't do this here for the sake of space, but it's done in the companion notebook.
Note
The path to your CSV file may be different depending on where you saved it.
The remaining features to be examined are the financial history features. They fall naturally into three groups: the status of the monthly payments for the last six months, and the billed and paid amounts for the same period. First, let's look at the payment statuses. It is convenient to break these out as a list so we can study them together. You can do this using the following code:
pay_feats = ['PAY_1', 'PAY_2', 'PAY_3', 'PAY_4', 'PAY_5', 'PAY_6']
We can use the .describe method on these six Series to examine summary statistics:
df[pay_feats].describe()
This should produce the following output:
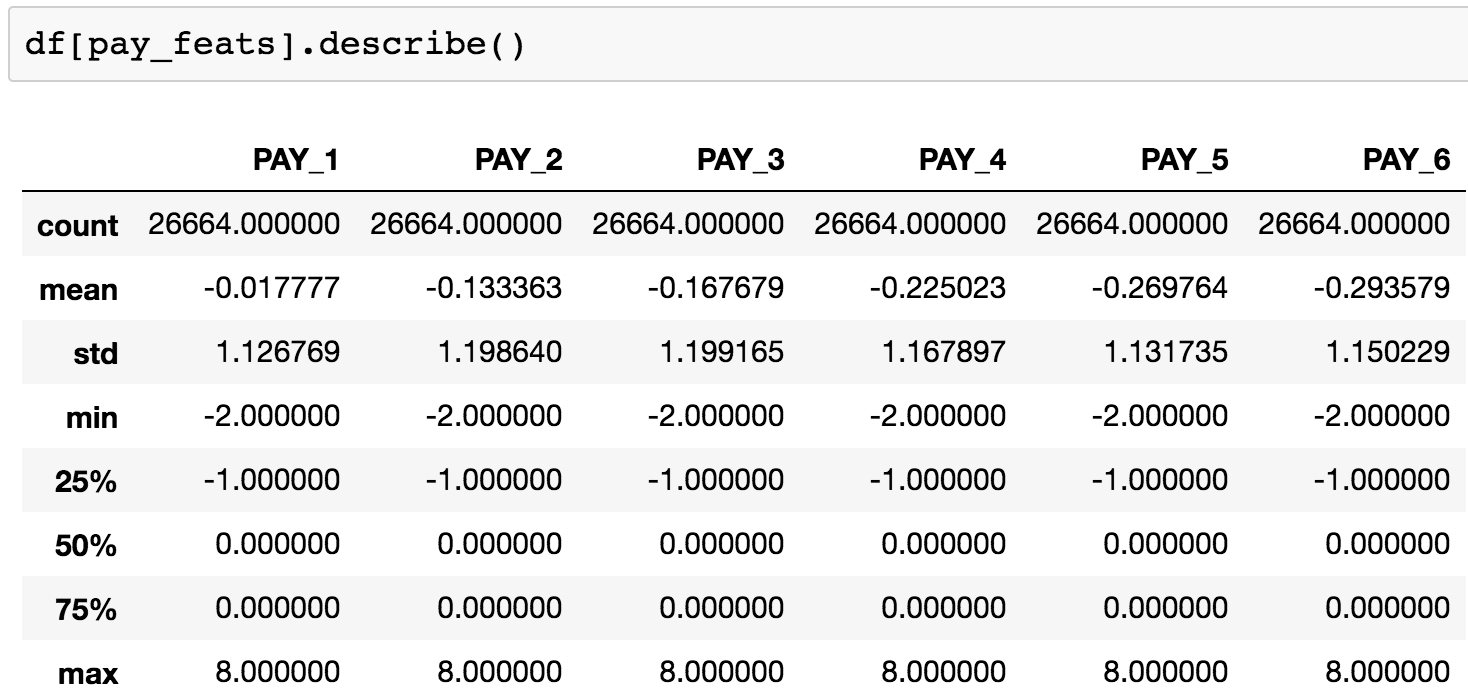
Figure 1.55: Summary statistics of payment status features
Here, we observe that the range of values is the same for all of these features: -2, -1, 0, ... 8. It appears that the value of 9, described in the data dictionary as "payment delay for nine months and above", is never observed.
We have already clarified the meaning of all of these levels, some of which were not in the original data dictionary. Now let's look again at the value_counts() of PAY_1, now sorted by the values we are counting, which are the index of this Series:
df[pay_feats[0]].value_counts().sort_index()
This should produce the following output:
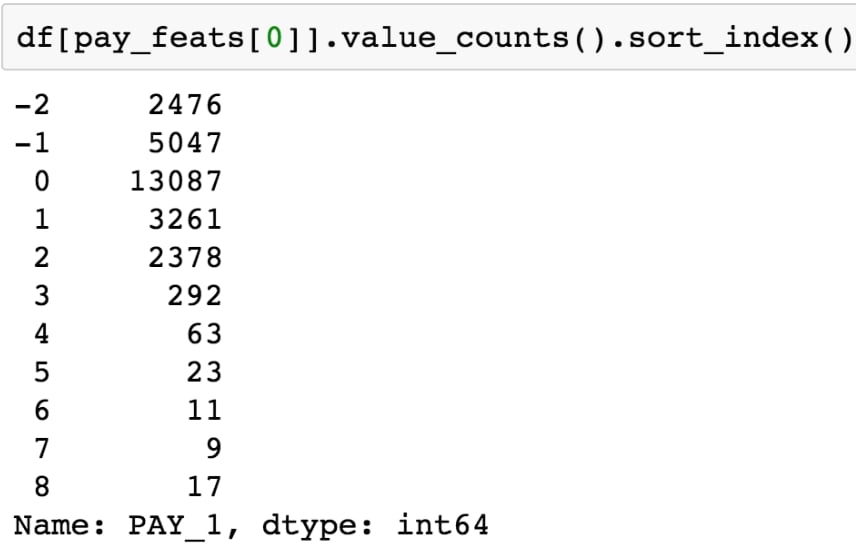
Figure 1.56: Value counts of the payment status for the previous month
Compared to the positive integer values, most of the values are either -2, -1, or 0, which correspond to an account that was in good standing last month: not used, paid in full, or made at least the minimum payment.
Notice that, because of the definition of the other values of this variable (1 = payment delay for one month; 2 = payment delay for two months, and so on), this feature is sort of a hybrid of categorical and numerical features. Why should no credit usage correspond to a value of -2, while a value of 2 means a 2-month late payment, and so forth? We should acknowledge that the numerical coding of payment statuses -2, -1, and 0 constitute a decision made by the creator of the dataset on how to encode certain categorical features, which were then lumped in with a feature that is truly numerical: the number of months of payment delay (values of 1 and larger). Later on, we will consider the potential effects of this way of doing things on the predictive capability of this feature.
For now, we will simply continue to explore the data. This dataset is small enough, with 18 of these financial features and a handful of others, that we can afford to individually examine every feature. If the dataset had thousands of features, we would likely forgo this and instead explore dimensionality reduction techniques, which are ways to condense the information in a large number of features down to a smaller number of derived features, or, alternatively, methods of feature selection, which can be used to isolate the important features from a candidate field of many. We will demonstrate and explain some feature selection techniques later. But on this dataset, it's feasible to visualize every feature. As we know from the last chapter, a histogram is a good way to get a quick visual interpretation of the same kind of information we would get from tables of value counts. You can try this on the most recent month's payment status features with df[pay_feats[0]].hist(), to produce this:
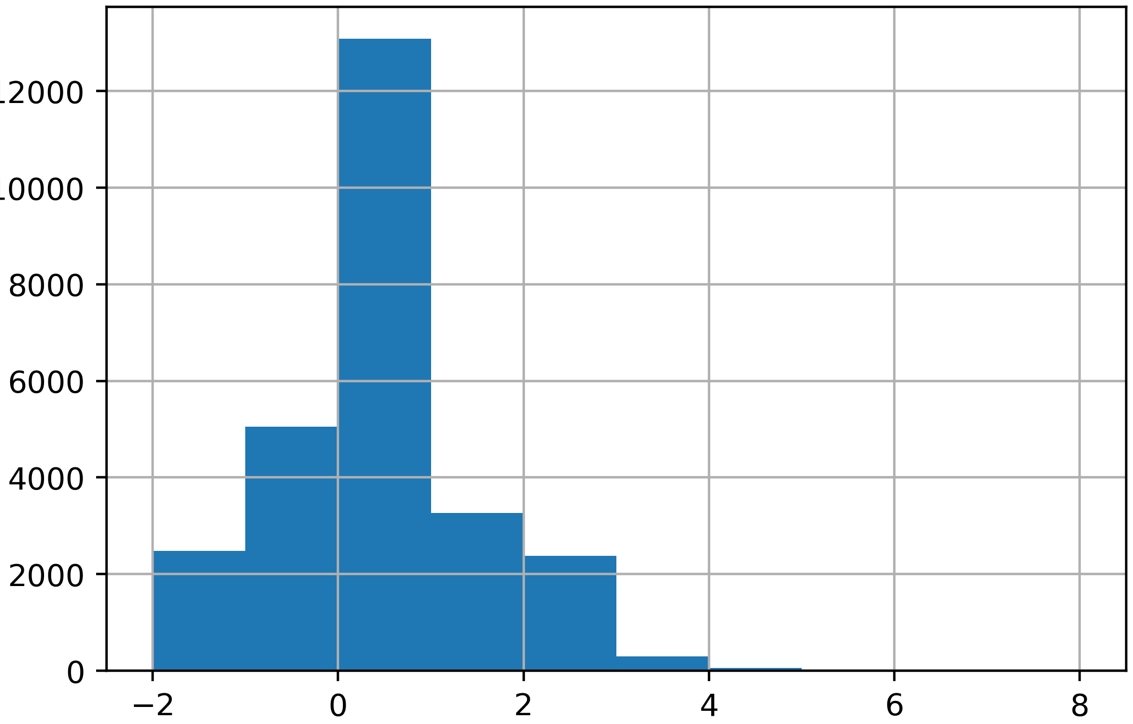
Figure 1.57: Histogram of PAY_1 using default arguments
Now we're going to take an in-depth look at how this graphic is produced and consider whether it is as informative as it should be. A key point about the graphical functionality of pandas is that pandas plotting actually calls matplotlib under the hood. Notice that the last available argument to the pandas .hist() method is **kwds, which the documentation indicates are matplotlib keyword arguments.
Note
For more information, refer to the following: https://pandas.pydata.org/pandas-docs/stable/reference/api/pandas.DataFrame.hist.html.
Looking at the matplotlib documentation for matplotlib.pyplot.hist shows additional arguments you can use with the pandas .hist() method, such as the type of histogram to plot (see https://matplotlib.org/api/_as_gen/matplotlib.pyplot.hist.html for more details). In general, to get more details about plotting functionality, it's important to be aware of matplotlib, and in some scenarios, you will want to use matplotlib directly, instead of pandas, to have more control over the appearance of plots.
You should be aware that aware that pandas uses matplotlib, which in turn uses NumPy. When plotting histograms with matplotlib, the numerical calculation for the values that make up the histogram is actually carried out by the NumPy .histogram function. This is a key example of code reuse, or "not reinventing the wheel". If a standard functionality, such as plotting a histogram, already has a good implementation in Python, there is no reason to create it anew. And the if mathematical operation to create the histogram data for the plot is already implemented, this should be leveraged as well. This shows the interconnectedness of the Python ecosystem.
We'll now address a couple of key issues that arise when calculating and plotting histograms.
Number of bins
Histograms work by grouping together values into what are called bins. The number of bins is the number of vertical bars that make up the discrete histogram plot we see. If there are a large number of unique values on a continuous scale, such as the histogram of ages we viewed earlier, histogram plotting works relatively well "out of the box", with default arguments. However, when the number of unique values is close to the number of bins, the results may be a little misleading. The default number of bins is 10, while in the PAY_1 feature, there are 11 unique values. In cases like this, it's better to manually set the number of histogram bins to the number of unique values.
In our current example, since there are very few values in the higher bins of PAY_1, the plot may not look much different. But in general, this is important to keep in mind when plotting histograms.
Bin edges
The locations of the edges of the bins determine how the values get grouped in the histogram. Instead of indicating the number of bins to the plotting function, you could alternatively supply a list or array of numbers for the bins keyword argument. This input would be interpreted as the bin edge locations on the x axis. The way values are grouped into bins in matplotlib, using the edge locations, is important to understand. All bins, except the last one, group together values as low as the left edge, and up to but not including values as high as the right edge. In other words, the left edge is closed but the right edge is open for these bins. However, the last bin includes both edges; it has a closed left and right edge. This is of more practical importance when you are binning a relatively small number of unique values that may land on the bin edges.
For control over plot appearance, it's usually better to specify the bin edge locations. We'll create an array of 12 numbers, which will result in 11 bins, each one centered around one of the unique values of PAY_1:
pay_1_bins = np.array(range(-2,10)) - 0.5
pay_1_bins
The output shows the bin edge locations:

Figure 1.58: Specifying histogram bin edges
As a final point of style, it is important to always label your plots so that they are interpretable. We haven't yet done this manually, because in some cases, pandas does it automatically, and in other cases, we simply left the plots unlabeled. From now on, we will follow best practice and label all plots. We use the xlabel and ylabel functions in matplotlib to add axis labels to this plot. The code is as follows:
df[pay_feats[0]].hist(bins=pay_1_bins)
plt.xlabel('PAY_1')
plt.ylabel('Number of accounts')
The output should look like this:
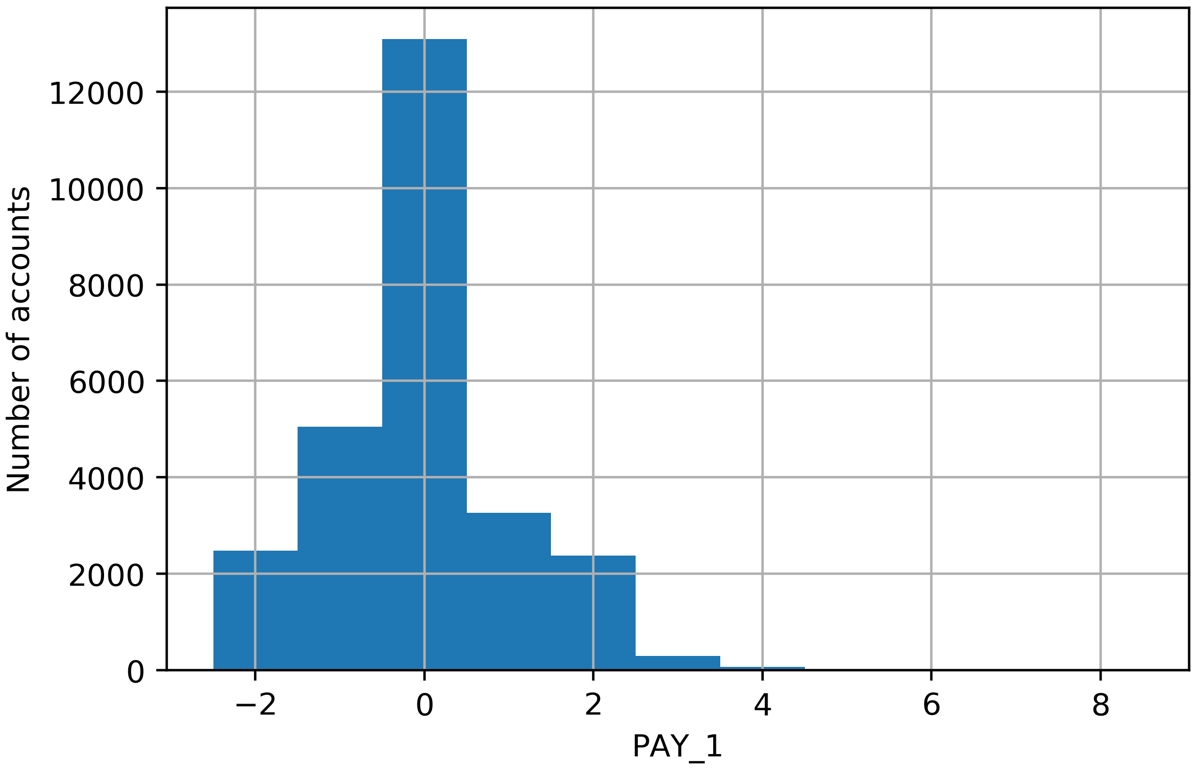
Figure 1.59: A better histogram of PAY_1
While it's tempting, and often sufficient, to just call plotting functions with the default arguments, one of your jobs as a data scientist is to create accurate and representative data visualizations. To do that, sometimes you need to dig into the details of plotting code, as we've done here.
What have we learned from this data visualization?
Since we already looked at the value counts, this confirms for us that most accounts are in good standing (values -2, -1, and 0). For those that aren't, it's more common for the "months late" to be a smaller number. This makes sense; likely, most people are paying off their balances before too long. Otherwise, their account may be closed or sold to a collection agency. Examining the distribution of your features and making sure it seems reasonable is a good thing to confirm with your client, as the quality of these data underlie the predictive modeling you seek to do.
Now that we've established some good plotting style for histograms, let's use pandas to plot multiple histograms together, and visualize the payment status features for each of the last six months. We can pass our list of column names pay_feats to access multiple columns to plot with the .hist() method, specifying the bin edges we've already determined, and indicating we'd like a 2 by 3 grid of plots. First, we set the font size small enough to fit between these subplots. Here is the code for this:
mpl.rcParams['font.size'] = 4
df[pay_feats].hist(bins=pay_1_bins, layout=(2,3))
The plot titles have been created automatically for us based on the column names. The y axes are understood to be counts. The resulting visualizations are as follows:
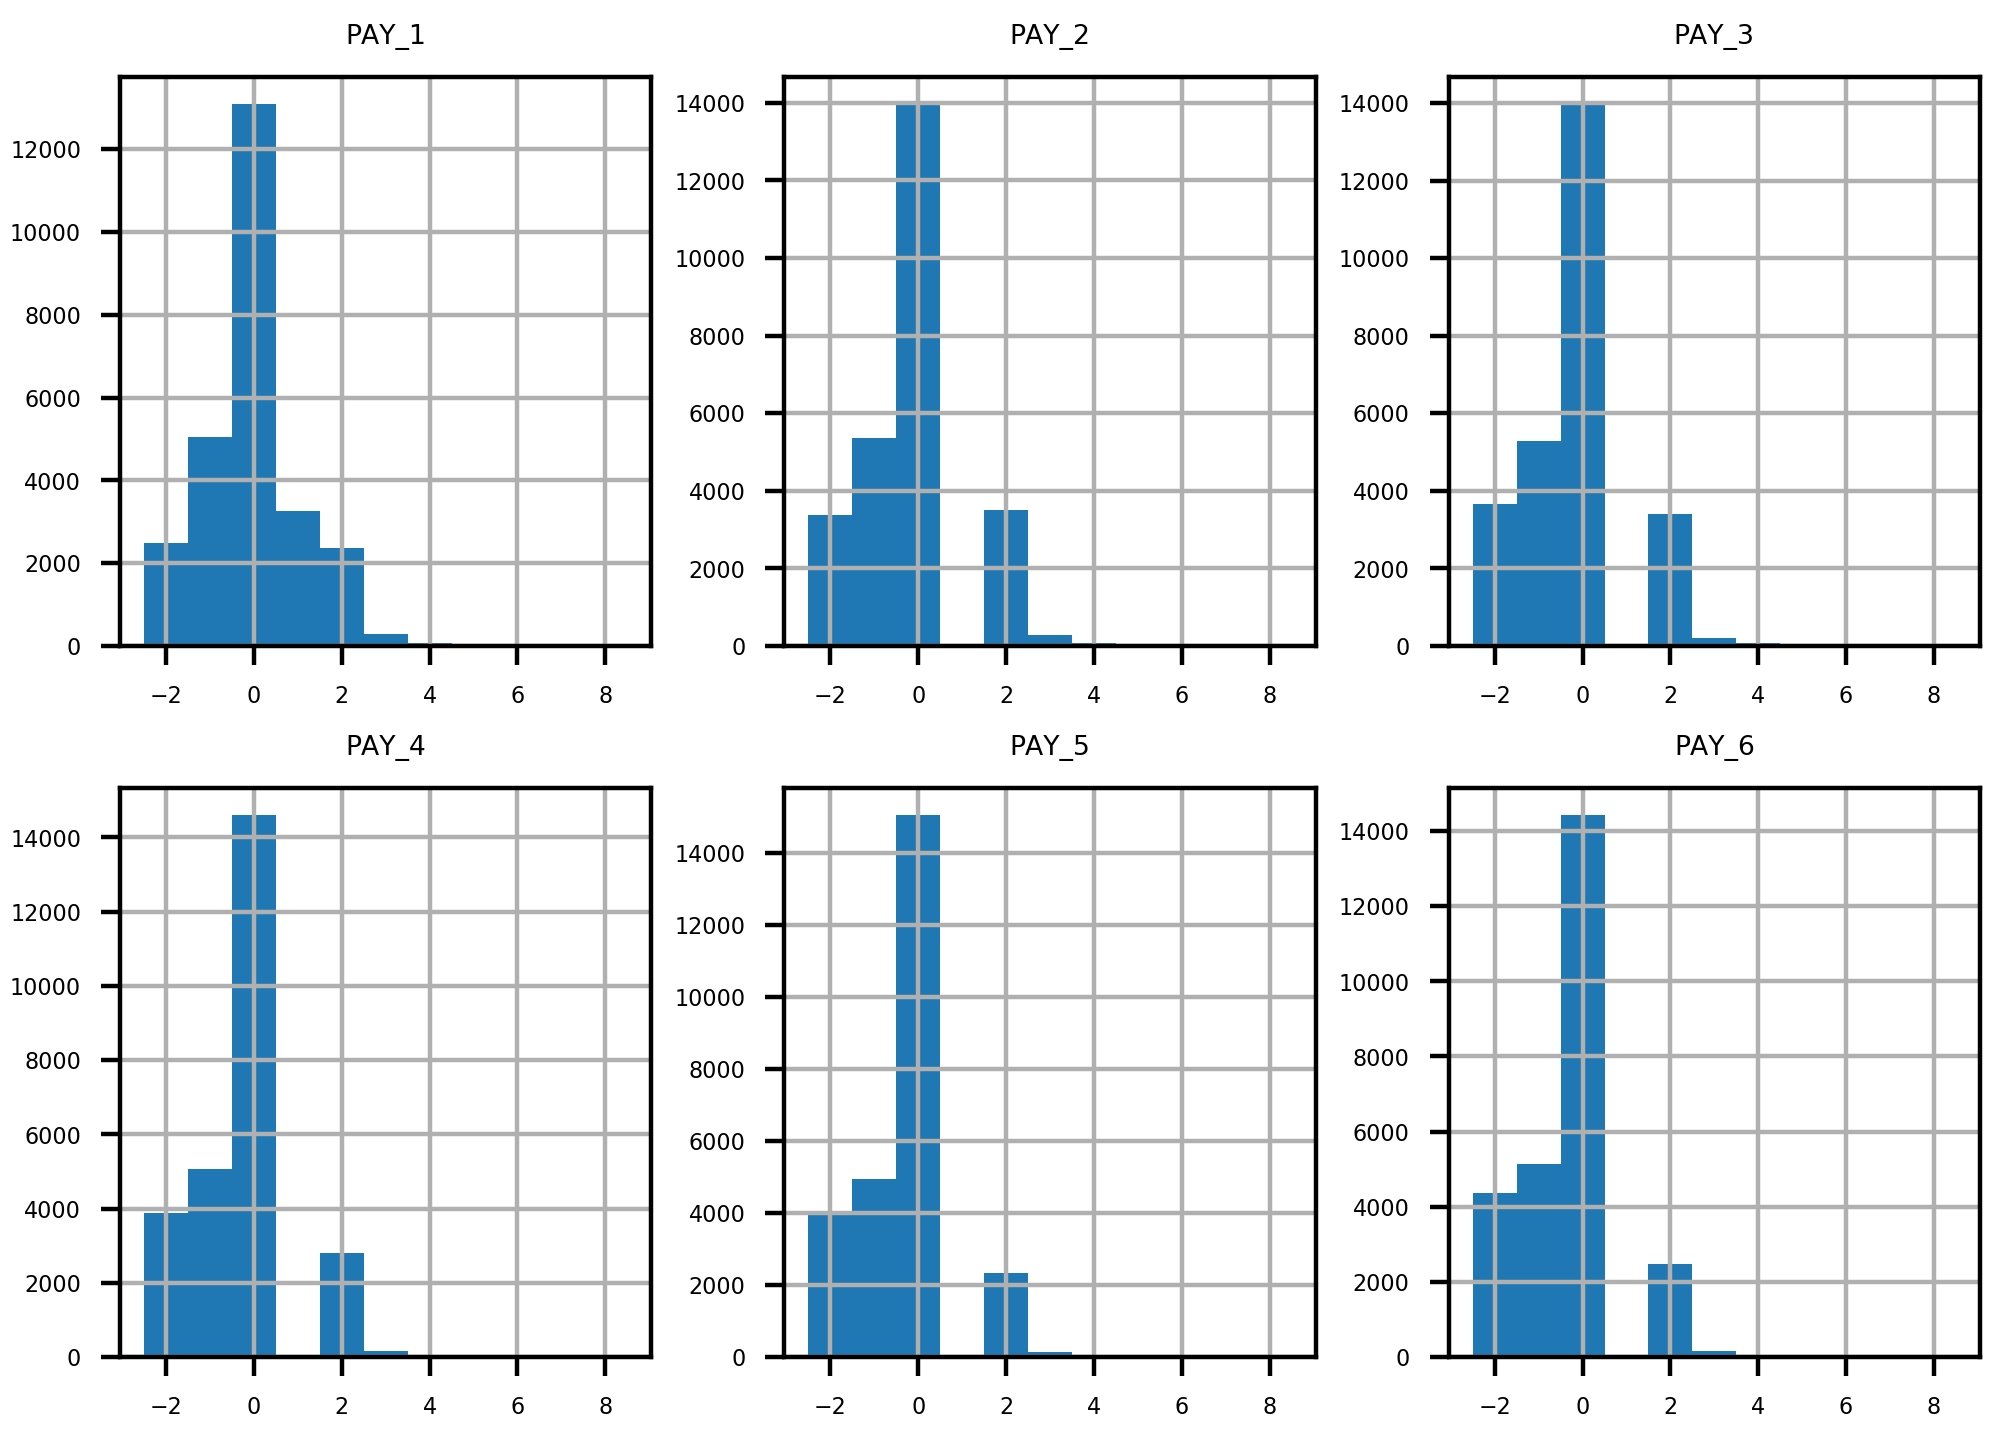
Figure 1.60: Grid of histogram subplots
We've already seen the first of these, and it makes sense. What about the rest of them? Remember the definitions of the positive integer values of these features, and what each feature means. For example, PAY_2 is the repayment status in August, PAY_3 is the repayment status in July, and the others go further back in time. A value of 1 means payment delay for 1 month, while a value of 2 means payment delay for 2 months, and so forth.
Did you notice that something doesn't seem right? Consider the values between July (PAY_3) and August (PAY_2). In July, there are very few accounts that had a 1-month payment delay; this bar is not really visible in the histogram. However, in August, there are suddenly thousands of accounts with a 2-month payment delay. This does not make sense: the number of accounts with a 2-month delay in a given month should be less than or equal to the number of accounts with a 1-month delay in the previous month. Let's take a closer look at accounts with a 2-month delay in August and see what the payment status was in July. We can do this with the following code, using a Boolean mask and .loc, as shown in the following snippet:
df.loc[df['PAY_2']==2, ['PAY_2', 'PAY_3']].head()
The output of this should appear as follows:
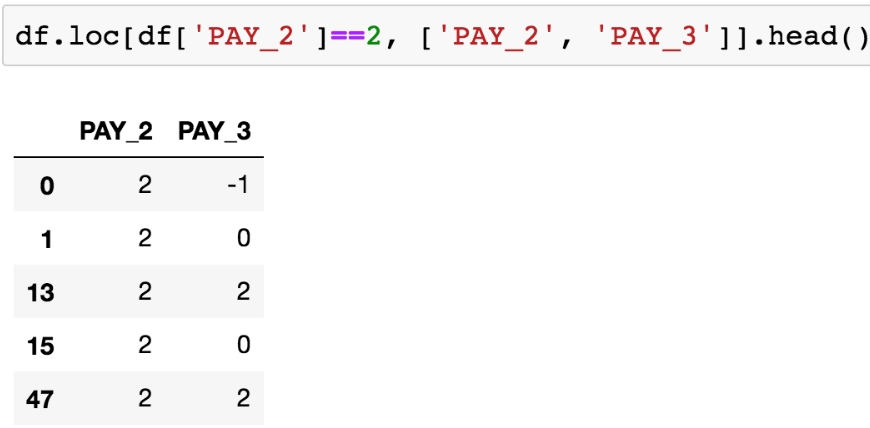
Figure 1.61: Payment status in July (PAY_3) of accounts with a 2-month payment delay in August (PAY_2)
From Figure 1.61, it's clear that accounts with a 2-month delay in August have nonsensical values for the July payment status. The only way to progress to a 2-month delay should be from a 1-month delay the previous month, yet none of these accounts indicate that.
When you see something like this in the data, you need to either check the logic in the query used to create the dataset or contact the person who gave you the dataset. After double-checking these results, for example using .value_counts() to view the numbers directly, we contact our client to inquire about this issue.
The client lets us know that they had been having problems with pulling the most recent month of data, leading to faulty reporting for accounts that had a 1-month delay in payment. In September, they had mostly fixed these problems (although not entirely; that is why there were missing values in the PAY_1 feature, as we found). So, in our dataset, the value of 1 is underreported in all months except for September (the PAY_1 feature). In theory, the client could create a query to look back into their database and determine the correct values for PAY_2, PAY_3, and so on up to PAY_6. However, for practical reasons, they won't be able to complete this retrospective analysis in time for us to receive it and include it in our analysis.
Because of this, only the most recent month of our payment status data is correct. This means that, of all the payment status features, only PAY_1 is representative of future data, those that will be used to make predictions with the model we develop. This is a key point: a predictive model relies on getting the same kind of data to make predictions that it was trained on. This means we can use PAY_1 as a feature in our model, but not PAY_2 or the other payment status features from previous months.
This episode shows the importance of a thorough examination of data quality. Only by carefully combing through the data did we discover this issue. It would have been nice if the client had told us up front that they were having reporting issues over the last few months, when our dataset was collected, and that the reporting procedure was not consistent during that time period. However, ultimately it is our responsibility to build a credible model, so we need to be sure we believe the data is correct, by making this kind of careful examination. We explain to the client that we can't use the older features since they are not representative of the future data the model will be scored on (that is, make predictions on future months), and politely ask them to let us know of any further data issues they are aware of. There are none at this time.
Activity 1: Exploring Remaining Financial Features in the Dataset
In this activity, you will examine the remaining financial features in a similar way to how we examined PAY_1, PAY_2, PAY_3, and so on. In order to better visualize some of these data, we'll use a mathematical function that should be familiar: the logarithm. You'll use pandas to apply, which serves to apply any function to an entire column or DataFrame in the process. Once you complete the activity, you should have the following set of histograms of logarithmic transformations of non-zero payments:
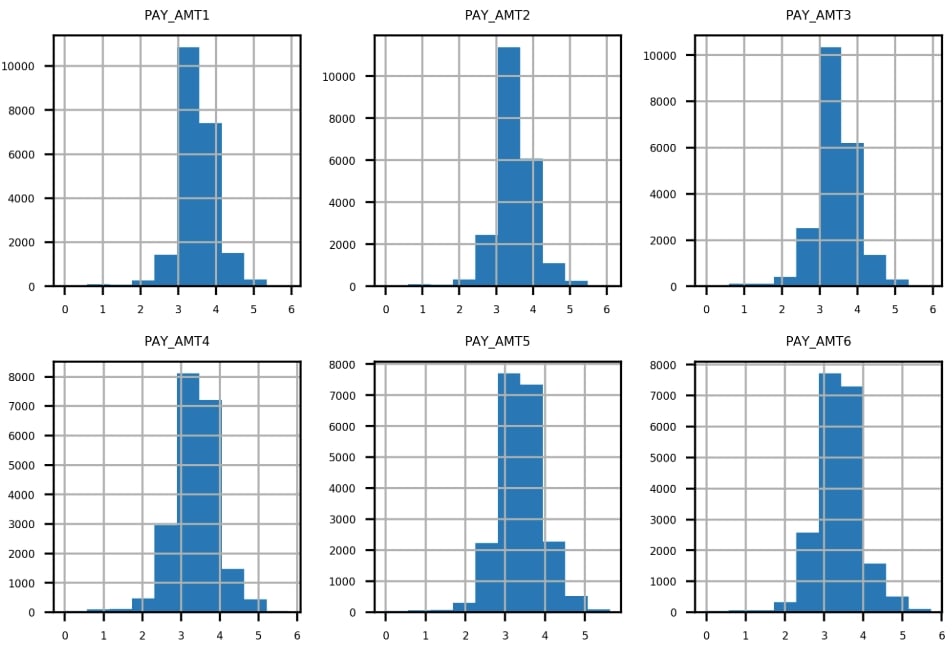
Figure 1.62: Expected set of histograms
Perform the following steps to complete the activity:
Note
The code and the resulting output graphics for this exercise have been loaded into a Jupyter Notebook that can be found here: http://bit.ly/2TXZmrA.
Create lists of feature names for the remaining financial features.
Use .describe() to examine statistical summaries of the bill amount features. Reflect on what you see. Does it make sense?
Visualize the bill amount features using a 2 by 3 grid of histogram plots.
Hint: You can use 20 bins for this visualization.
Obtain the .describe() summary of the payment amount features. Does it make sense?
Plot a histogram of the bill payment features similar to the bill amount features, but also apply some rotation to the x-axis labels with the xrot keyword argument so that they don't overlap. In any plotting function, you can include the xrot=<angle> keyword argument to rotate x-axis labels by a given angle in degrees. Consider the results.
Use a Boolean mask to see how many of the payment amount data are exactly equal to 0. Does this make sense given the histogram in the previous step?
Ignoring the payments of 0 using the mask you created in the previous step, use pandas .apply() and NumPy's np.log10() to plot histograms of logarithmic transformations of the non-zero payments. Consider the results.
Hint: You can use .apply() to apply any function, including log10, to all the elements of a DataFrame or a column using the following syntax: .apply(<function_name>).
Note
The solution to this activity can be found on page 324.


