Adding data from the Elasticsearch client
To ingest general content such as catalogs, HTML pages, and files from your application, Elastic provides a wide range of Elastic language clients to easily ingest data via Elasticsearch REST APIs. In this recipe, we will learn how to add sample data to Elasticsearch hosted on Elastic Cloud using a Python client.
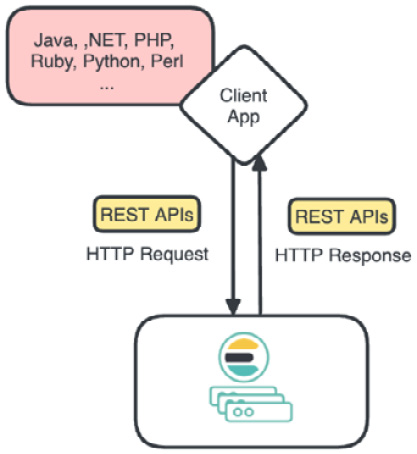
To use Elasticsearch’s REST APIs through various programming languages, a client application chooses a suitable client library. The client initializes and sends HTTP requests, directing them to the Elasticsearch cluster for data operations. Elasticsearch processes the requests and returns HTTP responses containing results or errors. The client application parses these responses and acts on the data accordingly. Figure 2.2 shows the summarized data flow:

Figure 2.2 – Elasticsearch’s client request and response flow
Getting ready
To simplify the package management, we recommend you install pip(https://pypi.org/project/pip/).
The snippets of this recipe are available here: https://github.com/PacktPublishing/Elastic-Stack-8.x-Cookbook/blob/main/Chapter2/snippets.md#adding-data-from-the-elasticsearch-client.
How to do it…
First, we will install the Elasticsearch Python client:
- Add
elasticsearch,elasticsearch-async, andload_dotenvto therequirements.txtfile of your Python project (the samplerequirements.txtfile can be found at this address: https://github.com/PacktPublishing/Elastic-Stack-8.x-Cookbook/blob/main/Chapter2/python-client-sample/requirements.txt). - Run the following command to install the Elasticsearch Python client library:
$ pip install -r requirements.txt
Now, let’s set up a connection to Elasticsearch.
- Prepare a
.envfile to store the access information,Cloud ID("ES_CID"),user name("ES_USER"), andpassword("ES_PWD"), for the basic authentication. You can find the sample.envfile at this address: https://github.com/PacktPublishing/Elastic-Stack-8.x-Cookbook/blob/main/Chapter2/python-client-sample/.env.Remember that we saved the password for our default user,
elastic, in the Deploying Elastic Stack on Elastic Cloud recipe in Chapter 1, and the instructions to find the cloud ID can be found in the same recipe. - Import the libraries in a Python file (
sampledata_index.py), which we will use for this recipe:import os from elasticsearch import Elasticsearch from dotenv import load_dotenv
- Load the environment variables and initiate an Elasticsearch connection:
load_dotenv() ES_CID = os.getenv('ES_CID') ES_USER = os.getenv('ES_USER') ES_PWD = os.getenv('ES_PWD') es = Elasticsearch( cloud_id=ES_CID, basic_auth=(ES_USER, ES_PWD) ) print(es.info()) - Now, you can run the script to check whether the connection is successful. Run the following command:
$ python sampledata_index.py
You should see an output that looks like the following screenshot:

Figure 2.3 – Connected Elasticsearch information
- We can now extend the script to ingest a document. Prepare a sample JSON document from the movie dataset:
mymovie = { 'release_year': '1908', 'title': 'It is not this day.', 'origin': 'American', 'director': 'D.W. Griffith', 'cast': 'Harry Solter, Linda Arvidson', 'genre': 'comedy', 'wiki_page':'https://en.wikipedia.org/wiki/A_Calamitous_Elopement', 'plot': 'A young couple decides to elope after being caught in the midst of a romantic moment by the woman.' } - Index the sample data in Elasticsearch. Here, we will choose the index name
'movies'and print the index results. Finally, we will store thedocumentID in atmpfile that we will reuse for the following recipes:response = es.index(index='movies', document=mymovie) print(response) # Write the '_id' to a file named tmp.txt with open('tmp.txt', 'w') as file: file.write(response['_id']) # Print the contents of the file to confirm it's written correctly with open('tmp.txt', 'r') as file: print(f"document id saved to tmp.txt: {file.read()}") time.sleep(2) - Verify the data in Elasticsearch to ensure that it has been successfully indexed; wait two seconds after the indexing, query Elasticsearch using the
_searchAPI, and then print the results:response = es.search(index='movies', query={"match_all": {}}) print("Sample movie data in Elasticsearch:") for hit in response['hits']['hits']: print(hit['_source']) - Execute the script again with the following script:
$ python sampledata_index.py
You should have the following result in the console output:

Figure 2.4 – The output of the sampledata_index.py script
The full code sample can be found at https://github.com/PacktPublishing/Elastic-Stack-8.x-Cookbook/blob/main/Chapter2/python-client-sample/sampledata_index.py.
How it works...
In this recipe, we learned how to use the Elastic Python client to securely connect to a hosted deployment on Elastic Cloud.
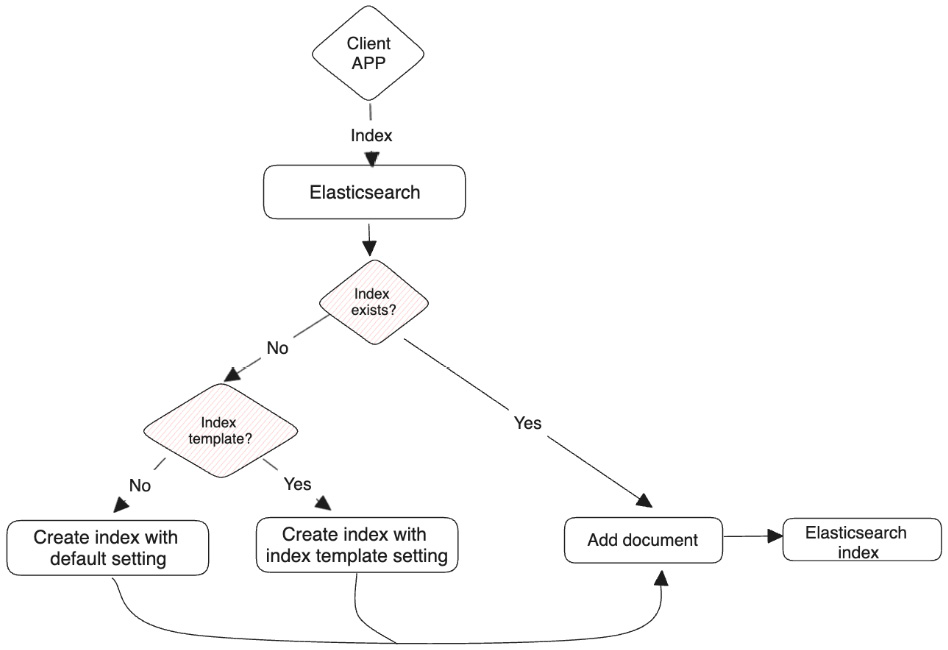
Elasticsearch created the movies index by default during the first ingestion, and the fields were created with default mapping.
Later in this chapter, we will learn how to define static and dynamic mapping to customize field types with the help of concrete recipes.
It’s also important to note that as we did not provide a document ID, Elasticsearch automatically generated an ID during the indexing phase as well.
The following diagram (Figure 2.5) shows the index processing flow:

Figure 2.5 – The ingestion flow
There’s more…
In this recipe, we used the HTTP basic authentication method. The Elastic Python client provides authentication methods such as HTTP Bearer authentication and API key authentication. Detailed documentation can be found at the following link: https://www.elastic.co/guide/en/elasticsearch/client/python-api/current/connecting.html#auth-bearer.
We chose to illustrate the simplicity of general content data ingestion by using the Python client. Detailed documentation for other client libraries can be found at the following link: https://www.elastic.co/guide/en/elasticsearch/client/index.html
During the development and testing phase, it’s also very useful to use the Elastic REST API and test either with an HTTP client, such as CURL/Postman, or with the Kibana Dev Tools console (https://www.elastic.co/guide/en/kibana/current/console-kibana.html).


