Relinking broken audio
It’s a sad truth that everyone at some point or another will face this issue. Since Pro Tools references audio files in a specified location, any change in the filename or location can break the link, causing it to appear offline in the session. Pro Tools also uses a unique identifier for ensuring that similarly named files do not get mixed up. This can cause problems from time to time, especially with OMFs and AAF files. In most scenarios, Pro Tools will try to relink the audio when it detects that some files are missing, but you can also manually relink them. We’ll go over how to do that in this recipe.
Getting ready
For this recipe, you will need a Pro Tools session with some audio placed into tracks. The audio files will need to have their links broken. You can do this by relocating the audio files into a subfolder within the Audio Files folder. Make sure you do this with the Pro Tools session closed; otherwise, performing such a change while it’s open can crash Pro Tools. When you open a session with broken links, a warning will appear, asking you what you want to do with Missing Files. Select the Skip All option when prompted:

Figure 2.11: The Missing Files window
How to do it…
We’ll be using the workspace tool to manually relink some broken audio links for this recipe. You can do this by following these steps:
- In the menu, go to Window | New Workspace | Default.
- In the sidebar on the left (the area labeled Locations), click on the icon that specifies your session name.
- Double-click the folder named Session Audio Files (Audio Files on Windows).
- Locate audio files that are broken – they will be grayed out and in italics (see Figure 2.12):

Figure 2.12: The Workspace window showing missing files
- Shift or Command and click (Ctrl on Windows) to highlight them.
- Right-click (or Control and click on macOS) on any of the highlighted files and select Relink.
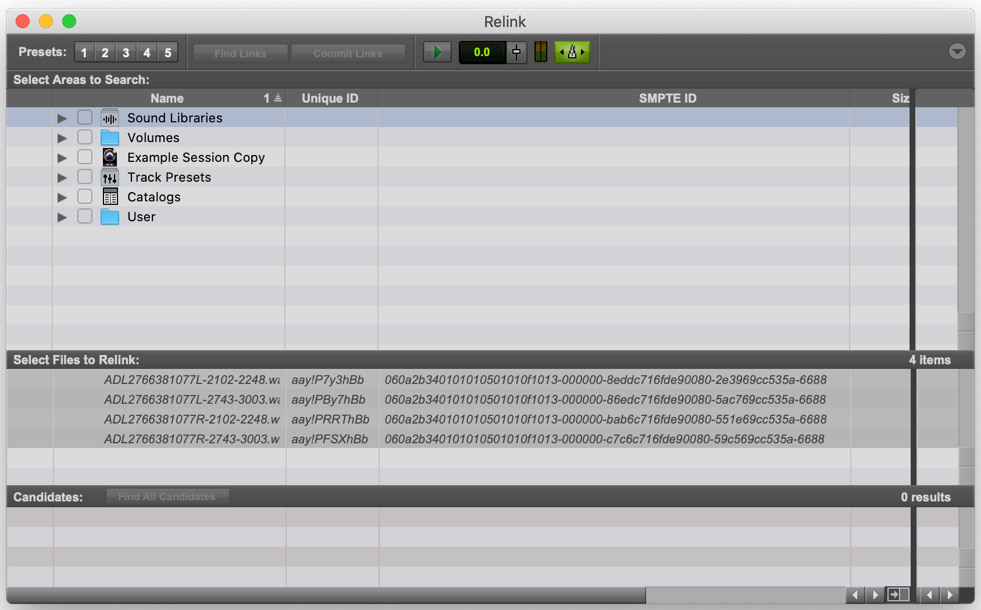
- In the Relink window, use the Select Areas to Search: area and navigate to your session’s audio files folder on your disk (this could be an internal or external hard drive or SSD; do not navigate to the session itself, which is denoted by a Pro Tools icon).
- Click the checkbox next to the
AudioFilesfolder. - Select all the files within the Search Files to Relink: area.
- Click the Find Links button toward the top of the window.
- When prompted for Linking Options, leave the default options enabled (Find By Name and File ID, Match Format, and Match Duration).
- Click OK.
- Click Commit Links.
- When asked to confirm, click Yes:

Figure 2.13: The Relink window
How it works…
Workspaces function like a file explorer and manager within Pro Tools. Tools such as Sound Libraries, Track Presets, and Catalogs can all be accessed here, but our focus is on the files within the open session. Examining the files listed here gives you a lot of information regarding the audio imported into your session and allows you to see which files are unlinked – the text is grayed out and in italics. You can then use the Relink command to open the relink window.
Within the Relink window, you can Find Links for specific files and in a specified location. You can also click on a higher-level folder or even entire volumes if you are unsure where the files could be located, but this takes significantly more time than locating the correct folder. You should always be cautious when moving files around or renaming files or folders with Pro Tools sessions, but it’s good to know where to solve linking errors if they come up.
There’s more…
As mentioned at the beginning of this recipe, it is sometimes possible to have linking errors appear when importing session data. If this is the case, Pro Tools might not recognize the audio files correctly, and it will remain this way unless you choose less restrictive forms of searching for files. After clicking the Find Links button, the Linking Options window will appear with the default options of finding File by Name and File ID, as well as Match Format and Match Duration selected. You can use Find by Name and deselect the other options to widen your search. Pro Tools will warn you about the dangers of linking a file that does not match the duration, so make sure you do link the correct file. This also reinforces the importance of good file naming.
You can also try the Find All Candidates button at the bottom. Instead of finding just one specific file, Pro Tools will offer you one or more files within the Candidates area of the window. Click the empty button to the left of the filename to see a Link icon appear – this denotes that this file will be used when relinking.


