The process of configuring the Active Directory starts by installing the Active Directory Domain Services role on Windows Server 2016. Once you've done this, you'll have installed the AD DS role, but AD DS will not yet be configured on the server. During configuration, you need to answer a few questions in order to successfully deploy a new forest or an additional domain controller.
Installing and configuring the Active Directory
Installing a new forest and domain controller
Before, or during, the configuration of a new forest or an additional domain controller, you need to answer the following questions:
- Do you want to install a new forest, a new tree, or an additional domain controller?
- What is the FQDN of the domain?
- Which domain and forest functional level do you need?
- Do you want to install DNS on the domain controller?
- Does the domain controller host the global catalog?
- Do you want to install RODC?
- What will the Directory Service Restore Mode (DSRM) password be?
- What is the name of NetBIOS?
- Where will the AD DS database, logs, and SYSVOL be stored?
Once you have the answers to these questions, you can start by configuring new forests or additional domain controllers. The whole process can be done through a GUI wizard or PowerShell. Both approaches will be covered in this chapter.
Installing a new forest (GUI)
Configuring a new forest using the GUI wizard is a straightforward process. If you have the answers to all the questions listed previously, you just need to follow the wizard:
- Go to Deployment Configuration:
- Select Add a new forest.
- Enter a Root domain name.
- Go to Domain Controller Options:
- Select Forest and Domain functional level.
- Check Domain Name System (DNS) server.
- Type the DSRM password.
- Go to Additional Options and verify the NetBIOS name, or change it if you need to.
- Go to Paths and change the paths if necessary. Otherwise, you can skip this step and keep the default values.
- Go to Review Options. Once you have configured everything, you need to review the configuration and confirm it.
- Go to Prerequisites Check. If you pass all the prerequisite checks, you just need to click Install and wait for AD DS to install.
- After the installation of AD DS, the server will restart automatically.
Installing a new forest on a Server Core installation
If you want to install and configure AD DS on Server Core, you need to use PowerShell instead of the GUI wizard. The steps in the process are same, but the approach is different:
- To begin with, you need to install an AD DS role on the server using the following command:
Install-WindowsFeature AD-Domain-Services -IncludeAllSubFeature -IncludeManagementTools
In the Install-WindowsFeature cmdlet, the -IncludeAllSubFeatures and -IncludeManagementTolls switches are very important. In this case, without those switches, Group Policy Management and RSAT for AD DS and AD LDS won't be installed.
- Once you have successfully installed the Active Directory Domain Services role, you need to run the following commands:
Import-Module ADDSDeployment
Install-ADDSForest -DomainName "mcsacertguide.local" -CreateDnsDelegation:$false -ForestMode "WinThreshold" -DomainMode "WinThreshold" -DomainNetbiosName "MCSACERTGUIDE" -InstallDns:$true -DatabasePath "C:\Windows\NTDS" -LogPath "C:\Windows\NTDS" -SysvolPath "C:\Windows\SYSVOL" -NoRebootOnCompletion:$false -Force:$true
The WinThreshold parameter in the -DomainMode and -ForestMode PowerShell switches defines that the highest domain and forest functional level will be used.
The switch for the DSRM password isn't included in this command, but once you run it, you will be asked to enter and confirm the password.
Installing a domain controller from Install from Media (IFM)
Sometimes, the network connection between two sites can be slow or unreliable. Bad network connectivity can cause issues with user authentication and reduce productivity. In this case, the best solution is to deploy an additional domain controller to the secondary site. The domain controller on the site will improve the authentication process, but before you add an additional domain controller to the domain, you need to avoid bad network issues during the initial AD DS replication, because the complete AD DS database and SYSVOL folder need to be replicated to the additional domain controller. Using the Install from Media (IFM) option, you will significantly reduce the amount of network traffic during the initial replication. To install the domain controller by IFM, you basically need to create a backup of AD DS and save the data to a USB drive or shared location.
The process starts on a read-write domain controller. RODC isn't a candidate for IFM, because you can't perform AD DS backup on a read-only database. You need to use the ndtsutil command-line tools to create an AD DS backup, which will be used later to promote an additional domain controller:
Ntdsutil
Activate instance ntds
Ifm
create SYSVOL full C:\IFM
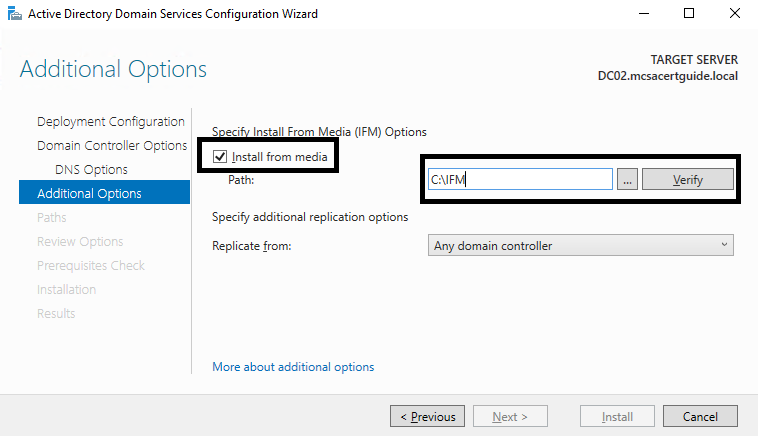
The whole process will last less than one minute, and then you can find all the necessary files in the provided folder. Once you have the AD DS backup on a local drive, you need to copy all the files to a new domain controller using a USB or external drive. The process of promoting a new domain controller using IFM is the same as the standard way, with only one difference. If you use the GUI wizard, on the Additional Setting tab, you just need to check the Install from Media checkbox and browse to the local folder where the AD DS backup files are stored.
The files will be verified automatically. If everything is fine with the AD DS backup, you will be able to go on to the next tab:
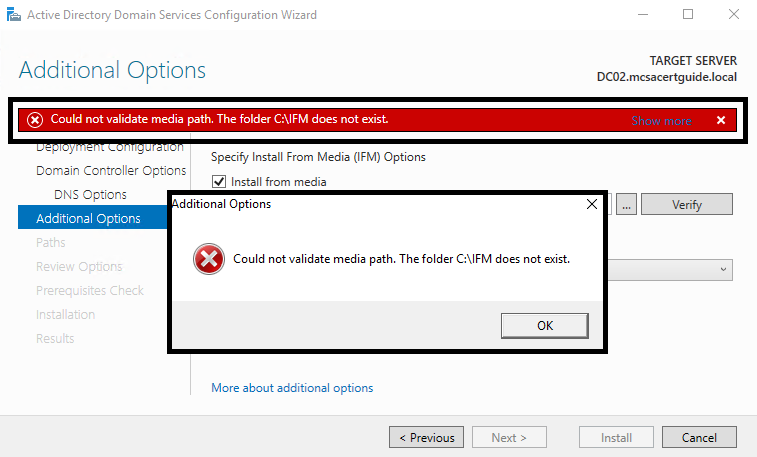
If the path isn't correct, you'll receive an error message:
If you use PowerShell to promote a new domain controller, you just need to add one more switch in the PowerShell command. You need to add a few more switches, so the command will look as follows:
Import-Module ADDSDeployment
Install-ADDSDomainController -DomainName "mcsacertguide.local" -CriticalReplicationOnly:$false -InstallationMediaPath "C:\IFM" -CreateDnsDelegation:$false -ForestMode "WinThreshold" -DomainMode "WinThreshold" -DomainNetbiosName "MCSACERTGUIDE" -InstallDns:$true -SiteName "Default-First-Site-Name" -DatabasePath "C:\Windows\NTDS" -LogPath "C:\Windows\NTDS" -SysvolPath "C:\Windows\SYSVOL" -NoRebootOnCompletion:$false -Force:$true
After initial replication using IFM, the new domain controller will replicate the other domain controllers using multi-master replication, the standard replication method.
Removing a domain controller from a domain
Adding a new domain controller was covered in the previous section. We now know how to deploy a new forest or an additional domain controller with the GUI wizard or with PowerShell commands. Sometimes, you need to remove the domain controller from the domain, a process that's logically different from adding a new domain controller.
The domain controller removal process consists of two steps: demoting the domain controller and removing an AD DS role from the server. Like other tasks, this can be done using either the GUI wizard or PowerShell commands.
If you want to remove the domain controller using the GUI wizard, the removal process consists of several steps that need to be performed:
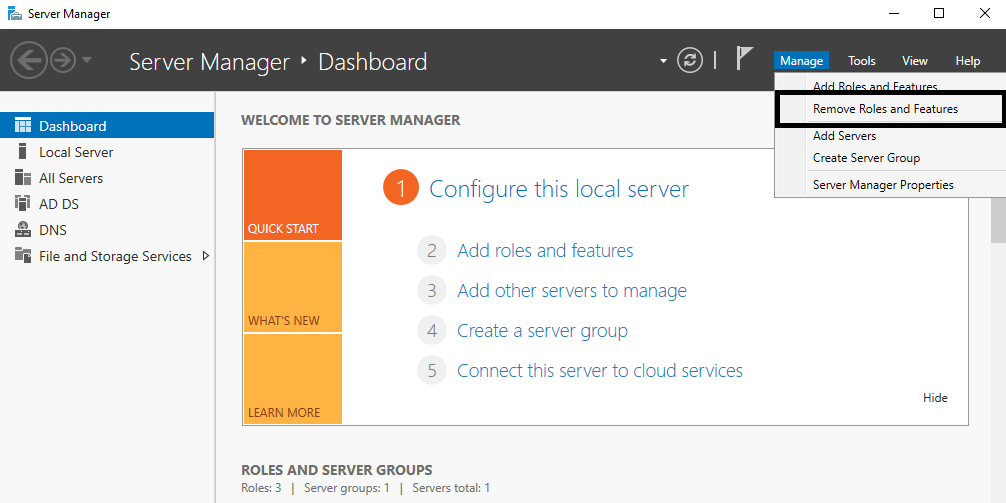
- The removal process starts with Remove Roles and Features using the Server Manager console:
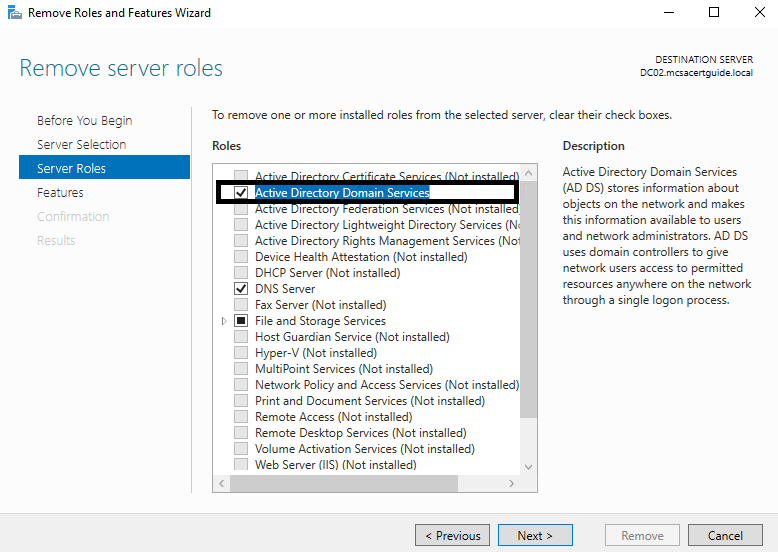
- You need to select the Active Directory Domain Services role, as that role needs to be removed:
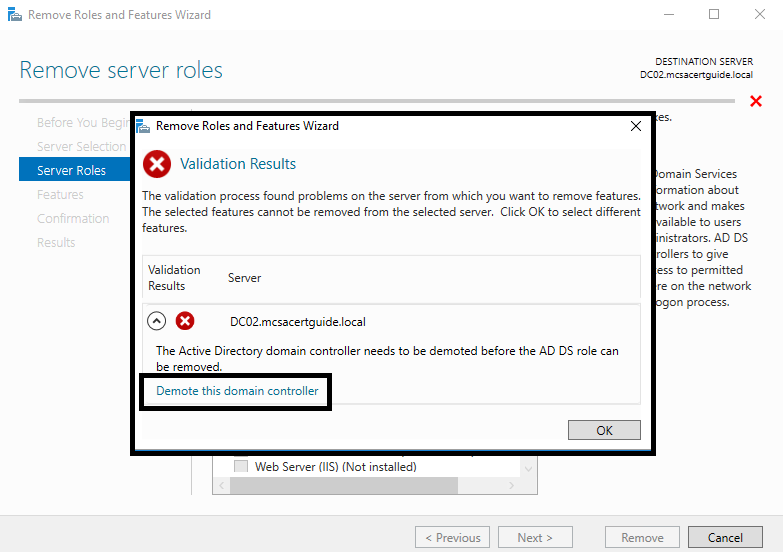
- Because the removal process is dependent on the demotion of the domain controller, the process will fail on validation. The wizard will give you the option to click on Demote this domain controller, as shown in the following screenshot. A new wizard for the demotion process will be opened automatically:
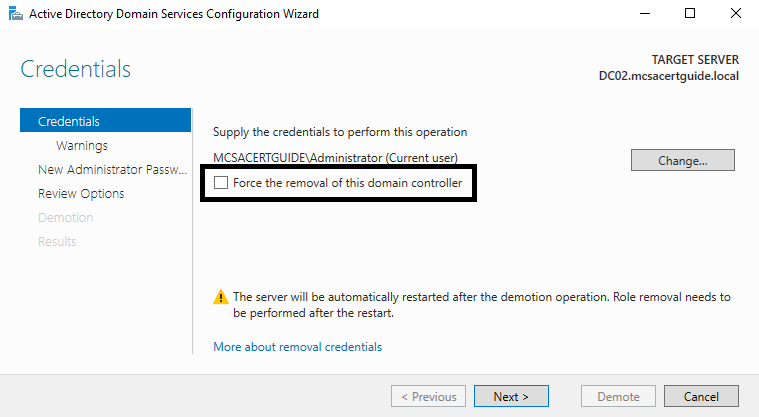
- If your domain controller is not the last in the domain, you don't need to check the Force the removal of this domain controller checkbox. If your domain controller is the last in the domain, or if it doesn't have any connectivity to other domain controllers, then you do need to check this checkbox:
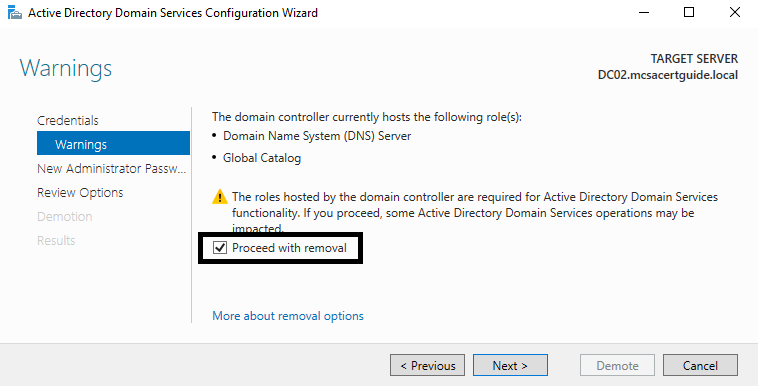
- Confirm that you want to proceed with the domain controller removal:
- Finally, you need to click on the Demote button to start the demotion process:
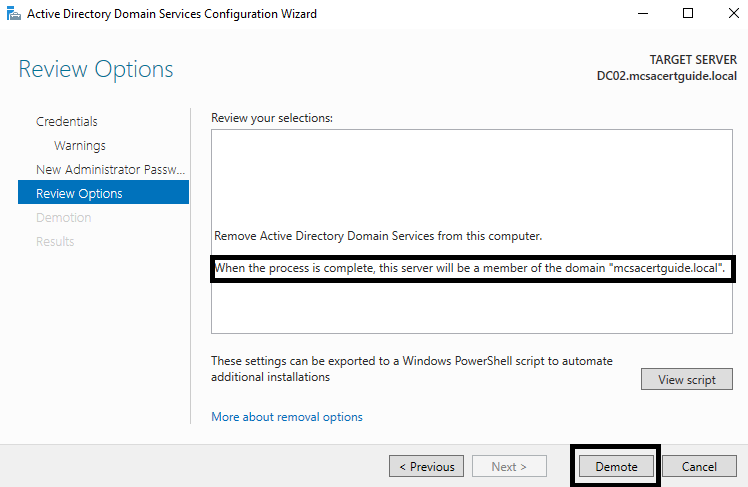
During the process, you'll be asked to enter your password twice. That is because the domain controller doesn't have local users or groups, and if you demote the domain controller from the server, the server will stay part of the domain as a member server. This means that the local users and groups will be active on the server again. The provided password is for the local Administrator account.
Once the domain controller is successfully demoted from the server, the server will restart. After the server is restarted, you need to start the AD DS removal process from the Server Manager in order to remove the AD DS role from the server.
If you decide to demote the domain controller and remove the AD DS role from the server using PowerShell, you need to start the process by demoting the domain controller. After that, you can remove the AD DS role from the server:
Import-Module ADDSDeployment
Uninstall-ADDSDomainController -DemoteOperationMasterRole:$true -Force:$true
You'll be asked to enter a new local administrator password twice. Once the PowerShell command successfully demotes the domain controller from the server, the server will restart. After the server is restarted, you need to run the following command to remove an AD DS role from the server:
Uninstall-WindowsFeature AD-Domain-Services -IncludeManagementTools -Restart
Upgrading a domain controller
Upgrading a domain controller is a process that's the same for all versions of Windows Server operating systems from Windows Server 2008. You can do this in one of two ways:
- Upgrade the operating system on existing domain controllers in place.
- Carry out a clean install and migrate to Windows Server 2016 as a new domain controller in the domain.
I personally prefer the second method, because when you finish, you will have a clean installation. The DNS records and AD DS database will be replicated on a new server.
In-place upgrade
If you want to upgrade an existing domain controller to Windows Server 2016, you need to perform an in-place upgrade. The source domain controller needs to be Windows Server 2008 or later. The in-place upgrade process doesn't perform an automatic schema and domain update; you need to run those command-line commands manually. The installation media includes the adprep.exe tool in \Support\Adprep. You need to run the following commands:
adprep.exe /forestprep
adprep.exe /domainprep
Once you have successfully performed the adprep commands, you can start by installing the upgraded operating system on a domain controller with the older OS version.
Domain-controller migration
If you decide to avoid potential in-place upgrade issues, but still want to upgrade your domain controllers to Windows Server 2016, you need to perform domain-controller migration. Although the word migration might make you nervous, domain-controller migration is actually a straightforward process. You just need to have Windows Server 2016 as a clean, installed operating system. Then, you can start the process of adding additional domain controllers in an existing domain, which is explained in one of the previous sections. During this process, DNS Zones, AD DS databases, and SYSVOL folders will be replicated on the new server.
Once you have at least two Windows Server 2016 domain controllers added to the existing domain, you can start the process of removing the old domain controllers. Before doing this, however, you need to do the following:
- Transfer all FSMO roles to new domain controllers.
- Change the IP addresses for the DNS servers to all domain computers.
Once you finish those tasks, you can start to remove the old domain controllers from the domain. When you remove the old domain controllers, you can upgrade the domain and the forest functional level to Windows Server 2016. After that, the domain and domain controllers are fully upgraded to the Windows Server 2016 version.
Configuring a global catalog server
As we've mentioned, the global catalog server is a domain controller that holds a global catalog. By default, the first domain controller in the forest root domain is the global catalog server. If you have a multi-domain environment that needs to be more scalable for cross-forest queries, you need to implement more than one global catalog server.
Configuring the global catalog on the domain controller can be done using the Active Directory Sites and Services MMC Snap-in or PowerShell commands. If you want to do this using a GUI, you just need to open the properties of domain controller and check the global catalog checkbox:
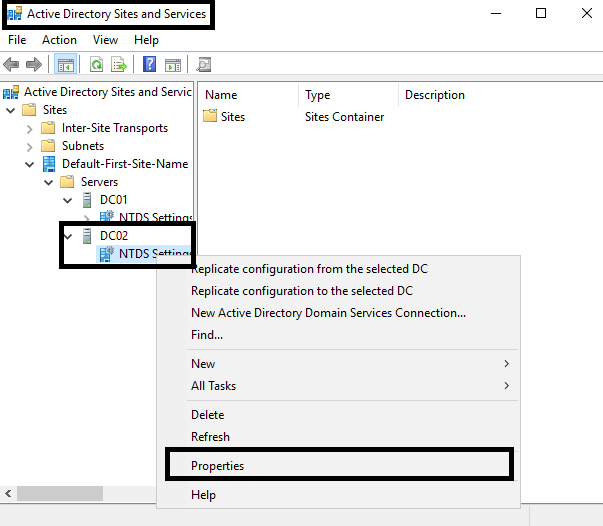
Once you open NTDS properties, you will be able to promote the server to a Global Catalog server and also remove the Global Catalog role from the server:
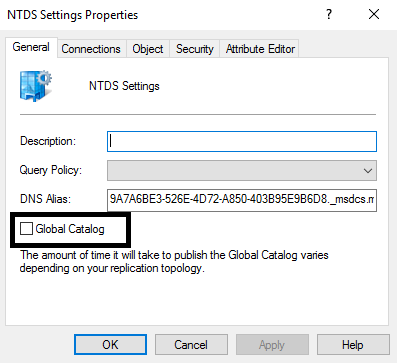
Using PowerShell, you need to run one of the following commands:
Set-ADObject -Identity (Get-ADDomainController DC02).ntdssettingsobjectdn -Replace @{options='1'}
Set-ADObject "CN=NTDS Settings,CN=DC02,CN=Servers,CN=Default-First-Site-Name,CN=Sites,CN=Configuration,DC=mcsacertguide,DC=local" -Replace @{options='1'}
Transferring and seizing operation master roles
Every forest and domain has FSMO roles that are important for a properly functioning AD DS environment. In some scenarios, such as a single domain infrastructure, the first domain controller in the forest root domain will hold all FSMO roles. Statistically, most organizations have this FSMO structure. Sometimes, however, you need to move one or more FSMO roles to another domain controller. This process can be planned, if we are demoting old domain controllers or workload balancing, or unplanned, due to a hardware failure of the domain controller that holds FSMO roles.
Transferring FSMO roles
Transferring an FSMO role is a planned action, in most cases, because we are demoting old domain controllers. When you transfer a role, the latest data will replicate to the target server. To transfer an FSMO role using the GUI, you need to use the following AD MMC Snap-ins:
| MMC Snap-in | FSMO role |
| Active Directory Users and Computers | PDC emulator, Infrastructure master, RID master |
| Active Directory Domain and Trust | Domain-naming master |
| Active Directory Schema | Schema master |
To transfer the PDC Emulator, Infrastructure master, and RID master FSMO roles, you need to use the Active Directory Users and Computers MMC Snap-in:
- Open MMC Snap-in.
- Select the domain and right-click on it.
- Select Operation Masters.
You will see three different tabs, one for each of these FSMO roles, and you can then perform a transfer.
To transfer the Domain-naming master FSMO role, you need to use the Active Directory Domain and Trust MMC Snap-in:
- Open MMC Snap-in.
- Select Active Directory Domains and Trusts and right-click on it.
- Select Operation Masters.
Then you will be able to perform the FSMO role transfer.
To transfer the Schema master FSMO role, you need to use a customized MMC Snap-in:
- If you haven't done so already, register the schema by running the regsvr32 schmmgmt.dll command.
- Open MMC Snap-in and open Active Directory Schema.
- Select the Active Directory Schema and right-click on it.
- Select Operation Masters.
Then you will be able to perform the FSMO role transfer.
Of course, the FSMO role transfer can also be done using PowerShell commands:
Move-ADDirectoryServerOperationMasterRole -Identity TargetDCName -OperationMasterRole FSMORoleName
As a parameter for the -OperationMasterRole switch in the PowerShell command, numbers can also be used instead of names. Here is a list of the roles and their corresponding numbers:
- PDCEmulator = 0
- RIDMaster = 1
- InfrastructureMaster = 2
- SchemaMaster = 3
- DomainNamingMaster = 4
Seizing FSMO roles
FSMO role-seizing is a last-resort action and is only used in scenarios in which the original domain controller isn't available, due to a hardware failure or accidental deletion. The available data on the other domain controllers might be incomplete or out of date. Unlike transferring, FSMO role-seizing can't be performed using Active Directory MMC Snap-ins. FSMO role-seizing can be completed only using PowerShell or the ntdsutil command-line tool.
The PowerShell command for FSMO role-seizing is the same as for transferring, but we need to include the -Force switch:
Move-ADDirectoryServerOperationMasterRole -Identity TargetDCName -OperationMasterRole FSMORoleName -Force
Installing and configuring a read-only domain controller (RODC)
As mentioned earlier, RODC is a read-only installation of AD DS. RODC installation can be performed in two different ways: a standard domain controller installation using the GUI wizard or PowerShell, or by creating a pre-staged computer account in AD DS for RODC. Both approaches will give you same result, but the pre-staged account configuration will force you to configure more settings related to RODC before promoting the server to RODC.
If you decide to go with the easier approach of using the GUI wizard, you just need to check the Read only domain controller (RODC) checkbox on the Domain Controller Options page:
- Go to Deployment Configuration and select Add a new domain to existing forest.
- Go to Domain Controller Options:
- Select the Forest and Domain functional level.
- Check Domain Name System (DNS) server.
- Check Read only domain controller (RODC).
- Type the DSRM password.
- Go to RODC Options:
- Define the RODC Administrator account (optional).
- Define which users or groups can replicate their passwords to RODC.
- Go to Additional Options and verify the NetBIOS name, or change it if you need to.
- Go to Paths and change the path if necessary. Otherwise, you can skip this step and keep the default values.
- Go to Review Options. Once you have configured everything, you need to review the configuration and confirm it.
- Go to Prerequisites Check. If you pass all prerequisite checks, you just need to click Install and wait for AD DS to install.
- After the installation of AD DS on the RODC, the server will restart automatically.
The PowerShell command that you will use to install RODC has a few more switches than the command that we used to install a standard domain controller:
Import-Module ADDSDeployment
Install-ADDSDomainController -DomainName "mcsacertguide.local" -InstallDns:$true -ReadOnlyReplica:$true -NoGlobalCatalog:$false -CriticalReplicationOnly:$false -AllowPasswordReplicationAccountName @("MCSACERTGUIDE\Allowed RODC Password Replication Group") -DenyPasswordReplicationAccountName @("BUILTIN\Administrators", "BUILTIN\Server Operators", "BUILTIN\Backup Operators", "BUILTIN\Account Operators", "MCSACERTGUIDE\Denied RODC Password Replication Group") -SiteName "Default-First-Site-Name" -DatabasePath "C:\Windows\NTDS" -LogPath "C:\Windows\NTDS" -SysvolPath "C:\Windows\SYSVOL" -NoRebootOnCompletion:$false -Force:$true
By default, RODC doesn't cache any passwords, for security reasons. In the RODC environment, you need to determine which passwords will be cached on RODC and which accounts need to be authenticated on a writable domain controller. By default, in the RODC environment, the system creates a domain-wide password-replication policy with two security groups:
- Allowed RODC Password Replication Group: Members of this group are allowed to cache passwords in RODC. By default, this group doesn't have any members.
- Denied RODC Password Replication Group: Members of this group aren't allowed to cache passwords in RODC. Some security-critical groups are members of this group by default, such as Administrators, Server Operators, Backup Operators, and Account Operators.
Configuring domain controller cloning
From Windows Server 2012, the fastest way to deploy a new domain controller is to clone computers. Prior to Windows Server 2012, only domain members could be cloned. Cloning copies the virtual drive of VMs and changes some configuration parameters, such as the IP address and the computer name. Cloning provides some benefits, such as rapidly provisioning computers with the same configuration and provisioning test environments.
Successful domain controller cloning requires the following:
- Hyper-V on Windows Server 2012 or later.
- Virtualized domain controllers that need to be Windows Server 2012 or later.
- A PDC emulator that runs on Windows Server 2012 or later. The PDC emulator must be online when the virtual domain controller clones start for the first time.
The domain-controller cloning process consist of several steps:
- Add the source domain controller to the Cloneable Domain Controllers group.
- Verify that the apps and services on the source domain support cloning and generate an XML file using the following PowerShell command:
Get-ADDCCloningExcludedApplicationList
Get-ADDCCloningExcludedApplicationList -GenerateXML
- Create the DCCloneConfig.xml file. When the cloning process recognizes it, a new domain controller will be created from the clone:
New-ADDCCloneConfigFile
- Shut down the source domain controller and export the virtual machine.
- Import a new virtual machine using the exported files.
- Name the new virtual machine and then copy the virtual machine (create a new unique ID).
- Start the cloned virtual machine.
Once you start the cloned domain controller, the clone checks whether the virtual machine identifier exists and reads the information stored in the previously created DCCloneConfig.xml file.


