Search icon CANCEL
Subscription
0
Cart icon
Your Cart (0 item)
Close icon
You have no products in your basket yet
Arrow left icon
Explore Products
Best Sellers
New Releases
Books
Videos
Audiobooks
Learning Hub
Free Learning
Arrow right icon
Microservices Development Cookbook

Microservices Development Cookbook: Design and build independently deployable modular services

eBook
€22.99 €32.99
Paperback
€41.99
Subscription
Free Trial
Renews at €18.99p/m

What do you get with eBook?

Product feature icon Instant access to your Digital eBook purchase
Product feature icon Download this book in EPUB and PDF formats
Product feature icon Access this title in our online reader with advanced features
Product feature icon DRM FREE - Read whenever, wherever and however you want
OR
Modal Close icon
Payment Processing...
tick Completed

Billing Address

Table of content icon View table of contents Preview book icon Preview Book

Microservices Development Cookbook

Breaking the Monolith

In this chapter, we will cover the following recipes:

  • Organizing your team to embrace microservices
  • Decomposing by business capability
  • Identifying bounded contexts
  • Migrating data in production
  • Refactoring your monolith
  • Evolving your monolith into services
  • Evolving your test suite
  • Using Docker for local development
  • Routing requests to services

Introduction

One of the hardest things about microservices is getting started. Many teams have found themselves building features into an ever-growing, hard-to-manage monolithic code base and don't know how to start breaking it apart into more manageable, separately deployable services. The recipes in this chapter will explain how to make the transition from monolith to microservices. Many of the recipes will involve no code whatsoever; instead, they will be focused on architectural design and how best to structure teams to work on microservices.

You'll learn how to begin moving from a single monolithic code base to suites of microservices. You'll also learn how to manage some of the initial challenges when you begin to develop features using this new architectural style.


Organizing your team

Conway's law tells us that organizations will produce designs whose structure is a copy of their communication structure. This often means that the organizational chart of an engineering team will have a profound impact on the structure of the designs of the software it produces. When a new startup begins building software, the team is small—sometimes it is comprised of just one or two engineers. In this setup, engineers work on everything, including frontend and backend systems, as well as operations. Monoliths suit this organizational structure very well, allowing engineers to work on any part of the system at any given time without moving between code bases.

As a team grows, and you start to consider the benefits of microservices, you can consider employing a technique commonly referred to as an the Inverse Conway Maneuver. This technique recommends evolving your team and organizational structure to encourage the kind of architectural style you want to see emerge. With regard to microservices, this will usually involve organizing engineers into small teams that you will eventually want to be responsible for a handful of related services. Setting your team up for this structure ahead of time can motivate engineers to build services by limiting communication and decision-making overhead within the team. Simply put, monoliths continue to exist when the cost of adding features as services is greater than the cost of adding a feature to the monolith. Organizing your teams in this way reduces the cost of developing services.

This recipe is aimed at managers and other leaders in companies who have the influence to implement changes to the structure of the organization.

How to do it…

Re-organizing a team is never a simple task, and there are many non-obvious factors to consider. Factors such as personality, individual strengths and weaknesses, and past histories are outside the scope of this recipe, but they should be considered carefully when making any changes. The steps in this recipe provide one possible way to move a team from being organized around a monolithic code base to being optimized for microservices, but there is no one-size-fits-all recipe for every organization.

Use the following steps as a guide if you think they apply, but otherwise use them for inspiration and to encourage thought and discussion:

  1. Working with other stakeholders in your organization, build out a product roadmap. You may have limited information about the challenges your organization will face in the short term, but do the best you can. It's perfectly natural to be very detailed for short-term items on a roadmap and very general for the longer term.
  2. Using the product roadmap, try to identify technical capabilities that will be required to help you deliver value to your users. For example, you may be planning to work on a feature that relies heavily on search. You may also have a number of features that rely on content uploading and management. This means that search and uploading are two technical capabilities you know you will need to invest in.
  3. As you see patterns emerge, try to identify the main functional areas of your application, paying attention to how much work you anticipate will go into each area. Assign higher priorities to the functional areas you anticipate will need a lot of investment in the short to medium term.
  4. Create new teams, ideally consisting of four to six engineers, who are responsible for one of the functional areas within your application. Start with the functional areas that you anticipate will require the most work over the next quarter or so. These teams can be focused on the backend services or they can be cross-functional teams that include the mobile and web engineers. The benefit of having cross-functional teams is that the team can then deliver the entire vertical component of the application autonomously. The combination of service engineers with engineers consuming their services will also enable more information sharing, and hopefully, empathy.

Discussion

Using this approach, you should end up with small, cohesive, and focused teams responsible for core areas of your application. The nature of teams is that individuals within the team should start to see the benefit of creating separately managed and deployed code bases that they can work in autonomously without the costly overhead of coordinating changes and deployments with other teams. 

To help illustrate these steps, imagine your organization builds an image-messaging application. The application allows users to take a photo with their smart phone and send it, along with a message, to a friend in their contacts list. Their friends can also send them photos with messages. A fictional roadmap for this fictional product could involve the need to add support for short videos, photo filters, and support for emojis. You now know that the ability to record, upload, and play videos, the ability to apply photo filters, and the ability to send rich text will be important to your organization. Additionally, you know from experience that users need to register, log in, and maintain a friends list. 

Using the preceding example, you may decide to organize engineers into a media team, responsible for uploading, processing and playing, filters, and storage and delivery, a messaging team, responsible for the sending of photo or video messages with associated text, and a users team, responsible for providing reliable authentication, registration, on-boarding, and social features.

Decomposing by business capability

In the early stages of product development, monoliths are the best suited to delivering features to users as quickly and simply as possible. This is appropriate, as at this point in a products development you do not have luxury problems of having to scale your teams, code bases or ability to serve customer traffic. Following good design practices, you separate your applications concerns into easy-to-read, modular code patterns. Doing so allows engineers to work on different sections of the code autonomously and limits the possibility of having to untangle complicated merge conflicts when it comes time to merge your branch into the master and deploy your code. 

Microservices require you to go a step further than the good design practices you've already been following in your monolith. To organize your small, autonomous teams around microservices, you should consider first identifying the core business capabilities that your application provides. Business capability is a business school term that describes the various ways your organization produces value. For example, your internal order management is responsible for processing customer orders. If you have a social application that allows users to submit user-generated content such as photos, your photo upload system provides a business capability. 

When thinking about system design, business capabilities are closely related to the Single Responsibility Principle (SRP) from object-oriented design (OOD). Microservices are essentially SRP extended to code bases. Thinking about this will help you design appropriately sized microservices. Services should have one primary job and they should do it well. This could be storing and serving images, delivering messages, or creating and authenticating user accounts.

How to do it...

Decomposing your monolith by business capability is a process. These steps can be carried out in parallel for each new service you identify a need for, but you may want to start with one service and apply the lessons you learn to subsequent efforts:

  1. Identify a business capability that is currently provided by your monolith. This will be the target for our first service. Ideally this business capability is something that has some focus on the roadmap you worked on in the previous recipe and ownership can be given to one of your newly created teams. Let's use our fictional photo messaging service as an example and assume we'll start with the ability to upload and display media as our first identified business capability. This functionality is currently implemented as a single model and controller in your Ruby on Rails monolith:
  1. In the preceding screenshot, AttachmentsController has four methods (called actions in Ruby on Rails lingo), which roughly correspond to the create, retrieve, update, delete (CRUD) operations you want to perform on an Attachment resource. We don't strictly need it, and so will omit the update action. This maps very nicely to a RESTful service, so you can design, implement, and deploy a microservice with the following API:
POST /attachments
GET /attachments/:id
DELETE /attachments/:id
  1. With the new microservice deployed (migrating data is discussed in a later recipe), you can now begin modifying client code paths to use the new service. You can begin by replacing the code in the AttachmentsController action's methods to make an HTTP request to our new microservice. Techniques for doing this are covered in the Evolving your monolith into services recipe later in this chapter.

Identifying bounded contexts

When designing microservices, a common point of confusion is how big or small a service should be. This confusion can lead engineers to focus on things such as the number of lines of code in a particular service. Lines of code are an awful metric for measuring software; it's much more useful to focus on the role that a service plays, both in terms of the business capability it provides and the domain objects it helps manage. We want to design services that have low coupling with other services, because this limits what we have to change when introducing a new feature in our product or making changes to an existing one. We also want to give services a single responsibility. 

When decomposing a monolith, it's often useful to look at the data model when deciding what services to extract. In our fictional image-messaging application, we can imagine the following data model:

We have a table for messages, a table for users, and a table for attachments. The Message entity has a one-to-many relationship with the User entity; every user can have many messages that originate from or are targeted at them, and every message can have multiple attachments. What happens as the application evolves and we add more features? The preceding data model does not include anything about social graphs. Let's imagine that we want a user to be able to follow other users. We'll define the following as a asymmetric relationship, just because user 1 follows user 2, that does not mean that user 2 follows user 1.

There are a number of ways to model this kind of relationship; we'll focus on one of the simplest, which is an adjacency list. Take a look at the following diagram:
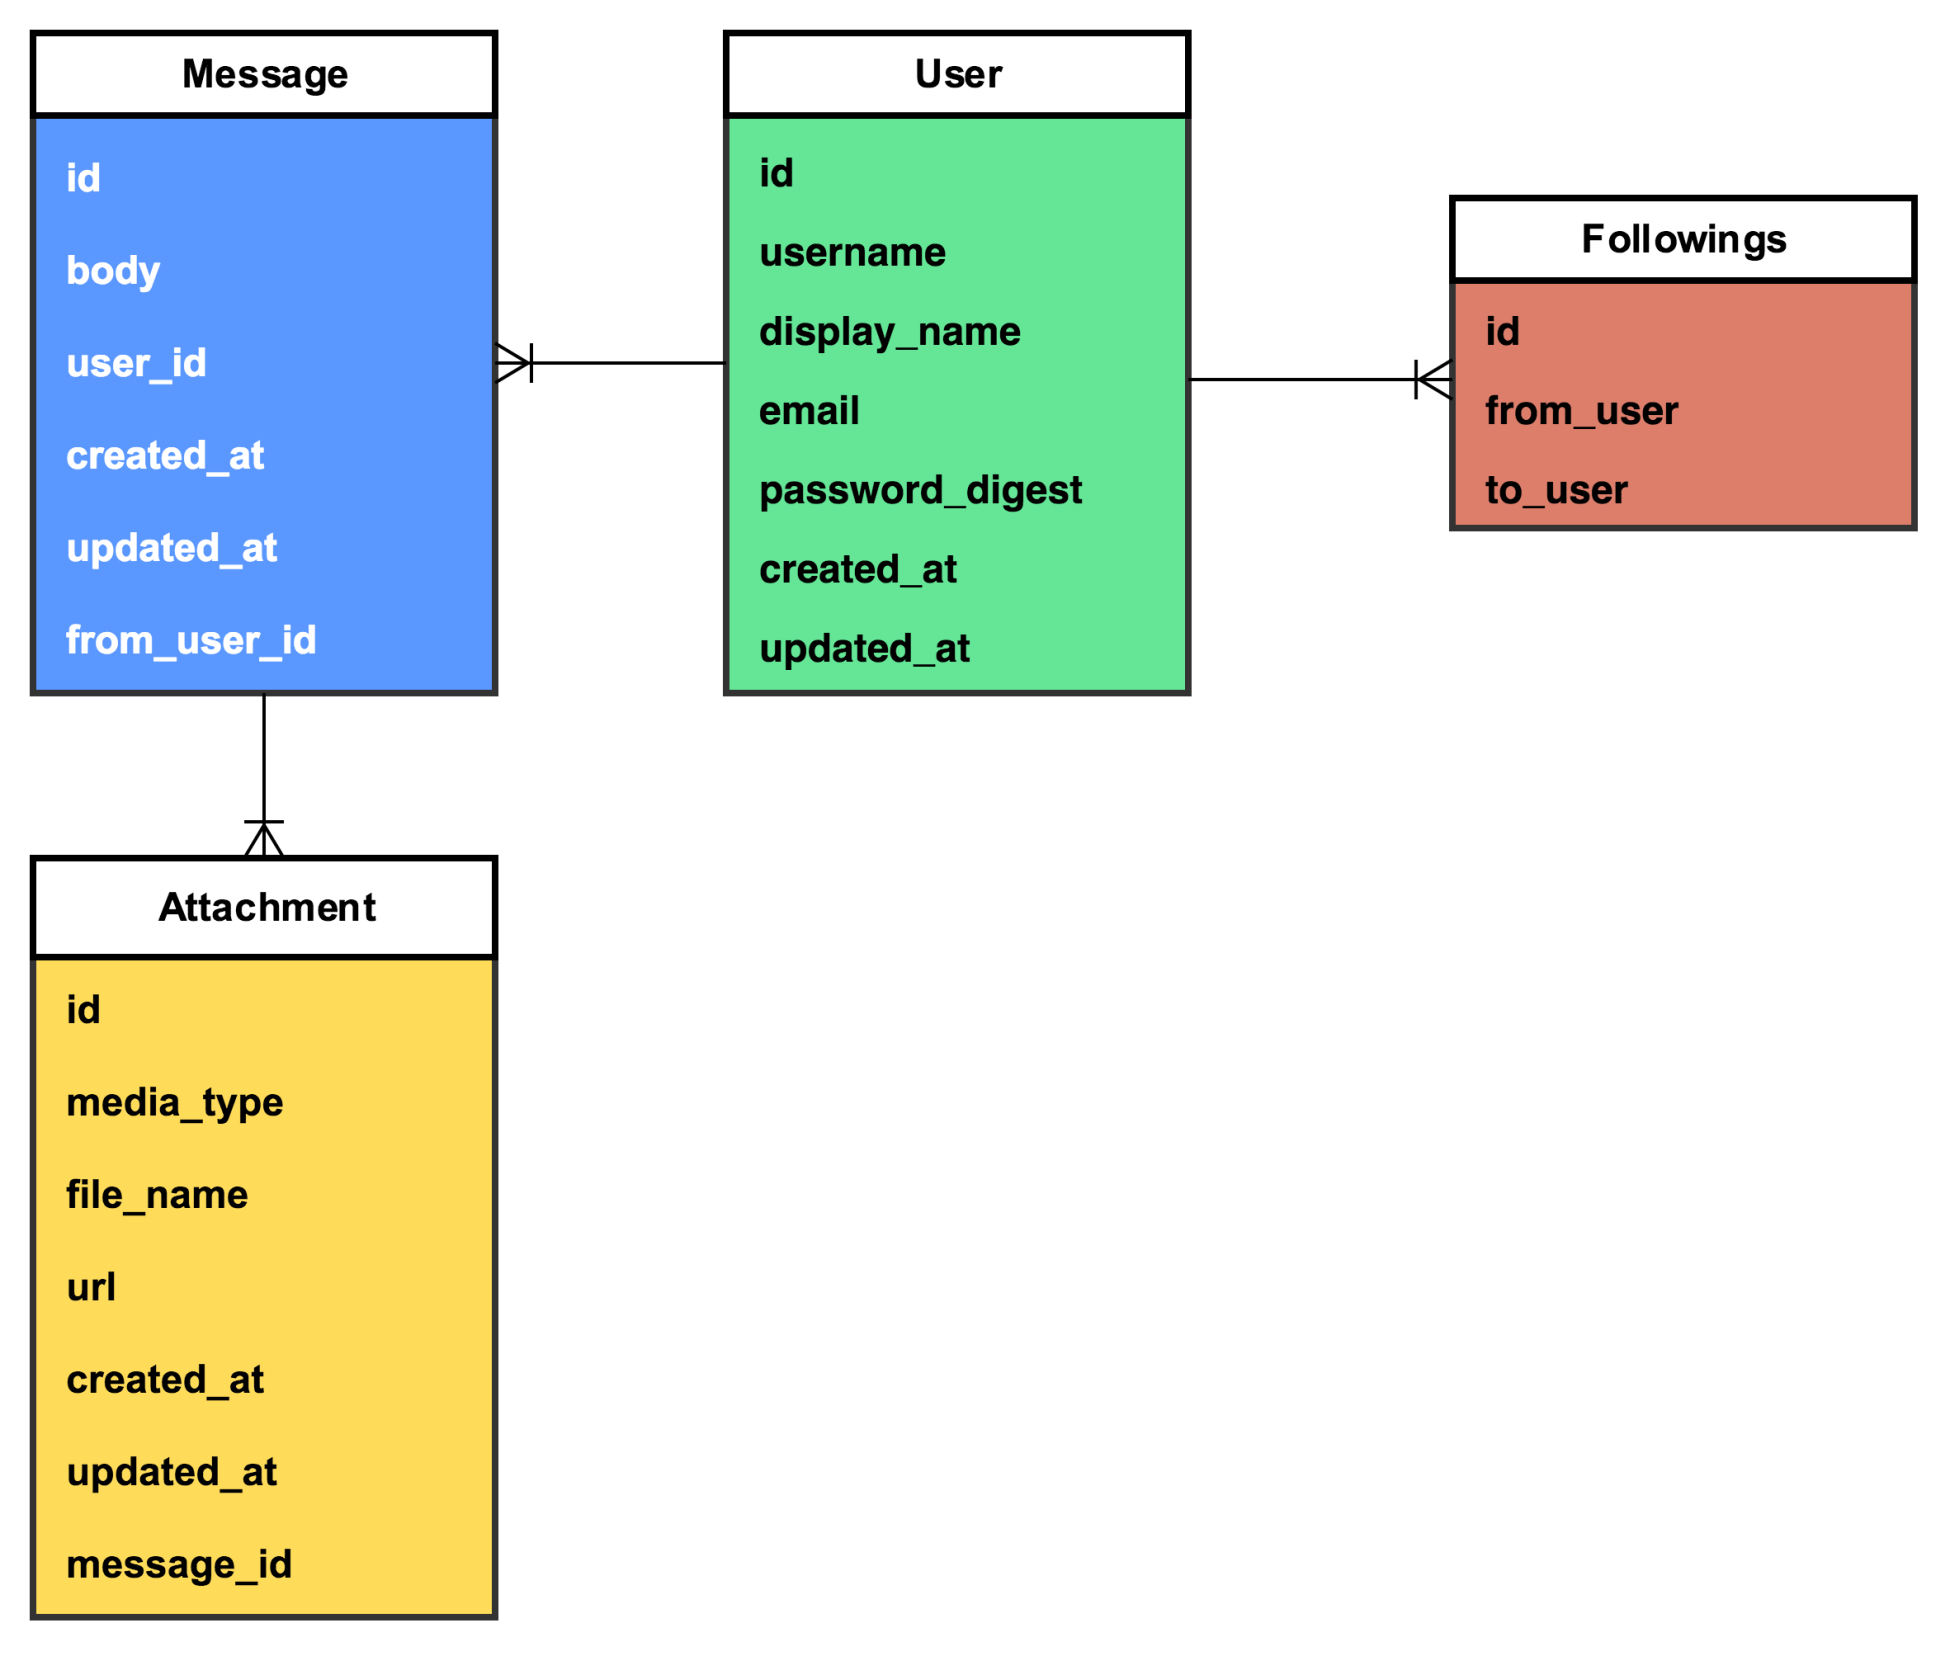
We now have an entity, Followings, to represent a follow relationship between two users. This works perfectly in our monolith, but introduces a challenge with microservices. If we were to build two new services, one to handle attachments, and another to handle the social graph (two distinct responsibilities), we now have two definitions of the user. This duplication of models is often necessary. The alternative is to have multiple services access and make updates to the same model, which is extremely brittle and can quickly lead to unreliable code.

This is where bounded contexts can help. A bounded context is a term from Domain-Driven Design (DDD) and it defines the area of a system within which a particular model makes sense. In the preceding example, the social-graph service would have a User model whose bounded context would be the users social graph (easy enough). The media service would have a User model whose bounded context would be photos and videos. Identifying these bounded contexts is important, especially when deconstructing a monolith—you'll often find that as a monolithic code base grows, the previously discussed business capabilities (uploading and viewing photos and videos, and user relationships) would probably end up sharing the same, bloated User model, which will then have to be untangled. This can be a tricky but enlightening and important process.

How to do it...

Deciding on how to define bounded contexts within a system can be a rewarding endeavor. The process itself encourages teams to have many interesting discussions about the models in a system and the various interactions that must happen between various systems:

  1. Before a team can start to define the bounded contexts it works with, it should first start listing the models that are owned by the parts of the system it works on. For example, the media team will obviously own the Attachment model, but it will also need to have information about users, and messages. The Attachment model may be entirely maintained within the context of the media teams services, but the others will have to have a well-defined bounded context that can be communicated to other teams if necessary.
  2. Once a team has identified potentially shared models, it's a good idea to have a discussion with other teams that use similar models or the same model.
  3. In those discussions, hammer out the boundaries of the model and decide whether it makes sense to share a model implementation (which in a microservice world would necessitate a service-to-service call) or go their separate ways and develop and maintain separate model implementations. If the choice is made to develop separate model implementations, it'll become important to clearly define the bounded context within which the model applies.
  4. The team should document clear boundaries in terms of teams, specific parts of the application, or specific code bases that should make use of the model.

Migrating data in production

Monolith code bases usually use a primary relational database for persistence. Modern web frameworks are often packaged with object-relational mapping (ORM), which allows you to define your domain objects using classes that correspond to tables in the database. Instances of these model classes correspond to rows in the table. As monolith code bases grow, it's not uncommon to see additional data stores, such as document or key value stores, be added. 

Microservices should not share access with the same database your monolith connects to. Doing so will inevitably cause problems when trying to coordinate data migrations, such as schema changes. Even schema-less stores will cause problems when you change the way data is written in one code base but not how data is read in another code base. For this and other reasons, it's best to have microservices fully manage the data stores they use for persistence.

When transitioning from a monolith to microservices, it's important to have a strategy for how to migrate data. All too often, a team will extract the code for a microservice and leave the data, setting themselves up for future pain. In addition to difficulty managing migrations, a failure in the monolith relational database will now have cascading impacts on services, leading to difficult-to-debug production incidents. 

One popular technique for managing large-scale data migrations is to set up dual writing. When your new service is deployed, you'll have two write pathsone from the original monolith code base to its database and one from your new service to its own data store. Make sure that writes go to both of these code paths. You'll now be replicating data from the moment your new service goes into production, allowing you to backfill older data using a script or a similar offline task. Once data is being written to both data stores, you can now modify all of your various read paths. Wherever the code is used to query the monolith database directly, replace the query with a call to your new service. Once all read paths have been modified, remove any write paths that are still writing to the old location. Now you can delete the old data (you have backups, right?). 

How to do it...

Migrating data from a monolith database to a new store fronted by a new service, without any impact on availability or consistency, is a difficult but common task when making the transition to microservices. Using our fictional photo-messaging application, we can imagine a scenario where we want to create a new microservice responsible for handling media uploads. In this scenario, we'd follow a common dual-writing pattern:

  1. Before writing a new service to handle media uploads, we'll assume that the monolith architecture looks something like the following diagram, where HTTP requests are being handled by the monolith, which presumably reads the multipart/form-encoded content body as a binary object and stores the file in a distributed file store (Amazon's S3 service, for example). Metadata about the file is then written to a database table, called attachments, as shown in the following diagram:

  1. After writing a new service, you now have two write paths. In the write path in the monolith, make a call to your service so that you're replicating the data in the monolith database as well as the database fronted by your new service. You're now duplicating new data and can write a script to backfill older data. Your architecture now looks something like this:
  1. Find all read paths in your Client and Monolith code, and update them to use your new service. All reads will now be going to your service, which will be able to give consistent results.
  2. Find all write paths in your Client and Monolith code, and update them to use your new service. All reads and writes are now going to your service, and you can safely delete old data and code paths. Your final architecture should look something like the following (we'll discuss edge proxies in later chapters):

Using this approach, you'll be able to safely migrate data from a monolith database to a new store created for a new microservice without the need for downtime. It's important not to skip this step; otherwise, you won't truly realize the benefits of microservice architectures (although, arguably, you'll experience all the downsides!). 

Refactoring your monolith

A common mistake when making the transition to microservices is to ignore the monolith and just build new features as services. This usually happens when a team feels that the monolith has gotten so out of control, and the code so unwieldy, that it would be better to declare bankruptcy and leave it to rot. This can be especially tempting because the idea of building green field code with no legacy baggage sounds a lot nicer than refactoring brittle, legacy code. 

Resist the temptation to abandon your monolith. To successfully decompose your monolith by business capability and start evolving it into a set of nicely factored, single-responsibility microservices, you'll need to make sure that your monolith code base is in good shape and is well factored, and well tested. Otherwise, you'll end up with a proliferation of new services that don't model your domain cleanly (because they overlap with functionality in the monolith), and you'll continue to have trouble working with any code that exists in your monolith. Your users won't be happy and your teams' energy will most likely start to decline as the weight of technical debt becomes unbearable. 

Instead, take constant, proactive steps to refactor your monolith using good, solid design principles. Excellent books have been written on the subject of refactoring (I recommend Refactoring by Martin Fowler and Working Effectively with Legacy Code by Michael Feathers), but the most important thing to know is that refactoring is never an all-or-nothing effort. Few product teams or companies will have the patience or luxury to wait while an engineering team stops the world and spends time making their code easier to change, and an engineering team that tries this will rarely be successful. Refactoring has to be a constant, steady process. 

However your team schedules its work, make sure you're reserving an appropriate time for refactoring. A guiding principle is, whenever you go to make a change, first make the change easy to make, then make the change. Your goal is to make your monolith code easier to work with, easier to understand, and less brittle. You should also be able to develop a robust test suite that will come in handy.

Once your monolith is in better shape, you can start to continuously shrink the monolith as you factor out services. Another aspect of most monolith code bases is serving dynamically generated views and static assets served through browsers. If your monolith is responsible for this, consider moving your web application component into a separately served JavaScript application. This will allow you to shrink your monolith from multiple directions.

How to do it...

Refactoring any code base is a process. For monoliths, there are a few techniques that can work quite well. In this example, we'll document the steps that can be taken to make refactoring a Ruby on Rails code base easy:

  1. Using the techniques described in previous recipes, identify business capabilities and bounded contexts within your application. Let's focus on the ability to upload pictures and videos. 


  1. Create a directory called app/services alongside controllers, models, and views. This directory will hold all of your service objects. Service objects are a pattern used in many Rails applications to factor out a conceptual service into a ruby object that does not inherit any Ruby on Rails functionality. This will make it easier to move the functionality encapsulated within a service object into a separate microservice. There is no one way to structure your service objects. I prefer to have each object represent a service, and move operations I want that service to be responsible for to that service object as methods. 
  2. Create a new file called attachments_service.rb under app/services and give it the following definition:
class AttachmentsService

def upload
# ...
end

def delete!
# ...
end

end
  1. Looking at the source code for the AttachmentsController#create method in the app/controllers/attachments_controller.rb file, it currently handles the responsibility for creating the Attachment instance and uploading the file data to the attachment store, which in this case is an Amazon S3 bucket. This is the functionality that we need to move to the newly created service object:
# POST /messages/:message_id/attachments
def create
message = Message.find_by!(params[:message_id], user_id:
current_user.id)
file = StorageBucket.files.create(
key: params[:file][:name],
body: StringIO.new(Base64.decode64(params[:file][:data]),
'rb'),
public: true
)
attachment = Attachment.new(attachment_params.merge!(message:
message))
attachment.url = file.public_url
attachment.file_name = params[:file][:name]
  attachment.save
json_response({ url: attachment.url }, :created)
end
  1. Open the newly created service object in the app/services/attachments_service.rb file and move the responsibility for uploading the file to the AttachmentsService#upload method:
class AttachmentsService

def upload(message_id, user_id, file_name, data, media_type)
message = Message.find_by!(message_id, user_id: user_id)
file = StorageBucket.files.create(
key: file_name,
body: StringIO.new(Base64.decode64(data), 'rb'),
public: true
)
Attachment.create(
media_type: media_type,
file_name: file_name,
url: file.public_url,
message: message
)
end

def delete!
end
end
  1. Now upload the AttachmentsController#create method in app/controllers/attachments_controller.rb to use the newly created AttachmentsService#upload method:
# POST /messages/:message_id/attachments
def create
service = AttachmentService.new
attachment = service.upload(params[:message_id], current_user.id,
params[:file][:name], params[:file][:data],
params[:media_type])
json_response({ url: attachment.url }, :created)
end
  1. Repeat this process for code in the AttachmentsController#destroy method, moving the responsibility to the new service object. When you're finished, no code in AttachmentsController should be interacting with the Attachments model directly; instead, it should be going through the AttachmentsService service object.

You've now isolated responsibility for the management of attachments to a single service class. This class should encapsulate all of the business logic that will eventually be moved to a new attachment service.

Evolving your monolith into services

One of the most complicated aspects of transitioning from a monolith to services can be request routing. In later recipes and chapters, we'll explore the topic of exposing your services to the internet so that the mobile and web client applications can communicate directly with them. For now, however, having your monolith act as a router can serve as a useful intermediary step. 

As you break your monolith into small, maintainable microservices, you can replace code paths in your monolith with calls to your services. Depending on the programming language or framework you used to build your monolith, these sections of code can be called controller actions, views, or something else. We'll continue to assume that your monolith was built in the popular Ruby on Rails framework; in which case, we'll be looking at controller actions. We'll also assume that you've begun refactoring your monolith and have created one or more service objects as described in the previous recipe.

It's important when doing this to follow best practices. In later chapters, we'll introduce concepts, such as circuit breakers, that become important when doing service-to-service communication. For now, be mindful that HTTP calls from your monolith to a service could fail, and you should consider how best to handle that kind of situation. 

How to do it...

  1. Open the service object we created in the previous recipe. We'll modify the service object to be able to call an external microservice responsible for managing attachments. For the sake of simplicity, we'll use an HTTP client that is provided in the Ruby standard library. The service object should be in the app/services/attachments_service.rb file:
class AttachmentsService

BASE_URI = "http://attachment-service.yourorg.example.com/"

def upload(message_id, user_id, file_name, data, media_type)
body = {
user_id: user_id,
file_name: file_name,
data: StringIO.new(Base64.decode64(params[:file]
[:data]), 'rb'),
message: message_id,
media_type: media_type
}.to_json
uri = URI("#{BASE_URI}attachment")
headers = { "Content-Type" => "application/json" }
Net::HTTP.post(uri, body, headers)
end

end
  1. Open the attachments_controller.rb file, located in pichat/app/controllers/, and look at the following create action. Because of the refactoring work done in the previous chapter, we require only a small change to make the controller work with our new service object:
class AttachmentsController < ApplicationController
# POST /messages/:message_id/attachments
def create
service = AttachmentService.new
response = service.upload(params[:message_id], current_user.id,
params[:file][:name], params[:file][:data],
params[:media_type])
json_response(response.body, response.code)
end
# ...
end

Evolving your test suite

Having a good test suite in the first place will help tremendously as you move from a monolith to microservices. Each time you remove functionality from your monolith code base, your tests will need to be updated. It's tempting to replace unit and functional tests in your Rails app with tests that make external network calls to your services, but this approach has a number of downsides. Tests that make external calls will be prone to failures caused by intermittent network connectivity issues and will take an enormous amount of time to run after a while.

Instead of making external network calls, you should modify your monolith tests to stub microservices. Tests that use stubs to represent calls to microservices will be less brittle and will run faster. As long as your microservices satisfy the API contracts you develop, the tests will be reliable indicators of your monolith code base's health. Making backwards-incompatible changes to your microservices is another topic that will be covered in a later recipe. 

Getting ready

We'll use the webmock gem for stubbing out external HTTP requests in our tests, so update your monolith gemfile to include the webmock gem in the test group:

group :test do
# ...
gem 'webmock'
end

You should also update spec/spec_helper.rb to disable external network requests. That will keep you honest when writing the rest of your test code:

require 'webmock/rspec'
WebMock.disable_net_connect!(allow_localhost: false)

How to do it...

Now that you have webmock included in your project, you can start stubbing HTTP requests in your specs. Once again, open specs/spec_helper.rb and add the following content:

stub_request(:post, "attachment-service.yourorg.example.com").
  with(body: {media_type: 1}, headers: {"Content-Type" => /image\/.+/}).
  to_return(body: { foo: bar })

Using Docker for local development

As we've discussed, microservices solve a particular set of problems but introduce some new challenges of their own. One challenge that engineers on your team will probably run into is doing local development. With a monolith, there are fewer moving parts that have to be managed—usually, you can get away with just running a database and an application server on your workstation to get work done. As you start to create new microservices, however, the situation gets more complicated. 

Containers are a great way to manage this complexity. Docker is a popular, open source software containerization platform. Docker allows you to specify how to run your application as a container—a lightweight standardized unit for deployment. There are plenty of books and online documentation about Docker, so we won't go into too much detail here, just know that a container encapsulates all of the information needed to run your application. As mentioned, a monolith application will often require an application server and a database server at a minimum—these will each run in their own container.

Docker Compose is a tool for running multicontainer applications. Compose allows you to define your applications containers in a YAML configuration file. Using the information in this file, you can then build and run your application. Compose will manage all of the various services defined in the configuration file in separate containers, allowing you to run a complex system on your workstation for local development.

Getting ready

Before you can follow the steps in this recipe, you'll need to install the required software:

  1. Install Docker. Download the installation package from the Docker website (https://www.docker.com/docker-mac) and follow the instructions.
  2. Install docker-compose by executing the following command line on macOS X:
brew install docker-compose

On Ubuntu Linux, you can execute the following command line:

apt-get install docker-compose

With those two packages installed, you'll be ready to follow the steps in this recipe.  

How to do it...

  1. In the root directory of your Rails application, create a single file called Dockerfile with the following contents:
  FROM ruby:2.3.3
RUN apt-get update -qq && apt-get install -y build-essential
libpq-dev nodejs RUN mkdir /pichat WORKDIR /pichat ADD Gemfile /pichat/Gemfile ADD Gemfile.lock /pichat/Gemfile.lock RUN bundle install ADD . /pichat
  1. Create a file called docker-compose.yml with the following contents:
version: '3'
services:
db:
image: mysql:5.6.34
ports:
- "3306:3306"
environment:
MYSQL_ROOT_PASSWORD: root

app:
build: .
environment:
RAILS_ENV: development
command: bundle exec rails s -p 3000 -b '0.0.0.0'
volumes:
- .:/pichat
ports:
- "3000:3000"
depends_on:
- db
  1. Start your application by running the docker-compose up app command. You should be able to access your monolith by entering http://localhost:3000/ in your browser. You can use this approach for new services that you write.

Routing requests to services

In previous recipes, we focused on having your monolith route requests to services. This technique is a good start since it requires no client changes to work. Your clients still make requests to your monolith and your monolith marshals the request to your microservices through its controller actions. At some point, however, to truly benefit from a microservices architecture, you'll want to remove the monolith from the critical path and allow your clients to make requests to your microservices. It's not uncommon for an engineer to expose their organization's first microservice to the internet directly, usually using a different hostname. However, this starts to become unmanageable as you develop more services and need a certain amount of consistency when it comes to monitoring, security, and reliability concerns.

Internet-facing systems face a number of challenges. They need to be able to handle a number of security concerns, rate limiting, periodic spikes in traffic, and so on. Doing this for each service you expose to the public internet will become very expensive, very quickly. Instead, you should consider having a single edge service that supports routing requests from the public internet to internal services. A good edge service should support common features, such as dynamic path rewriting, load shedding, and authentication. Luckily, there are a number of good open source edge service solutions. In this recipe, we'll use a Netflix project called Zuul.

How to do it...

  1. Create a new Spring Boot service called Edge Proxy with a main class called EdgeProxyApplication.
  2. Spring Cloud includes an embedded Zuul proxy. Enable it by adding the @EnableZuulProxy annotation to your EdgeProxyApplication class:
package com.packtpub.microservices;

import org.springframework.boot.SpringApplication;
import org.springframework.boot.autoconfigure.SpringBootApplication;
import org.springframework.cloud.netflix.zuul.EnableZuulProxy;

@EnableZuulProxy
@SpringBootApplication
public class EdgeProxyApplication {

public static void main(String[] args) {
SpringApplication.run(EdgeProxyApplication.class, args);
}

}
  1. Create a file called application.properties under src/main/resources/ with the following contents:
zuul.routes.media.url=http://localhost:8090
ribbon.eureka.enabled=false
server.port=8080

In the preceding code, it tells zuul to route requests to /media to a service running on port 8090. We'll touch on that eureka option in later chapters when we discuss service discovery, for now just make sure it's set to false

At this point, your service should be able to proxy requests to the appropriate service. You've just taken one of the biggest steps toward building a microservices architecture. Congratulations!

Left arrow icon Right arrow icon
Download code icon Download Code

Key benefits

  • Get to grips with microservice architecture to build enterprise-ready applications
  • Adopt best practices to find solutions to specific problems
  • Monitor and manage your services in production

Description

Microservices have become a popular choice for building distributed systems that power modern web and mobile apps. They enable you to deploy apps as a suite of independently deployable, modular, and scalable services. With over 70 practical, self-contained tutorials, the book examines common pain points during development and best practices for creating distributed microservices. Each recipe addresses a specific problem and offers a proven, best-practice solution with insights into how it works, so you can copy the code and configuration files and modify them for your own needs. You’ll start by understanding microservice architecture. Next, you'll learn to transition from a traditional monolithic app to a suite of small services that interact to ensure your client apps are running seamlessly. The book will then guide you through the patterns you can use to organize services, so you can optimize request handling and processing. In addition this, you’ll understand how to handle service-to-service interactions. As you progress, you’ll get up to speed with securing microservices and adding monitoring to debug problems. Finally, you’ll cover fault-tolerance and reliability patterns that help you use microservices to isolate failures in your apps. By the end of this book, you’ll have the skills you need to work with a team to break a large, monolithic codebase into independently deployable and scalable microservices.

Who is this book for?

Microservice Development Cookbook is for developers who want to build effective and scalable microservices. Basic knowledge of microservices architecture is assumed.

What you will learn

  • Learn how to design microservice-based systems
  • Develop services that do not impact users during failures
  • Monitor your services to perform debugging and create observable systems
  • Manage the security of your services
  • Create fast and reliable deployment pipelines
  • Manage multiple environments for your services
  • Simplify the local development of microservice-based systems

Product Details

Country selected
Publication date, Length, Edition, Language, ISBN-13
Publication date : Aug 31, 2018
Length: 260 pages
Edition : 1st
Language : English
ISBN-13 : 9781788476362
Concepts :
Tools :

What do you get with eBook?

Product feature icon Instant access to your Digital eBook purchase
Product feature icon Download this book in EPUB and PDF formats
Product feature icon Access this title in our online reader with advanced features
Product feature icon DRM FREE - Read whenever, wherever and however you want
OR
Modal Close icon
Payment Processing...
tick Completed

Billing Address

Product Details

Publication date : Aug 31, 2018
Length: 260 pages
Edition : 1st
Language : English
ISBN-13 : 9781788476362
Concepts :
Tools :

Packt Subscriptions

See our plans and pricing
Modal Close icon
€18.99 billed monthly
Feature tick icon Unlimited access to Packt's library of 7,000+ practical books and videos
Feature tick icon Constantly refreshed with 50+ new titles a month
Feature tick icon Exclusive Early access to books as they're written
Feature tick icon Solve problems while you work with advanced search and reference features
Feature tick icon Offline reading on the mobile app
Feature tick icon Simple pricing, no contract
€189.99 billed annually
Feature tick icon Unlimited access to Packt's library of 7,000+ practical books and videos
Feature tick icon Constantly refreshed with 50+ new titles a month
Feature tick icon Exclusive Early access to books as they're written
Feature tick icon Solve problems while you work with advanced search and reference features
Feature tick icon Offline reading on the mobile app
Feature tick icon Choose a DRM-free eBook or Video every month to keep
Feature tick icon PLUS own as many other DRM-free eBooks or Videos as you like for just €5 each
Feature tick icon Exclusive print discounts
€264.99 billed in 18 months
Feature tick icon Unlimited access to Packt's library of 7,000+ practical books and videos
Feature tick icon Constantly refreshed with 50+ new titles a month
Feature tick icon Exclusive Early access to books as they're written
Feature tick icon Solve problems while you work with advanced search and reference features
Feature tick icon Offline reading on the mobile app
Feature tick icon Choose a DRM-free eBook or Video every month to keep
Feature tick icon PLUS own as many other DRM-free eBooks or Videos as you like for just €5 each
Feature tick icon Exclusive print discounts

Frequently bought together


Stars icon
Total 120.97
Software Architect’s Handbook
€41.99
Microservices Development Cookbook
€41.99
Microservice Patterns and Best Practices
€36.99
Total 120.97 Stars icon
Banner background image

Table of Contents

10 Chapters
Breaking the Monolith Chevron down icon Chevron up icon
Edge Services Chevron down icon Chevron up icon
Inter-service Communication Chevron down icon Chevron up icon
Client Patterns Chevron down icon Chevron up icon
Reliability Patterns Chevron down icon Chevron up icon
Security Chevron down icon Chevron up icon
Monitoring and Observability Chevron down icon Chevron up icon
Scaling Chevron down icon Chevron up icon
Deploying Microservices Chevron down icon Chevron up icon
Other Books You May Enjoy Chevron down icon Chevron up icon

Customer reviews

Rating distribution
Full star icon Full star icon Full star icon Full star icon Full star icon 5
(1 Ratings)
5 star 100%
4 star 0%
3 star 0%
2 star 0%
1 star 0%
Mattia Gheda Nov 14, 2018
Full star icon Full star icon Full star icon Full star icon Full star icon 5
If you’ve felt the pain of maintaining a monolith but are not sure on how to get started with your move to microservices, then you should read this book.Using a practical approach, each chapter guides the reader through the steps and caveats that building an application based on microservices presents. Code samples included.
Amazon Verified review Amazon
Get free access to Packt library with over 7500+ books and video courses for 7 days!
Start Free Trial

FAQs

How do I buy and download an eBook? Chevron down icon Chevron up icon

Where there is an eBook version of a title available, you can buy it from the book details for that title. Add either the standalone eBook or the eBook and print book bundle to your shopping cart. Your eBook will show in your cart as a product on its own. After completing checkout and payment in the normal way, you will receive your receipt on the screen containing a link to a personalised PDF download file. This link will remain active for 30 days. You can download backup copies of the file by logging in to your account at any time.

If you already have Adobe reader installed, then clicking on the link will download and open the PDF file directly. If you don't, then save the PDF file on your machine and download the Reader to view it.

Please Note: Packt eBooks are non-returnable and non-refundable.

Packt eBook and Licensing When you buy an eBook from Packt Publishing, completing your purchase means you accept the terms of our licence agreement. Please read the full text of the agreement. In it we have tried to balance the need for the ebook to be usable for you the reader with our needs to protect the rights of us as Publishers and of our authors. In summary, the agreement says:

  • You may make copies of your eBook for your own use onto any machine
  • You may not pass copies of the eBook on to anyone else
How can I make a purchase on your website? Chevron down icon Chevron up icon

If you want to purchase a video course, eBook or Bundle (Print+eBook) please follow below steps:

  1. Register on our website using your email address and the password.
  2. Search for the title by name or ISBN using the search option.
  3. Select the title you want to purchase.
  4. Choose the format you wish to purchase the title in; if you order the Print Book, you get a free eBook copy of the same title. 
  5. Proceed with the checkout process (payment to be made using Credit Card, Debit Cart, or PayPal)
Where can I access support around an eBook? Chevron down icon Chevron up icon
  • If you experience a problem with using or installing Adobe Reader, the contact Adobe directly.
  • To view the errata for the book, see www.packtpub.com/support and view the pages for the title you have.
  • To view your account details or to download a new copy of the book go to www.packtpub.com/account
  • To contact us directly if a problem is not resolved, use www.packtpub.com/contact-us
What eBook formats do Packt support? Chevron down icon Chevron up icon

Our eBooks are currently available in a variety of formats such as PDF and ePubs. In the future, this may well change with trends and development in technology, but please note that our PDFs are not Adobe eBook Reader format, which has greater restrictions on security.

You will need to use Adobe Reader v9 or later in order to read Packt's PDF eBooks.

What are the benefits of eBooks? Chevron down icon Chevron up icon
  • You can get the information you need immediately
  • You can easily take them with you on a laptop
  • You can download them an unlimited number of times
  • You can print them out
  • They are copy-paste enabled
  • They are searchable
  • There is no password protection
  • They are lower price than print
  • They save resources and space
What is an eBook? Chevron down icon Chevron up icon

Packt eBooks are a complete electronic version of the print edition, available in PDF and ePub formats. Every piece of content down to the page numbering is the same. Because we save the costs of printing and shipping the book to you, we are able to offer eBooks at a lower cost than print editions.

When you have purchased an eBook, simply login to your account and click on the link in Your Download Area. We recommend you saving the file to your hard drive before opening it.

For optimal viewing of our eBooks, we recommend you download and install the free Adobe Reader version 9.