Installing everything you need to run Optimus
To start using Optimus, you will need a laptop with Windows, Ubuntu, or macOS installed with support for Python, PIP packages, and Conda. If you are new to Python, PIP is the main package manager. It allows Python users to install and manage packages that expand the Python standard library's functionality.
The easiest way to install Optimus is through PIP. It will allow us to start running examples in just a few minutes. Later in this section, we will see some examples of Optimus running on a notebook, on a shell terminal, and on a file read by Python, but before that, we will need to install Optimus and its dependencies.
First, let's install Anaconda.
Installing Anaconda
Anaconda is a free and open source distribution of the Python and R programming languages. The distribution comes with the Python interpreter, Conda, and various packages related to machine learning and data science so that you can start easier and faster.
To install Anaconda on any system, you can use an installer or install it through a system package manager. In the case of Linux and macOS, you can install Anaconda using APT or Homebrew, respectively.
On Linux, use the following command:
sudo apt-get install anaconda # on Linux
For macOS and Windows, go to https://www.anaconda.com/products/individual. Download the Windows file that best matches your system and double-click the file after downloading it to start the installation process:
brew cask install anaconda # on macOS
With Anaconda now installed, let's install Optimus.
Installing Optimus
With Anaconda installed, we can use Conda to install Optimus:
As stated on the Conda website, Conda is provides "package, dependency, and environment management for any language." With Conda, we can manage multiple Python environments without polluting our system with dependencies. For example, you could create a Conda environment that uses Python 3.8 and pandas 0.25, and another with Python 3.7 and pandas 1.0. Let's take a look:
- To start, we need to open the Anaconda Prompt. This is just the command-line interface that comes with Conda:
- For Windows: From the Start menu, search for and open Anaconda Prompt.
- For macOS: Open Launchpad and click the Terminal icon.
- For Linux: Open a Terminal window.
- Now, in the terminal, we are going to create a Conda environment named Optimus to create a clean Optimus installation:
conda create -n optimus python=3.8
- Now, you need to change from the
(base)environment to the(optimus)environment using the following command:conda activate optimus
- Running the following command on your terminal will install Optimus with its basic features, ready to be tested:
pip install pyoptimus
- If you have done this correctly, running a simple test will tell us that everything is correct:
python -c 'import optimus; optimus.__version__'
Now, we are ready to use Optimus!
We recommend using Jupyter Notebook, too.
Installing JupyterLab
If you have not been living under a rock the last 5 years, you probably know about Jupyter Notebook. JupyterLab is the next generation of Jupyter Notebook: it is a web-based interactive development environment for coding. Jupyter (for short) will help us test and modify our code easily and will help us try out our code faster. Let's take a look:
- To install JupyterLab, go to the Terminal, as explained in the Installing Optimus section, and run the following command:
conda install -c conda-forge jupyterlab
- At this point, you could simply run Jupyter. However, we are going to install a couple of handy extensions to debug Dask and track down GPU utilization and RAM:
conda install nodejs
conda install -c conda-forge dask-labextension
jupyter labextension install dask-labextension
jupyter serverextension enable dask_labextension
- Now, let's run Jupyter using the following command:
jupyter lab --ip=0.0.0.0
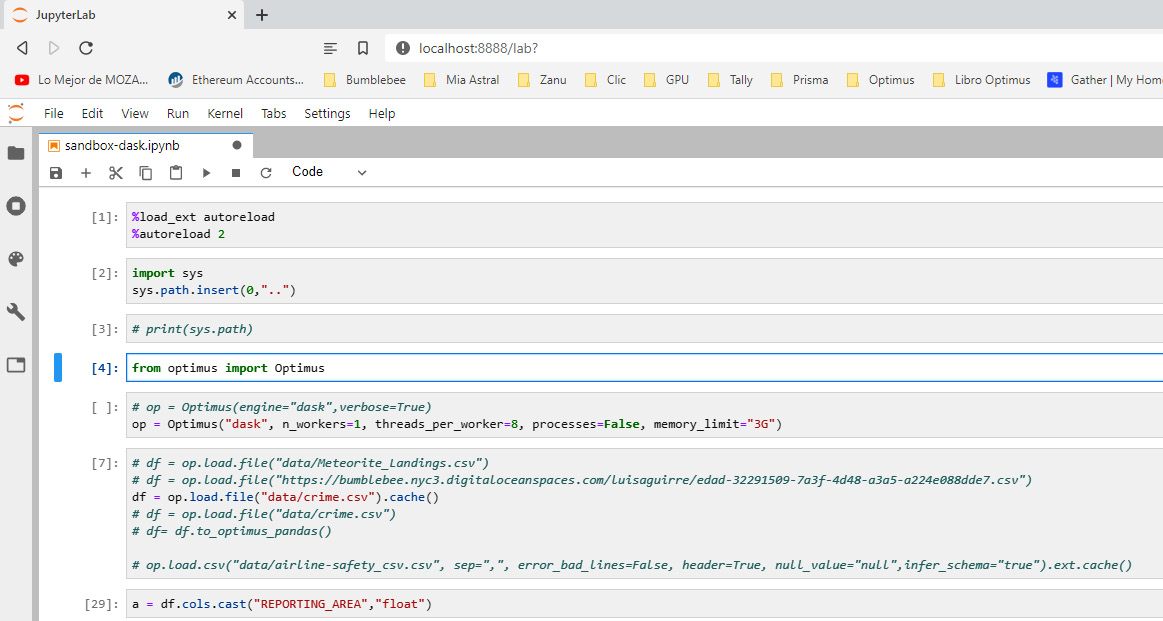
- You can access Jupyter using any browser:

Figure 1.2 – JupyterLab UI
Next, let's look at how to install RAPIDS.
Installing RAPIDS
There are some extra steps you must take if you want to use a GPU engine with Optimus.
RAPIDS is a set of libraries developed by NVIDIA for handling end-to-end data science pipelines using GPUs; cuDF and Dask-cuDF are among these libraries. Optimus can use both to process data in a local and distributed way.
For RAPIDS to work, you will need a GPU, NVIDIA Pascal™ or better, with a compute capability of 6.0+. You can check the compute capability by looking at the tables on the NVIDIA website: bit.ly/cc_gc.
First, let's install RAPIDS on Windows.
Installing RAPIDS on Windows 10
RAPIDS is not fully supported at the time of writing (December 2020), so you must use the Windows Subsystem for Linux version 2 (WSL2). WSL is a Windows 10 feature that enables you to run native Linux command-line tools directly on Windows.
You will need the following:
- Windows 10 version 2004 (OS build 202001.1000 or later). You must sign up to get Windows Insider Preview versions, specifically to the Developer Channel. This is required for the WSL2 VM to have GPU access: https://insider.windows.com/en-us/.
- CUDA version 455.41 in CUDA SDK v11.1. You must use a special version of the NVIDA CUDA drivers, which you can get by downloading them from NVIDIA's site. You must join the NVIDIA Developer Program to get access to the version; searching for
WSL2 CUDA Drivershould lead you to it.
Here are the steps:
- Install the developer preview version of Windows. Make sure that you click the checkbox next to Update to install other recommended updates too.
- Install the Windows CUDA driver from the NVIDIA Developer Program.
- Enable WSL 2 by enabling the Virtual Machine Platform optional feature. You can find more steps here: https://docs.microsoft.com/en-us/windows/wsl/install-win10.
- Install WSL from the Windows Store (Ubuntu-20.04 is confirmed to be working).
- Install Python on the WSL VM, tested with Anaconda.
- Go to the Installing RAPIDS section of this chapter.
Installing RAPIDS on Linux
First, you need to install the CUDA and NVIDIA drivers. Pay special attention if your machine is running code that depends on a specific CUDA version. For more information about the compatibility between the CUDA and NVIDIA drivers, check out bit.ly/cuda_c.
If you do not have a compatible GPU, you can use a cloud provider such as Google Cloud Platform, Amazon, or Azure.
In this case, we are going to use Google Cloud Platform. As of December 2020, you can get an account with 300 USD on it to use. After creating an account, you can set up a VM instance to install RAPIDS.
To create a VM instance on Google Cloud Platform, follow these steps:
- First, go to the hamburger menu, click Compute Engine, and select VM Instances.
- Click on CREATE INSTANCE. You will be presented with a screen that looks like this:

Figure 1.3 – Google Cloud Platform instance creation
- Select a region that can provide a GPU. Not all zones have GPUs available. For a full list, check out https://cloud.google.com/compute/docs/gpus.
- Make sure you choose N1 series from the dropdown.
- Be sure to select an OS that's compatible with the CUDA drivers (check the options available here: https://developer.nvidia.com/cuda-downloads). After the installation, you will be using 30 GB of storage space, so make sure you assign enough disk space:

Figure 1.4 – Google Cloud Platform OS selection
- Check the Allow HTTP traffic option:

Figure 1.5 – Google Cloud Platform OS selection
- To finish, click the Create button at the bottom of the page:

Figure 1.6 – Google Cloud instance creation
Now, you are ready to install RAPIDS.
Installing RAPIDS
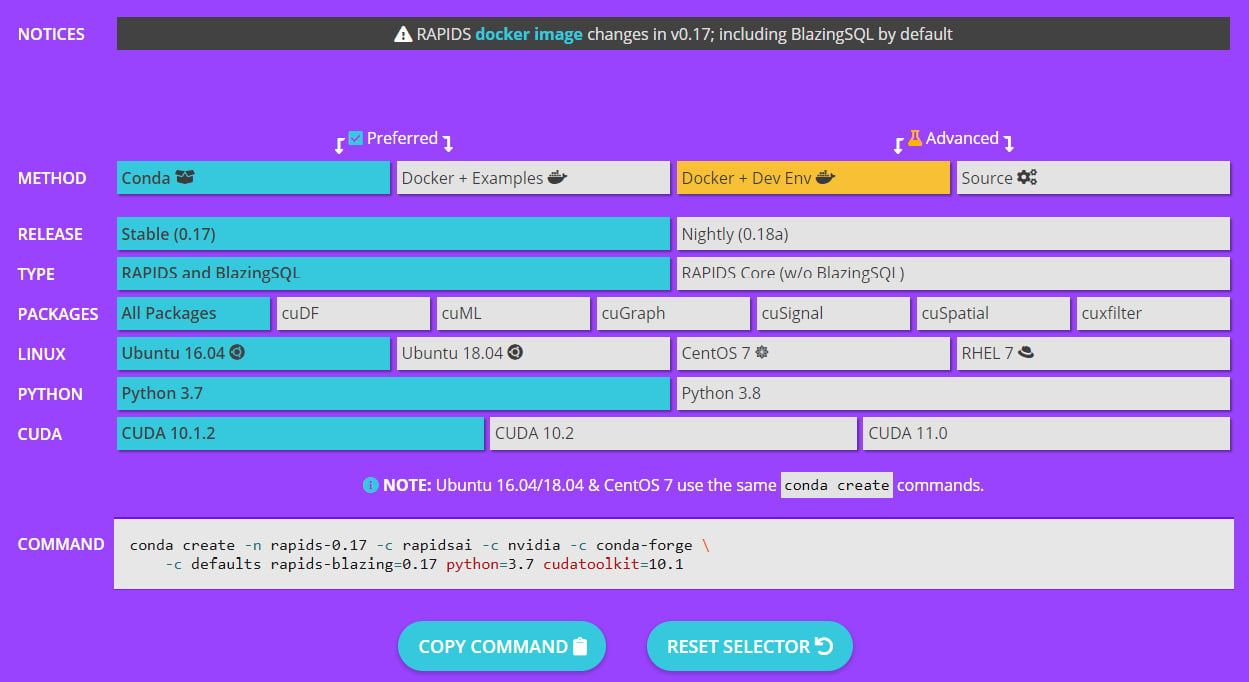
After checking that your GPU works with Optimus, go to https://rapids.ai/start.html. Select the options that match your requirements and copy the output from the command section to your command-line interface:

Figure 1.7 – Google Cloud Platform OS selection
After the installation process is complete, you can test RAPIDS by importing the library and getting its version:
python -c 'import cudf; cudf.__version__'
Next, let's learn how to install Coiled for easier setups.
Using Coiled
Coiled is a deployment-as-a-service library for scaling Python that facilitates Dask and Dask-cuDF clusters for users. It takes the DevOps out of the data role to enable data professionals to spend less time setting up networking, managing fleets of Docker images, creating AWS IAM roles, and other setups they would have to handle otherwise, so that they can spend more time on their real job.
To use a Coiled cluster on Optimus, we can just pass minimal configuration to our Optimus initialization function and include our token provided by Coiled in a parameter; to get this token, you must create an account at https://cloud.coiled.io and get the token from your dashboard, like so:
op = Optimus(coiled_token="<your token here>", n_workers=2)
In this example, we initialized Optimus using a Coiled token, and set the number of workers to 2. Optimus will initialize a Dask DataFrame and handle the connection to the cluster that was created by Coiled. After this, Optimus will work as normal.
When using Coiled, it's important to maintain the same versions between the packages in the remote cluster and the packages in your local machine. For this, you can install a Coiled software environment as a local conda environment using its command-line tool. To use Optimus, we will use a specific software environment called optimus/default:
coiled install optimus/default
conda activate coiled-optimus-default
In the preceding example, we told coiled install to create the conda environment and then used conda activate to start using it.
Using a Docker container
If you know how to use Docker and you have it installed on your system, you can use it to quickly set up Optimus in a working environment.
To use Optimus in a Docker environment, simply run the following command:
docker run -p 8888:8888 --network="host" optimus-df/optimus:latest
This will pull the latest version of the Optimus image from Docker Hub and run a notebook process inside it. You will see something like the following:
To access the notebook, open this file in a browser:
    file://...
Or copy and paste one of these URLs:
    http://127.0.0.1:8888/?token=<GENERATED TOKEN>
Just copy the address and paste it into your browser, making sure it has the same token, and you'll be using a notebook with Optimus installed in its environment.


