Logging in to Power Automate
Power Automate has four distinct experiences:
- End user web portal: User or creator interfaces with the purpose of designing, importing, saving, exporting, and executing flows.
- Mobile app: User or creator interfaces with the purpose of designing, importing, saving, exporting, and executing flows, formatted specifically for mobile devices
- Desktop: Most commonly used for creating Robotic Process Automation (RPA) flows
- Admin: The overall administration of the Power Automate environment for your tenant, including the number of executions or runs and data gateway configurations
Power Automate tenant administration is largely outside the scope of what we’re going to be learning from a design aspect, but should you ever need to administer the Power Automate environment, you’ll know where to start.
Regardless of which interface you’re going to use, you’ll need access to Power Automate to get the most out of this book. If you don’t have access to Microsoft Power Automate within your organization, you’ll want to go start a Microsoft 365 trial so you can gain access to it. To start a trial subscription, navigate to https://www.microsoft.com/en-us/microsoft-365/try and click the Free trial for business link.
It’s also important to note Microsoft Power Automate is a cloud-only solution—there is no required on-premises server counterpart (though you may install server-side components such as the data gateway or utilize Power Automate Desktop on Windows 10 and 11 computers). Microsoft Power Automate is available in the following Microsoft 365 clouds:
- Worldwide/Commercial: https://flow.microsoft.com
- United States Government Community Cloud (Moderate): https://gov.flow.microsoft.us
- United States Government Community Cloud (High): https://high.flow.microsoft.us
For the purposes of this book, we’ll focus on the features of the worldwide commercial solution. Users of Government Community Cloud Moderate (such as state and local governments) or Government Community Cloud High (such as federal civilian employees) may have slightly different feature sets available.
End user web portal interface
The end user web portal interface is where you’ll design, manage, and execute most of your flows. To access it, you can log in to http://flow.microsoft.com, or log in to the Microsoft 365 end user portal (https://portal.office.com) and click on the Power Automate tile. If you’re using one of the other sovereign clouds, use the links in the previous section or contact your reseller for specific links.
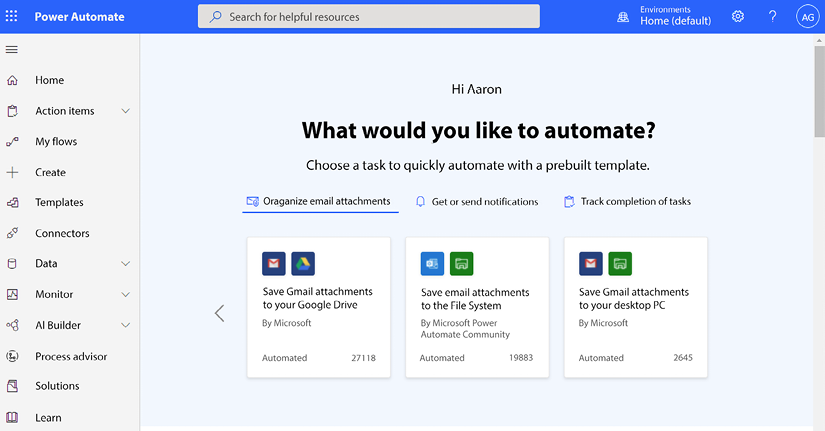
The web portal interface is depicted in Figure 2.1:

Figure 2.1: Power Automate home page
The left part of the page features a navigation menu that includes options to review action items (approvals and business process flows), as well as to create and manage your own flows and search for templates and connectors. The following list describes the options available:
- Home: The dashboard displayed upon first logging in
- Action items: The top-level menu item containing links to Approvals (approval workflows) and Business process flows (multi-step task-oriented flows)
- My flows: Flows that you have created (or that have been shared with you)
- Create: The interface for creating new flows
- Templates: Pre-canned flows comprising connectors that only need to be customized
- Connectors: List of connectors available in Power Automate
- Data: A top-level menu item containing links to the following:
- Tables (formerly Entities): Objects in Dataverse (formerly Common Data Service)
- Connections: Authentication configurations for connectors
- Custom connectors: Custom interfaces to REST API applications
- Gateways: Basic information about existing data gateways to connect to on-premises data sources
- Monitor: A top-level menu item containing links to the following:
- Cloud flow activity: Review recent cloud flow runs or executions
- Desktop flow runs: Review recent desktop flow runs
- Machines: Real-time status for machines running desktop flows
- AI Builder: A top-level menu item containing links to the following:
- Explore: Samples, examples, and pre-built models for learning and using in your own flows
- Models: AI models that you’ve built or have been shared with you for creating AI-based flows
- Document automation: Tools for using both AI and RPA to extract structured and unstructured data from documents
- Process advisor: Tools for analyzing business processes and detecting automation opportunities to be optimized
- Solutions: Containers for managing the transporting and life cycle of Power Platform applications
- Learn: A link to the landing page for Power Automate in the Microsoft documentation (https://docs.microsoft.com/en-us/power-automate/)
In this book, we’ll explore some of the components to use when building your own flows. You may want to spend some time looking through the connectors (https://flow.microsoft.com/en-us/connectors/) and templates (https://flow.microsoft.com/en-us/templates/) to start getting ideas of what types of applications and services you can integrate with Power Automate. You’ll want to focus on connectors and templates that help you integrate apps that your organization uses on a regular basis.
Mobile app interface
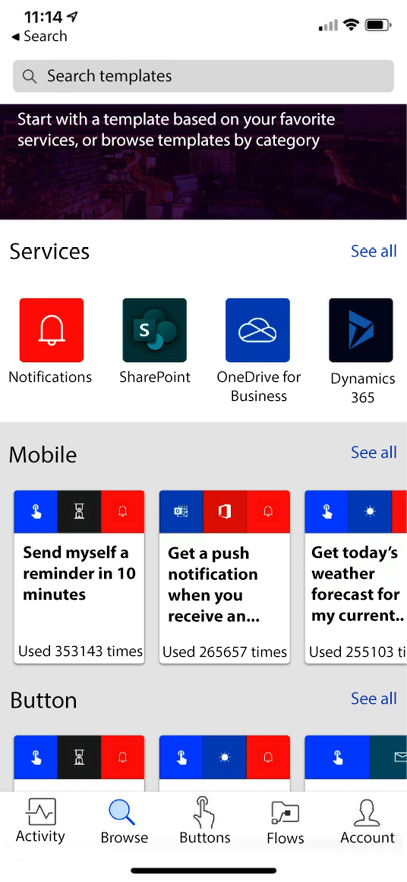
The Power Automate mobile app, available for both the iOS (https://apps.apple.com/us/app/microsoft-flow/id1094928825) and Android (https://play.google.com/store/apps/details?id=com.microsoft.flow) platforms, offers a similar design aesthetic and experience, as shown in the following screenshot:

Figure 2.2: Power Automate for iOS
The following options are available on the home screen:
- Activity: Shows a list of recently completed flows and approval activities
- Browse: Search connectors and templates to begin creating a new flow
- Buttons: Allows you to create button (or instant) flows to be triggered from your mobile device
- Flows: Lists your own and your team’s (that is, shared) flows
- Account: Your Office 365 tenant account sign-in information
The mobile experience focuses on surfacing flow components specifically tailored to mobile devices. The majority of this book will focus on the end user web portal experience, but there will be a few opportunities to use the mobile app.
Power Automate Desktop interface
As mentioned in Chapter 1, Introducing Microsoft Power Automate, Power Automate Desktop is a new way to interact with flows. You can only create robotic process automation flows from Power Automate Desktop.
The Power Automate Desktop application itself is free to download for Windows 10 and is included with Windows 11. However, in order to use advanced features (such as RPA flows), you may need to acquire additional licensing.
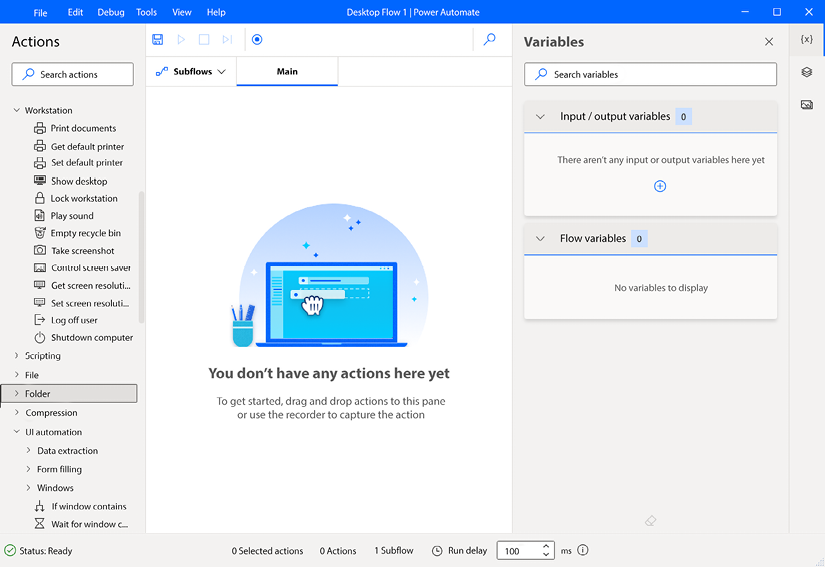
Figure 2.3 shows the Power Automate Desktop application on Windows 10:

Figure 2.3: Power Automate Desktop on Windows 10
Power Automate Desktop allows you to interrogate system resources and interact with files, browser instances, applications such as Outlook and Excel, command prompts, and even printers.
Admin interface
Previously, administrators needed to use both the Power Automate admin center as well as the Power Platform admin center to manage their environments. In 2021, all the functions were combined into the Power Platform admin center. You’ll have view-only access to this interface unless you’re a global admin of a Microsoft 365 tenant or have been granted Power Platform admin rights.
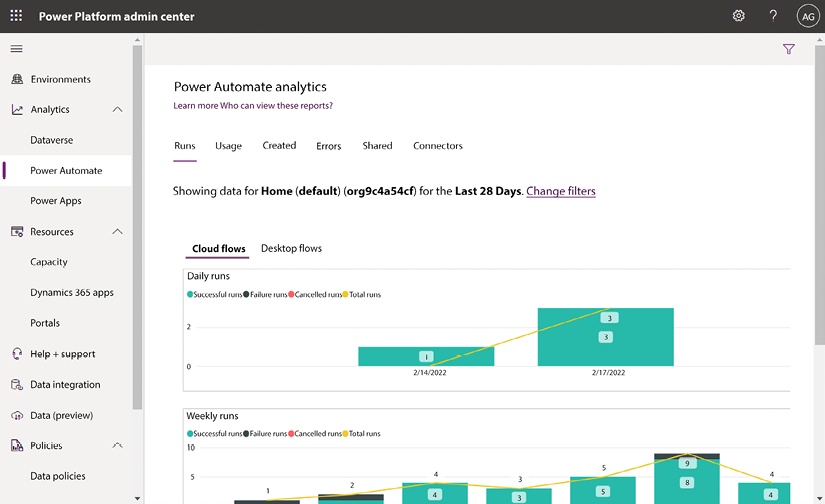
The Power Automate admin center (previously https://admin.flow.microsoft.com, which now redirects to https://admin.powerplatform.microsoft.com) allows you to keep track of runs executed tenant-wide, view license information, view overall environment data, and configure Data Loss Prevention (DLP) policies. In addition, the Power Platform admin center allows you to administer features across the entire Power Platform, including Power Automate, but also to Dynamics 365, Power BI, and Power Apps, as shown in Figure 2.4:

Figure 2.4: Power Platform admin center
While the admin interface will not be used extensively in this book, you should understand that it exists and that administrators of the overall Microsoft 365 environment can modify configurations and view statistical data across the organization.
Now that you’ve seen the various interfaces for Power Automate, let’s start creating!


