Introducing Sparx Systems Enterprise Architect
Sparx Systems Enterprise Architect – known as Sparx – is a modeling tool that has evolved over the years from just UML modeling in the early 2000s to a tool that can today model almost everything, including modern AWS and Azure diagrams. Note that this book is not sponsored by Sparx Systems and not affiliated with any of their partners; we have chosen Sparx for multiple reasons that will be explained in the next subsection, and we will have a first look at the components of its UI in the subsection after that.
Why Sparx?
Using an EA tool is not mandatory to establish an EA office or build an architecture repository, but it makes things easier, more efficient, and better governed. If you or your organization are not using an EA tool, I highly advise you to do so unless you are still in the early discovery phases.
If you have not used Sparx before, you can download a trial copy now and get familiar with the different components of the UI, as well as getting used to the way of creating diagrams. Sparx Systems has a huge library of resources that can help you learn their product and become an expert in it. It will be extremely helpful to explore the fundamental materials provided at this location before you proceed with the book (https://sparxsystems.com/resources/user-guides/15.2/index.html).
If you use a different tool other than Sparx, you will still be able to apply all the concepts that will be provided in this book in your tool of choice. The concepts can be applied using any tool, but we will be focusing on Sparx only. The reasons that we have chosen Sparx can be summarized as follows:
- Low cost of ownership
- Direct download and free trial
- Widely known
Let's explore each one of these advantages in more detail.
Low cost of ownership
Sparx is a tool that anyone can purchase without massively hurting their pockets. If you are studying and practicing at your own cost, you can get Sparx up and running for as little as $229. Most other EA tools cost an average of $10,000 per user per license, so you can see how huge the difference is. If you work for an organization that does not want to put a big investment in an EA tool, either due to budget constraints or to lower the risk involved with practicing EA, then Sparx is an excellent tool to start with. Once the architecture maturity of your organization increases, you can choose to migrate to a more sophisticated and more expensive tool if needed.
Please check the Sparx Systems website (https://sparxsystems.com/) for an up-to-date price list and to learn more about the different licenses they offer. For the record, I am using the corporate license for this book, so every diagram you will see in this book – and many more – can be done with it.
Direct download and free trial
If you want to explore Sparx, you do not have to go through a long procurement process where you fill out a form with your information, submit it, and wait for the marketing team to call you back, ask you more questions, schedule a demo, and make a purchase order before putting your hands on their tool. With Sparx, all you need is to register your email address and you will be provided with a link to download a fully functional, 30-day trial copy of the EA tool. If you do not like it, no one will keep bugging you with sales emails and phone calls; just simply uninstall it. If you like it, pay for the license online, enter the provided license key, and your trial version will become a licensed version. Everything that you have practiced so far will still be there for you.
Widely known
Because of the previous reasons, Sparx is a very well-known tool in the market and almost every architect has used it or heard of it. Throughout my career of EA implementation, Sparx has been the tool that more than 40% of my clients have used, about 10% used other tools, and the rest were not using EA tools at all. You can do an internet search for EA tools and see what is currently available on the market.
Having talked about why we're using Sparx, let's explore the main areas of its UI and get ourselves familiar with it.
The Sparx UI
This section will give you a very quick overview of the Sparx UI. The following figure shows you the sections of the Sparx UI followed by a brief description of each. We have used version 15.2 of Sparx in this book, so if you are using a different version, you may see some differences between what is in this book and what is on your screen.
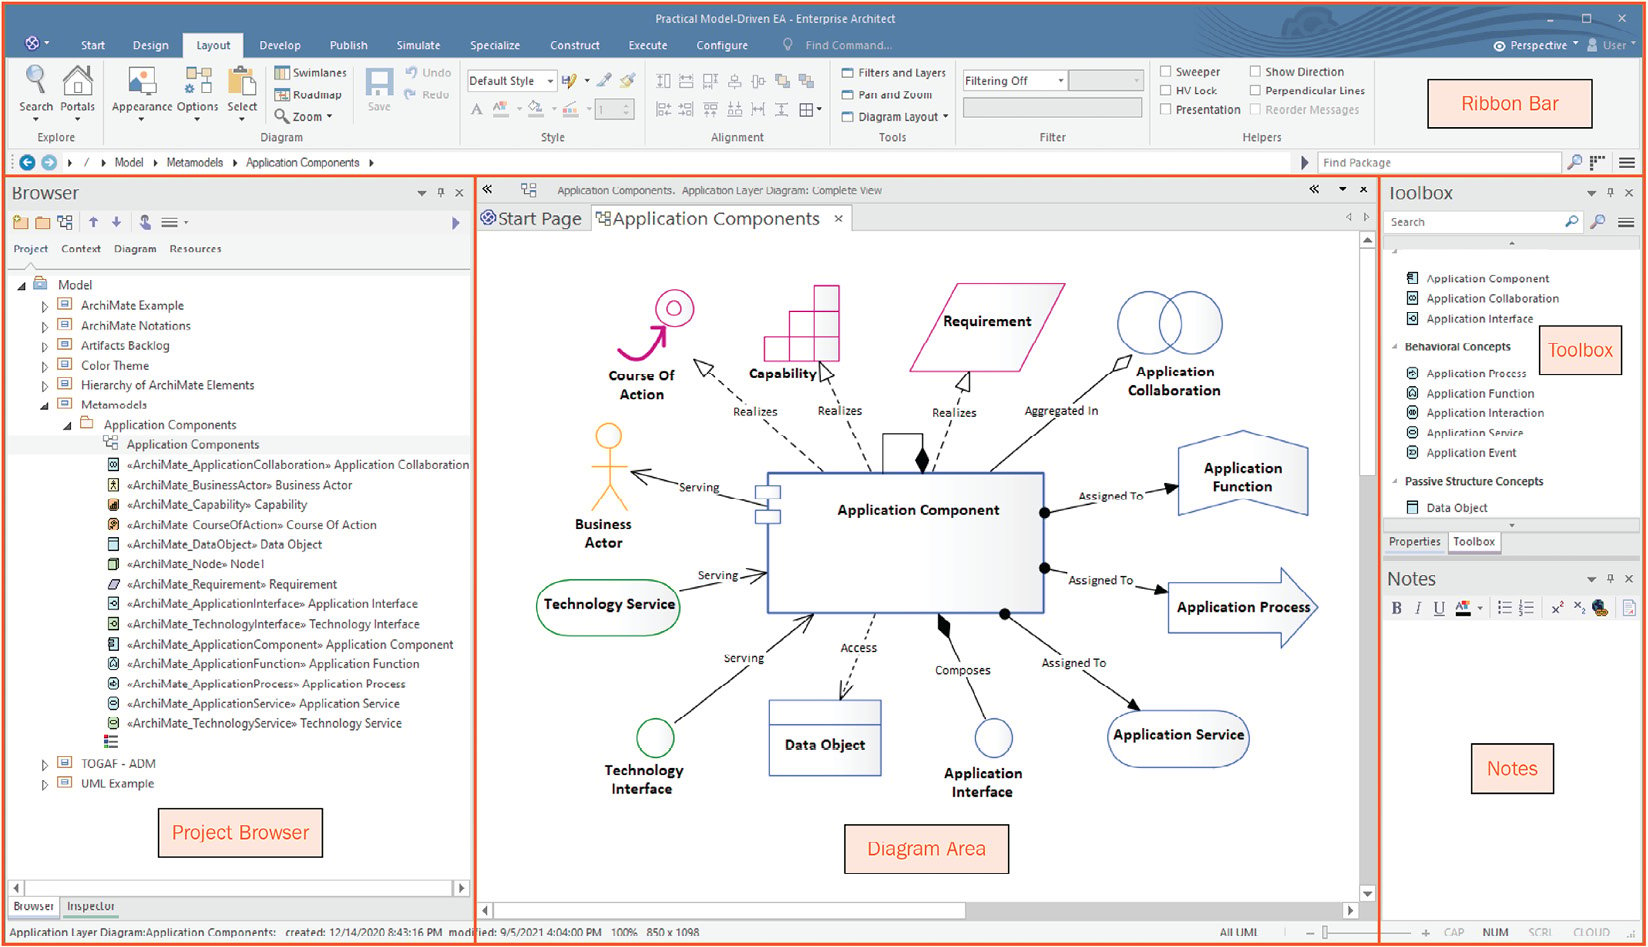
Figure 1.9 – The Sparx UI showing the main sections
As you can see in the figure, there are four main areas of the Sparx UI:
- The Diagram Area
- The Project Browser
- The Ribbon Bar
- The Toolbox
Note that the project browser area has multiple tabs (currently showing the Browser and Inspector tabs), and the Toolbox area has multiple tabs too (currently showing Toolbox and Properties). These tabs can be docked to any side of the screen, so you can drag the Toolbox tab, for example, to fit within the same area that the project browser fits. In fact, you can fit all the tabs on one side of the screen and have more space for diagrams in the middle. It is all up to your preferences.
Let's explore each of these main areas now.
The Diagram Area
The diagram area is where your diagrams get created and designed. There is nothing much to say about this area right now, but this is the area where the actual work is done, so we will learn more about it as we progress. Right-clicking on the diagram background will bring a context pop-up menu. Click Properties and the diagram properties window will be displayed:
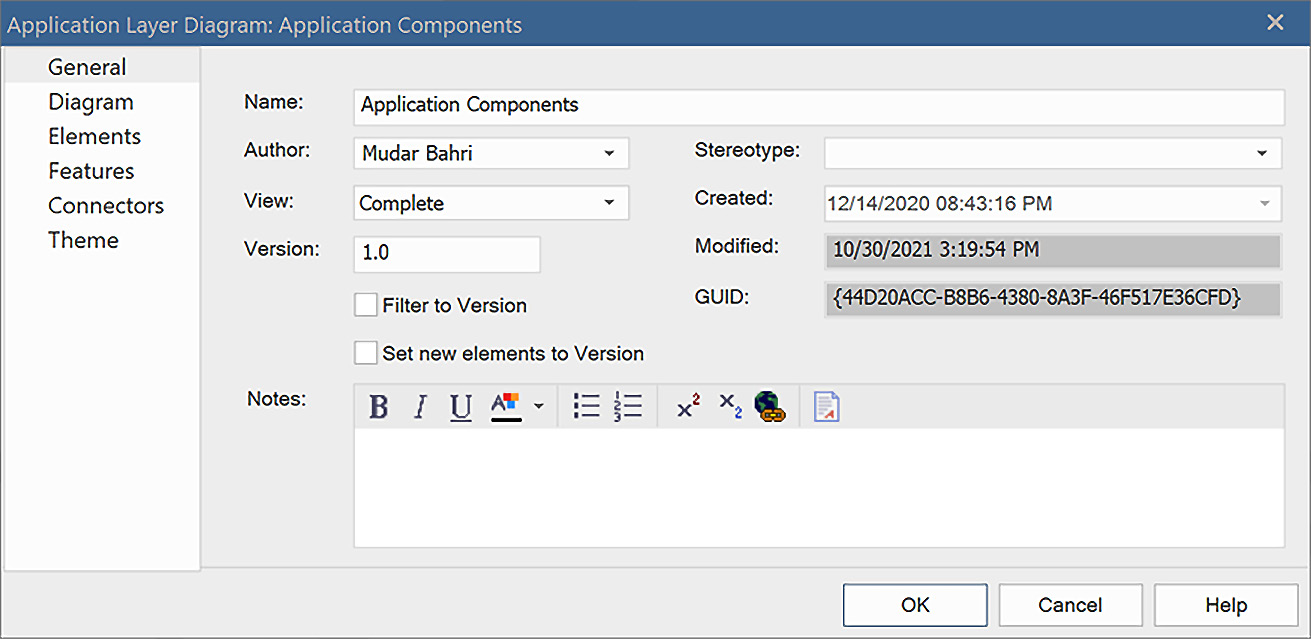
Figure 1.10 – The diagram properties window
Please make yourself familiar with the different tabs and options and refer to the online material whenever needed by clicking on the Help command button or pressing F1 on the keyboard. You do not have to remember every screen option now, but just explore what is there.
Project Browser
This area displays your resources in the form of packages and elements. Think of the Windows filesystem, for example; the packages are like folders and elements are like files. In a nutshell, everything in Sparx is either an element or a package. Diagrams are elements, and all the shapes that you place on them are elements too.
Unlike in visual modeling tools such as Microsoft Visio and Lucidchart, in EA modeling tools including Sparx, you create an actual element for every shape you put on the diagram, so the shape is not only a visual item but an actual element that lives inside your repository. Take a second look at Figure 1.9 and you will notice that for every element that we have placed on the diagram, there is a representation of the same element in the project browser, including an element for the diagram itself. This is an essential concept in EA modeling because if you want to show multiple views (that is, diagrams) for the same element, then you have to reuse the element from the project browser, rather than creating a new element from the toolbox. If you find this confusing, do not worry now as we will practice many examples that show you when to create an element from the Toolbox and when to reuse it from the project browser.
Explore the properties window for any elements by highlighting the element and right-clicking it, then choosing Properties from the context menu. You will notice that it is the same window for all elements regardless of their type:
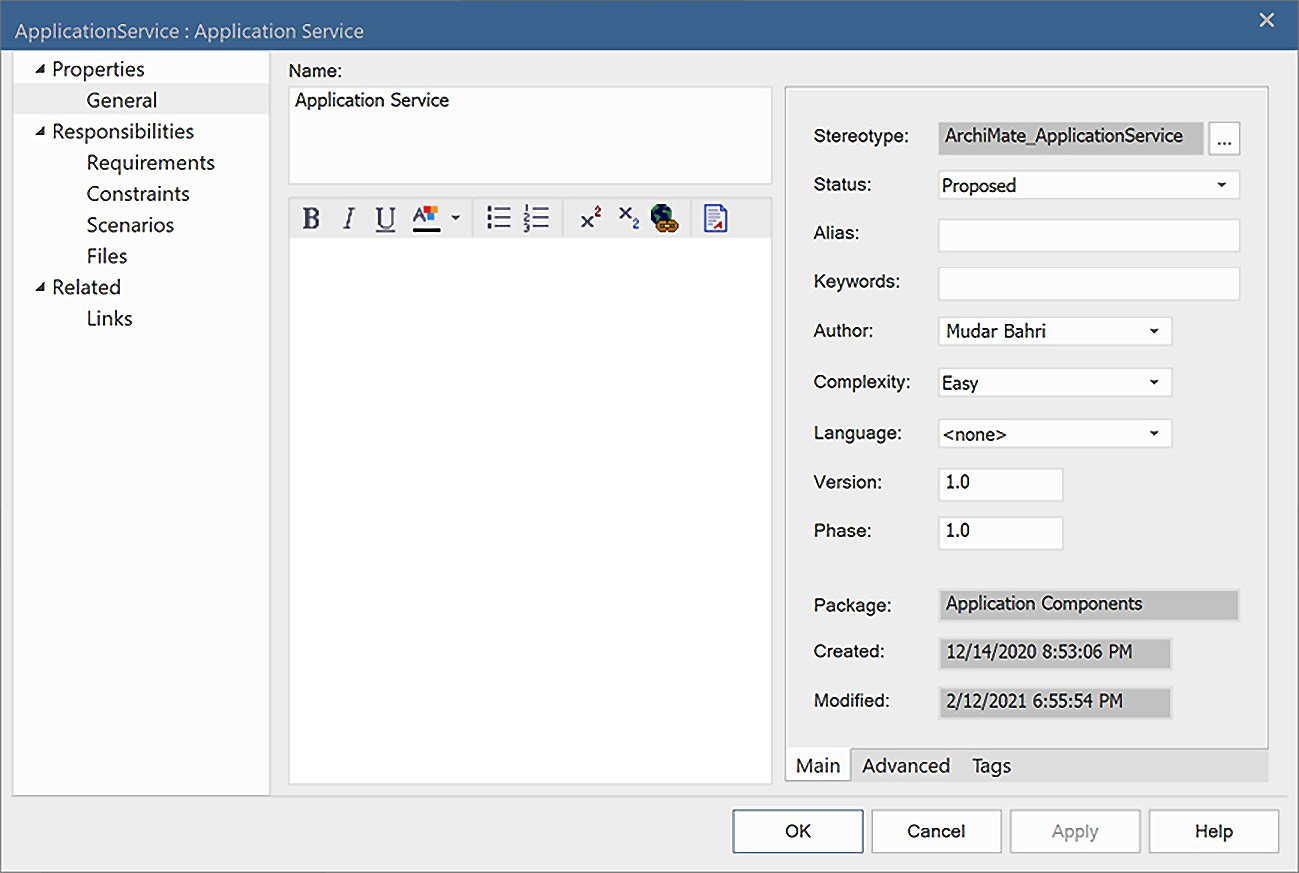
Figure 1.11 – Element properties window
Explore the different tabs and options and make yourself familiar with them. Refer to the online documentation if you need help.
The Ribbon Bar
Sparx has Microsoft Office-like toolbars with large icons and menu options. Some ribbons are for configuring the Sparx environment, some are for alignments and layouts, some are for publishing and exporting, and other options. The following figure shows four sample menus, but you need to refer to the Sparx online user guides for the complete documentation of all the options and actions they provide. We will only talk about the ones that we will use, so not every menu option will be covered:
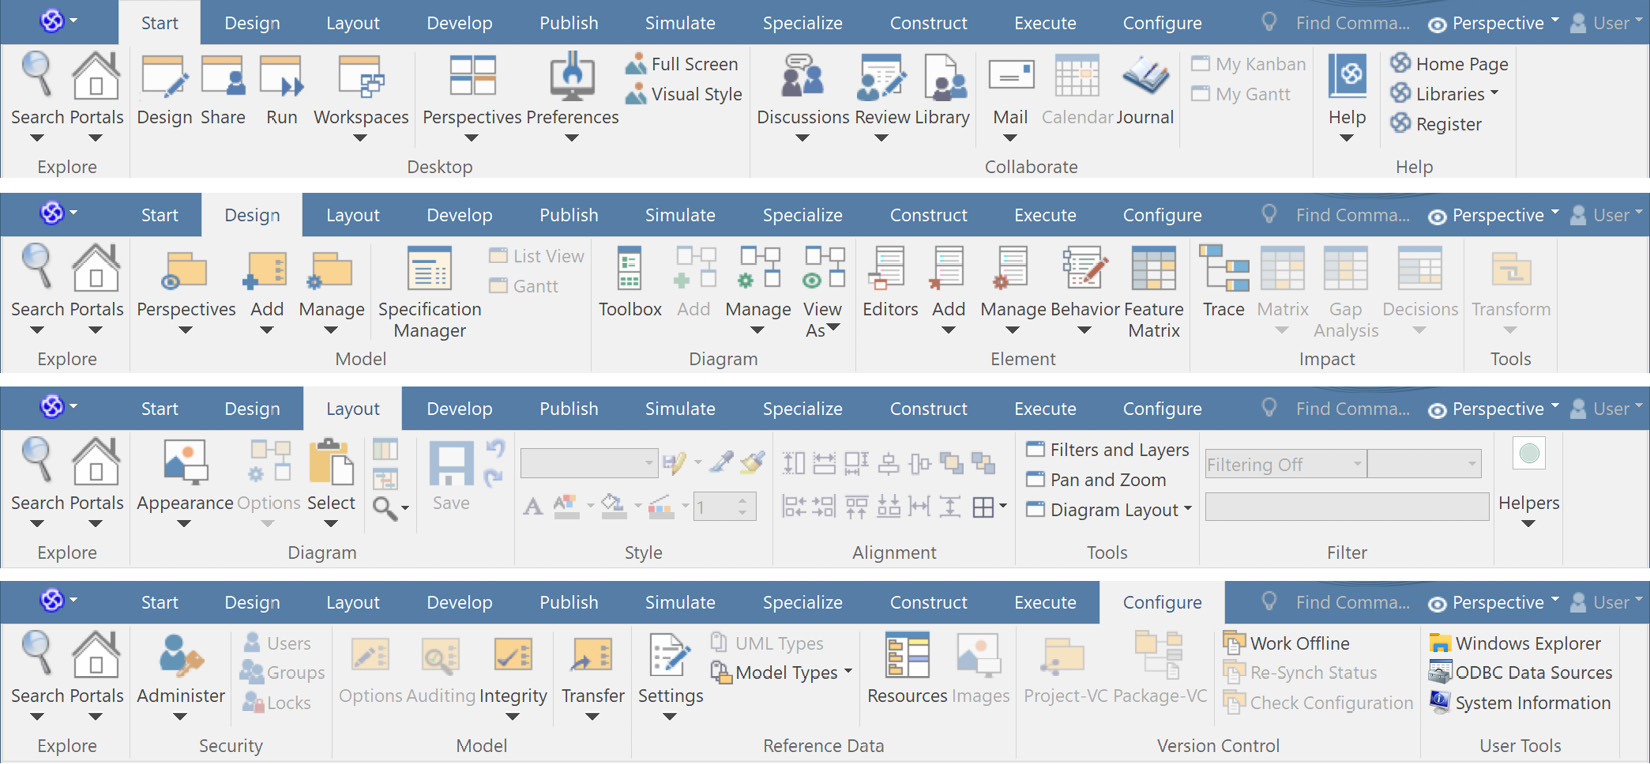
Figure 1.12 – Four sample toolbars from the Sparx ribbon bar
Notice how some menu items have a small arrow indicating that clicking on them will open a drop-down list of options. Also notice that menu items that perform similar functions are grouped within groups. The Start toolbar, for example, has four groups: Explore, Desktop, Collaborate, and Help. Throughout the book, we will follow this pattern to guide you on which menu item to select: Toolbar Name > Group > Menu Item > Menu Sub-Item, which is the same style that Sparx uses in the online material. For example, if you need to adjust the Z-order of an element and bring it to the top, I will ask you to click Layout > Alignment > Bring to Top, which makes it easier for you to find that option than just saying "Click on the Bring to Top menu item."
Toolbox
The toolbox has dynamic content, and it changes according to the type of the diagram. The toolbox that you see in Figure 1.9 is the one associated with diagrams of the ArchiMate® application diagram type. You can change to different content by clicking on the hamburger menu (the menu that has a stack of three horizontal lines) on the top-right side of the toolbox and changing to different content, as shown in Figure 1.13:
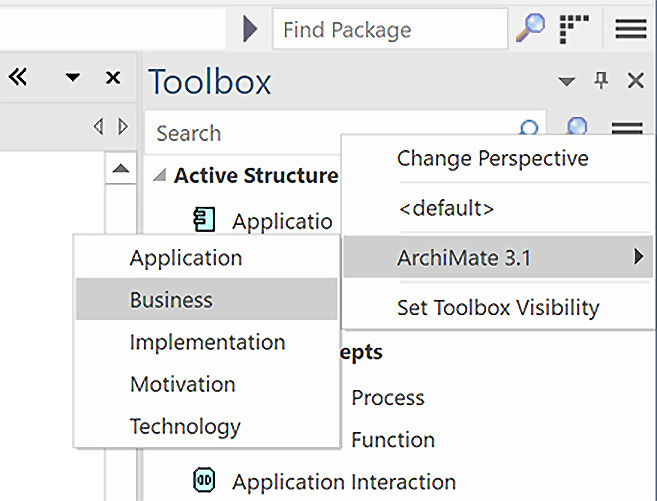
Figure 1.13 – Changing the Toolbox content
As we have advised for other areas on the UI, if you need to explore the Toolbox area, use Help if needed and get yourself familiar with it.
Important Note
Drag items from the toolbox to the diagram area to create new items in the repository. Drag items from the Project Explorer to the diagram area to reuse an existing element.
This was a lot of information to put in one chapter, but more details will come as we practice putting this information into useful artifacts.


