Search icon CANCEL
Subscription
0
Cart icon
Your Cart (0 item)
Close icon
You have no products in your basket yet
Arrow left icon
Explore Products
Best Sellers
New Releases
Books
Videos
Audiobooks
Learning Hub
Free Learning
Arrow right icon
Arrow up icon
GO TO TOP
.NET Core 2.0 By Example

You're reading from   .NET Core 2.0 By Example Learn to program in C# and .NET Core by building a series of practical, cross-platform projects

Arrow left icon
Product type Paperback
Published in Mar 2018
Publisher Packt
ISBN-13 9781788395090
Length 458 pages
Edition 1st Edition
Languages
Tools
Arrow right icon
Authors (2):
Arrow left icon
Neha Shrivastava Neha Shrivastava
Author Profile Icon Neha Shrivastava
Neha Shrivastava
Rishabh Verma Rishabh Verma
Author Profile Icon Rishabh Verma
Rishabh Verma
Arrow right icon
View More author details
Toc

Table of Contents (12) Chapters Close

Preface 1. Getting Started FREE CHAPTER 2. Native Libraries in .NET Core 3. Building Our First .NET Core Game – Tic-Tac-Toe 4. Let's Chat Web Application 5. Developing the Let's Chat Web Application 6. Testing and Deploying – The Let's Chat Web Application 7. To the Cloud 8. Movie Booking Web App 9. Microservices with .NET Core 10. Functional Programming with F# 11. Other Books You May Enjoy

Deploying the movie booking app


We have already deployed one of our sample web apps in Azure and this is no different. The assumption here is that the reader already has an Azure subscription and is logged in with the email ID used for the subscription. If this is not the case, please go through the previous chapters where we have discussed Azure subscription at length. Let's have a look at steps to deploy our movie booking app on the cloud: 

  1. In the Visual Studio Solution Explorer window, right-click on the MovieBooking project and then click Publish. It will open a Publish dialog.
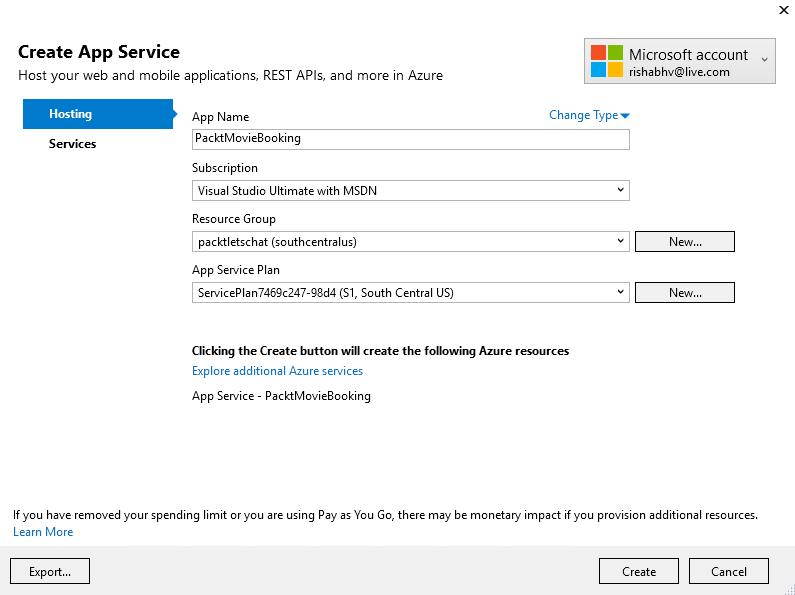
  1. Select Create New and then click OK. It will open the Create App Service dialog. Enter the required fields, as shown in the following screenshot:
  1. After filling in all the required input, click on Services on the left panel. It will display the following dialog:
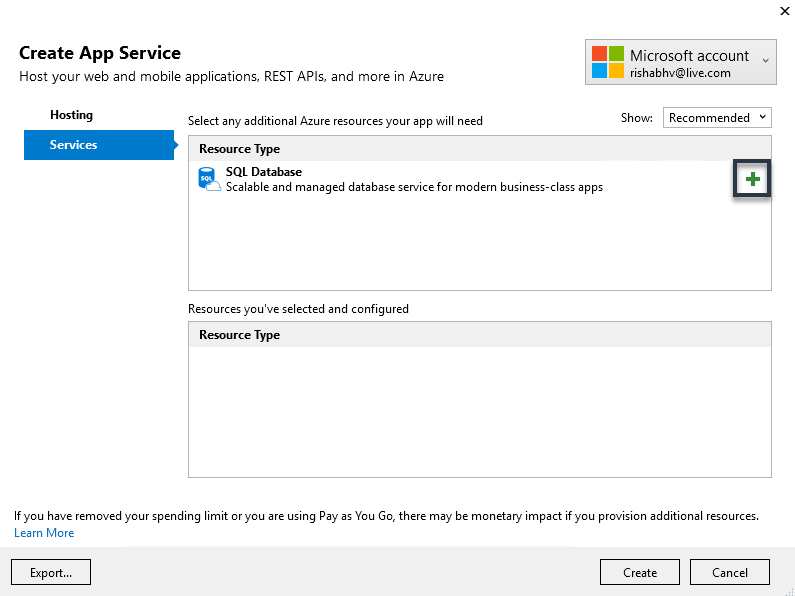
  1. We need a database for our app to function and the dialog shows the SQL Database as the additional Azure resource that we need to deploy. Click on the + icon...
lock icon The rest of the chapter is locked
Register for a free Packt account to unlock a world of extra content!
A free Packt account unlocks extra newsletters, articles, discounted offers, and much more. Start advancing your knowledge today.
Unlock this book and the full library FREE for 7 days
Get unlimited access to 7000+ expert-authored eBooks and videos courses covering every tech area you can think of
Renews at $19.99/month. Cancel anytime
Banner background image