Building a solution skeleton with unit testing
Now that we’ve got the technical requirements out of the way, it’s time to build our first implementation. For this chapter, and to keep the focus on TDD concepts, let’s start with simple business requirements.
Let’s assume that you are a developer, working for a fictitious company called Unicorn Quality Solutions Inc. (UQS), which produces high-quality software.
Requirements
The software teams in UQS follow an agile approach and describe business requirements in terms of a user story.
You are working on a math library that is packaged to be consumed by other developers. You can think of this as if you are building a feature within a NuGet library to be used by other applications. You’ve picked a user story to implement, as outlined here:
Story Title:
Integers Division
Story Description:
As a math library client, I want a method to divide two integers
Acceptance Criteria:
Supports an Int32 input and a decimal output
Supports high-precision return with no/minimal rounding
Supports dividing divisible and indivisible integers
Throws a DivideByZeroException when dividing by 0
Creating a project skeleton
You will need two C# projects for this story. One is the class library that will contain the production code and a second library for unit testing the class library.
Note
Class libraries enable you to modularize functionality that can be used by multiple applications. When compiled, they will generate dynamic-link library (DLL) files. A class library cannot run on its own, but it can run as part of an application.
If you have not worked with a class library before, for the purposes of this book, you can treat it like a console app or a web app.
Creating a class library project
We are going to create the same projects set up in two ways—via the graphical user interface (GUI) and via the .NET command-line interface (CLI). Choose what you prefer or what you are familiar with.
Via the GUI
To create a class library, run VS and then follow these steps:
- From the menu, select File | New | Project.
- Look for
Class Library (C#). - Select the rectangle containing Class Library (C#) | hit Next. The Add a new project dialog will display, as follows:
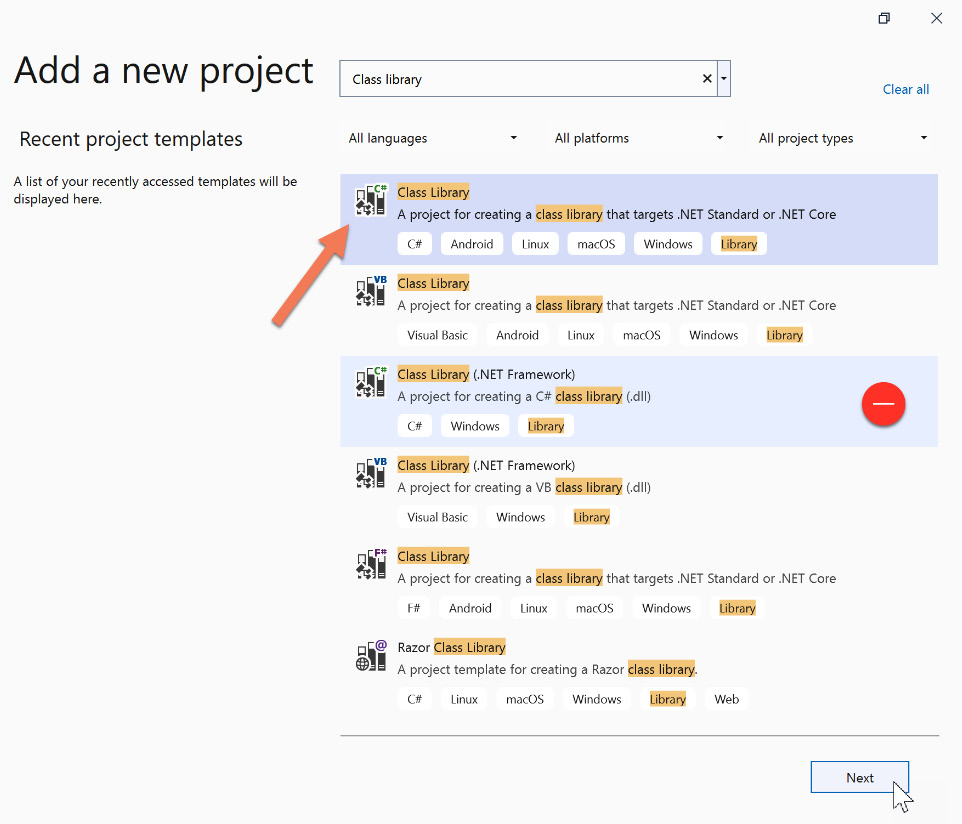
Figure 1.4 – Finding the Class Library (C#) project template
Important Note
Make sure you can see the C# tag in the box and do NOT select the Class Library (.NET Framework) item. We are using .NET (not classical .NET Framework).
- In the Configure your new project dialog, type
Uqs.Arithmeticin the Project name field andUqsMathLibin the Solution name field, then hit Next. The process is illustrated in the following screenshot:
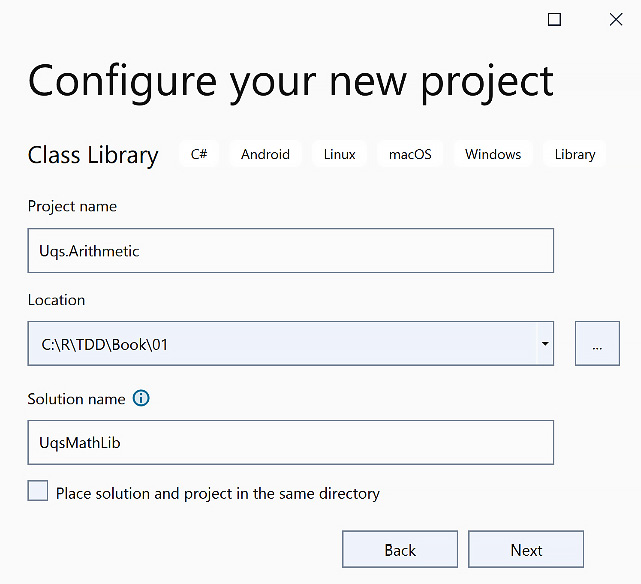
Figure 1.5 – Configure your new project dialog
- In the Additional information window, select
.NET 6.0 (Long-term support)and hit Create. The process is illustrated in the following screenshot:
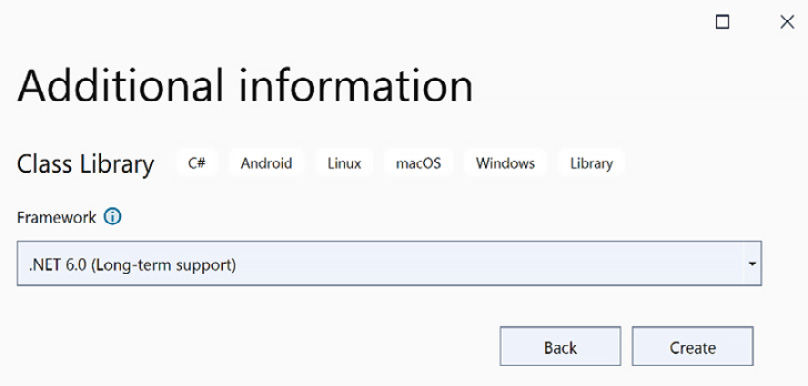
Figure 1.6 – Additional information
We now have a class library project within the solution, using the VS GUI.
Via the CLI
If you prefer to create your project via the CLI, here are the required commands:
- Create a directory called
UqsMathLib(md UqsMathLib). - Navigate to this directory via your terminal (
cd UqsMathLib), as illustrated in the following screenshot:
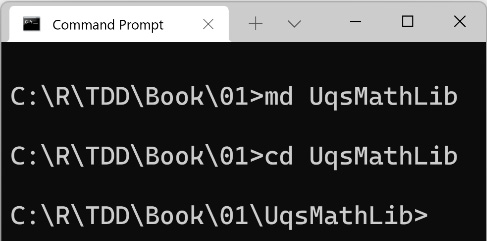
Figure 1.7 – Command Prompt showing the commands
- Create a solution file (
.sln) that will be generated with the same name as the directory—that is,UqsMathLib.sln—by running the following command:dotnet new sln
- Create a new class library called
Uqs.Arithmeticin a directory with the same name and use .NET 6.0. Here’s the code you need to execute:dotnet new classlib -o Uqs.Arithmetic -f net6.0
- Add the newly created project to the solution file by running the following command:
dotnet sln add Uqs.Arithmetic
We now have a class library project within the solution, using the CLI.
Creating a unit testing project
Currently, we have a solution with one class library project. Next, we want to add the unit test library to our solution. For this, we will use xUnit Test Project.
xUnit.net is a free, open source, unit testing tool for .NET. It is licensed under Apache 2. VS natively supports adding and running xUnit projects, so no special tool or plugin is needed to use xUnit.
We will be going into more details about xUnit in Chapter 3, Getting Started with Unit Testing.
We will follow a common convention for naming unit test projects: [ProjectName].Tests.Unit. Thus, our project will be called Uqs.Arithmetic.Tests.Unit.
We will create a unit test project in two ways, so you can pick whatever suits you best.
Via the GUI
To create a unit testing project, go to Solution Explorer in VS, then follow these steps:
- Right-click on the solution file (
UqsMathLib). - Go to Add | New Project…, as illustrated in the following screenshot:
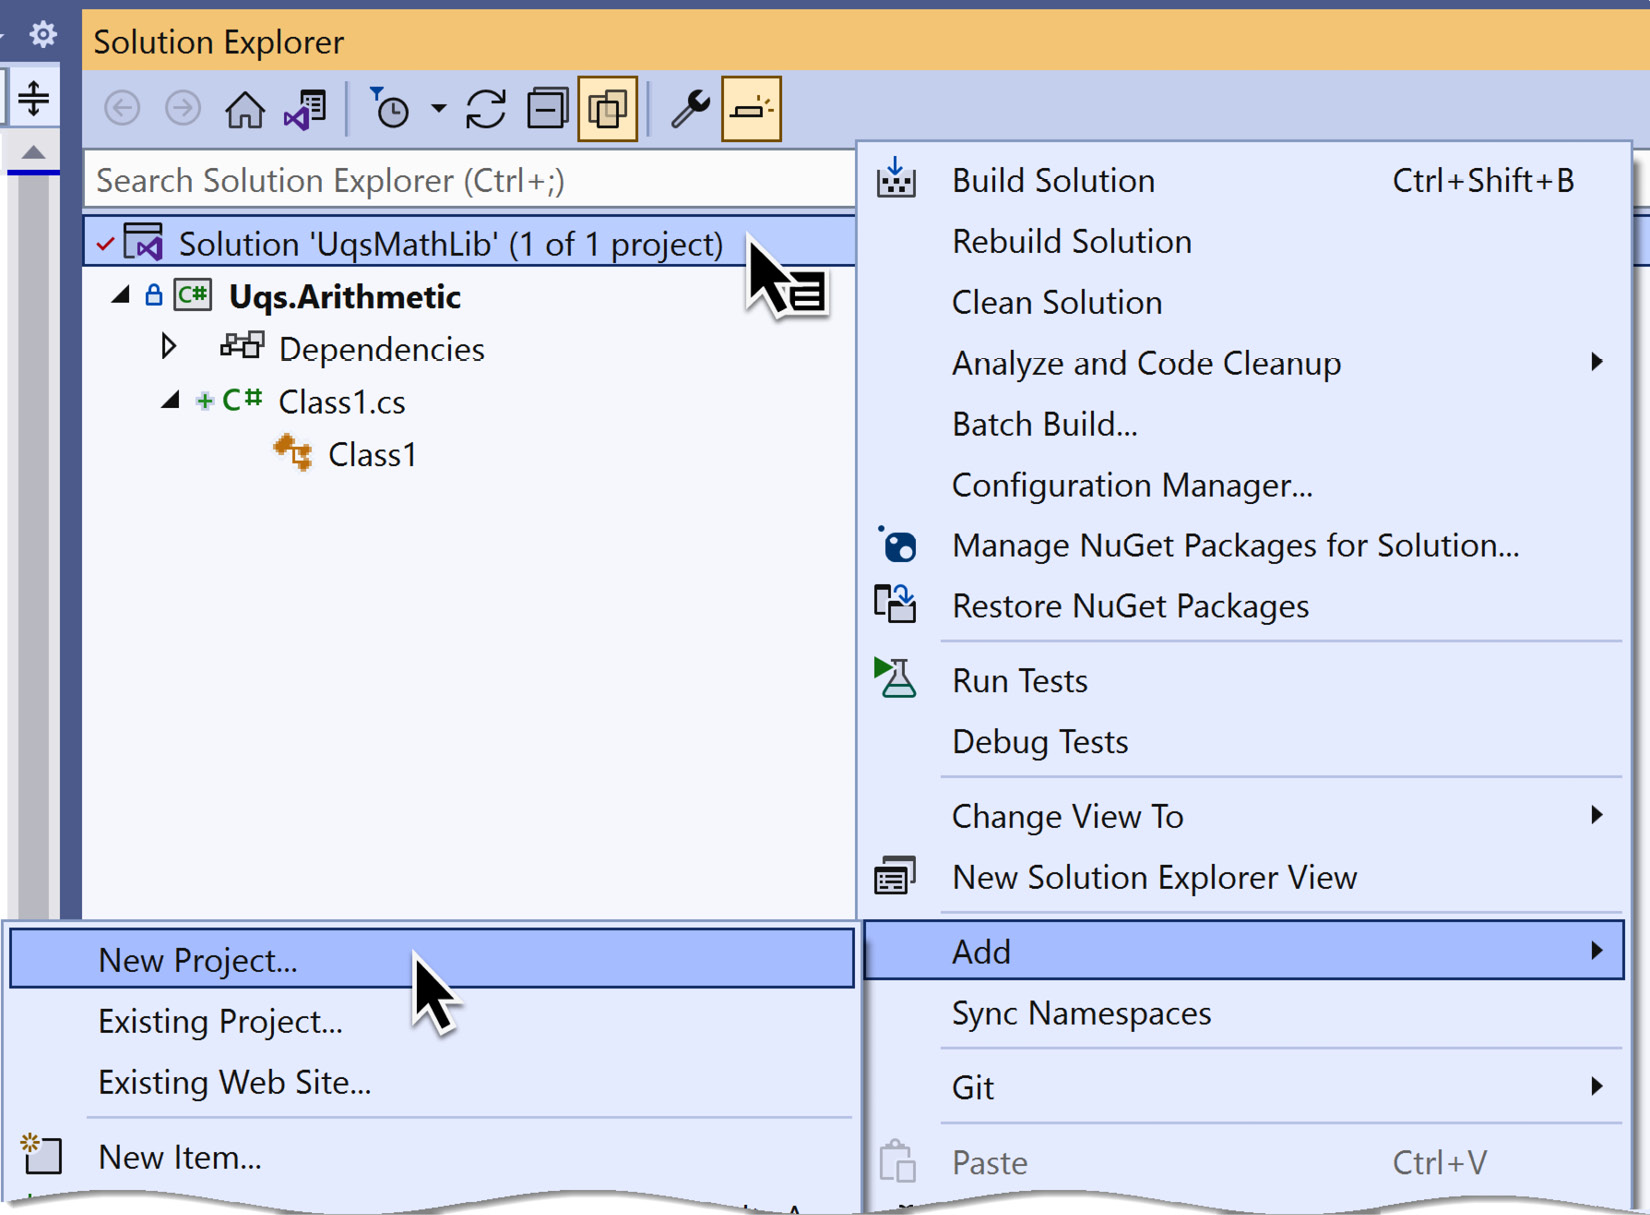
Figure 1.8 – Creating a new project in a solution
- Look for xUnit Test Project | hit Next.
- Set the Project name value as
Uqs.Arithmetic.Tests.Unit. - Hit Next | select .NET 6.0 | hit Create.
You have created a project via the VS GUI, but we still need to set the unit test project to have a reference to the class library. To do so, follow these steps:
- In VS Solution Explorer, right-click on Dependencies in
Uqs.Arithmetic.Tests.Unit. - Select Add Project Reference….
- Tick
Uqs.Arithmeticand hit OK.
We now have our solution fully constructed via the VS GUI. You may choose to do the same GUI steps in the CLI instead. In the next section, we will do exactly that.
Via the CLI
Currently, we have a solution with one class library project. Now, we want to add the unit test library to our solution.
Create a new xUnit project called Uqs.Arithmetic.Tests.Unit in a directory with the same name and use .NET 6.0. Here’s the code you need to execute:
dotnet new xunit -o Uqs.Arithmetic.Tests.Unit -f net6.0
Add the newly created project to the solution file by running the following command:
dotnet sln add Uqs.Arithmetic.Tests.Unit
We now have two projects in our solution. As the unit test project will be testing the class library, the project should have a reference to the class library.
You have created a project via the CLI, but we still need to set the unit test project to have a reference to the class library. To do so, add a project reference from Uqs.Arithmetic.Tests.Unit to Uqs.Arithmetic, like so:
dotnet add Uqs.Arithmetic.Tests.Unit reference
   Uqs.Arithmetic
We now have our solution fully constructed via the CLI.
Final solution
Whichever method you’ve used to create the solution—either the VS GUI or the CLI—you should now have the same files created. Now, you can open the solution in VS, and you’ll see this:
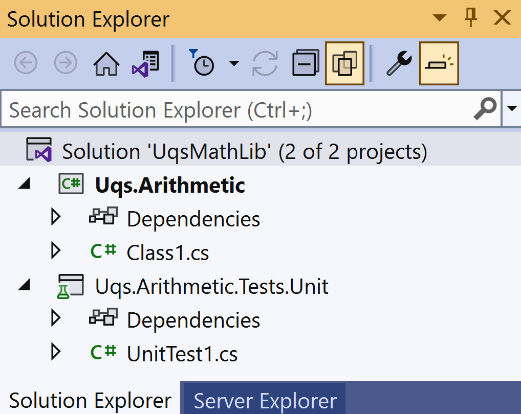
Figure 1.9 – The final created solution structure
To start from a clean slate, delete Class1.cs as we won’t be using it—it was added automatically by the template.
The logical structure of our two projects looks like this:

Figure 1.10 – Projects’ logical structure
What we’ve created so far are two projects: one that will be shipped to production at some stage (Uqs.Arithmetic) and one to test this project (Uqs.Arithmetic.Tests.Unit). The solution file links the two projects together.
Now that we have finished the less fun part of building the project skeleton and setting the dependencies, we can now start the more fun one, which is directly related to unit testing.
Familiarizing yourself with built-in test tools
We have reached the stage where we need to look into how to discover and execute tests, and to do that, we need to understand which tools are available to us.
We have code that is already generated by the xUnit template—look at the code inside UnitTest1.cs, as displayed here:
using Xunit;
namespace Uqs.Arithmetic.Tests.Unit;
public class UnitTest1
{
    [Fact]
    public void Test1()
    {
    }
}
This is a normal C# class. Fact is an attribute from xUnit. It simply tells any xUnit-compatible tool that the method decorated with Fact is a unit test method. xUnit-compatible tools such as Test Explorer and .NET CLI Test Command should be able to find this method in your solution and run it.
Following the trend of the previous sections, we will utilize the available test tools in two ways—via the VS GUI and via the CLI.
Via the GUI
VS comes with a GUI as a test runner to discover and execute tests—it is called Test Explorer. To see how a test runner would discover test methods, from the menu, go to Test | Test Explorer. You will see the following screen:

Figure 1.11 – Test Explorer showing unexecuted tests
As you can see, it detected all the tests in our solution, showing the tests in a Project Name > Namespace > Class > Method hierarchy. Also, you can see that the test hierarchy is grayed out and has an exclamation mark. This is a sign that the tests were never run. You can click on the upper-left Run button (shortcut keys: Ctrl + R, T. This is pressing and holding Ctrl then pressing R and quickly switching from R to T) and run this test. This will build your project and will execute the code within the methods decorated with Fact. The results are shown here:

Figure 1.12 – Test Explorer showing executed test results
Don’t expect anything fancy as we have an empty shell, but at least the tests will turn green and you will know that your setup is working. You can similarly discover and execute tests using the CLI.
Via the CLI
You can also execute the same test by using Command Prompt, going to the solution directory, and executing the following command:
dotnet test
This is what you are going to get:
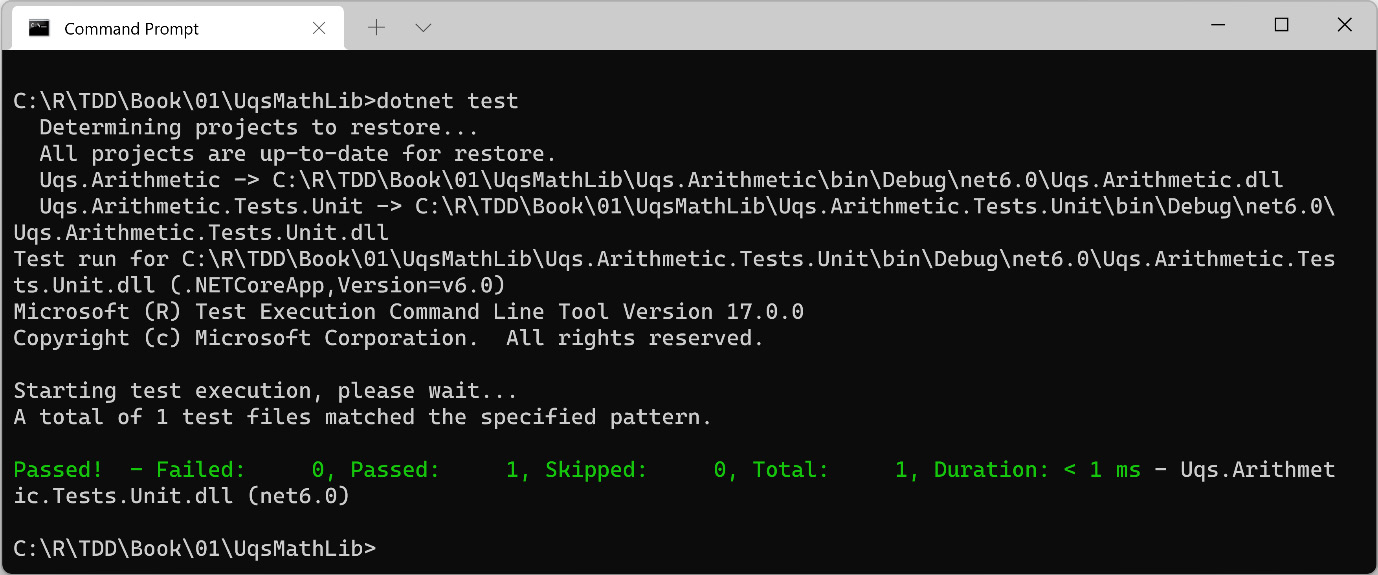
Figure 1.13 – .NET Test command discovering and executing tests
Running commands such as this will come in handy later on when we want to automate test running.


