Installing Unity Hub
To develop our metaverse, just like a video game, we will need to install Unity on our computers. In this section, we will follow all the necessary steps to do so. We will install Unity Hub, which will allow us to manage multiple versions of Unity in a simple and orderly way, create a project from scratch, and explore the fundamental parts of the editor to get familiar with the graphical interface.
Unity Hub is an application that allows us to manage and install multiple versions of the Unity editor on our computer. Also, for each version, it allows us to install different build platforms and tools in an isolated way. It is very common that throughout our professional careers developing video games, we need different versions of Unity to support different projects, which, for whatever reason, cannot be updated or do not work quite right in later versions of Unity.
This is where Unity Hub comes into play – it allows us to easily install any version of Unity in isolation without it conflicting with other versions. It also allows us to load existing Unity projects on our computers and configure which version of Unity it should use when opening.
To install this tool, execute the following steps:
- Please download and install the Unity Hub program from https://unity3d.com/get-unity/download. It is recommended that you use Unity Hub to manage the Unity versions on your computer instead of downloading and installing the Unity editor directly.
The screenshots in this book were taken in Unity Hub version 3.0.0. The functions and buttons in earlier or future versions should not change.
- You will need to activate a license for Unity if you have not already done so. The Unity User license has free plans for Students and Community; you can decide if you need to upgrade your plan to Plus or Pro in the future. For our project, a free plan is sufficient since all Unity features are open in the free license.
- Press the Download For Mac or Download For Windows button, as shown in the following screenshot:
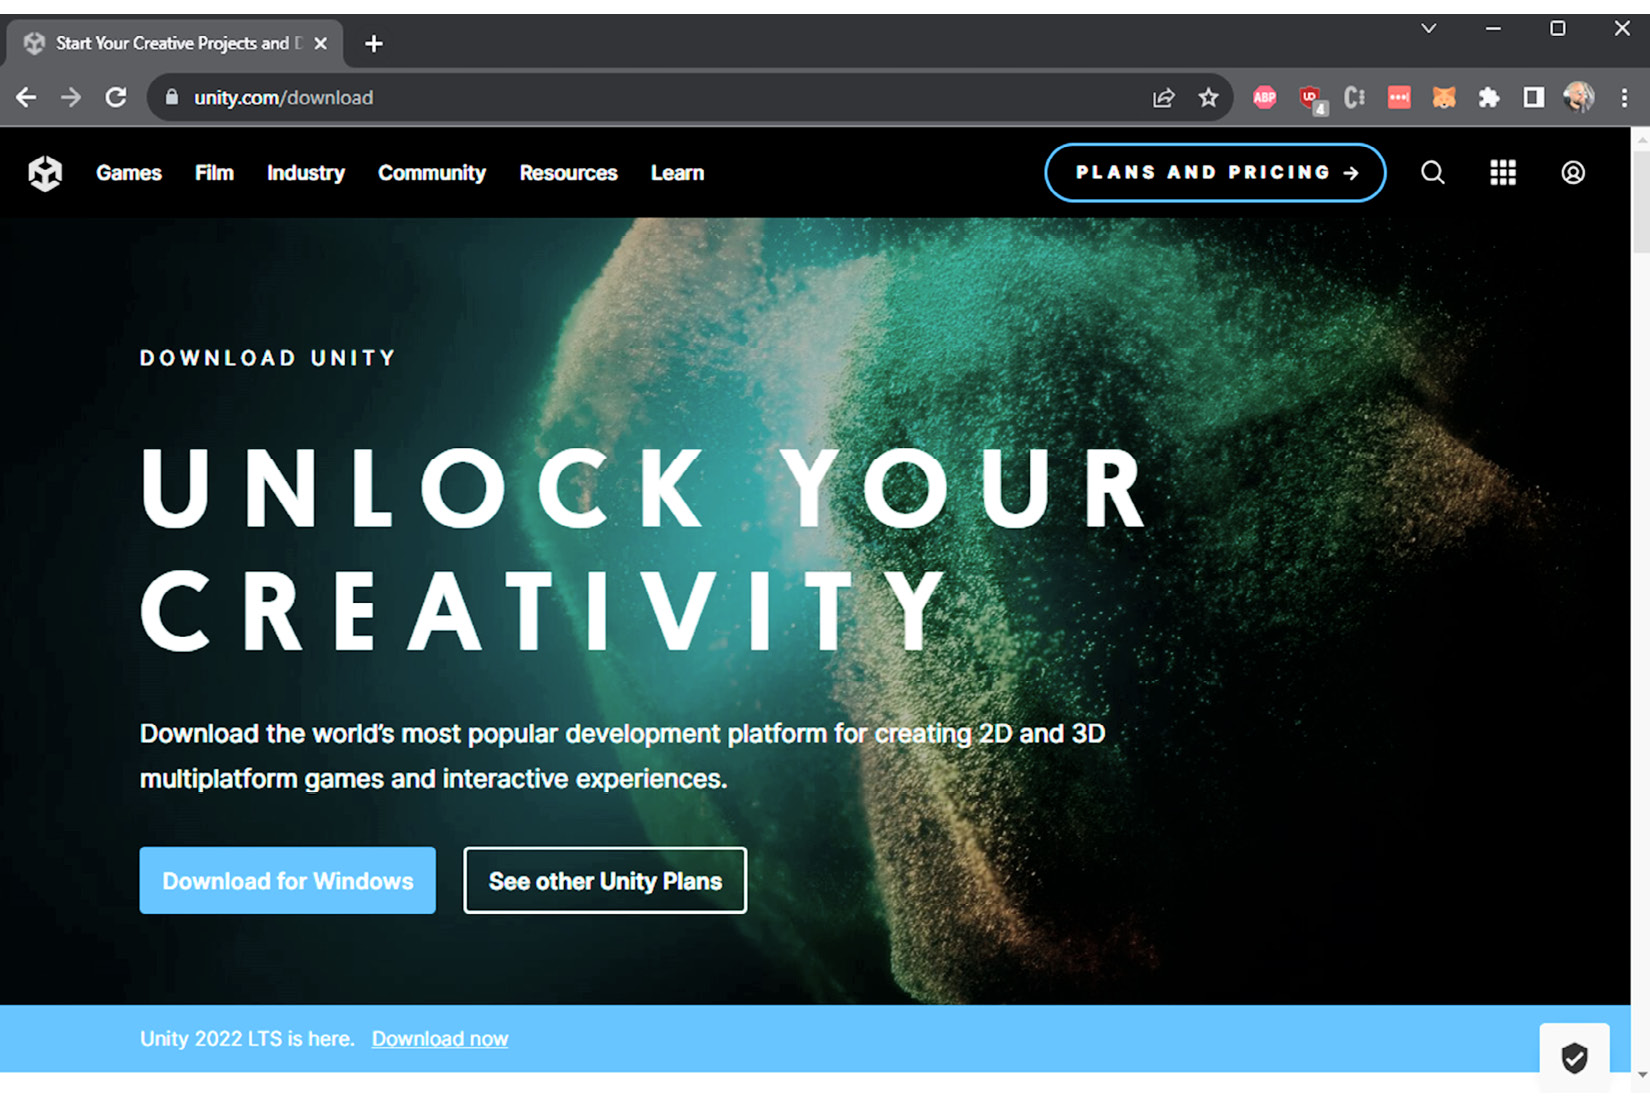
Figure 1.1 – Installing Unity Hub instead of downloading Unity directly
- If this is your first experience with Unity or you want to expand your knowledge, I recommend that you take a look at the Learn and Community menus that you will find in Unity Hub when you open it.
- If this is the first time you are using Unity Hub, you will need to create a new account for free. You can also log in with your Google, Facebook, or Apple account and accept the terms and conditions of use.
Once we have downloaded Unity Hub, we can proceed to install it on our computers. Unity Hub allows us to manage multiple installations of different versions of the Unity editor on our computers. This will allow us to maintain compatibility with all previous projects that we have or those that we will create in the future. Next, I will guide you through the process of installing a new instance of the Unity editor step by step.
Installing the Unity editor
As a recommendation, whenever you start a new project in Unity, it is interesting to download the latest version available. That is why, in our metaverse, we will do it this way.
When starting a new engine installation, Unity will show us different options, such as the recommended LTS version, other recent versions, and a history of previous versions, all of which are very useful when you have a legacy project that needs a specific version to work.
To start a new installation, execute the following steps:
- On the Unity Hub main screen, select the Installs tab and click on the Install Editor button:
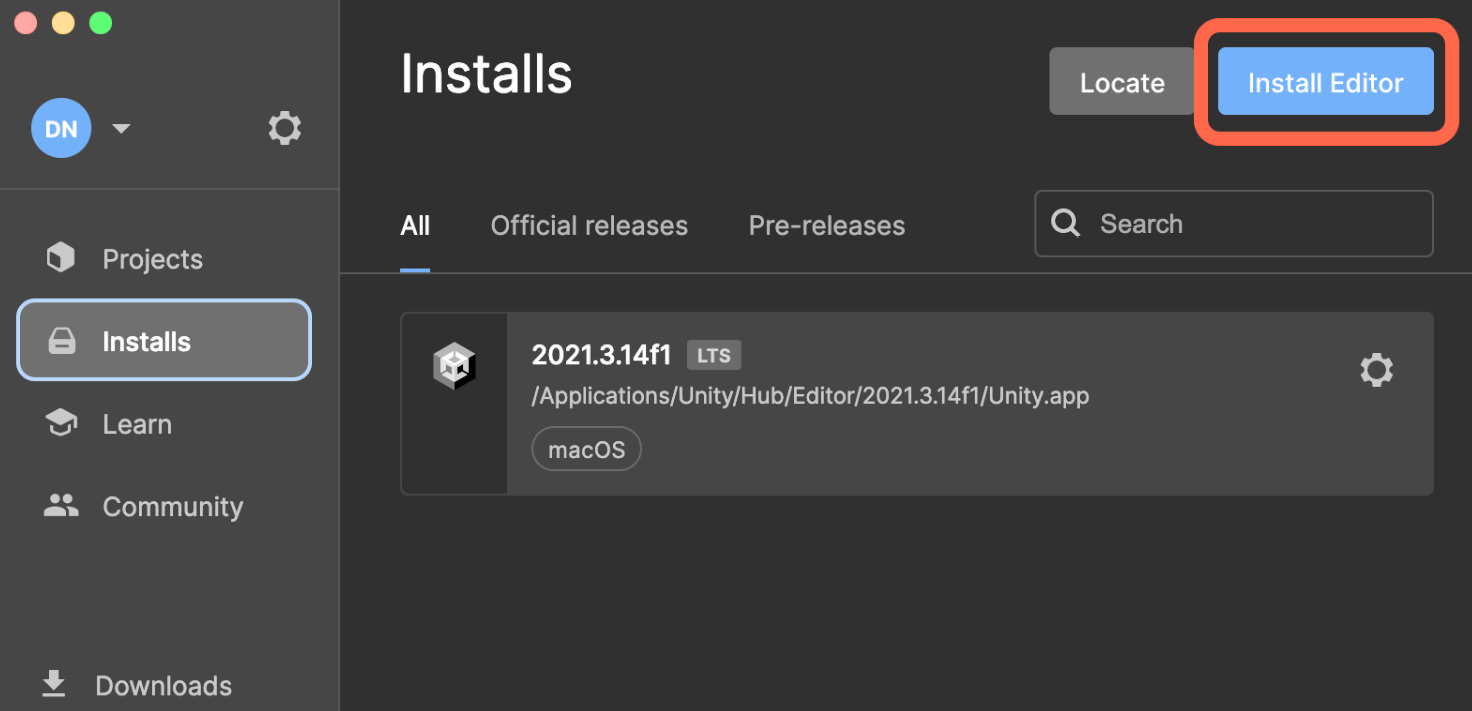
Figure 1.2 – The Install Editor button in Unity Hub
- Click on the Archive tab and then click on the download archive link, a tab will open in your browser that will show the Unity version catalog. If you wish, you can also go to the url https://unity.com/releases/editor/archive in your browser:
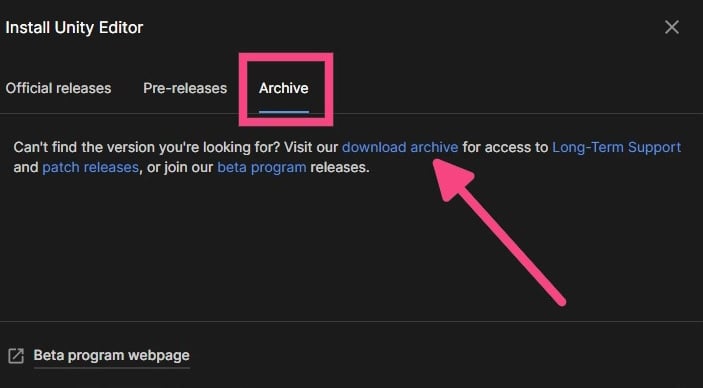
Figure 1.3 – Archive tab in Unity Hub
- This project has been built from version 2021.1.14f1. Once you are on the Unity version catalog page, you can search for the desired version. Click on the Unity 2021.X tab to find the 2021.1.14f version, finally click on the Unity Hub button, this action will launch the download in Unity Hub.
About the Unity version
In this book, we have built the project on version 2021.3.14f1. This version will most likely be lower than the version Unity recommends at the time of installation. We cannot guarantee that the project will work in future versions of Unity. To use a particular version of Unity or if the version you are looking for is not listed in Unity Hub, you can access the version history at https://unity.com/releases/editor/archive.
- The next step is very important: to configure the installation, we must select the components that will be installed initially. Do not worry if you have skipped this step – you will be able to reinstall other components in the future. For the correct course of our project, we will need to check the following:
- If you are working on Mac, you will have to select Visual Studio for Mac, whereas if you are on Windows, the Microsoft Visual Studio Community 20xx option will appear.
- In Chapter 14, Distributing, we will learn how to compile and export our project on different platforms. To successfully carry out this part, at this point (or later if you wish) we need to install the necessary components to compile for Android, iOS, and Windows.
- Check the following components:
- Android Build Support, with OpenJDK and Android SDK and NDK Tools
- iOS Build Support
- Linux Build Support (IL2CPP)
- Mac Build Support (IL2CPP) (Mono) if you are using Windows
- Windows Build Support (Mono) (IL2CPP) If you are using Windows
Some of the components are heavy and may take a while to download and install; it’s a good time for a coffee!
Changing Unity’s installation location
Using the Unity Hub gear icon, you can change the location where the Unity version you have selected will be installed. You can change the path from the Installs tab:
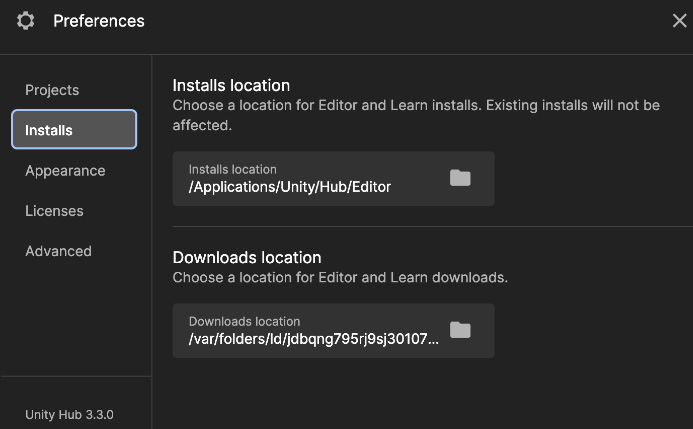
Figure 1.4 – Setting the default installation folder
Well, after knowing the main requirements to be able to work with Unity3D without problems, we will see in detail how to create new projects from Unity Hub.
Creating and managing Unity projects
The Unity Hub tool also serves to manage our projects, regardless of the version of Unity in which they were conceived. We can have an infinite number of projects, old and new, and each of them can be configured to be edited in a different version of Unity. You can easily add the projects you have in some directory on your computer using the Open button.
Don’t worry if you have loaded a project that uses a version you don’t have installed in Unity Hub. As you can see in Figure 1.5, a warning icon will appear to warn you that the project uses a version of the engine that you do not have installed and allows you to install that particular version by clicking on the button specifying the version number:
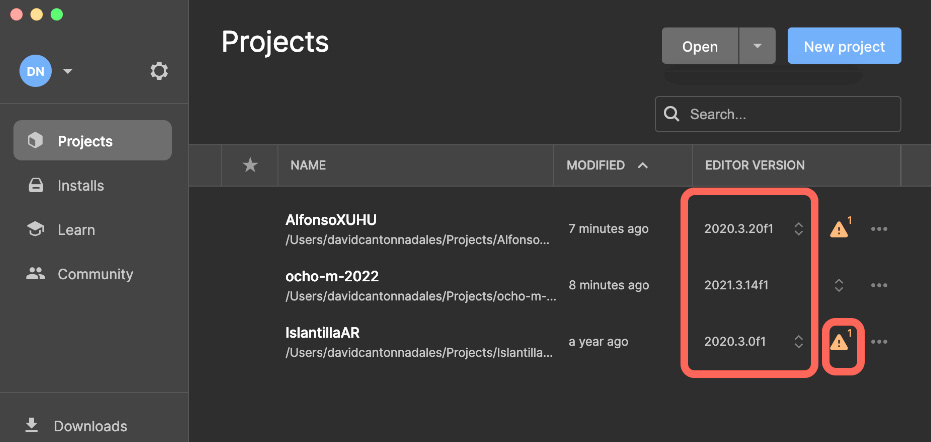
Figure 1.5 – Managing multiple projects with different versions of Unity
To begin, we will need to create a new project. Each project that we’ll create from Unity Hub will be created in a specific folder that we create. Don’t worry about this – the project creation wizard will ask us each time where we want to create it.
If you always want to create them in the same directory and you want to avoid configuring this every time you create a new project, you can configure it at a general level in the same window that appears in Figure 1.4.
In the Projects tab, you will see which directory is used by default for each new project. Just click and select the new destination and click Accept.
Now, to create our new project, execute the following steps:
- With Unity Hub open with the Projects tab active, click on the New Project button, located at the top right. Once the new project creation wizard opens, it will ask us to update the initial configuration we want to have (template), the name of our project, and the location where it will be created:
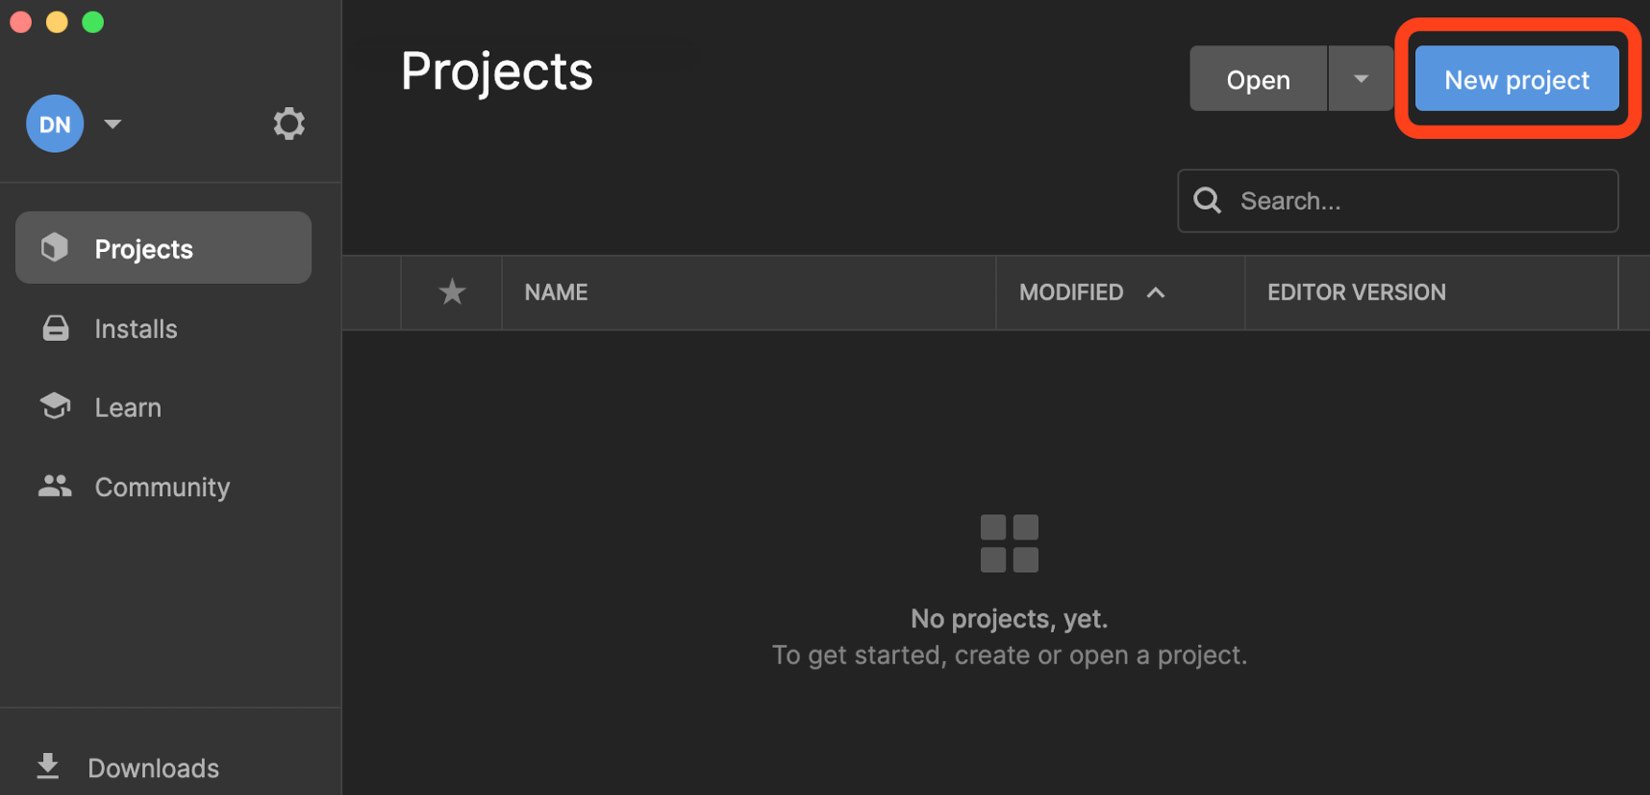
Figure 1.6 – The New project button in Unity Hub
- Scroll down and select the 3D (URP) template. We will see why we have selected this item and not another one shortly. It is possible that you may not have used the 3D (URP) template before and you need to download it; in this case, click on the Download template button:
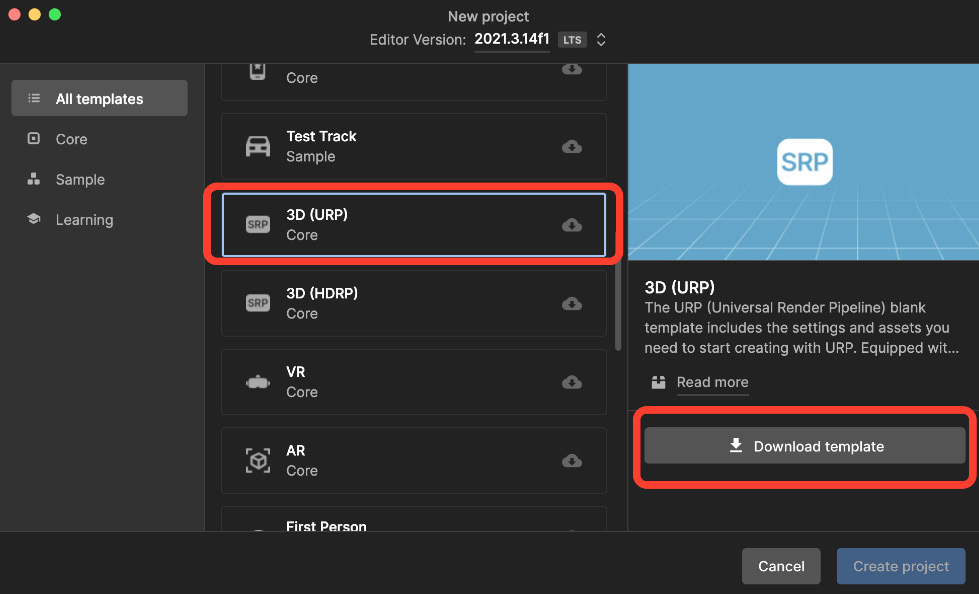
Figure 1.7 – Creating a new project
- Once you have downloaded the template, you can fill in the title of your new project and its location. In my case, I am going to call this project
MyMetaverseand I will save it in my default directory. - Remember that you can choose the directory you prefer as this will not influence the development of the project. In my case and for your reference, I have used the
/Users/davidcantonnadales/Projects/MyMetaversepath. If you’re using Windows, it can be something likeC:Projects/MyMetaverse:
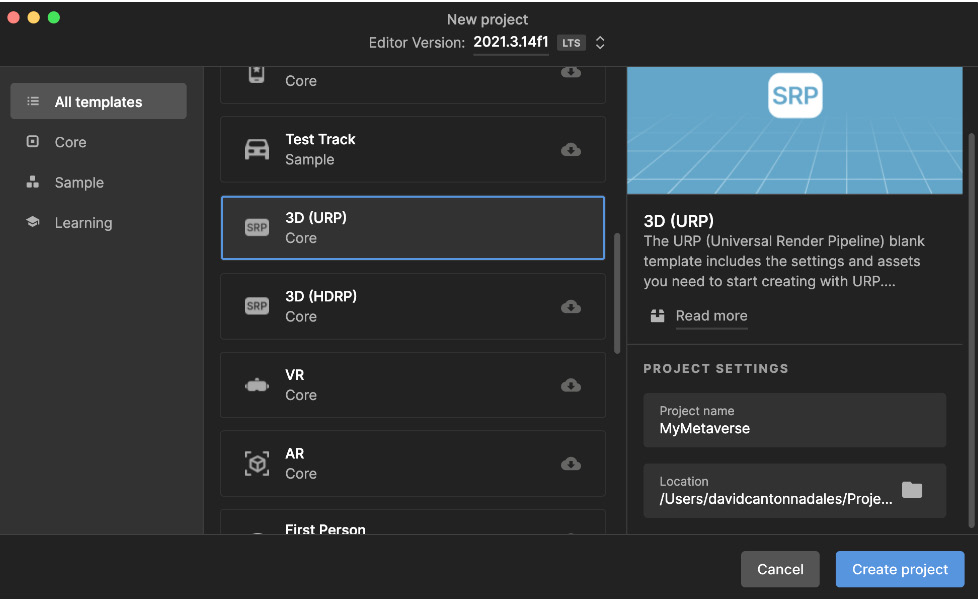
Figure 1.8 – Setting up the name and location of the new project
Things to consider when choosing your project name
In some projects I have done, I have had problems with the spaces in the project creation directory. Keep in mind that Unity will create a folder with the same name as the project you have chosen. For example, if we had chosen My Metaverse instead of MyMetaverse, it would create a directory with a blank space. To avoid possible problems later on, I recommend that you avoid blank spaces.
You may have some doubt in your mind as to why we have used the URP rendering method instead of the default one. I have specified the technical benefits we have obtained by selecting the URP rendering method for our project in the following note.
Why did we choose the 3D template (URP)?
Unity allows you to create Universal Render Pipeline (URP) or High Definition Render Pipeline (HDRP) projects so that you can focus on performance or quality rendering.
URP offers better graphics quality than the default Standard Render Pipeline (SRP) built-in system in Unity. URP is designed for casual games for mobile and PC/Mac, offering great compatibility between different devices. On the other hand, there is a superior render pipeline called High Definition Render Pipeline (HDRP) that’s oriented to AAA games for consoles and PC with great features.
If you want to learn detailed technical information about the differences between URP and HDRP in Unity, I recommend that you check out this blog post: https://vionixstudio.com/2022/02/12/urp-vs-hdrp-in-unity.
- Once you have clicked the Create button, Unity will take a few seconds to configure and create the new project. It will also load the default plugins. Once everything has finished loading, the editor will open with a default scene. When this whole process is finished, you will see something similar to Figure 1.9:
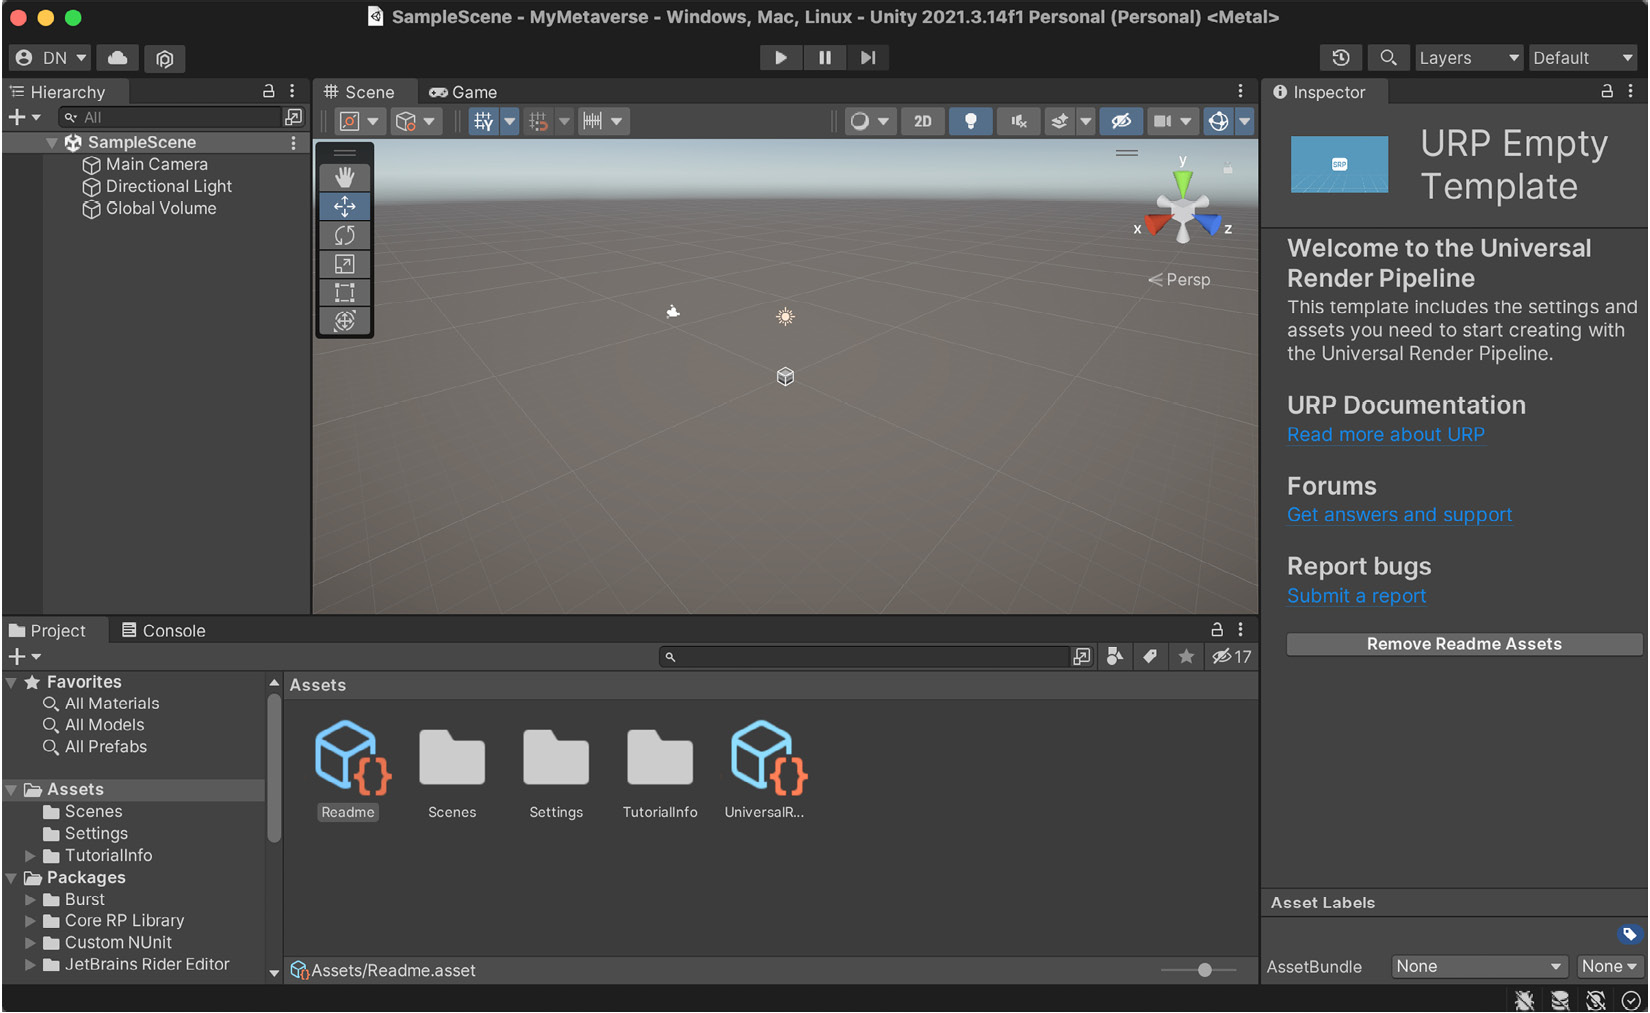
Figure 1.9 – The appearance of the Unity editor after creating a new project
With that, we have created our first project. As you can see, Unity has created our first blank scene called SampleScene. Before we move on to the next point, let me briefly explain something about the target platforms that Unity offers.
As I commented at the beginning of this book, our project will be compatible with multiple platforms – that is, it can be compiled and exported for Android, iOS, Windows, macOS, and Linux. At the end of this book, we will learn how to do this for each of the platforms.
In Unity, when we create a new project, by default, it is configured to be exported for Mac/Windows. You can view the target platform’s settings by opening the Build Settings menu. On Mac and Windows, you can access this menu by clicking on File in the toolbar and then on the Build Settings menu:
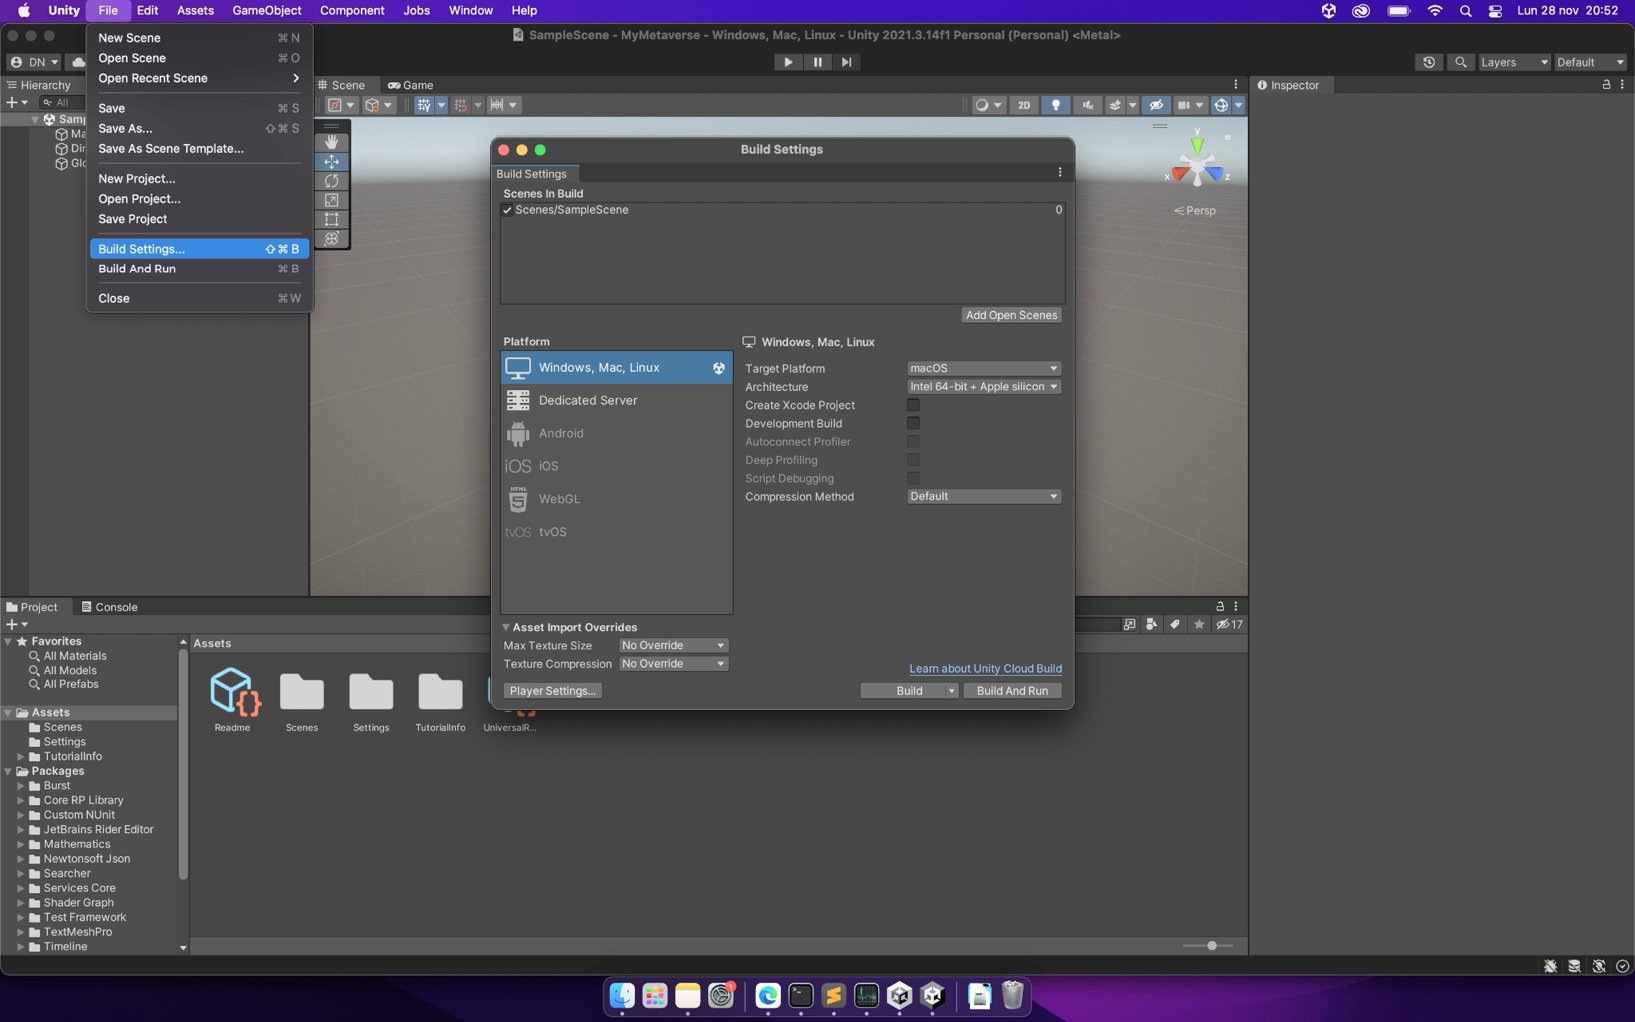
Figure 1.10 – The Build Settings window
For now, and until we finish most of the chapters and get to the Cross Platform compilation part, we will not need to change these settings. We will dig into this later.
Basics of using the Unity editor
If this is the first time you’re using Unity, do not skip this section as we will briefly review all the parts that comprise Unity. We will explore the most important menus and begin to learn the basic actions that will lay the foundations of the knowledge necessary for you to advance to the following chapters.
The first and most basic thing to know about Unity is its organization. By default, when we create a new project, we see the Unity editor with five clear divisions called layouts. There are several predefined layouts that we will see later. In addition, we can customize this aspect to our taste and save the configuration.
If we pay attention to the Unity editor, we can distinguish mainly five sections in the layout that load by default. To learn about other layouts, take a look at Windows | Layouts, as shown in the following figure:
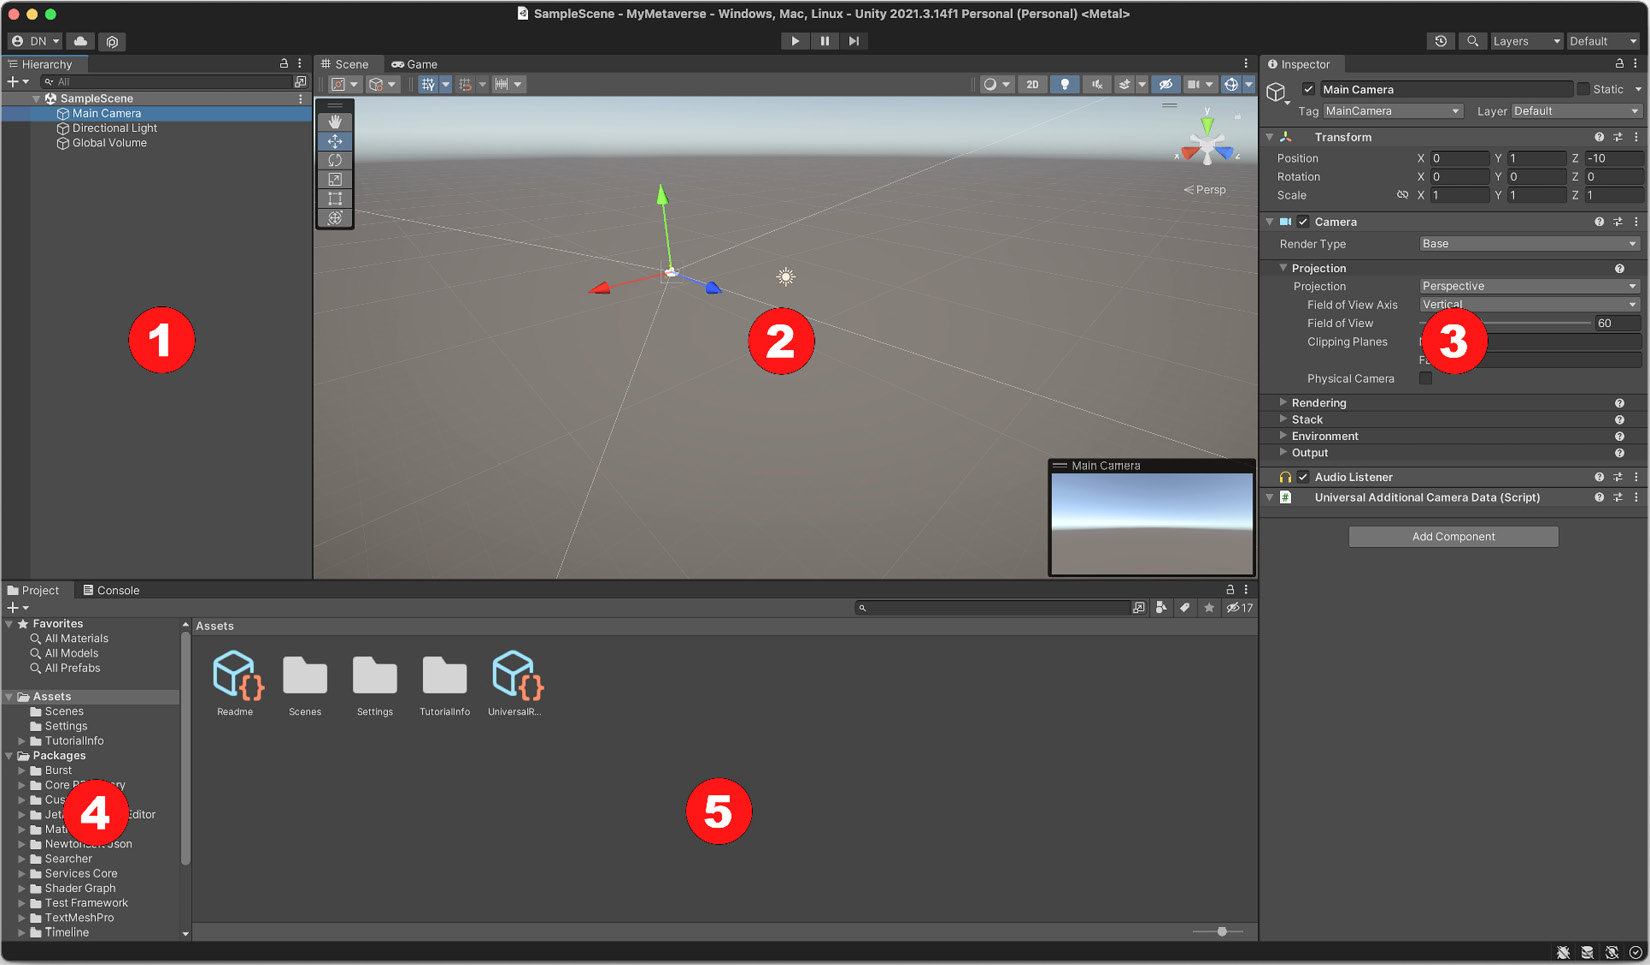
Figure 1.11 – The default layout in the Unity editor
Let’s review what the divisions we have numbered in the preceding screenshot are for:
- Hierarchy window: All the objects that appear in our scene (GameObjects) are organized as a tree, and they can be relocated and grouped in parent-child mode. There is a root node with the name of the scene; the rest will hang from here. It is here where we will select the object we are going to work with so that we can move it, enlarge it, edit it, and so on.
- Scene window: This is the three-dimensional representation of the world we are building. This is where the objects that we have in the Hierarchy window will be represented graphically. When you select an object of the hierarchy, it will be marked in the scene, as shown in the preceding screenshot with the GameObject called Main Camera.
- Inspector window: This section displays information about the position, rotation, and scale properties of the selected object in the Hierarchy window. The changes we make to these values will affect the visual representation of the Scene window. Also, in this Inspector window, we can manage the components of an object.
By way of summary, it can be said that components are pieces with unique functionality, which are attached to a GameObject and cause it to acquire a new functionality or feature. These components can also be scripts that we make in C#. We will start programming our own scripts in Chapter 5, Preparing a New World for Travel.
- Project window: Here, you will find the folders of the added resources and the assets or plugins that have been installed in our project. For example, here, we will find the images, audio, or 3D objects that we will be using in some of the scenes.
- Project window in detail: As a master detail view, this window shows the contents of the folders that were selected in the Project window. The assets that we select here will have their information displayed in the Inspector window.
We already know how a layout is composed in Unity; inside each window of the layout, we can find other functionalities that we can access by changing tabs, as shown in the following figure:
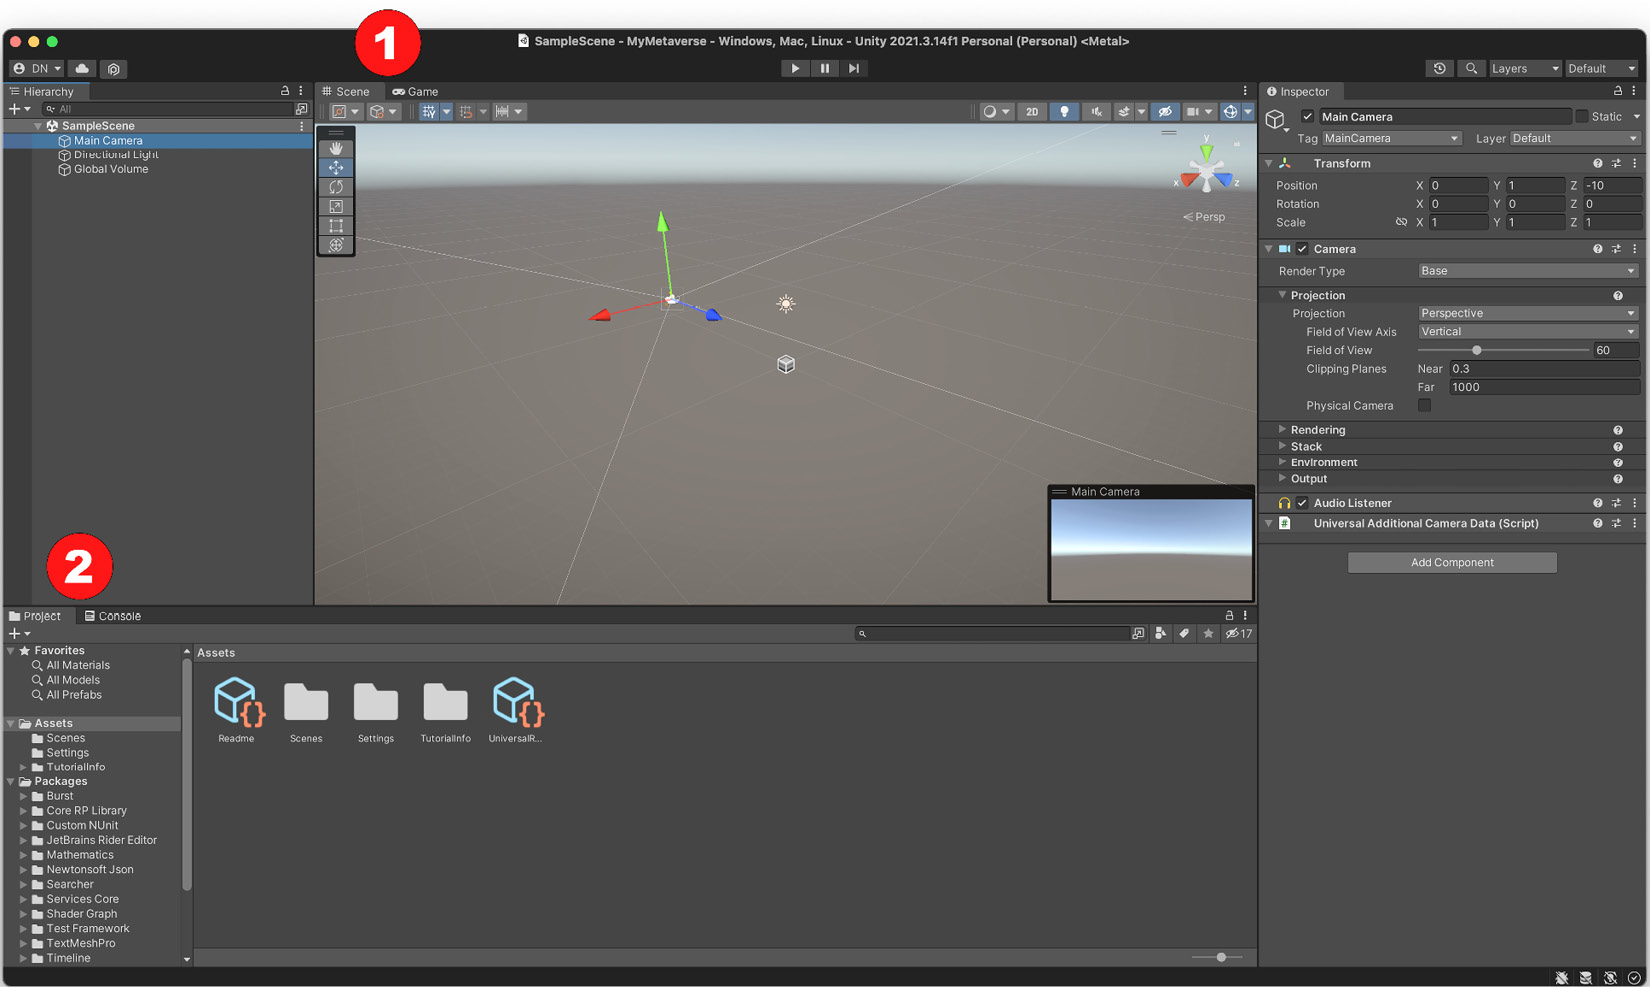
Figure 1.12 – Tabs with other functions in the layout
If we look at the Scene window in Figure 1.12, we will see that there are two tabs called Scene and Game (1). The Scene tab, which is checked by default, as we mentioned previously, shows the 3D representation of the objects placed in the Hierarchy window. Here, we can move freely with the mouse and keyboard to explore the scene.
In the Game tab, we will see what is focusing and rendering the camera in our scene – in this case, the Main Camera GameObject.
In the Project window, there are two tabs – Project and Console (2). In Project, as we have seen previously, the folders of the resources and assets that we have in our project are shown. In the Console tab, we will see information about errors and logs when we run our project.
On the other hand, we have the main menu bar of Unity, in which we can find the following options:

Figure 1.13 – The Unity editor’s main menu bar
Let’s take a closer look:
- File: Here, you can find the options to create a new scene, save the changes of the current scene, or open another one. You also have options to open or close a project. Finally, in Build Settings, you can change the Target Platform settings, as we saw previously.
- Edit: Here, we can see different actions, such as ordering or copying and pasting, that we can use for the GameObject of the current scene. Another very important menu that you can access from here is Project Settings, which contains all the settings applicable to our project.
- Assets: This menu allows you to search, import, and manage your project assets.
- GameObject: This menu allows you to add new items to your scene. It also gives you advanced options to create them as parents or children of others. There is a list of GameObjects that comes with Unity by default, such as lights, particle systems, cameras, and others.
- Component: This menu shows a list of built-in components that you can add to your selected GameObject.
- Window: This menu includes very important options, such as layout management, which we talked about previously. There are also actions to organize the editor panels.
A very important menu that we will see later is called Package Manager. This is an asset manager. When you acquire a new asset or when you want to acquire a new asset, this is where you can find it and add it to your project.
Last but not least, we have the main tools for manipulating the GameObject in the scene, as shown in Figure 1.14:
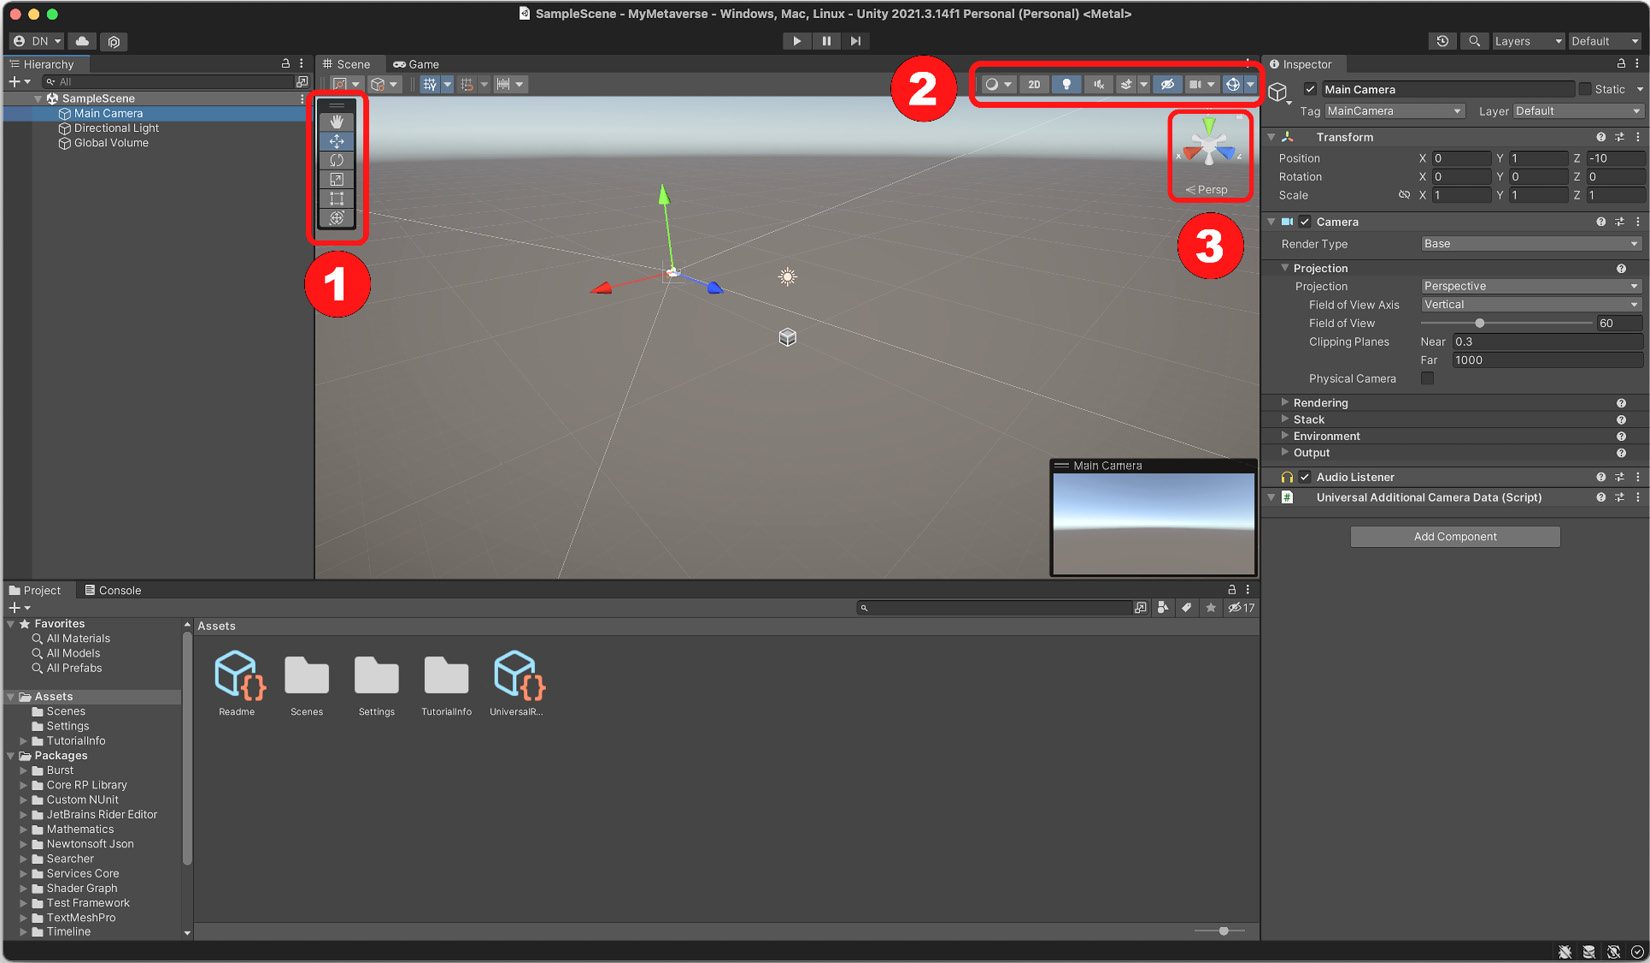
Figure 1.14 – The main toolbars in the Unity editor
Let’s take a look:
- Tools: These are the buttons you will use the most in any project you create in Unity. These five buttons are used to rotate, move, transform, and scale the currently selected GameObject.
- View options: This bar has display options that affect the current scene, such as enabling or disabling the lighting, changing the camera rendering to 2D/3D, disabling the sound, and so on.
- Gizmo: This cross is used to change the viewing perspective in the scene. Here, you can view the scene from above, left, right, or below... just click on the different orientations.
Creating a new scene
Now that we’ve covered a lot of the theory regarding Unity and its interface, it’s time to get down to business. For this, we are going to create our first scene. For now, this scene will only have a floor, but it will serve as a base for the following chapters.
Follow these steps to create a new scene from scratch:
- Create a new scene from the File menu by selecting New Scene.
- The New Scene creation window will appear. Since our project is being created with URP, select the Standard (URP) option. This will create the scene with the appropriate settings:
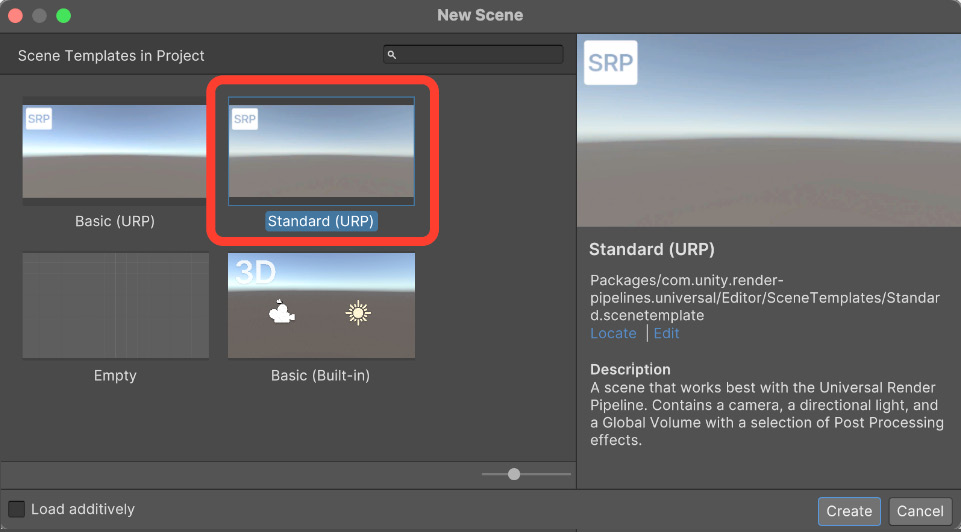
Figure 1.15 – Creating a new scene with URP configuration
- Upon clicking the Create button, you will need to choose the name of your new scene. The scene we are creating will be our main scene, so you could call it
MainScene, for example.
The Where option allows you to specify the directory inside the project where you will create the scene. For the moment, you can leave it as-is. We will learn more about how assets are organized in the project later:
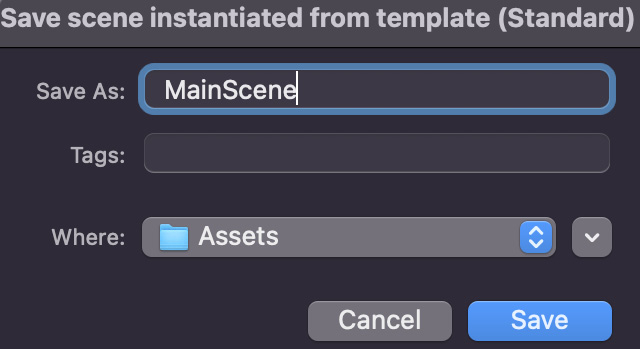
Figure 1.16 – Choosing a name for the new scene
- After clicking the Save button, the new scene will be created and opened. By default, Unity adds a Camera object, a Light object, and a GameObject called Global Volume, which is in charge of adding post-processing settings to our camera and will make everything look much better.
- Now, to create our floor, we will use a Plane object. Click GameObject | 3D Object | Plane.
- We already have a floor; you can see that it has been created in the Hierarchy window. Now, you can change the name of the newly created object. For example, you can call it
Floorinstead of Plane. - Make sure that the ground is at the lowest part of the scene and in the center. For this, modify the position values by clicking on the GameObject from the Hierarchy panel and changing the X, Y, and Z positions to
0,0, and0. This can be seen in Figure 1.17:
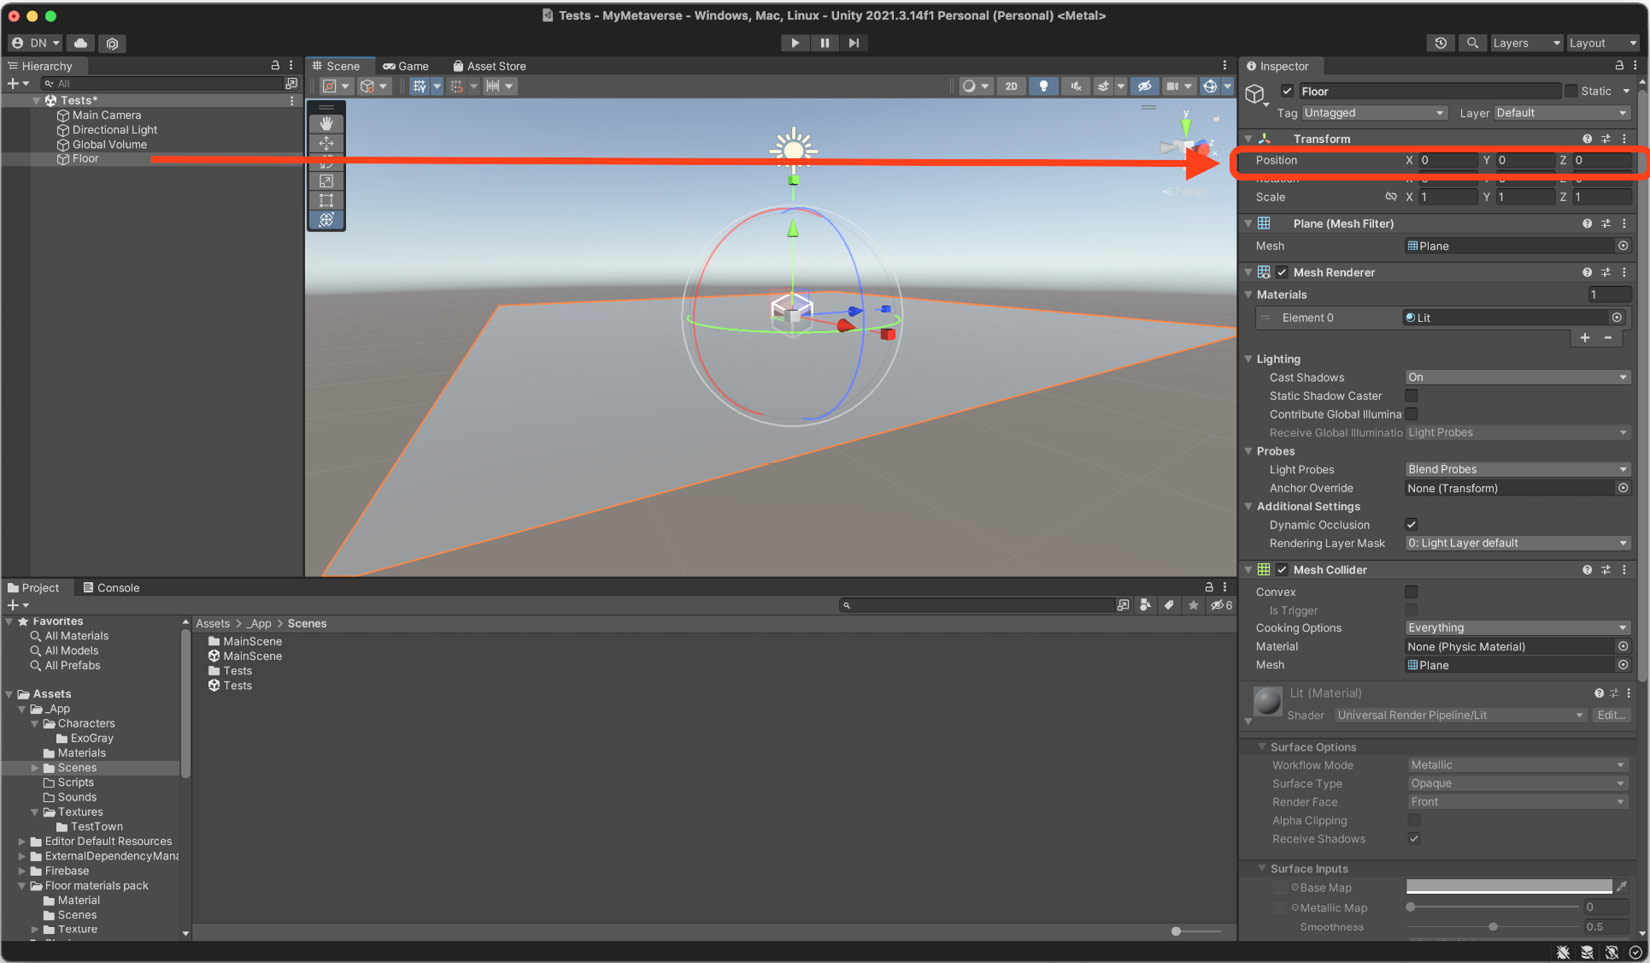
Figure 1.17 – Changing the position of the floor
- The floor we’ve created is too small – we would like it to be wider so that the character we create later can walk several steps before falling into the void. You can modify the floor’s size by manipulating the Scale values in the Inspector panel.
By default, the panel is created with 1, 1, 1 values; we will change these to 10, 10, 10. As you change these values, you will see how the floor is enlarged.
- Finally, save the changes you’ve made to the scene via the File | Save menu. The scene will now look like this:
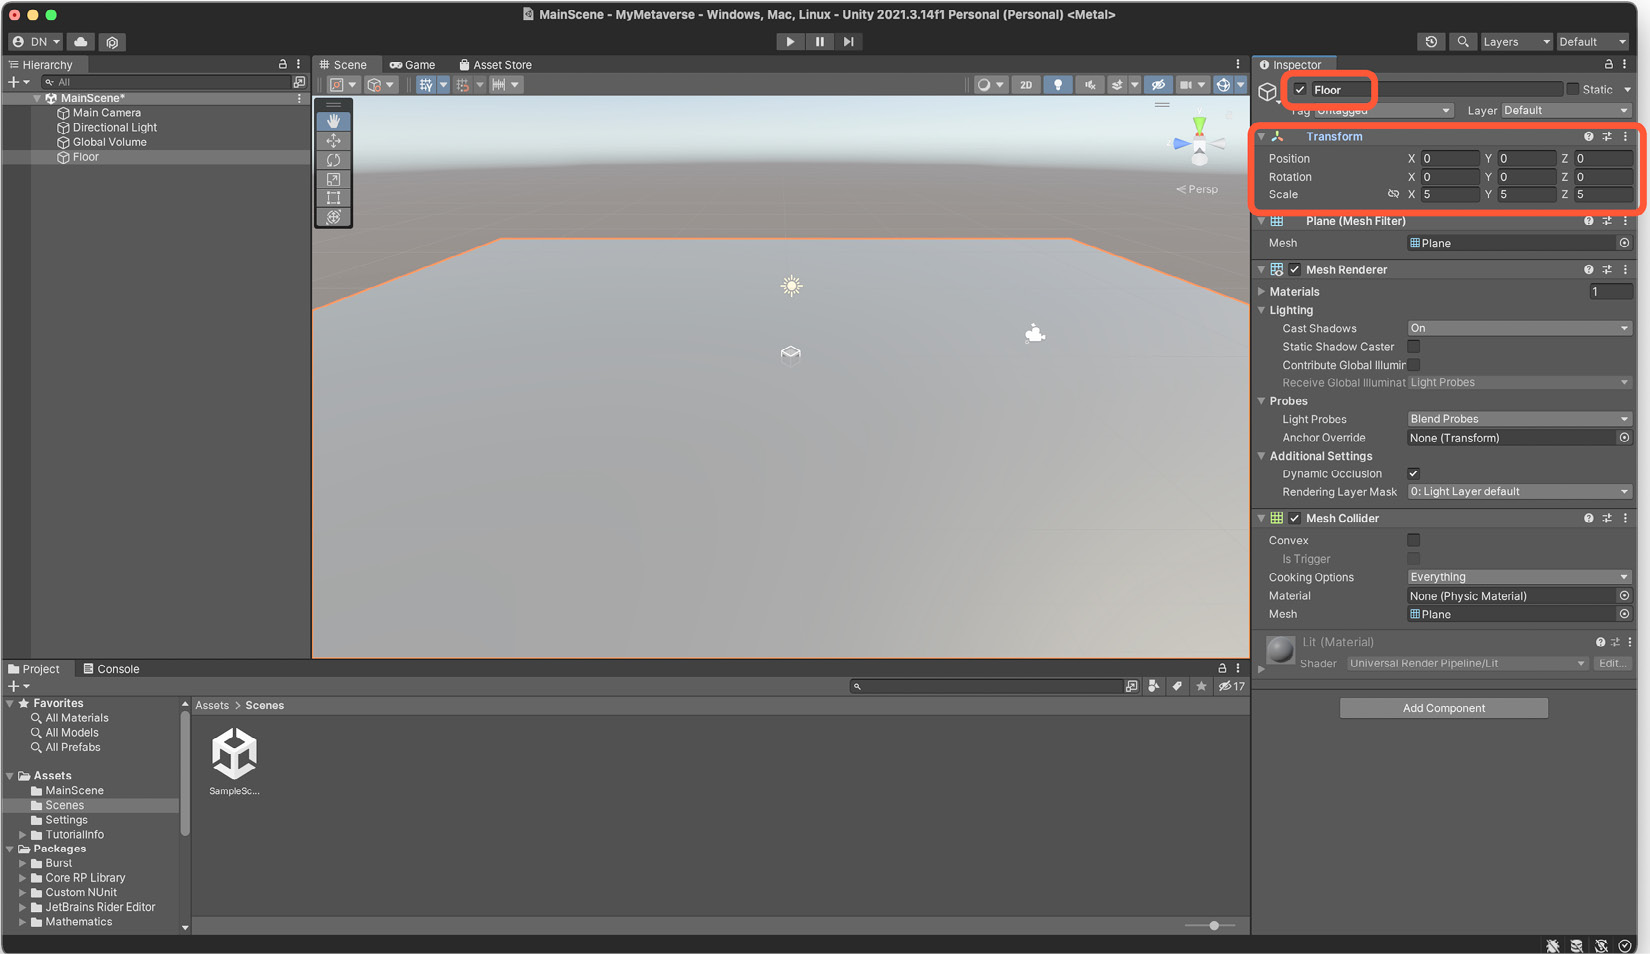
Figure 1.18 – The new scene with a floor
Getting familiar with Scene View controls
At this point, we already know the basics of the Unity interface, including how to create a new scene and change the Position and Scale properties of a GameObject. At this point, I recommend that you explore the controls to navigate the scene with the mouse and keyboard.
For example, using right-click to pivot the view, press Alt + left-click (Option + left-click on Mac) to orbit the view around the center of the view and center-click the mouse to move the view.
You can also use Alt + right-click (Option + right-click on Mac) or the mouse scroll wheel to move closer or further out. For more detailed information about keyboard and mouse combinations, you can visit https://docs.unity3d.com/Manual/SceneViewNavigation.html.
Advanced object positioning documentation
You can find extended information on how to change the position, rotation, and scale properties of a GameObject at https://docs.unity3d.com/Manual/PositioningGameObjects.html.
Now that you have learned everything you need to install Unity to create new projects and scenes, you know the most important points of the user interface, as well as how to place objects and modify their properties in a scene. Next, we’ll look at a very important technique that will lay the foundation for efficiently organizing files, folders, and assets in your project.


