Making OpenAI API requests with Postman
The OpenAI Playground is a great way to test model completions and provides the exact same responses that you would receive with the OpenAI API, but it serves a different purpose. While the Playground is treated as a sandbox for experimentation that is easy to use, interactive, and great for learning, the OpenAI API enables users to integrate the models directly into their applications.
Getting ready
In order to make HTTP requests, we need a client such as Postman to post requests to the API. We also need to generate an API key, a unique identifier that authorizes us to make requests to OpenAI’s API.
In this recipe and book, we will select Postman as our API client, but note that many alternatives exist, including WireMock, Smartbear, and Paw. We have chosen Postman because it is the most widely used tool, it’s cross-platform (meaning that it works on Windows, Mac, and Linux), and finally, for our use case it’s completely free.
Installing Postman
Postman is the widely recognized stand-alone tool for testing APIs, used by over 17 million users (https://blog.postman.com/postman-public-api-network-is-now-the-worlds-largest-public-api-hub/). It contains many features, but its core use case is enabling developers to send HTTP requests and viewing responses in an easy-to-use user interface. In fact, Postman also contains a web-based version (no downloads necessary), which is what we will be using in this section.
To use Postman, navigate to https://www.postman.com/ and create a free account using the Sign Up for Free button. Follow the on-screen instructions until you get to platform, where you should see a menu bar at the top with options for Home, Workspaces, API Network, and more. Alternatively, you can choose to download and install the Postman application on your computer (follow the steps on the website), removing the need to create a Postman account.
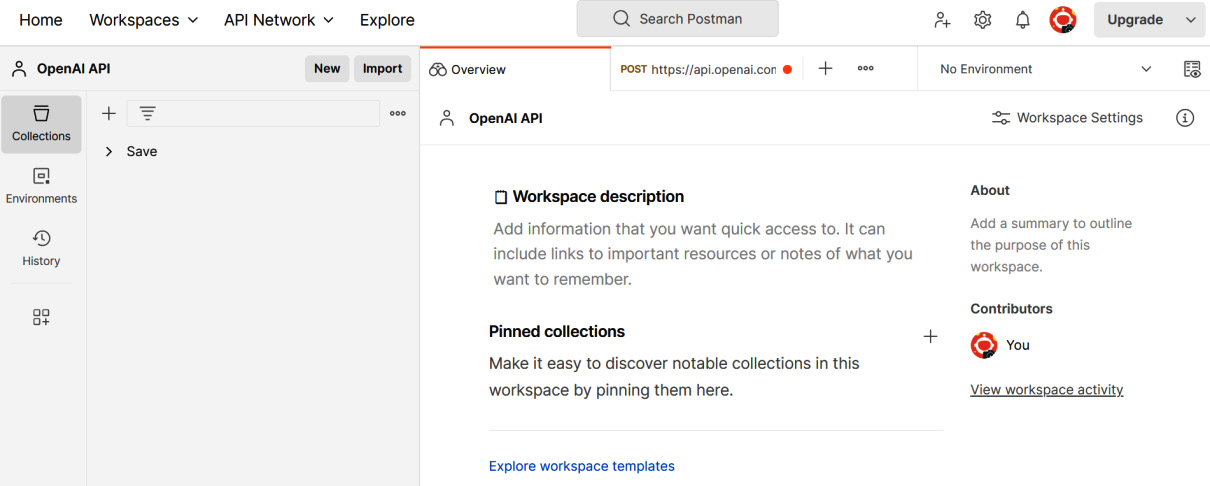
Now that we are on the Postman platform, let’s configure our workspace:
- Select Workspaces from the top and click Create Workspace.
- Select Blank Workspace and click Next.
- Give the workspace a name (such as
OpenAI API), select Personal, and then select Create.

Figure 1.7 – Configuring the Postman workspace
Getting your API key
API keys are used to authenticate HTTP requests to OpenAI’s servers. Each API key is unique to an OpenAI Platform account. In order to get your OpenAI API key:
- Navigate to https://platform.openai.com/ and log in to your OpenAI API account.
- Select Personal from the top right and click View API keys.
- Select the Create new secret key button, type in any name, and then select Create secret key.
- Your API key should now be visible to you – note it down somewhere safe, such as in a password-protected
.txtfile.
Note
Your API key is your means of authenticating with OpenAI – it should not be shared with anyone and should be stored as securely as any password.
How to do it…
After setting up our Postman workspace and generating our OpenAI API key, we have everything we need to make HTTP requests to the API. We will first create and send the request, and then analyze the various components of the request.
In order to make an API request using Postman, follow these steps:
- In your Postman workspace, select the New button on the top-left menu bar, and then select HTTP from the list of options that appears. This will create a new Untitled Request.
- Change the HTTP request type from GET to POST in the Method drop-down menu (by default, it will be set to GET).
- Enter the following URL as the endpoint for Chat Completions: https://api.openai.com/v1/chat/completions
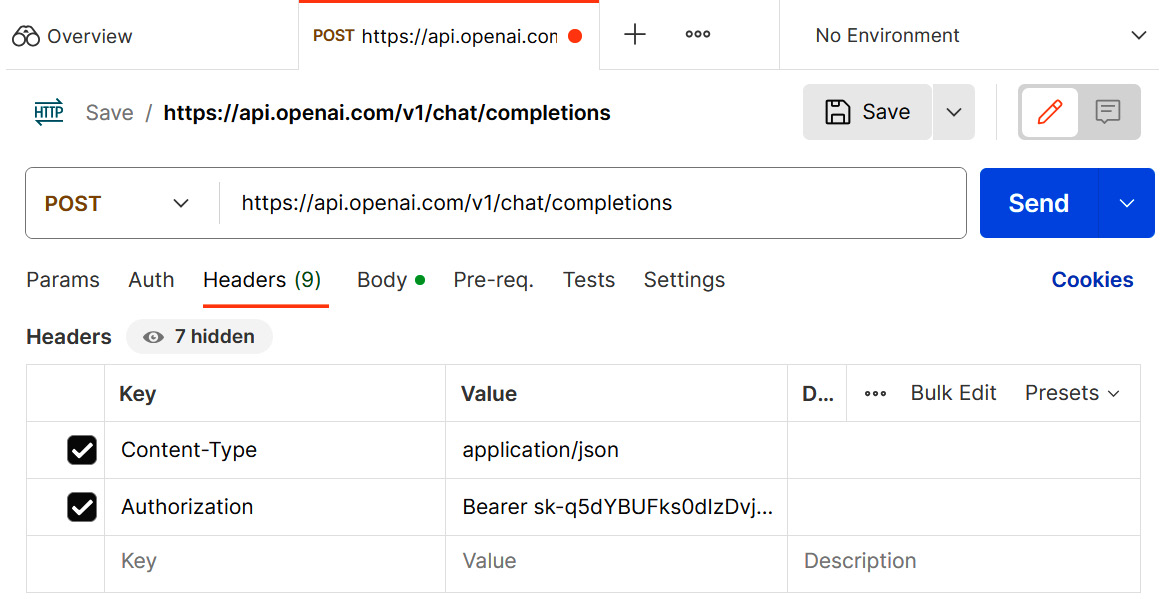
- Select Headers in the sub-menu, and add the following key-value pairs into the table below it:
|
Key |
Value |
|
|
|
|
|
|
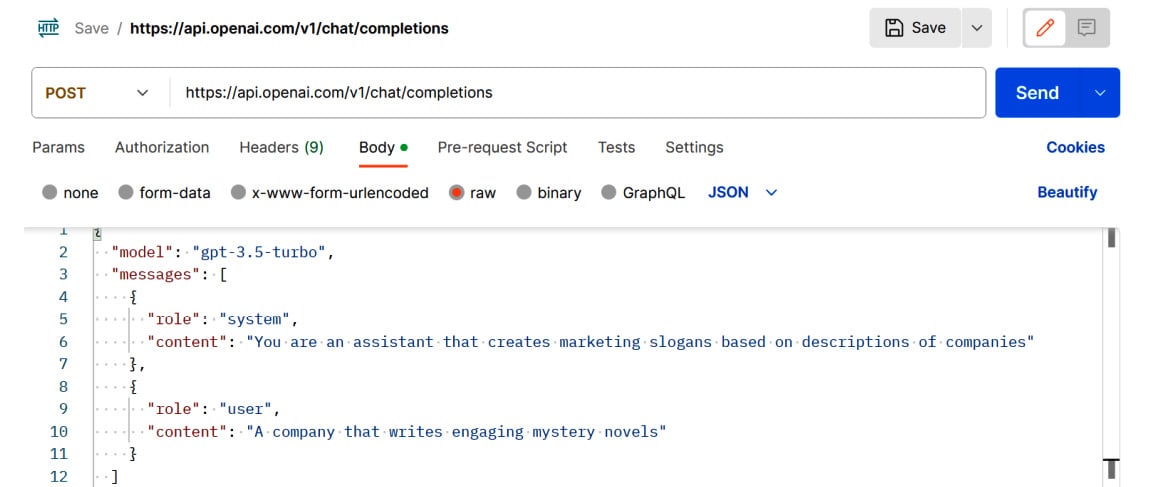
Select Body in the sub-menu and then select raw for the request type. Enter the following request body, which details to OpenAI the prompt, system message, chat log, and a set of other parameters that it needs to use to generate a completion response:
{
  "model": "gpt-3.5-turbo",
  "messages": [
    {
      "role": "system",
      "content": "You are an assistant that creates marketing slogans based on descriptions of companies"
    },
    {
      "role": "user",
      "content": "A company that writes engaging mystery novels"
    }
  ]
}
The Headers and Body sections of the Postman request should look like this:

Figure 1.8 – Postman Headers

Figure 1.9 – Postman Body
5. Click the Send button on the top right to make your HTTP request.
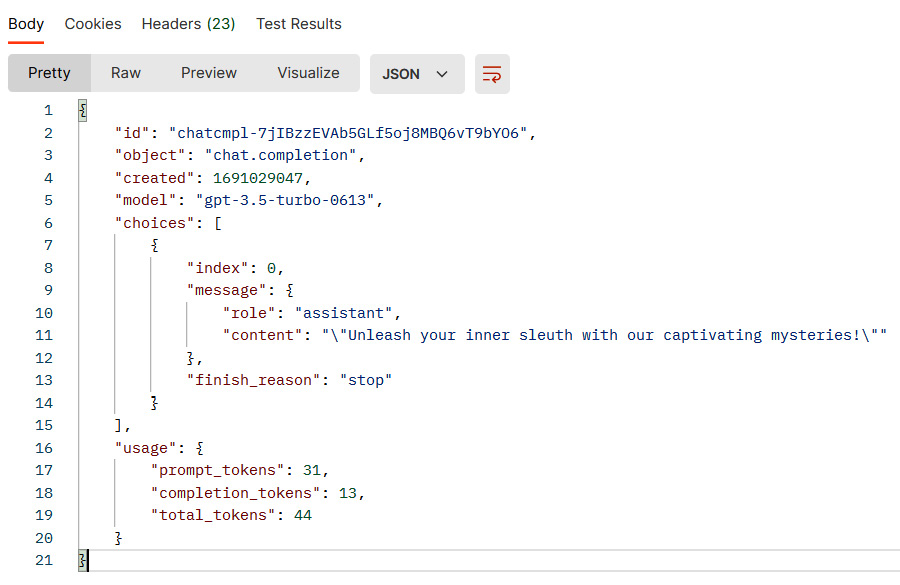
After sending the HTTP request, you should see the response from OpenAI API. The response is in the form of a JavaScript Object Notation (JSON) object.

Figure 1.10 – Postman request body and response
How it works…
In order to build intelligent applications, we need to start using the OpenAI API instead of the Playground. There are other benefits to using the OpenAI API as well, including the following:
- More flexibility, control, and customization of the model, its parameters, and its completions
- Enables you to integrate the power of OpenAI’s models directly into your application without your end users interacting with OpenAI at all
- Provides you the power to scale the amount of model requests you’re making to fit the load of your application
We are now going to shift our focus exclusively to the API, but seasoned developers will always revert to the Playground to perform testing on their system messages, chat logs, and parameters.
To make API requests, we need two things:
- A way to make our requests – For this, we used Postman as it’s an easy-to-use tool. When developing applications, however, the app itself will make requests.
- A way to authenticate our requests – For this, we generated an API key from our OpenAI account. This tells OpenAI who is making this request.
The actual API request consists of four elements: the endpoint, the Header, the body, and finally, the response. Note that this concept is not exclusive to OpenAI but applies to most APIs.
The endpoint
The endpoint serves as the location of your HTTP request, which manifests itself in the form of a specific URL. A web server exists at the endpoint URL to listen to requests and provide the corresponding data. With OpenAI, each function corresponds to a different endpoint.
For example, two additional examples of different endpoints within OpenAI are the following:
# used for generating images
https://api.openai.com/v1/images/generations
# used for generating embeddings
https://api.openai.com/v1/embeddings
Additionally, the OpenAI API endpoint only accepts POST method requests. Think of the HTTP methods (POST, GET, etc.) as different ways to travel to a location: by train, air, or sea. In this case, OpenAI only accepts POST requests.
The Header
The Header of an API request contains metadata about the request itself. Information represented in Header tags contains relevant and important elements about the body, and helps the server interpret the request. Specifically, in our case, we set two Headers:
Content-Type: We set the content-type of our request toapplication/json, meaning that we are telling the server that our request body will be in JSON format.Authorization: We set the authorization value to the API key, which allows the server to verify the client (Postman and our OpenAI Platform account in our case) that is making the specific request. The server can use the API key to check whether the client has permissions to make the request and whether the client has enough credit available to make the request. It’s worth noting that often, API keys are sent as a Bearer token within the authorization Header. A Bearer token signifies that the bearer of this token (i.e., the client making the request) is authorized to access specific resources. It serves as a compact and self-contained method for transmitting identity and authorization information between the client and the server.
The Body
Finally, the Body of an API request is the request itself, expressed in the JSON notation format (which purposely matches the Content-Type defined in the Header of the request). The required parameters for the endpoint that we are using (Chat Completions) are model and messages:
model: This represents the specific model that is used to produce the completion. In our case, we usedgpt-3.5-turbo, which represents the latest model that was available at the time. This is equivalent to using the Model dropdown in the Parameters section of the OpenAI Playground, which we saw in the Setting up your OpenAI Playground environment recipe.messages: This represents the System Message and Chat Log that the model has access to when generating its completion. In a conversation, it represents the list of messages comprising the conversation so far. In JSON, the list is denoted by[]to indicate that the message parameter contains a list of JSON objects (messages). Each JSON object (or message) withinmessagesmust contain arolestring and acontentstring:role: In each message, this represents the role of the message author. To create a System Message, the role should be equal tosystem. To create a User message, the role should be equal touser. To create an Assistant message, the role should equal toassistant.content: This represents the content of the message itself.
In our case, we had set the System Message to You are an assistant that creates marketing slogans based on descriptions of companies, and the User message or prompt to A company that writes engaging mystery novels. This, in JSON form, is equivalent to our first Playground example.
The response
When we made the preceding request using Postman, we received a response from OpenAI in JSON notation. JSON is a lightweight data format that is easy for humans to read and write, and easy for machines to parse and generate. The data format consists of parameters, which are key-value pairs. Each parameter value can be in the form of a string, another JSON object, a list of strings, or a list of JSON objects.

Figure 1.11 – Postman OpenAI API response
As you can see in Figure 1.11, the response contains both metadata and actual content. The parameters and their meaning are described as follows:
id: A unique identifier for the transaction – every response has a different ID. This is typically used for record-keeping and tracking purposes.object: The designation of the request and object type returned by the API, which in this scenario ischat.completion(as we used the Chat Completions endpoint), signifying the conclusion of a chat request.created: A timestamp denoting the exact moment of chat completion creation (based on Unix time)..model: The precise model that was used to generate the response, which in this case isgpt-3.5-turbo-0613. Note that this differs from the model parameter in the request body. The model parameter in the Body section specifies the model type (gpt-3.5-turbo) that was used, whereas the model parameter in the Response section specifies not only the model type, but also the model version (which, in this case, is0613).Choices: An array that comprises the responses generated by the model. Each element of this array contains the following:index: A number that represents the order of the choices, with the first choice having an index of0message: An object containing the message produced by the assistant, comprising the following:role: The role of the entity generating the message. This is very similar to the roles in the Chat Log within the Playground screen.content: The literal text or output generated by the OpenAI model.
finish_reason: A string that indicates why the OpenAI model decided to stop generating further output. In this case,stopmeans the model concluded the message in a natural way.
usage: A list of parameters that represent the usage, or costs, of the particular API request:prompt_tokens: The quantity of tokens utilized in the initial prompt or the input messagecompletion_tokens: The number of tokens produced by the model as a response to the prompttotal_tokens: An aggregate of the prompt and completion tokens, signifying the total tokens expended for the specific API invocation
The response in JSON format may be difficult for us to read. In fact, what we particularly care about is not id, index, or created, but the content parameter, which contains the response
Unleash your inner sleuth with our captivating mysteries!
However, the JSON response format is essential when integrating the API into your own applications.
This recipe summarizes the essential elements of the OpenAI API and demonstrates how to use an API client such as Postman to send requests and receive responses. This is important because this is the primary method that we will use to learn more about the API and its various other aspects (such as parameters, different endpoints, interpreting the response, etc.).


