Workspaces
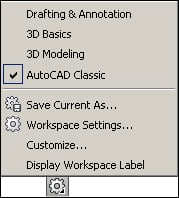
AutoCAD comes with several workspaces. It's up to each of us to choose a workspace based on a classic environment or the ribbon. To change workspaces, we can pick the workspace switching button on the status bar:

There are other processes for acceding this command such as the workspaces list on the Quick Access Toolbar (title bar), the Workspaces toolbar, or by digitizing WSCURRENT, but the access shown is consistent among all versions and always available.
Classic environment
The classic environment is based on the toolbars and the menu bar and doesn't use the ribbon. AutoCAD comes with AutoCAD Classic workspace, but it's very simple to adapt and view the suitable toolbars for 3D.
The advantages of using this environment are speed and consistency. To show another toolbar, we right-click over any toolbar and choose it. Typically, we want to have the following toolbars visible besides Standard and Layers: Layers II, Modeling, Solid Editing, and Render:

Ribbon environment
Since the 2009 version, AutoCAD also allows for a ribbon-based environment. Normally, this environment uses neither toolbars nor the menu bar. AutoCAD comes with two ribbon workspaces, namely, 3D Basics and 3D Modeling; the first being less useful than the second.
The advantages are that we have consistency with other software, commands are divided into panels and tabs, the ribbon can be collapsed to a single line, and it includes some commands not available on the toolbars. The disadvantage is that as it's a dynamic environment, we frequently have to activate other panels to access commands and some important commands and functions are not always visible:

Note
When modeling in 3D, the layers list visibility is almost mandatory. We may add this list to the Quick Access Toolbar by applying the CUI command or by right-clicking above the command icon we want to add. Another way is to pull the Layers panel to the drawing area, thus making it permanently visible.


