Search icon CANCEL
Subscription
0
Cart icon
Your Cart (0 item)
Close icon
You have no products in your basket yet
Arrow left icon
Explore Products
Best Sellers
New Releases
Books
Videos
Audiobooks
Learning Hub
Free Learning
Arrow right icon
Arrow up icon
GO TO TOP
Mastering Microsoft Dynamics 365 Customer Engagement

You're reading from   Mastering Microsoft Dynamics 365 Customer Engagement An advanced guide to developing and customizing CRM solutions to improve your business applications

Arrow left icon
Product type Paperback
Published in Feb 2019
Publisher Packt
ISBN-13 9781788990226
Length 572 pages
Edition 2nd Edition
Languages
Concepts
Arrow right icon
Author (1):
Arrow left icon
Deepesh Somani Deepesh Somani
Author Profile Icon Deepesh Somani
Deepesh Somani
Arrow right icon
View More author details
Toc

Table of Contents (21) Chapters Close

Preface 1. Section 1: Introduction to Sales, Service, and Marketing Modules with a Unified User Interface FREE CHAPTER
2. Working with Sales 3. Working with Service 4. Working with Marketing 5. Understanding the New Unified User Interface 6. Section 2: Understanding Customization and App Design
7. Designing Unified Interface Apps 8. Customization Enhancements in Dynamics 365 9. Business Process Flows and Rules in Dynamics 365 10. Section 3: Development Enhancements and Code Improvements in Dynamics 365
11. Client-Side Scripting 12. Plugin Development with Dynamics 365 13. Working with the XRM Framework 14. Mobile Enhancements in Dynamics 365 15. Virtual Entities in Dynamics 365 16. Section 4: Learning about the Portal, Configuration, and Security Enhancements in Dynamics 365
17. Working with Dynamics 365 Portals 18. Configuration Enhancements in Dynamics 365 19. Analytics with Dynamics 365 (Word and Excel Templates) 20. Other Books You May Enjoy

Creating a Unified Interface

In Dynamics 365, you can create your own Hub, that is, a Unified Interface. The following steps will help you to create your own Dynamics 365 Hub:

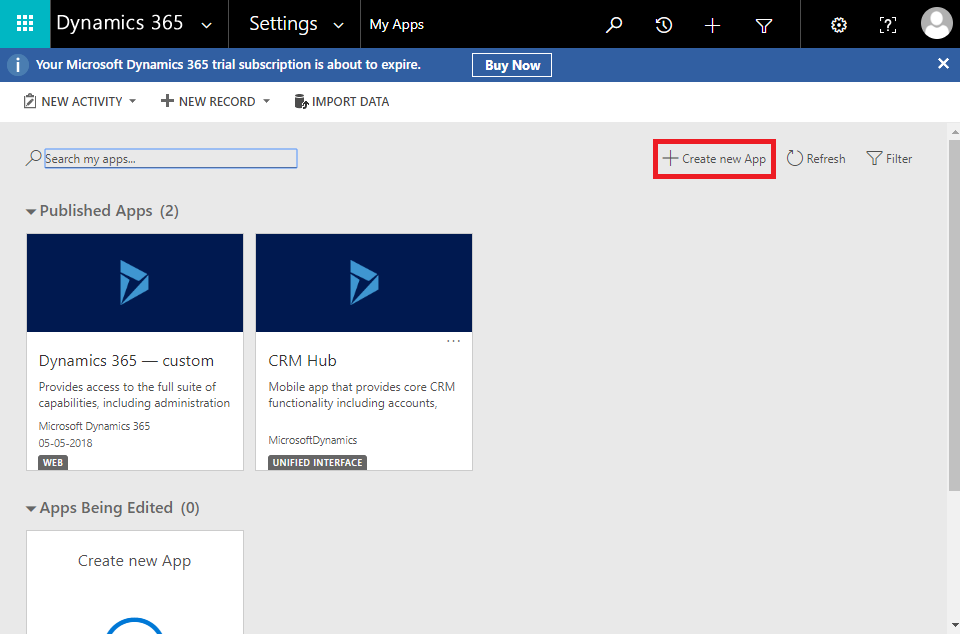
  1. Navigate to Settings | My Apps:
  1. Click on the +Create new App option:
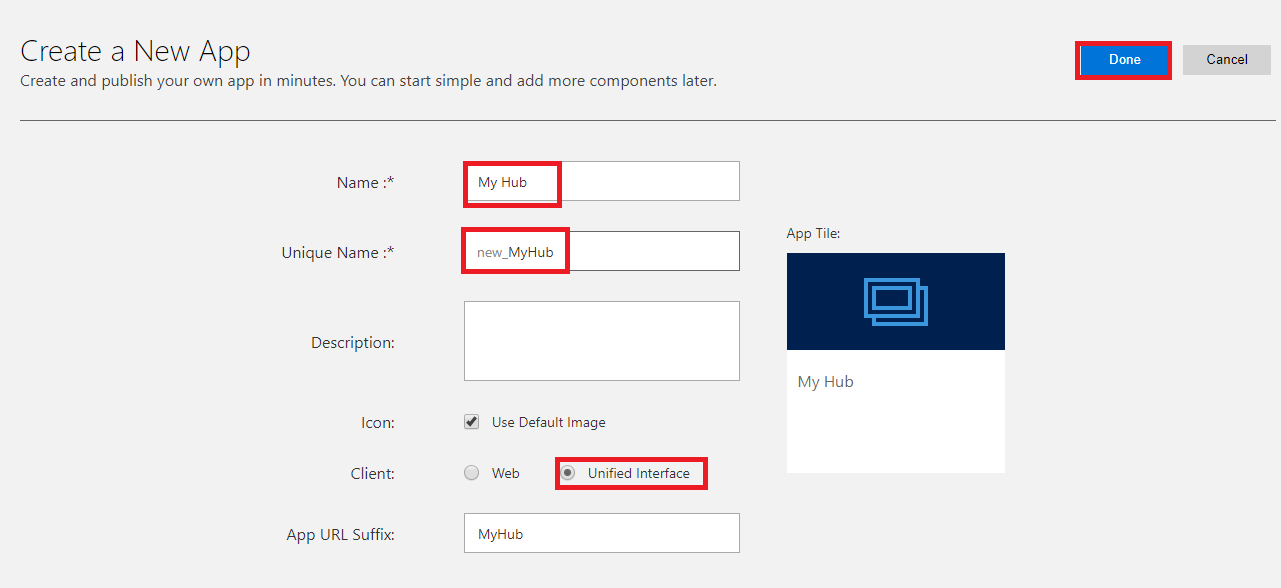
  1. Fill out the required fields for the Unified Interface Name and the Unique Name. Make sure to select the Client type as the Unified interface. Click the Done button after making the necessary changes, as shown in the following screenshot:
  1. After clicking the Done button, an App Designer will pop up. To add entities, click on Entities on the right side of the screen, as shown in the following screenshot:
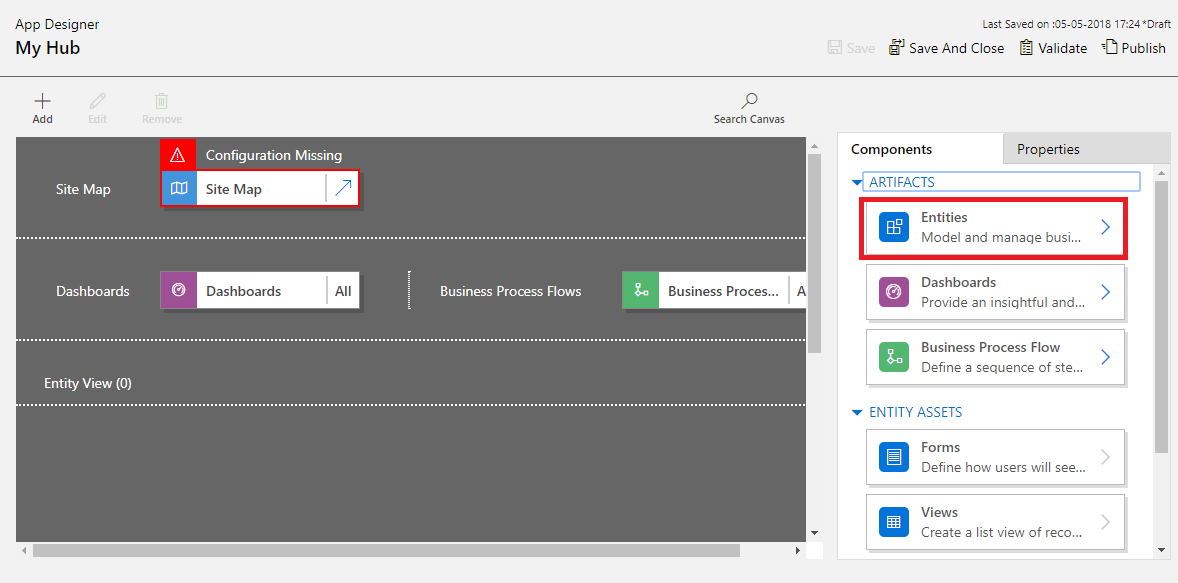
  1. Select the check boxes of the entities to add to the current Unified Interface. When any entity is selected from a list of all the components, such as Forms, Views, Charts, and Dashboards, then that entity will be automatically...
lock icon The rest of the chapter is locked
Register for a free Packt account to unlock a world of extra content!
A free Packt account unlocks extra newsletters, articles, discounted offers, and much more. Start advancing your knowledge today.
Unlock this book and the full library FREE for 7 days
Get unlimited access to 7000+ expert-authored eBooks and videos courses covering every tech area you can think of
Renews at $19.99/month. Cancel anytime
Banner background image