Search icon CANCEL
Subscription
0
Cart icon
Your Cart (0 item)
Close icon
You have no products in your basket yet
Arrow left icon
Explore Products
Best Sellers
New Releases
Books
Videos
Audiobooks
Learning Hub
Free Learning
Arrow right icon
Salesforce Lightning Platform Enterprise Architecture

Salesforce Lightning Platform Enterprise Architecture: Architect and deliver packaged applications that cater to enterprise business needs , Third Edition

eBook
€22.99 €32.99
Paperback
€41.99
Subscription
Free Trial
Renews at €18.99p/m

What do you get with Print?

Product feature icon Instant access to your digital eBook copy whilst your Print order is Shipped
Product feature icon Paperback book shipped to your preferred address
Product feature icon Download this book in EPUB and PDF formats
Product feature icon Access this title in our online reader with advanced features
Product feature icon DRM FREE - Read whenever, wherever and however you want
Product feature icon AI Assistant (beta) to help accelerate your learning
OR
Modal Close icon
Payment Processing...
tick Completed

Shipping Address

Billing Address

Shipping Methods
Table of content icon View table of contents Preview book icon Preview Book

Salesforce Lightning Platform Enterprise Architecture

Building and Publishing Your Application

The key to turning an idea into reality lies in the execution. Having the inception of an idea and getting it implemented as an application and into the hands of users is an exciting journey and one that constantly develops and evolves between you and your users. One of the great things about developing on the Lightning Platform is the support you get from the platform beyond the core engineering phase of the production process.

In this first chapter, we will use the declarative and Salesforce DX aspects of the platform to quickly build an initial version of an application that we will use throughout this book. This will give you an opportunity to get some hands-on experience with some of the packaging and installation features that are needed to release applications to subscribers. We will also take a look at the facilities available to publish your application through Salesforce AppExchange (equivalent to Apple's App Store), and finally, provide end user support.

We will then use this application as a basis for incrementally releasing new versions of the application throughout the chapters of this book, building on our understanding of enterprise application development. The following topics outline what we will achieve in this chapter:

  • Introducing Salesforce DX
  • Required organizations
  • Introducing the book's sample application
  • Package types and benefits
  • Creating your first managed package
  • Package dependencies and uploading
  • Supporting package upgradability 
  • Introduction to AppExchange and creating listings
  • Installing and testing your package
  • Becoming a Salesforce partner and the benefits of doing so
  • Licensing
  • Supporting your application
  • Customer metrics
  • Trialforce and Test Drive features

Introducing Salesforce DX

Throughout this book, we will be using the Salesforce DX tool. Salesforce provides this tool for developers to perform many development and time-saving tasks, such as creating developer environments (known as Scratch Orgs), creating projects, synchronizing code with source control, creating and managing packages, and much more. In fact, it optimizes and helps you automate the entire Application Life Cycle (ALM) process for your application and package. Throughout this book, you will learn key aspects of this process, starting in this chapter.

We will dive straight into using this tool's Command Line Interface (CLI) along with an Integrated Development Environment (IDE), Microsoft Visual Studio Code (VSCode), for which Salesforce has also created many useful extensions. You do not need to be an expert in Salesforce DX to complete this book but I do recommend you take the time to complete the basic Trailhead trails: https://trailhead.salesforce.com/en/content/learn/trails/sfdx_get_started.

Salesforce DX brings with it the second generation of packaging technology for ISVs building on the Lightning Platform; this is known as 2GP for short. Previous editions of this book used the first generation technology (1GP). If you were to compare the experience between the two technologies, you would see that the package creation process using 2GPs is now fully automated through the CLI and requires no UI interaction. This is also very advantageous in respect of building further automation around your release pipeline, which will be covered in Chapter 13, Source Control and Continuous Integration. This book focuses on creating new ISV packages and not migrating between 1GP and 2GP for existing packages. You can read more about 1GP and 2GP at https://developer.salesforce.com/docs/atlas.en-us.sfdx_dev.meta/sfdx_dev/sfdx_dev_build_and_release_your_app.htm.

Required organizations

Several Salesforce organizations are required to develop and test your application. Salesforce DX allows you to manage many of these organizations, though, in due course, as your relationship with Salesforce becomes more formal, you will have the option of accessing their Partner Portal website to create organizations of different types and capabilities. We will discuss this in more detail later.

It's a good idea to have some kind of naming convention to keep track of the different organizations and logins. As stated earlier, these organizations will be used only for the purposes of learning and exploring in this book:

Username

Usage

Purpose

[email protected]

Namespace

In this org, we will define a unique identifier for our application, called a namespace. You can think of this as a web domain as it is also unique to your application across the Salesforce service. Create this org at https://developer.salesforce.com/.

[email protected]

Salesforce DX

Salesforce DX requires you to first connect to an org known as the Dev Hub. This org helps Salesforce and you to co-ordinate all the orgs you need for development and testing purposes. I recommend that, for this book, you use the free 30-day trial available at https://developer.salesforce.com/promotions/orgs/dx-signup.

 
You will have to substitute myapp and my.com (perhaps by reusing your company domain name to avoid naming conflicts) with your own values. You should take the time to familiarize yourself with [email protected].

The following are other organization types that you will eventually need in order to manage the publication and licensing of your application. However, they are not needed to complete the chapters in this book:

Usage

Purpose

Production/CRM Org

Your organization may already be using this org to manage contacts, leads, opportunities, cases, and other CRM objects. Make sure that you have the complete authority to make changes, if any, to this org since this is where you run your business. If you do not have such an org, you can request one via the Partner Program website described later in this chapter by requesting (via a case) a CRM ISV org. Even if you choose to not fully adopt Salesforce for this part of your business, this type of org is still required when it comes to utilizing the licensing aspects of the platform. Eventually, when you are ready to develop your package for real, this org will also become your Salesforce DX Dev Hub. For this book, we will use a temporary Dev Hub org as described earlier.

AppExchange Publishing Org (APO)

This org is used to manage your use of AppExchange. We will discuss this in the Introduction to AppExchange and listings section later in this chapter. This org is actually the same Salesforce org you designate as your production org and is where you conduct your sales and support activities from.

License Management Org (LMO)

Within this organization, you can track who installs your application (as leads), the licenses you grant them, and for how long. It is recommended that this is the same org as the APO described earlier.

Trialforce Management Org (TMO) and

Trialforce Source Org (TSO)

Trialforce is a way to provide orgs with your preconfigured application data so that prospective customers can try out your application before buying it. It will be discussed later in this chapter.

Typically, the LMO and APO can be the same as your primary Salesforce production org, which allows you to track all your leads and future opportunities in the same place. This leads to the rule of APO = LMO = production org. Though neither of them should be your actual developer or test org, you can work with Salesforce support and your Salesforce account manager to plan and assign these orgs.

Introducing the book's sample application

For this book, we will use the world of Formula 1 motor car racing as the basis for a packaged application that we will build together. Formula 1 is, for me, the motor sport that is equivalent to enterprise application software, due to its scale and complexity. It is also a sport that I follow. My knowledge of both of these fields helped me when building the examples that we will use.

We will refer to our application as FormulaForce throughout this book, though please keep in mind Salesforce's branding policies when naming your own application, as they prevent the use of the word "Force" in company or product titles.

This application will focus on the data collection aspects of races, drivers, and their many statistics, utilizing platform features to structure, visualize, and process this data in both historic and current contexts.

Run the following commands to create a Salesforce DX project for your application and create a special org known as a scratch org for you to perform your development work in. This org is given the alias "dev" and set as the project default. These orgs only last 7 days (by default, the maximum is 30 days) so be sure to synchronize regularly, as described later in this chapter:

sfdx force:project:create --projectname formulaforce
cd formulaforce
sfdx force:org:create
--definitionfile config/project-scratch-def.json
--setalias dev
--setdefaultusername
code .
The preceding code command is used as a convenience to quickly open VSCode in the current directory. From here, you can open the Integrated Terminal and continue to execute Salesforce DX CLI commands from within the IDE.

The .forceIgnore file allows you to control which aspects of the scratch org and your local files are synchronized. Later in this book, in Chapter 2, Leveraging Platform Features, we will cover permission sets as a means to configure security rather than using the less flexible profiles feature. In preparation for this, enter the following into the .forceIgnore file and save it. This stops any unwanted profile changes that you might directly or indirectly make from being synchronized with your project:

# Profiles
**/profiles/**

For this chapter, we will create some initial Custom Objects and Fields, as detailed in the following table. Do not worry about creating any custom tabs just yet. You can use your preferred approach for creating these initial objects. Ensure that you have opened your project's current scratch org by running the following command:

sfdx force:org:open
From within Visual Studio Code and with your project open, you can use the shortcut key combination Cmd Shift P on a Mac or Ctrl Shift P on Windows to open the Command Palette. Start typing SFDX Open and you will see the SFDX: Open Default Org command to quickly open your scratch org without typing the preceding command. You can also run other Salesforce DX commands this way, such as creating scratch orgs.

Here is a list of objects along with their field names and types:

Object

Field name and type

Season__c

Name (text)

Race__c

Name (text)

Season (Master Detail Lookup to Season)

Driver__c

Name (text)

Contestant__c

Name (Auto Number CONTEST-{00000000})

Race (Master Detail Lookup to Race)

Driver (Lookup to Driver)


The following screenshot shows the preceding objects within the Schema Builder tool, available under the Setup menu:
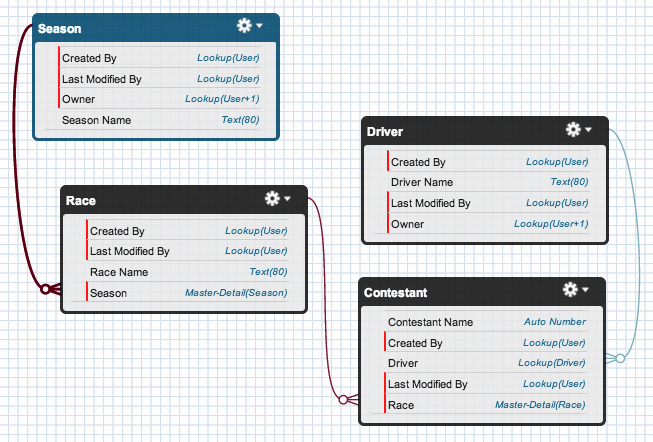
Once you have completed creating the preceding objects, you should synchronize them with your project:

sfdx force:source:pull

This is an important command when using Salesforce DX to ensure you always have the latest changes as a permanent record in file form. The entire project and the files representing your application can then be stored in source control from this point onward if desired. We will review these files further later.

Package types and benefits

A package is a container that holds your application components, such as Custom Objects, Apex code, Apex Triggers, Visualforce pages, Lightning Components, and so on. This makes up your application. While there are other ways to move components between Salesforce orgs, a package provides a container that you can use for your entire application or to deliver optional features by leveraging so-called extension packages.

Salesforce has evolved its packaging technology and now refers to its legacy packaging technology as 1GP (1st Generation Packaging) and its latest technology as 2GP (2nd Generation Packaging). This book uses 2GP exclusively – keep this in mind when reviewing Salesforce documentation on the packaging.

There are two types of packages—managed and unlocked. Unlocked packages also result in the installation of components into another org; however, they can be readily modified or even deleted by the administrator of that org. While they can be used for upgrades, changes made in an installation org will be overwritten. Given these attributes, they are not particularly ideal from a support perspective. Moreover, the Apex code that you write is also visible for all to see, so your intellectual property is at risk.

Unlocked packages can be used for sharing template components that are intended to be changed by the subscriber. If you are not using GitHub or the GitHub Salesforce Deployment Tool (https://github.com/afawcett/githubsfdeploy), they can also provide a means to share open source libraries with developers.

The features and benefits of managed packages

This book focuses solely on managed packages. Managed packages have the following features, which are ideal for distributing your application. The org where your application package is installed is referred to as a subscriber org since users of this org subscribe to the services your application provides:

  • Intellectual Property (IP) protection: Users in the subscriber org cannot see your Apex source code, although they can see your Visualforce pages code and static resources. While the Apex code is hidden, JavaScript code is not, so you may want to consider using a minify process to partially obscure such code.
  • The naming scope: Your component names are unique to your package throughout the utilization of a namespace. This means that, even if you have object X in your application, and the subscriber has an object of the same name, they remain distinct. You will define a namespace later in this chapter.
  • The governor scope: The code in your application executes within its own governor limit scope (such as DML and SOQL governors, which are subject to passing a Salesforce security review) and is not affected by other applications or code within the subscriber org. Note that some governors, such as the CPU time governor, are shared by the whole execution context (discussed in Chapter 4Apex Execution and Separation of Concerns), regardless of the namespace.
  • Upgrades and versioning: Once subscribers have started using your application, creating data, making configurations, and so on, you will want to provide upgrades and patches with new versions of your application.
  • Feature management: Allows you to enable, disable, and track the use of features you create in your application.
  • Analytics: Allows you to receive anonymous data from Salesforce relating to the use of components such as pages and objects in your application. You can use this information, for example, to monitor the adoption of new features you release.

There are other benefits to managed packages, but these are only accessible after becoming a Salesforce partner and completing the security review process; these benefits are described later in this chapter. Salesforce provides ISVforce Guide (otherwise known as the Packaging Guide) in which these topics are discussed in depth – bookmark it now! The ISVforce Guide can be found at http://login.salesforce.com/help/pdfs/en/salesforce_packaging_guide.pdf.

Creating your first managed package

Packages and subsequent versions are created using Salesforce DX CLI commands. The steps to be performed are:

  1. Setting your package namespace
  2. Creating the package and assigning it to the namespace
  3. Adding components to the package
Not all aspects of the Lightning Platform can be packaged. To help ensure you are fully aware of what is supported and what is not, Salesforce has created an interactive report known as the Salesforce Metadata Coverage report. This can be found here: https://developer.salesforce.com/docs/metadata-coverage.

These steps will be discussed in the following sections.

Setting and registering your package namespace

An important decision when creating a managed package is the namespace; this is a prefix applied to all your components (Custom Objects, Visualforce pages, Lightning Components, and so on) and is used by developers in subscriber orgs to uniquely distinguish between your packaged components and others, even those from other packages. The namespace prefix is an important part of the branding of the application since it is implicitly attached to any Apex code or other components that you include in your package.

The namespace can be up to 15 characters, though I personally recommend that you keep it to less than this, as it becomes hard to remember and leads to frustrating typos if you make it too complicated. I would also avoid the underscore character as well. It is a good idea to have a naming convention if you are likely to create more managed packages in the future. The following is the format of an example naming convention:

[company acronym - 1 to 4 characters][package prefix 1 to 4 characters]

For example, the ACME Corporation's Road Runner application might be named acmerr.

Log in to the namespace org discussed earlier in this chapter. Navigate to the Packages page (accessed under the Setup menu, under the Create submenu). Click on the Edit button to begin a short wizard to enter your desired namespace. This can only be done once and must be globally unique (meaning it cannot be set in any other org), much like a website domain name.

Assigning namespaces
For the purposes of following along with this book, please feel free to make up any namespace you desire; for example, fforce{yourinitials}. Do not use one that you may plan to use in the future, since once it has been assigned, it cannot be changed or reused.

The following screenshot shows the Packages page:

Once you have set the namespace, the preceding page should look like the following screenshot, with the difference being that it is now showing the namespace prefix that you have used and that managed packages can now also be created. You are now ready to create a managed package and assign it to the namespace:

You can now log out from the namespace org – it is no longer needed from this point on. Log in to your Dev Hub org and register your namespace with Salesforce DX. This allows you to create scratch orgs that use that namespace, allowing you to develop your application in a way that more closely represents its final form. Salesforce provides an excellent guide on registering your namespace at https://developer.salesforce.com/docs/atlas.en-us.sfdx_dev.meta/sfdx_dev/sfdx_dev_reg_namespace.htm.

Creating the package and assigning it to the namespace

Return to VSCode and edit your sfdx-project.json file to reference the namespace:

{
"packageDirectories": [
{
"path": "force-app",
"default": true
}
],
"namespace": "fforce",
"sfdcLoginUrl": "https://login.salesforce.com",
"sourceApiVersion": "45.0"
}
The sample code associated with each chapter of this book does not reference any namespace in the sfdx-project.json file. If you want to continue using your namespace after you have refreshed your project for a given chapter, you must repeat the preceding edit with your own namespace. It is generally good practice to develop using the namespace of your package as it is closer to the final installed state of your code and thus will ensure any bugs related to namespace handling are identified earlier.

To create your package and register it with your DevHub, run the following command:

sfdx force:package:create 
--name "FormulaForce App"
--description "FormulaForce App"
--packagetype Managed
--path force-app

Once the command completes, review your sfdx-project.json file again; it should look like the example that follows. In the following example, the ID starting with 0Ho will vary:

{
"packageDirectories": [
{
"path": "force-app",
"package": "FormulaForce App",
"default": true
}
],
"namespace": "fforce",
"sfdcLoginUrl": "https://login.salesforce.com",
"sourceApiVersion": "45.0",
"packageAliases": {
"FormulaForce App": "0Ho6A000000CaVxSAK"
}
}
Salesforce DX records your package and package version IDs here with aliases that you can edit or leave as the defaults. These aliases are easier to recall and understand at a glance when using other Salesforce DX CLI commands relating to packages. For example, the sfdx force:package:install CLI command supports an ID or an alias.

Adding components to the package

In this book, the contents of your project's /force-app package directory folder will become the source of truth for the components that are included in each release of your package. The following layout shows what your application should look like in source file form so far:

├── LICENSE
├── README.md
├── config
│ └── project-scratch-def.json
├── force-app
│ └── main
│ └── default
│ ├── layouts
│ │ ├── Contestant__c-Contestant\ Layout.layout-meta.xml
│ │ ├── Driver__c-Driver\ Layout.layout-meta.xml
│ │ ├── Race__c-Race\ Layout.layout-meta.xml
│ │ └── Season__c-Season\ Layout.layout-meta.xml
│ └── objects
│ ├── Contestant__c
│ │ ├── Contestant__c.object-meta.xml
│ │ └── fields
│ │ ├── Driver__c.field-meta.xml
│ │ └── Race__c.field-meta.xml
│ ├── Driver__c
│ │ └── Driver__c.object-meta.xml
│ ├── Race__c
│ │ ├── Race__c.object-meta.xml
│ │ └── fields
│ │ └── Season__c.field-meta.xml
│ └── Season__c
│ └── Season__c.object-meta.xml
└── sfdx-project.json
You can consider creating multiple dependent packages from within one project by using different package directory folders for each package. Each package can share the same namespace or choose another. By default, code is not visible between packages unless you explicitly mark it as global, a concept discussed later in this book. To make code accessible only between your own packages (sharing the same namespace) and not your customers, use the @namespaceAccessible annotation rather than the global keyword. We will discuss Extension Packages later in this chapter.

To create the first release of your package, run the following command (all on one line):

sfdx force:package:version:create 
--package "FormulaForce App"
--definitionfile config/project-scratch-def.json
--wait 10 --installationkeybypass

Some things to note about the previous command line parameters are as follows:

  • The --package parameter uses the package alias as defined in the sfdx-project.json file to identify the package we are creating this version against.
  • The --wait parameter ensures that you take advantage of the ability of the command to update your sfdx-project.json file with the ID of the package version.
  • --installationkeypass is needed to ensure you agree to the fact that the package can be installed by anyone that has the ID. For your real applications, you may want to include a password if you feel there is a risk of this information being exposed.

At this stage in the book, we have simply added some Custom Objects, so the process of creating the package should complete reasonably quickly. Note that what you're actually uploading to is a central application store known as AppExchange (covered later), but don't worry – only those that know the package version ID (or password if you have one) can see and use it at this stage.

Once the preceding command completes, your sfdx-project.json file should look like the following. Again, the IDs will vary based on the ones shown here – each time you create a new version of your package, it will be recorded here:

{
"packageDirectories": [
{
"path": "force-app",
"package": "FormulaForce App",
"versionName": "ver 0.1",
"versionNumber": "0.1.0.NEXT",
"default": true
}
],
"namespace": "fforce",
"sfdcLoginUrl": "https://login.salesforce.com",
"sourceApiVersion": "45.0",
"packageAliases": {
"FormulaForce App": "0Ho6A000000CaVxSAK",
"FormulaForce [email protected]": "04t6A0000038K3GQAU"
}
}

The NEXT keyword is used in the preceding versionNumber configuration to automatically assign a new version number each time a new package version is created.

Extension packages

As their name suggests, extension packages extend or add to the functionality delivered by the existing packages they are based on, though they cannot change the base package contents. They can extend one or more base packages, and you can even have several layers of extension packages, though you may want to keep an eye on how extensively you use this feature, as managing inter-package dependency can get quite complex, especially during development and deployment when using features such as Push Upgrade.

If you want to use extension packages to control access to features of your application you want to sell as add-ons, for example, then you might want to consider the Feature Management feature. In this case, you would still package all of your application in one package but selectively hide parts of it through Feature Parameters

Extension packages are created in much the same way as the process you've just completed, except that you must define the dependent package in the sfdx-project.json file (shown as follows) and ensure the Scratch Org has those base packages installed in it before use. The following is an example sfdx-project.json file showing a package dependency for a new extension package that is currently in development:

{
"packageDirectories": [
{
"path": "force-app",
"package": "FormulaForce - Advanced Analytics Addon",
"default": true,
"dependencies": [
{
"package": "FormulaForce [email protected]"
}
]
}
],
"namespace": "bookns1",
"sfdcLoginUrl": "https://login.salesforce.com",
"sourceApiVersion": "45.0",
"packageAliases": {
"FormulaForce [email protected]": "04t6A012003AB3GQAU"
}
}

The project containing the preceding example configuration only contains the extension package components, since there is only one packageDirectories entry. In this case, the base package is developed in a separate project. However, as noted earlier, you can have multiple packages within a single SFDX project. This does have the benefit of being able to work on both base and extension packages together in one scratch org. However, it requires more careful management of the default package directory setting when performing synchronization operations. Personally, I find that having separate projects enforces a better mindset when managing how packages are coupled.

As shown later in this chapter, you can manually install any package in a scratch org, either via the browser with the package install URL or via the SFDX CLI. If a package takes a long time to install and configure, you may want to consider using the Scratch Org Snapshots feature, especially if you are building a CI/CD pipeline, as described later in this book, in Chapter 13, Source Control and Continuous Integration. Typically, a scratch org is empty when you create it; however, with this feature, you can have it include pre-installed base packages and related configuration or data.

As the code contained within extension packages makes reference to other Custom Objects, Custom Fields, Apex code, and so on that are present in base packages, the platform tracks these dependencies and the version of the base package present at the time the reference was made. When an extension package is installed, this dependency information ensures that the subscriber (customer) org has the correct version (minimum) of the base packages installed before permitting the installation of the extension package to complete.

You can also manage the dependencies between extension packages and base packages yourself through the Versions tab (when viewing an Apex class via the Setup menu) or XML metadata for applicable components (we will revisit versioning in Apex in Chapter 10, Providing Integration and Extensibility, while discussing API integration).

The preceding sections have described the package creation process, including the ability to create other extension packages to allow you to deploy parts of your application that are applicable to only a subset of your customers, for example, for a given market. The following sections introduce concepts that require more understanding before you release your package to your target customers. Some of these things cannot be reverted.

Package platform feature dependencies

Packages can have dependencies on platform features and/or other packages (as previously described). While some features of Salesforce are common, customers can purchase different editions and features according to their needs. Scratch orgs have access to most of these features for free. This means that, as you develop your application, it is important to understand when and when not to use those features (this is done in order to avoid unwanted dependencies that might block or inhibit the adoption of your application).

When referencing a certain Standard Object, field, or component type, you will make a prerequisite dependency on your package, which your customers will need to have before they can complete the installation. Some Salesforce features, for example, Multi-Currency or Chatter, have either a configuration or, in some cases, a cost impact on your users (different org editions). Carefully consider which features your package is dependent on.

As a best practice, to ensure you are targeting the intended features, update your scratch org configuration file and configure it to enable only the desired edition and platform features you wish to be dependent on. You may also want to have multiple scratch org configuration files for different testing purposes, especially if your application code has different code paths depending on a platform feature being enabled or not (as described later in this chapter).

The following example scratch org configuration file enables features relating to Enterprise Edition and, in addition, enables the Multi-Currency feature:

{
"orgName": "FormulaForce App Testing with Multi Currency",
"edition": "Enterprise",
"features": ["MultiCurrency"]
}
You can also configure various settings through scratch org configuration files, such as the Case and Account settings found under the Setup menu. This can help further emulate your customers' own org configurations and thus improve the accuracy of your testing. For more information, see the Salesforce Help topic at https://developer.salesforce.com/docs/atlas.en-us.sfdx_dev.meta/sfdx_dev/sfdx_dev_scratch_orgs_def_file_config_values.htm.

Later in this book, we will be discussing Lightning Components. If you are packaging these, you will be implicitly imposing the need for your customers to utilize the Salesforce My Domain feature. This is not enforced at installation time, so it is an optional dependency. However, users will not be able to use your packaged Lightning Components without first enabling and configuring My Domain.

Release and beta packages

Once you have created your package, it's good practice to do further testing (sometimes called regression and/or acceptance testing) internally and/or with a selection of customers. This testing may result in the need to make changes that would normally be blocked if the package version had been installed in production. To give you the ability to do further testing and still make changes, packages are either in Beta or Release state, as described here:

  • Release: Release packages can be installed in subscriber production orgs, and can also provide an upgrade path from previous releases. The downside is that you cannot delete the previously released components, or change certain things, such as a field's type. Changes to components that are marked global, such as Apex code methods and Lightning Component attributes, are also restricted. While Salesforce is enhancing the platform to provide the ability to modify certain released aspects, you need to be certain that your application release is stable before selecting this option.
  • Beta: Beta packages cannot be installed in subscriber production orgs; you can install them only into other scratch orgs, sandbox, or Partner Portal created orgs. Also, Beta packages cannot be upgraded once installed; this is the reason why Salesforce does not permit their installation in production orgs. The key benefit is in the ability to continue to change new components of the release, to address bugs and features relating to user feedback, after which, you can create another Beta version.

Package versions are, by default, in Beta state. In order to promote them to Release, you need to run the following SFDX CLI command:

sfdx force:package:version:promote 
--package "FormulaForce [email protected]"
The ability to delete previously published components (uploaded within a release package) is enabled by raising a support case with Salesforce Support. Once you have understood the full implications, they will enable it.

Optional package dependencies

It is possible to make some Salesforce features and/or base package component references (Custom Objects and Fields) optional aspects of your application. There are two approaches to this, depending on the type of feature.

Dynamic bindings

For example, the Multi-Currency feature adds a CurrencyIsoCode field to standard and Custom Objects. If you explicitly reference this field, for example, in your Apex code, Lightning pages or components, you will incur a hard dependency on your package. If you want to avoid this and make it a configuration option (for example) in your application, you can utilize dynamic Apex and Visualforce. Lightning value bindings are dynamic in nature, though the aura:attribute element type references will form a compile-time reference to the specified objects.

Extension packages

If you wish to package component types that are only available in subscriber orgs of certain editions, you can choose to include these in extension packages. For example, you may wish to support the Professional Edition, which does not support record types. In this case, create an Enterprise Edition extension package (as outlined above) for your application's functionality, which leverages the functionality from this edition.

Note that you will need multiple scratch org configurations and partner testing orgs for each combination of features that you utilize in this way to effectively test the configuration options or installation options that your application requires.

Supporting package upgradability

Having just created and released your package, you can start to share it with your customers. Later in this chapter, we will discuss ways to list your package and install it. Before we get too far ahead though, let's first consider a very important aspect of managing your package – upgradability. As customers embrace your application, they will customize its features and APIs and expect them to continue working even after upgrades to the latest version. 

Upgrading a package is as simple as installing the new version over an existing version (we will do this in the next chapter). The Lightning Platform manages package upgrades for you, without asking users to log out of the system or experience any interruption.

Salesforce DX managed packages have built-in support for upgradability and also help remove a lot of the traditional pain of ensuring you do not accidentally make breaking changes to your application or even, in most cases, worrying about writing upgrade scripts. For example, it will prevent you from deleting a Custom Object or Field that has previously been included in a released package or modifying an Apex global class or method.

Managing package ancestry

A package version ancestry is the lineage a valid upgrade path takes; in a simple case, this might be v1.0 to v1.1 to v1.2 and so on. In this case, the ancestor of v1.2 is v1.1 and the ancestor of v1.1 is v1.0, meaning that customers can upgrade from v1.0 to v1.1 or even from v1.0 straight to v1.2. We will follow this simple serial ancestry lineage as we build out the package throughout this book. That way, you will see the value of package upgradability. 

In a more complex scenario, you may decide to split your upgrade paths if you decide to take a radically different direction with the product for new customers, in which case, you might start a new upgrade path like so: v1.1 | v1.2 | v2.0. This obviously needs very careful consideration but does allow you more freedom should you need it.

The ancestorId or ancestorVersion configurations within the sfdx-project.json file define the ancestry for the package version you are currently developing in your scratch orgs. We will explore what effect this has on developing in a scratch org later. This configuration also denotes the desired upgrade path during package creation, as described previously.

You can only define an ancestor of your next version based on an already released version of your package. In this chapter, we will use ancestorId. The ID to be used is actually the 05i ID of your desired released package version. To retrieve this, run the following command:

sfdx force:package:version:report 
--package "FormulaForce [email protected]"
--verbose

An example output from the preceding command is shown here:

=== Package Version
Name Value
───────────────────────────── ──────────────────
Name ver 0.1
Subscriber Package Version Id 04t6A0000038K3GQAU
Id 05i6A000000XZLyQAO
Package Id 0Ho6A000000CaVxSAK
Version 0.1.0.1
Description
Branch
Tag
Released true

Next, add the ancestorId configuration to the sfdx-package.json file as shown here:

{
"packageDirectories": [
{
"path": "force-app",
"package": "FormulaForce App",
"versionName": "ver 0.1",
"versionNumber": "0.1.0.NEXT",
"ancestorId": "05i6A000000XZLyQAO",
"default": true
}
],
"namespace": "fforce",
"sfdcLoginUrl": "https://login.salesforce.com",
"sourceApiVersion": "45.0",
"packageAliases": {
"FormulaForce App": "0Ho6A000000CaVxSAK",
"FormulaForce [email protected]": "04t6A0000038K3GQAU"
}
}

Each time you release a version of your package, you must repeat the preceding process. This is a significant part of your release process so be sure to document it carefully along with your other release management tasks.

Don't worry if you forget to manage ancestry throughout the rest of this book as you are only building a sample application and aren't sharing it with users who will care about upgrades.

For package versions created without ancestry, you will have to either use a new test scratch org to install the new release or uninstall a previous version from an existing test org. This is because the platform will not permit an upgrade to a package already installed in an org if the package being installed does have valid ancestry information, even if it shares the same namespace.

Developing in scratch orgs containing ancestry information

Next time you create a scratch org, you will notice that aspects of the Setup menu are now aware that certain components have been previously released to your customers and will block certain operations that would break upgradability, such as changing the API name or deletion. The following screenshot shows an example of such a notification:

Of course, there is nothing stopping you from deleting a source file in your local copy of the package that is representing a previously released component, for example, the Team__c folder. If you try this, however, you will get an error during package creation. Either way, when you maintain ancestry information in your sfdx-package.json file, the system protects you from accidental or intentional breaking changes being made to your upgrade path. 

If you want to create a scratch org without ancestry information, you can use the --noancestors parameter on the sfdx force:org:create command. This can be useful when creating test orgs (which cannot have the same namespace as installed packages). Finally, keep in mind that the preceding enforcement, when developing in a scratch org with ancestry defined, is advantageous to identify upgrade breaking changes early in the release cycle. You may want to skip managing ancestry for this book, though it should be considered a good practice when developing for real.

Becoming a Salesforce partner and the benefits of doing so

The Salesforce Partner Program has many advantages. The first place to visit is https://partners.salesforce.com/. You will want to focus on the areas of the site relating to being an Independent Software Vendor (ISV) partner. From there, you can click on Join Now. It is free to join, though you will want to read through the various agreements carefully, of course.

Once you wish to start listing a package and charging users for it, you will need to arrange billing details for Salesforce to take the various fees involved. While this book is not equipped to go into the details, do pay careful attention to the Standard Objects used in your package, as this will determine the license type required by your users and the overall cost to them, in addition to your charges.

For example, integrating with CRM objects that existing Saleforce customers are already using, such as Account, Contact, and Opportunity can be beneficial to you as a feature of your application, since it's an appealing, immediate, and seamless integration not found on other platforms without further configuration or even, in some cases, coding effort.

If you're planning on using Standard Objects, and are in doubt about the costs (as they do vary depending on the type), you can request a conversation with Salesforce to discuss this; this is something to keep in mind in the early stages.

Make sure, when you associate a Salesforce user with the Partner Community, you utilize a user that you use daily (known as your Partner Business Org user) and not one from a development or test org. Once you have completed the signup process, you will gain access to the Partner Community. The following screenshot shows what the current Partner Community home page looks like. From here, you can access many useful services:

This is your primary place to communicate with Salesforce and access additional materials and announcements relevant to ISVs, so do keep checking it often. You can raise cases and provide additional logins to other users in your organization, such as other developers who may wish to report issues or ask questions.

Security review and benefits

The features described in this section are only available once your package has gone through a Salesforce-driven process known as a security review, which is initiated via your listing when logged into AppExchange. Unless you plan to give your package away for free, there is a charge involved in putting your package through this process.

While the review is optional and there is nothing stopping you from distributing your package installation URL directly, keep in mind that Salesforce displays a banner during installation and, once installed, it informs admins that the package has not gone through a security review. Furthermore, you will not be able to benefit from the ability to list your new application on AppExchange for others to see and review. More importantly, you will also not have access to the following features to help you deploy, license, and support your application. The following is a list of the benefits you get once your package has passed the security review:

  • Bypass subscriber org setup limits: Limits such as the number of tabs and Custom Objects are bypassed. This means that if the subscriber org has reached its maximum number of Custom Objects, your package will still install. This feature is sometimes referred to as Aloha. Without this, your package installation may fail. You can determine whether Aloha has been enabled via the Subscriber Overview page that comes with the LMA application, which is discussed in the next section.
  • Licensing: You are able to utilize the Salesforce-provided License Management Application (LMA) and Feature Management Application (LFM) in your LMO.
  • Subscriber support: With this feature, users in the subscriber org can enable, for a specific period, a means for you to log in to their org (without exchanging passwords), reproduce issues, and enable much more detailed debug information, such as Apex stack traces. In this mode, you can also see custom settings that you have declared as protected in your package, which is useful for enabling additional debug or advanced features.
  • Push upgrade: Using this feature, you can automatically apply upgrades to your subscribers without their manual intervention, either directly through the Push UI, on a scheduled basis, or via the Push API. You may use this for applying either smaller bug fixes that don't affect Custom Objects or APIs, or for deploying full upgrades. The latter requires careful coordination and planning with your subscribers to ensure that changes and new features are adopted properly.
  • Usage Metrics: This feature provides additional analytics on how customers are using your application, such as the objects they are using and the parts of the user interface they are accessing. Your Product Management team can use this to drive roadmap priorities and track the adoption of new features.
Salesforce asks you to perform an automated security scan of your software via a web page (http://security.force.com/security/tools/forcecom/scanner). This service can be quite slow depending on how many scans are in the queue. Another option is to obtain the Eclipse plugin from the actual vendor, CheckMarx, at http://www.checkmarx.com, which runs the same scan but allows you to control it locally or via your Continuous Integration (CI) build system. There are a number of code analysis tools now available for Apex, such as the open source project PMD, which includes rules for security and other code quality checks: https://pmd.github.io/latest/pmd_rules_apex.html.

This book focuses on building a fully native application; as such, additional work involved in so-called "hybrid" applications (where parts of your application have been implemented on your own servers, for example) are not considered here. However, keep in mind that if you make any callouts to external services, Salesforce will also most likely ask you and/or the service provider to run a BURP scanner, to check for security flaws.

Make sure you plan a reasonable amount of time to go through the security review process; it is essential that you initially list your package, though if it becomes an issue, you have the option of issuing your package install URL directly to initial customers and early adopters.

Getting the best out of the Partner Community

It's worth taking some time to review the content and facilities in the Partner Community. Some of the key areas to take a look at are listed as follows:

  • Education and Trailhead: This allows you to monitor the progress of other users in your organization on Trailhead. Trailhead is Salesforce's way of learning while doing. Users read about new technologies or development approaches and are then asked to perform some challenges to validate their understanding. They are awarded badges, as part of a gamification system. Using this tab, you can see who has the most badges!
  • Featured Groups: This page, under More, allows you quick access to a number of Salesforce-managed Chatter groups. A key group is the Partner Alerts group. I would strongly recommend you set up an email digest for this group. Only Salesforce posts to this group, so a per-post digest level is tolerable and keeps you informed without having to log in to the community.
  • Support: This is, of course, the place you go to raise cases with Salesforce. As you raise cases, the UI automatically attempts to search for known issues or support articles that might help answer your questions. You can also report and filter on open cases here.
  • Publishing: This page allows you to list your creations on the Salesforce AppExchange site. Later sections in this chapter cover this in more detail.
  • Partner Alerts: Partner Alerts are critical to keeping on top of changes to the service that could affect your development process and/or your customers. These might range from critical fixes, security improvements, to changes in behavior you need to be prepared for. Although rare, you may be asked to make changes to your solution by a certain deadline to ensure your users are not impacted:

There are many Chatter groups shown on the Featured Groups page in the Partner Community, shown as follows. Review them all and set up email digests to help keep you informed without having to manually log in and check through this page each time:

Creating test and demo orgs via the Environment Hub

Partners can use the Environment Hub to create orgs for further testing or demo purposes. Orgs can be linked and logins can be managed here as well. Unlike scratch orgs you can get from the Dev Hub, these orgs have additional user licenses. It is also possible to link your Trailforce Source Org (TSO) and create orgs based on templates you define, allowing you to further optimize the base org configuration for your own further testing and demo needs. For more information, review the Partner Community page detailing the Environment Hub (https://partners.salesforce.com/s/education/general/Environment_Hub).

Introduction to AppExchange and listings

Salesforce provides a website referred to as AppExchange, which lets prospective customers find, try out, and install applications built using the Lightning Platform. Applications listed here can also receive ratings and feedback. You can also list your mobile applications on this site as well.

In this section, I will be using an AppExchange package that I already own. The package has already gone through the process to help illustrate the steps that are involved. For this reason, you do not need to perform these steps at this stage in the book; they can be revisited at a later phase in your development, once you're happy to start promoting your application.

Once your package is known to AppExchange, each time you release your package (as described previously), you effectively create a private listing. Private listings are not visible to the public until you decide to make them so. This gives you the chance to prepare any relevant marketing details and pricing information while final testing is completed. Note that you can still distribute your package to other Salesforce users or even early beta or pilot customers without having to make your listing public.

In order to start building a listing, you need to log in to the Partner Community and click the Publishing tab in the header. This will present you with your Publishing Console. Here, you can link and manage Organizations that contain your Packages, create Listings, and review Analytics regarding how often your listings are visited:

Select the Publishing Console option from the menu, then click on the Create New Listing button and complete the steps shown in the wizard to associate the packaging org with AppExchange; once completed, you should see it listed.

It's really important that you consistently log in to AppExchange using your APO user credentials. Salesforce will let you log in with other users. To make it easy to confirm, consider changing the user's display name to something like MyCompany Packaging:

Though it is not a requirement to complete the listing steps, unless you want to try out the process yourself to see the type of information required, you can delete any private listings that you have created after you complete this book.

Installing and testing your package

There are two ways to install your package: through the browser's user interface with clicks or through the SFDX CLI—a more automated experience. For this chapter, we will use the browser user interface to get a better impression of what your end users will see (assuming you permit them to do the install themselves). In the next section, the SFDX CLI path will be discussed.

When you created your package version earlier in this chapter, you should have received an email with a link to install the package. If not, take the 04t ID from your sfdx-project.json file and apply it to the end of the following URL:

https://login.salesforce.com/packaging/installPackage.apexp?p0=

Do not attempt to install your package in your project's current default scratch org where you developed the package. Instead, let's create a new scratch org for test purposes and open it to perform the install via the browser. Note that we are reusing the same scratch org configuration but you may want to have different configurations for testing:

sfdx force:org:create 
--definitionfile project-scratch-def.json
--setalias test
--noancestors
--nonamespace
sfdx force:org:open -u test

Here are some things to note about the preceding command line parameters:

  • The --setalias parameter defines an alias for this org as "test"; conversely, we used "dev" for the alias for the scratch org used to develop the package. This now means that you can easily open either org directly by just using the alias, without having to remember any user name or password. Note that the -s / --setdefaultuser parameter is not used here so the "dev" scratch org remains the default for synchronization. 
  • The --noancestors and --nonamespace parameters disable the standard behavior to have the scratch org inherit the namespace and ancestry behavior we discussed earlier. These are not needed to create scratch orgs for testing package installs.

Once the test scratch org opens, paste the preceding installation link into your browser. The installation process will start. A compact view of the initial installation page is shown in the following screenshot; click on the Continue button and follow the default installation prompts to complete the installation:

If your package has not gone through a Salesforce Security Review, as described earlier in this chapter, you will see a banner informing the user of this fact. This banner is also visible when users review installed packages under the Setup menu.

Package installation covers the following aspects (once the user has entered the package password, if one was set):

  • Package overview: The platform provides an overview of the components that will be added or updated (if this is an upgrade) to the user. Note that, due to the namespace assigned to your package, these will not overwrite existing components in the subscriber org created by the subscriber.
  • Connected App and Remote Access: If the package contains components that represent connections to the services outside of the Salesforce services, the user is prompted to approve these.
  • Approve Package API Access: If the package contains components that make use of the client API (such as JavaScript code), the user is prompted to confirm and/or configure these. Such components will generally not be called much; features such as JavaScript Remoting are preferred, and they leverage the Apex runtime security configured post-installation.
  • Security configuration: In this step, you can determine the initial visibility of the components being installed (objects, pages, and so on), selecting admin only or the ability to select the profiles to be updated. This option predates the introduction of permission sets, which permit post-installation configuration.
If you package profiles in your application, the user will need to remember to map these to the existing profiles in the subscriber org, as per step 2. This is a one-time option, as the profiles in the package are not actually installed, only merged. I recommend that you utilize permission sets to provide security configurations for your application. These are installed and are much more granular in nature.

When the installation is complete, navigate to the Installed Packages menu option under the Setup menu. Here, you can see confirmation of some of your package details, such as the namespace and version, as well as licensing details, which will be discussed later in this chapter.

It is also possible to provide a Configure link for your package, which will be displayed next to the package when installed and listed on the Installed Packages page in the subscriber org. Here, you can provide a Visualforce page to access configuration options and processes, for example. If you have enabled Seat based licensing, there will also be a Manage Licenses link to determine which users in the subscriber org have access to your package components, such as tabs, objects, and Visualforce pages. Licensing, in general, is discussed in more detail later in this chapter.

Automating package installation

It is possible to automate package installation using the Salesforce DX CLI. This can be useful if you want to automate the deployment of your packages to scratch orgs and/or other test orgs created as part of a Continuous Integration (CI) pipeline (as discussed in Chapter 13, Source Control and Continuous Integration). Run the following commands within the project directory (or VSCode Terminal pane).

The first command will first create a new scratch org, as described in the previous section; the next command will run the install command; and finally, the third command will open the test scratch org, where you can confirm via the Setup | Installed Packages menu item that the package has been installed:

sfdx force:org:create 
--definitionfile project-scratch-def.json
--setalias test
--noancestors
--nonamespace
sfdx force:package:install
--package "FormulaForce [email protected]"
--publishwait 10
--wait 10
--targetusername test
sfdx force:org:open -u test

Note that the installation will also upgrade a package if the package is already installed. A few things to note about the preceding sfdx force:package:install parameters are as follows:

  • The --publishwait parameter ensures that the command waits for any final background processing to complete before your package can be installed.
  • The --package parameter uses the package alias defined in the sfdx-project.json file. This parameter can also take the 04t ID as well (this is useful if the command is not run within the project directory).
  • The --targetusername parameter uses the test scratch org alias to explicitly define which scratch org to install the package in, since the creation of the scratch org (via the preceding command) did not overwrite the default scratch org.
The Salesforce DX CLI can also list packages installed in an org, for example, if you wanted to determine whether a dependent package needs to be installed or upgraded before running the preceding CLI. Finally, you can also uninstall packages if you wish.

Understanding how to license your package

Once you have completed the security review, you are able to request access to the LMA by raising support cases via the Partner Portal. Once this access is provided by Salesforce, use the installation URL to install it like any other package in your LMO.

If you have requested a CRM for ISV's org (by raising a case in the Partner Portal), you may find the LMA already installed.

The following screenshot shows the License Management Application once installed:

Since it is not possible to execute this process for the sample package you have created, I will use a package that I already own and have already taken through the process, to help illustrate the steps that are involved. For this reason, you do not need to perform these steps.

After completing the installation, return to AppExchange and log in. Then, locate your listing in Publisher Console under Uploaded Packages. Next to your package, there will be a Manage Licenses link. After clicking on this link for the first time, you will be asked to connect your package to your LMO org. Once this is done, you will be able to define the license requirements for your package.

The following example shows the license for a free package, with an immediately active license for all users in the subscriber org:

In most cases regarding packages that you intend to charge for, you would offer a free trial, rather than setting the license default to active immediately. For paid packages, select a license length, unless perhaps it's a one-off charge, and then select the license that does not expire. Finally, if you're providing a trial license, you need to carefully consider the default number of seats (users); users may need to be able to assign themselves different roles in your application to get the full experience.

While licensing is currently expressed at a package level, it is very likely that more granular licensing around the modules or features in your package will be provided by Salesforce in the future. This will likely be driven by the permission sets feature. As such, keep in mind a functional orientation to your permission set design.

If you configure a number of seats against the license, then the Manage Licenses link will be shown on the Installed Packages page next to your package. The administrator in the subscriber org can use this page to assign applicable users to your package. The following screenshot shows how your installed package looks to the administrator when the package has licensing enabled:

Note that you do not need to keep reapplying the license requirements for each version you upload; the last details you defined will be carried forward to new versions of your package until you change them. Either way, these details can also be completely overridden on the License page of the LMA application.

You may want to apply a site-wide (org-wide) active license to extensions or add-on packages. This allows you to at least track who has installed such packages, even though you don't intend to manage any licenses around them since you are addressing licensing on the main package.

The Licenses tab and managing customer licenses

The Licenses tab provides a list of individual license records that are automatically generated when users install your package in their orgs. Salesforce captures this action and creates the relevant details, including Lead information. This also contains the contact details of the organization and the person who performed the installation, as shown in the following screenshot:

From each of these records, you can modify the current license details to extend the expiry period or disable the application completely. If you do this, the package will remain installed with all of its data. However, none of the users will be able to access the objects, Apex code, or pages, not even the administrator. You can also re-enable the license at any time. The following screenshot shows the Details section:

The Feature Parameters tab and managing features

Feature Management allows you to hide your application features (programmatically) and/or objects contained in your package until the user wants to use them or you have elected to enable them after purchase. Additionally, it allows you to embed tracking into your application logic to gather statistics such as when the user first used a feature or how often it was used. In order to use this feature, you need to install the Feature Management Application (FMA) (also available via a Salesforce Support Case) in your LMO. Once installed, the Feature Parameters tab allows you to view and manage the values of feature parameters embedded in your package.

The following example from one of my own test packages shows three parameters of varying data types that help track feature usage (Subscriber to LMO). You can read more about this use case at https://github.com/afawcett/fmfc. You can also create feature parameters that allow you to push values to subscriber orgs and thus remotely enable features (LMO to Subscriber) via code paths in your UI and Apex code that reference the same feature parameter:

There is extensive information on how to use Feature Management in the ISVForce Guide, which you can refer to at https://developer.salesforce.com/docs/atlas.en-us.packagingGuide.meta/packagingGuide/fma_manage_features.htm.

The Subscribers tab

The Subscribers tab lists all your customers or subscribers (it shows their Organization Name from the company profile) that have your packages installed (only those linked via AppExchange). This includes their Organization ID, Edition (Developer, Enterprise, or others), and also the type of instance (sandbox or production). You can view this here:

The Subscriber Overview page

When you click on Organization Name from the list in this tab, you are taken to the Subscriber Overview page. This page is sometimes known as the Partner Black Tab. This page is packed with useful information, such as the contact details (also seen via the Leads tab) and the login access that may have been granted (we will discuss this in more detail in the next section), as well as which of your packages they have installed, their current license status, and when they were installed. The following is a screenshot of the Subscriber Overview page:

How licensing is enforced in the subscriber org

Licensing is enforced in one of two ways, depending on the execution context in which your packaged Custom Objects, Fields, and Apex code are being accessed from.

The first context is where a user is interacting directly with your objects, fields, tabs, and pages via the user interface or via the Salesforce APIs (Partner and Enterprise). If the user or the organization is not licensed for your package, these will simply be hidden from view, and, in the case of the API, will return an error. Note that administrators can still see packaged components under the Setup menu.

The second context is the type of access made from Apex code, such as an Apex Trigger or controller, written by the customers themselves or from within another package. This indirect way of accessing your package components is permitted if the license is site-wide (or org-wide) or there is at least one user in the organization that is allocated a seat.

This condition means that, even if the current user has not been assigned a seat (via the Manage Licenses link), they are still accessing your application's objects and code, although indirectly, for example, via a customer-specific utility page or Apex Trigger, which automates the creation of some records or the defaulting of fields in your package.

Your application's Apex Triggers (for example, the ones you might add to Standard Objects) will always execute, even if the user does not have a seat license, as long as there is just one user seat license assigned to your package in the subscriber org. However, if that license expires, the Apex Trigger will no longer be executed by the platform, until the license expiry is extended.

Providing support

Once your package has completed the security review, additional functionality for supporting your customers is enabled. Specifically, this includes the ability to log in securely (without exchanging passwords) to their environments and debug your application. When logged in in this way, you can see everything the user sees, in addition to extended debug logs that contain the same level of detail as they would in a developer org.

First, your customer enables access via the Grant Account Login page. This time, however, your organization (note that this is the Company Name as defined in the packaging org under Company Profile) will be listed as one of those available in addition to Salesforce Support. The following screenshot shows the Grant Account Login Access page:

Next, you log in to your LMO and navigate to the Subscribers tab as described. Open Subscriber Overview for the customer, and you should now see the link to Login as that user. From this point on, you can follow the steps given to you by your customer and utilize the standard Debug Logs and Developer Console tools to capture the debug information you need. The following screenshot shows a user who has been granted login access via your package to their org:

This mode of access also permits you to see protected custom settings and Custom Metadata, if you have included any of those in your package. If you have not encountered these before, it's well worth researching them as they provide an ideal way to enable and disable debug, diagnostic, or advanced configurations that you normally don't want your customers to see.

Customer metrics

Salesforce exposes information relating to the use of your package components in subscriber orgs. This enables you to report what Custom Objects and Visualforce pages your customers are using and, more importantly, those they are not. This information is provided by Salesforce and cannot be opted out of by the customer.

This facility needs to be enabled by Salesforce Support. Once enabled, the MetricsDataFile object is available in your production org and will receive a data file periodically that contains the metric's records. The Usage Metrics Visualization application can be found by searching on AppExchange, and can help with visualizing this information.

Trialforce and Test Drive

Large enterprise applications often require some consultation with customers to tune and customize them to their needs after the initial package installation. If you wish to provide trial versions of your application, Salesforce provides a means to take snapshots of the results of this installation and setup process, including sample data.

You can then allow prospective users who visit your AppExchange listing or your website to sign up to receive a personalized instance of a Salesforce org based on the snapshot you made. Potential customers can then use this to fully explore the application for a limited time until they sign up to be a paying customer. Such orgs will eventually expire when the Salesforce trial period ends for the org created (typically after 14 days). Thus, you should keep this in mind when setting the default expiry on your package licensing.

The standard approach is to offer a web form for the prospective user to complete in order to obtain the trial. Review the Providing a Free Trial on your Website and Providing a Free Trial on AppExchange sections of the ISVforce Guide for more on this.

You can also consider utilizing the Signup Request API, which gives you more control over how the process is started and the ability to monitor it, such that you can create the lead records yourself. You can find out more about this in the Creating Signups Using the API section in the ISVforce Guide. As a more advanced option, if you are an ISV with an existing application and wish to utilize Salesforce.com as a backend service, you can use this API to completely create and manage orgs on their behalf. Review the Creating Proxy Signups for OAuth and the API Access section in the ISVforce Guide for more information on this.

Alternatively, if the prospective user wishes to try your package in their sandbox environment, for example, you can permit them to install the package directly, either from AppExchange or from your website. In this case, ensure that you have defined a default expiry on your package license, as described earlier. In this scenario, you or the prospective user will have to perform the setup steps after installation.

Finally, there is a third option called Test Drive, which does not create a new org for the prospective user on request but does require you to set up an org with your application, preconfigure it, and then link it to your listing via AppExchange. Instead of the users completing a signup page, they click on the Test Drive button on your AppExchange listing. This logs them into your test drive org as read-only users. Because this is a shared org, the user experience and features you can offer to users is limited to those that mainly read information. I recommend that you consider Trialforce over this option unless there is some really compelling reason to use it.

When defining your listing in AppExchange, the Leads tab can be used to configure the creation of lead records for trials, test drives, and other activities on your listing. Enabling this will result in a form being presented to the user before accessing these features on your listing. If you provide access to trials through signup forms on your website, for example, lead information will not be captured.

Distributing Salesforce Connected Apps

If you plan to build any kind of platform integration, including a dedicated mobile application, for example, using Salesforce APIs or any you build using Apex, you will need to create and package what's known as a Connected App. This allows you, as the ISV, to set up the OAuth configuration that allows users of these integrations to connect to Salesforce, and thus, your logic and objects running on the platform. You don't actually need to package this configuration, but you are encouraged to do so since it will allow your customers to control and monitor how they utilize your solution.

Summary

This chapter has given you a practical overview of the initial package creation process, from using Salesforce DX through to installing it into another Salesforce org. While some of the features discussed cannot be fully exercised until you're close to your first release phase, you can head to development with a good understanding of how early decisions, such as references to Standard Objects, are critical to your licensing and cost decisions.

It is also important to keep in mind that, while tools such as Trialforce help automate the setup, this does not apply to installing and configuring your customer environments. Thus, when making choices regarding configurations and defaults in your design, keep in mind the costs to the customer during the implementation cycle.

Make sure you plan for the security review process in your release cycle (the free online version has a limited bandwidth) and, ideally, integrate a static analysis tool that supports security scanning into your CI build system as early as possible, since such tools not only monitor security flaws but also help report breaches in best practices, such as a lack of test asserts and SOQL or DML statements in loops.

In the following chapters, we will start exploring the engineering aspects of building an enterprise application as we build upgrades on the package created in this chapter, allowing us to better explore how the platform supports the incremental growth of your application.

As you revisit the tools covered in this chapter, be sure to reference the excellent ISVforce Guide at http://www.salesforce.com/us/developer/docs/packagingGuide/index.htm for the latest detailed steps and instructions on how to access, configure, and use these features.
Left arrow icon Right arrow icon
Download code icon Download Code

Key benefits

  • Use the Lightning Platform to build integrated, scalable, and robust apps focused on enterprise-level customer demands
  • Use the Lightning Component framework to deliver modern and responsive user experiences targeting multiple devices through Lightning Experience and Salesforce Mobile
  • Extend your application with access to external services and AI

Description

Salesforce Lightning provides a secure and scalable platform to build, deploy, customize, and upgrade applications. This book will take you through the architecture of building an application on the Lightning platform to help you understand its features and best practices, and ensure that your app keeps up with your customers’ increasing needs as well as the innovations on the platform. This book guides you in working with the popular aPaaS offering from Salesforce, the Lightning Platform. You’ll see how to build and ship enterprise-grade apps that not only leverage the platform's many productivity features, but also prepare your app to harness its extensibility and customization capabilities. You'll even get to grips with advanced application architectural design patterns such as Separation of Concerns, Unit Testing and Dependency Integration. You will learn to use Apex and JavaScript with Lightning Web Components, Platform Events, among others, with the help of a sample app illustrating patterns that will ensure your own applications endure and evolve with the platform. Finally, you will become familiar with using Salesforce DX to develop, publish, and monitor a sample app and experience standard application life cycle processes along with tools such as Jenkins to implement CI/CD. By the end of this book, you will have learned how to develop effective business apps and be ready to explore innovative ways to meet customer demands.

Who is this book for?

This book is for Lightning platform developers who want to discover the true potential of the platform to develop complex scalable applications for use in enterprise businesses.

What you will learn

  • Create and deploy AppExchange packages and manage upgrades
  • Understand Enterprise Application Architecture patterns
  • Customize mobile and desktop user experience with Lightning Web Components
  • Manage large data volumes with asynchronous processing and big data strategies
  • Implement Source Control and Continuous Integration
  • Add AI to your application with Einstein
  • Use Lightning External Services to integrate external code and data with your Lightning Application
Estimated delivery fee Deliver to Malta

Premium delivery 7 - 10 business days

€32.95
(Includes tracking information)

Product Details

Country selected
Publication date, Length, Edition, Language, ISBN-13
Publication date : Nov 04, 2019
Length: 646 pages
Edition : 3rd
Language : English
ISBN-13 : 9781789956719
Category :
Languages :
Concepts :
Tools :

What do you get with Print?

Product feature icon Instant access to your digital eBook copy whilst your Print order is Shipped
Product feature icon Paperback book shipped to your preferred address
Product feature icon Download this book in EPUB and PDF formats
Product feature icon Access this title in our online reader with advanced features
Product feature icon DRM FREE - Read whenever, wherever and however you want
Product feature icon AI Assistant (beta) to help accelerate your learning
OR
Modal Close icon
Payment Processing...
tick Completed

Shipping Address

Billing Address

Shipping Methods
Estimated delivery fee Deliver to Malta

Premium delivery 7 - 10 business days

€32.95
(Includes tracking information)

Product Details

Publication date : Nov 04, 2019
Length: 646 pages
Edition : 3rd
Language : English
ISBN-13 : 9781789956719
Category :
Languages :
Concepts :
Tools :

Packt Subscriptions

See our plans and pricing
Modal Close icon
€18.99 billed monthly
Feature tick icon Unlimited access to Packt's library of 7,000+ practical books and videos
Feature tick icon Constantly refreshed with 50+ new titles a month
Feature tick icon Exclusive Early access to books as they're written
Feature tick icon Solve problems while you work with advanced search and reference features
Feature tick icon Offline reading on the mobile app
Feature tick icon Simple pricing, no contract
€189.99 billed annually
Feature tick icon Unlimited access to Packt's library of 7,000+ practical books and videos
Feature tick icon Constantly refreshed with 50+ new titles a month
Feature tick icon Exclusive Early access to books as they're written
Feature tick icon Solve problems while you work with advanced search and reference features
Feature tick icon Offline reading on the mobile app
Feature tick icon Choose a DRM-free eBook or Video every month to keep
Feature tick icon PLUS own as many other DRM-free eBooks or Videos as you like for just €5 each
Feature tick icon Exclusive print discounts
€264.99 billed in 18 months
Feature tick icon Unlimited access to Packt's library of 7,000+ practical books and videos
Feature tick icon Constantly refreshed with 50+ new titles a month
Feature tick icon Exclusive Early access to books as they're written
Feature tick icon Solve problems while you work with advanced search and reference features
Feature tick icon Offline reading on the mobile app
Feature tick icon Choose a DRM-free eBook or Video every month to keep
Feature tick icon PLUS own as many other DRM-free eBooks or Videos as you like for just €5 each
Feature tick icon Exclusive print discounts

Frequently bought together


Stars icon
Total 117.97
Mastering Apex Programming
€38.99
Salesforce Lightning Platform Enterprise Architecture
€41.99
Apex Design Patterns
€36.99
Total 117.97 Stars icon
Banner background image

Table of Contents

16 Chapters
Building and Publishing Your Application Chevron down icon Chevron up icon
Leveraging Platform Features Chevron down icon Chevron up icon
Application Storage Chevron down icon Chevron up icon
Apex Execution and Separation of Concerns Chevron down icon Chevron up icon
Application Service Layer Chevron down icon Chevron up icon
Application Domain Layer Chevron down icon Chevron up icon
Application Selector Layer Chevron down icon Chevron up icon
Building User Interfaces Chevron down icon Chevron up icon
User Interfaces with Lightning Framework Chevron down icon Chevron up icon
Providing Integration and Extensibility Chevron down icon Chevron up icon
Asynchronous Processing and Big Data Volumes Chevron down icon Chevron up icon
Unit Testing Chevron down icon Chevron up icon
Source Control and Continuous Integration Chevron down icon Chevron up icon
Integrating with External Services Chevron down icon Chevron up icon
Adding AI with Einstein Chevron down icon Chevron up icon
Other Books You May Enjoy Chevron down icon Chevron up icon

Customer reviews

Rating distribution
Full star icon Full star icon Full star icon Full star icon Half star icon 4.4
(5 Ratings)
5 star 80%
4 star 0%
3 star 0%
2 star 20%
1 star 0%
AMol SOlanki Mar 14, 2022
Full star icon Full star icon Full star icon Full star icon Full star icon 5
Book will talk about how you build packages, deploy it and manage upgrades. This book will help you understand the architecture of building an application on the Lightning platform. Author did a great job at explaining how to handle large datasets with asynchronous processing including CICD. Author has also explained hoe you use LES to integrate with external code. A good book for devs to understand the concept.
Amazon Verified review Amazon
Nicholas Feb 23, 2020
Full star icon Full star icon Full star icon Full star icon Full star icon 5
Aside from being a comprehensive review of the Lightning Platform's features and best practices around solution architecture, Andrew Fawcett manages to make a large amount of complex content easily consumable by efficiently segmenting chapters into purposeful sections. I was surprised at how large the book was, and then surprised again at how easily I was able to read it twice within a month. I'll carry this book around with me for the rest of my career (or until the next edition is written).
Amazon Verified review Amazon
Mrinal Jan 04, 2022
Full star icon Full star icon Full star icon Full star icon Full star icon 5
It worse! experience to read on kindle cloud due to strange formatting
Amazon Verified review Amazon
Meighan Aug 28, 2021
Full star icon Full star icon Full star icon Full star icon Full star icon 5
Extremely helpful
Amazon Verified review Amazon
Amazon Purchaser Jan 30, 2021
Full star icon Full star icon Empty star icon Empty star icon Empty star icon 2
The term Architecture is very much misleading for this book and hence forget about Enterprise Architecture .This book is one fit for developers. Do not expect anything to drive your thoughts an Enterprise Architect need.
Amazon Verified review Amazon
Get free access to Packt library with over 7500+ books and video courses for 7 days!
Start Free Trial

FAQs

What is the delivery time and cost of print book? Chevron down icon Chevron up icon

Shipping Details

USA:

'

Economy: Delivery to most addresses in the US within 10-15 business days

Premium: Trackable Delivery to most addresses in the US within 3-8 business days

UK:

Economy: Delivery to most addresses in the U.K. within 7-9 business days.
Shipments are not trackable

Premium: Trackable delivery to most addresses in the U.K. within 3-4 business days!
Add one extra business day for deliveries to Northern Ireland and Scottish Highlands and islands

EU:

Premium: Trackable delivery to most EU destinations within 4-9 business days.

Australia:

Economy: Can deliver to P. O. Boxes and private residences.
Trackable service with delivery to addresses in Australia only.
Delivery time ranges from 7-9 business days for VIC and 8-10 business days for Interstate metro
Delivery time is up to 15 business days for remote areas of WA, NT & QLD.

Premium: Delivery to addresses in Australia only
Trackable delivery to most P. O. Boxes and private residences in Australia within 4-5 days based on the distance to a destination following dispatch.

India:

Premium: Delivery to most Indian addresses within 5-6 business days

Rest of the World:

Premium: Countries in the American continent: Trackable delivery to most countries within 4-7 business days

Asia:

Premium: Delivery to most Asian addresses within 5-9 business days

Disclaimer:
All orders received before 5 PM U.K time would start printing from the next business day. So the estimated delivery times start from the next day as well. Orders received after 5 PM U.K time (in our internal systems) on a business day or anytime on the weekend will begin printing the second to next business day. For example, an order placed at 11 AM today will begin printing tomorrow, whereas an order placed at 9 PM tonight will begin printing the day after tomorrow.


Unfortunately, due to several restrictions, we are unable to ship to the following countries:

  1. Afghanistan
  2. American Samoa
  3. Belarus
  4. Brunei Darussalam
  5. Central African Republic
  6. The Democratic Republic of Congo
  7. Eritrea
  8. Guinea-bissau
  9. Iran
  10. Lebanon
  11. Libiya Arab Jamahriya
  12. Somalia
  13. Sudan
  14. Russian Federation
  15. Syrian Arab Republic
  16. Ukraine
  17. Venezuela
What is custom duty/charge? Chevron down icon Chevron up icon

Customs duty are charges levied on goods when they cross international borders. It is a tax that is imposed on imported goods. These duties are charged by special authorities and bodies created by local governments and are meant to protect local industries, economies, and businesses.

Do I have to pay customs charges for the print book order? Chevron down icon Chevron up icon

The orders shipped to the countries that are listed under EU27 will not bear custom charges. They are paid by Packt as part of the order.

List of EU27 countries: www.gov.uk/eu-eea:

A custom duty or localized taxes may be applicable on the shipment and would be charged by the recipient country outside of the EU27 which should be paid by the customer and these duties are not included in the shipping charges been charged on the order.

How do I know my custom duty charges? Chevron down icon Chevron up icon

The amount of duty payable varies greatly depending on the imported goods, the country of origin and several other factors like the total invoice amount or dimensions like weight, and other such criteria applicable in your country.

For example:

  • If you live in Mexico, and the declared value of your ordered items is over $ 50, for you to receive a package, you will have to pay additional import tax of 19% which will be $ 9.50 to the courier service.
  • Whereas if you live in Turkey, and the declared value of your ordered items is over € 22, for you to receive a package, you will have to pay additional import tax of 18% which will be € 3.96 to the courier service.
How can I cancel my order? Chevron down icon Chevron up icon

Cancellation Policy for Published Printed Books:

You can cancel any order within 1 hour of placing the order. Simply contact [email protected] with your order details or payment transaction id. If your order has already started the shipment process, we will do our best to stop it. However, if it is already on the way to you then when you receive it, you can contact us at [email protected] using the returns and refund process.

Please understand that Packt Publishing cannot provide refunds or cancel any order except for the cases described in our Return Policy (i.e. Packt Publishing agrees to replace your printed book because it arrives damaged or material defect in book), Packt Publishing will not accept returns.

What is your returns and refunds policy? Chevron down icon Chevron up icon

Return Policy:

We want you to be happy with your purchase from Packtpub.com. We will not hassle you with returning print books to us. If the print book you receive from us is incorrect, damaged, doesn't work or is unacceptably late, please contact Customer Relations Team on [email protected] with the order number and issue details as explained below:

  1. If you ordered (eBook, Video or Print Book) incorrectly or accidentally, please contact Customer Relations Team on [email protected] within one hour of placing the order and we will replace/refund you the item cost.
  2. Sadly, if your eBook or Video file is faulty or a fault occurs during the eBook or Video being made available to you, i.e. during download then you should contact Customer Relations Team within 14 days of purchase on [email protected] who will be able to resolve this issue for you.
  3. You will have a choice of replacement or refund of the problem items.(damaged, defective or incorrect)
  4. Once Customer Care Team confirms that you will be refunded, you should receive the refund within 10 to 12 working days.
  5. If you are only requesting a refund of one book from a multiple order, then we will refund you the appropriate single item.
  6. Where the items were shipped under a free shipping offer, there will be no shipping costs to refund.

On the off chance your printed book arrives damaged, with book material defect, contact our Customer Relation Team on [email protected] within 14 days of receipt of the book with appropriate evidence of damage and we will work with you to secure a replacement copy, if necessary. Please note that each printed book you order from us is individually made by Packt's professional book-printing partner which is on a print-on-demand basis.

What tax is charged? Chevron down icon Chevron up icon

Currently, no tax is charged on the purchase of any print book (subject to change based on the laws and regulations). A localized VAT fee is charged only to our European and UK customers on eBooks, Video and subscriptions that they buy. GST is charged to Indian customers for eBooks and video purchases.

What payment methods can I use? Chevron down icon Chevron up icon

You can pay with the following card types:

  1. Visa Debit
  2. Visa Credit
  3. MasterCard
  4. PayPal
What is the delivery time and cost of print books? Chevron down icon Chevron up icon

Shipping Details

USA:

'

Economy: Delivery to most addresses in the US within 10-15 business days

Premium: Trackable Delivery to most addresses in the US within 3-8 business days

UK:

Economy: Delivery to most addresses in the U.K. within 7-9 business days.
Shipments are not trackable

Premium: Trackable delivery to most addresses in the U.K. within 3-4 business days!
Add one extra business day for deliveries to Northern Ireland and Scottish Highlands and islands

EU:

Premium: Trackable delivery to most EU destinations within 4-9 business days.

Australia:

Economy: Can deliver to P. O. Boxes and private residences.
Trackable service with delivery to addresses in Australia only.
Delivery time ranges from 7-9 business days for VIC and 8-10 business days for Interstate metro
Delivery time is up to 15 business days for remote areas of WA, NT & QLD.

Premium: Delivery to addresses in Australia only
Trackable delivery to most P. O. Boxes and private residences in Australia within 4-5 days based on the distance to a destination following dispatch.

India:

Premium: Delivery to most Indian addresses within 5-6 business days

Rest of the World:

Premium: Countries in the American continent: Trackable delivery to most countries within 4-7 business days

Asia:

Premium: Delivery to most Asian addresses within 5-9 business days

Disclaimer:
All orders received before 5 PM U.K time would start printing from the next business day. So the estimated delivery times start from the next day as well. Orders received after 5 PM U.K time (in our internal systems) on a business day or anytime on the weekend will begin printing the second to next business day. For example, an order placed at 11 AM today will begin printing tomorrow, whereas an order placed at 9 PM tonight will begin printing the day after tomorrow.


Unfortunately, due to several restrictions, we are unable to ship to the following countries:

  1. Afghanistan
  2. American Samoa
  3. Belarus
  4. Brunei Darussalam
  5. Central African Republic
  6. The Democratic Republic of Congo
  7. Eritrea
  8. Guinea-bissau
  9. Iran
  10. Lebanon
  11. Libiya Arab Jamahriya
  12. Somalia
  13. Sudan
  14. Russian Federation
  15. Syrian Arab Republic
  16. Ukraine
  17. Venezuela