Search icon CANCEL
Subscription
0
Cart icon
Your Cart (0 item)
Close icon
You have no products in your basket yet
Arrow left icon
Explore Products
Best Sellers
New Releases
Books
Videos
Audiobooks
Learning Hub
Free Learning
Arrow right icon
Arrow up icon
GO TO TOP
Implementing Oracle API Platform Cloud Service

You're reading from   Implementing Oracle API Platform Cloud Service Design, deploy, and manage your APIs in Oracle's new API Platform

Arrow left icon
Product type Paperback
Published in May 2018
Publisher
ISBN-13 9781788478656
Length 518 pages
Edition 1st Edition
Tools
Concepts
Arrow right icon
Authors (4):
Arrow left icon
Luis Weir Luis Weir
Author Profile Icon Luis Weir
Luis Weir
Philip Wilkins Philip Wilkins
Author Profile Icon Philip Wilkins
Philip Wilkins
Andrew Bell Andrew Bell
Author Profile Icon Andrew Bell
Andrew Bell
Sander Rensen Sander Rensen
Author Profile Icon Sander Rensen
Sander Rensen
Arrow right icon
View More author details
Toc

Table of Contents (12) Chapters Close

Platform architecture

As briefly described earlier, the platform is modular, hybrid, and highly customizable. The following figure shows the core components that build up the platform:

Oracle APIP CS – high-level architecture

As the diagram suggests, the platform consists the following components:

  1. Management Service: The management service is a cloud-based application that underpins the management console, developer portal, and platform API. It's the engine of the entire platform, in other words, the brains of the platform.
  2. Management Portal: As the name suggests, this is where APIs, Gateways and User/Roles are managed. It's a role-based application so what a user can do pretty much depends on the role the user belongs to.
  3. Developer Portal: A web-based application where developers can search and subscribe to APIs. This is where all of the API documentation can be found and also where application keys are provided after a subscription to an API takes place.
  4. REST APIs: Oracle APIP CS was built following an API-first approach and therefore, all functionality available via the different portals are also accessible via the REST endpoints. In fact, more capabilities are available via the API than available than from the portals–at least in the first release of the product.
  5. Apiary: This is the component of the platform responsible for delivering API-first design capabilities and enables a documentation-driven API design approach. Apiary in itself is feature-rich delivering capabilities such as support for Swagger and API Blueprint specifications, a mockup engine that allows automatic stubs generation based on a API specification, assertions engine for team-based semantic validation, team collaboration, among many others, which will be described in the next section. It is also worth noting that both the management console and the developer portal have already been integrated with Apiary.
  6. API Gateways: These are the engines that enforce/apply the different API policies to the managed endpoints. They can be deployed virtually in any computing infrastructure, cloud and/or on-premises, so long that the right (certified) operating system is used. Gateways communicate with the management service implementing a featured known as phone-home. The way it works is that the gateways are configured to periodically call the Oracle API-CS platform API to download new policies that are to be applied to the specified APIs and also download platform updates that need to be applied to the gateway infrastructure. In this model, it is the gateways responsibility to establish the communication to the management service and not the other way around, therefore making it a lot easier to deploy gateways as no firewall ports or network changes are required-so long that the gateways have outbound internet access.
  1. Identity Cloud Service: Although this component is not really part of the Oracle APIP CS, but rather a related cloud service, it's important to depict as it enables the platform to integrate with an organization's existing LDAP directory. Given that the majority of organizations may already have an LDAP directory of some sort (that is, MS Active Directory) to manage their users and roles, this capability becomes quite critical when implementing the platform in a landscape that has many users especially developers.
Note that in the very first release of Oracle APIP CS, the use of Identity Cloud Service is not supported. Instead, WebLogic Console is configured to in order to support
  1. Compute nodes, Oracle Traffic Director (OTD) and Database Cloud: All Management Services, including the Management and Developer Portals, run in Oracle cloud infrastructure. When the platform is set-up, these components are provisioned in 4 compute nodes: two for the management service and portals, one for the OTD load balancer and one for the database cloud instance. The creation of this IaaS infrastructure has to have happened prior the provisioning the Oracle APIP CS.

The following section elaborates each component in detail.

Components description

This section elaborates into detail each of the components of the management portal.

Management portal

The management portal is the main console for the Oracle API platform. A web-based application deployed in the Oracle Cloud PaaS, it delivers capabilities to manage an API throughout the entire lifecycle. From API creation, policy implementation, access management, and API documentation to API documentation and analytics. In addition, depending on the user role (described later in the chapter), it is also possible to manage users, API gateways, and platform settings. The management portal comes with several features as illustrated in the following diagram:

Oracle APIP CS-management portal

The following section describes each of the pages illustrated in the diagram.

Note that the pages available in the management portal, depends on the version of the platforms being used. Versions have been appended to the page name to show from which release a given page is available. Nomenclature for versions are simple: <year>.<quarter>.<release number>. For example, v17.x + indicates that a page is available from 2017 onwards including any quarter.

This book is based on version 17.3.3. (3rd quarter 2017). This chapter will be updated yearly to reflect the latest additions and key known features of the roadmap.

APIs page

The APIs page is the landing page after a user has signed in into the management portal. The landing page is also an API catalog as all APIs created in the platform are initially listed here and can also be searched upon based on different criteria:

Management portal–APIs page

It is also from this page that a user can either create a new API by clicking on Create API or edit an existing by simply clicking on the name of a given API. This action will take the user into the API implementation page:

Management portal–API implementation page

When it comes to API life cycle management, this is one of the most (if not the most) important pages as from here it is possible to implement an API by assigning and configuring any relevant policies, deploy it, create the API documentation, manage the user grants, application registrations, and also retrieve insightful API analytics.

Note that the APIs page is overall targeted mainly at API Managers, which in API Platform is the role responsible for implementing an API. Roles and responsibilities are described in greater detail in section Roles later in the chapter.

The API implementation page

The API implementation page's main purpose is to provide all capabilities needed in order to fully implement an API. For example, policy implementation, deployment, documentation, security, and monitoring are all capabilities provided within this page.

The page is divided into six different sections, each of which can be accessed by clicking on the relevant icons located on the right-hand side of the page.

The implementation section

The landing section allows for API policies to be implemented on an API.

An API policy is, in essence, a configurable rule that is enforced at runtime when the API is called. Policies come in many flavors and for different purposes. A mature API management offering should provide a variety of policies to ensure that several needs can be satisfied, such as authentication, authorization, key validation, throttling, and routing, to name a few.

The management portal comes with twenty-one predefined policies (at the time this book was written based on API Platform Cloud Service version 17.3.3), grouped in 5 main categories. Policies can be applied to request and response payloads in HTTP methods: GET, POST, PUT, and DELETE.

The policies that can be applied to request payloads are as following:

  1. Security: policies that focused on enforcing authentication, authorization, key validation, and other thread protection policies such as IP filtering and cross-origin resource sharing (CORS):
Implementation section–security policies
  1. Traffic management: this group of policies deliver capabilities to throttle and limit the number of API calls made by consumers based on multiple criteria. In other words, handle the volume of traffic sent to the API. This type of policy can as well be useful to prevent against denial of service attacks (DoS). The following screenshot shows the Traffic Management policies as shown in the management portal:
Implementation section–traffic management policies
  1. Interface management: Policies that deliver capabilities to manage what and how HTTP resources (that is, /<resource>), methods (GET, POST, DELETE, UPDATE) and payloads can be accessed. The following screenshot shows the Interface Management policies as shown in the management portal:
Implementation section–interface management policies
  1. Routing: Policies focused on routing HTTP calls to service endpoints based on multiple criteria such as HTTP header values, the specific gateway handling the traffic, the application calling the API or based on HTTP resource accessed. The following screenshot shows the Routing policies as shown in the management portal:
Implementation section–routing policies
  1. Other: Complementary policies that deliver additional capabilities that don't fall in any of the above categories like for example service callouts, logging, and custom policies based on groovy scripting. The following image shows the Other policies as shown in the management portal:
Implementation section–other policies
For an example on how to implement API policies refer to Chapter 6, Defining Policies for APIs.

For further information on policies available in management portal and how to implement them, please refer to the following link:
https://docs.oracle.com/en/cloud/paas/api-platform-cloud/apfad/implementing-apis.html#GUID-1EE65B88-5050-4AFE-8F53-4B256D4E2AA3

The deployment section

The deployment section of the API implementation page allows for the API to be deployed into any registered logical gateway. When an API is deployed to a given logical gateway, all gateway nodes will deploy the API. From this same section, it is possible to undeploy APIs and also visualize any rejected or failed API deployments:

In the management portal, all gateways nodes (instance of gateways running on a machine), are grouped into what's referred to as logical gateways. A logical gateway, therefore, encompassed all gateway nodes associated to the same logical instance.

The concept of a logical gateway will be explained in more detail later in the chapter.
API implementation page–deployments section

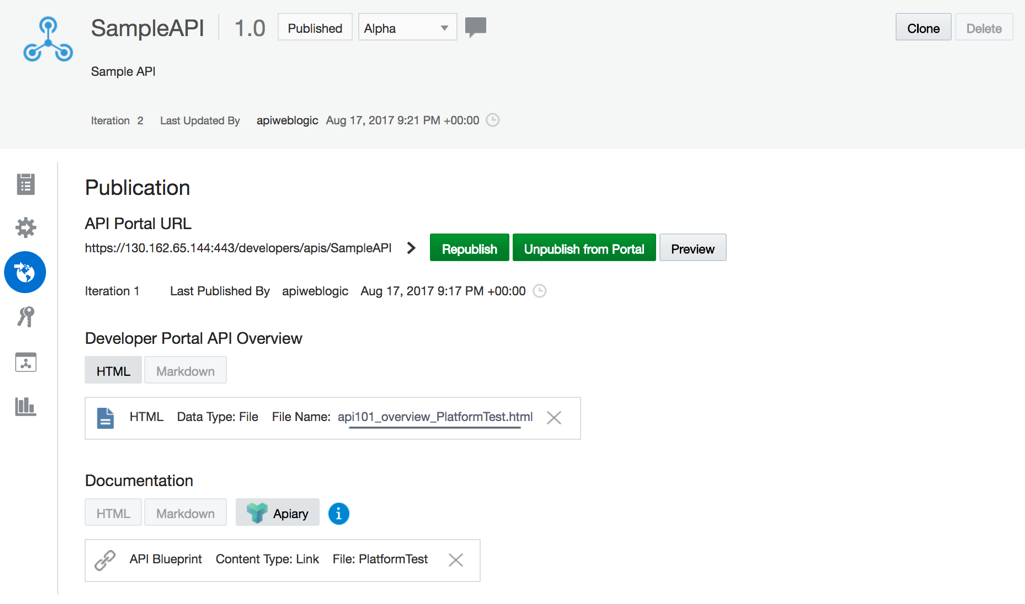
The publication section

The publication section allows for API documentation to be created and then published in the developer portal. The documentation consists of two main parts:

  1. API overview documentation: Simply put, free text to help describe the functionality and usage of the API. It can be HTML or Markdown text.
  2. API specification documentation: The API Blueprint or Swagger specification document for the API created in Apiary:
API implementation page–publication section
APIs can be specified in a number of ways, as opposed to web services where the main mechanism to define a service is by creating a WSDL (web service description language) document. For APIs, the most popular specifications are Swagger and API Blueprint. Apiary supports both.

Recommend reading the following article for further information on the topic:
https://nordicapis.com/top-specification-formats-for-rest-apis

The grants section

The Grants section allows for different grants to be specified and therefore, control which users or groups can manage, deploy, register, and read private/public information for the API. There are six grants available:

  • Manage API: Allows to modify the definition of and issue grants for the API
  • View all details: Allows to view all information about the API in the management portal
  • Deploy API: Allows to deploy or un-deploy the API to a gateway for which they have deploy rights
  • View public details: Allows to view the publicly available details of this API on the Developer Portal
  • Register: Allows to users to register their applications to use the API
  • Request registration: Allows to users to request registration of their applications to use the API
API implementation page–grants section

Registration section

Developers that can access the developer portal can create applications that are then registered to consume any given API they have been granted access to. When an application is registered to a given API, an application-key is provided. Presence of the application-key when calling an API can then be enforced by using the Key Validation policy.

From this page, registrations to the API can be created, approved, rejected, or suspended:

API implementation page–registration section

The analytics section

The Analytics section delivers insightful near-real dashboards and stats for the API. Information such as the total number of calls, successful versus failed calls, response times, and payload size can be visualized and filtered as well based on criteria such as gateways that processed the calls, name of the consumer application and timeframes.

In the section there are three main tabs:

  • General: this tab provides a summary of all API calls in a single dashboard. The calls are can be seen classified by volume and status (All, Successful, Rejected or Failed), payload size, or API resource.
  • Applications: this tab provides a summary view of API calls broken down by Applications. It provides a total of successful calls, rejections and errors.
  • Errors and Rejections: this tab provides great insight on API calls that resulted in Errors (most likely a HTTP 5xx Server Error response code) or Rejections (typically a HTTP 401 Unauthorized or 403 Forbidden). The calls can be seen classified by total numbers and type of error/rejection.
API implementation page–analytics section
The APIs page documentation can be accessed from the following URL:
http://docs.oracle.com/en/cloud/paas/api-platform-cloud/apfad/managing-apis.html

Applications page

As it was briefly described earlier, an application in Oracle APIP CS represents the consumers for one or many APIs. For API-Platform an application is just a logical representation, therefore it does not matter what the application actually is. It can be a mobile application, a web application or even a wearable device.

Applications are uniquely identified with applications keys which can be visualized by clicking on the application itself and accessing the application details page:

Management portal–applications page

The settings section

Once in the application details page, the Settings section is displayed. From here, it is possible not only to visualize the application key or App Key for short, but also reissue it. This can be useful for security purposes. Other details such as contact details for the owner of the application and type of application (that is, mobile app, backend system, and so on) can be visualized:

Applications page–application details

Grants section

The gateways page

From the Gateways page, all registered logical gateways and gateways nodes can be visualized and managed. Details such as gateway names and description, load balancer URLs and number of APIs deployed are visible. Also, note that next to the gateway name the version of the gateway is visible. This is important to make sure that the version implemented is compatible with the version of the management service (ideally both should be in the same version):

Management portal–gateways page
A logical gateway as the name suggests, represents a grouping of one or many gateway nodes. A gateway node is an actual physical instance of the gateway that's running on a compute instance (could be in the cloud and/or on-premise) and is capable of handling API requests.
Logical gateways and gateway nodes

By clicking on a given gateway listed, the Gateway details page opens, and from there gateway settings, gateway properties, physical gateway nodes belonging to the logical gateway, deployments, grants, and gateway analytics can be visualized and certain properties edited.

Settings section

The settings section (landing section), provides details such as the load balancer URL, the unique logical Gateway ID, and the gateway location which is just free text metadata to provide further insight as to where the actual gateway is actually deployed:

Gateways page–settings section

Properties section

The Properties section allows for certain message processing limits to be defined. This is important as common question asked when implementing a gateway is what is the maximum message size that can be handled, so such details cannot just be visualized but also edited from this page.

Following is the description as per Oracle documentation:

  1. Maximum Message Size: Specifies the maximum size, in bytes, of the request, excluding attachments. The default value is set to 1024000. The maximum allowed value is 200 MB.
  2. Maximum Number of Unbounded Items: Specifies the maximum number of unbounded items that a message can contain. The default value is set to 1024.
  3. Maximum Size of a Single Message Entry: Specifies the maximum size of a single message entity, such as an element, attribute or comment. The default value is 102400.
  4. Maximum Nested Elements in a Message: Specifies the maximum number of nested elements allowed in a message. The default value is 1024 nested elements.
Gateways page–gateway properties section

Nodes section

From the Nodes section, details of all physical nodes (in other words running gateway instances) that belong to the logical gateway can be visualized. From this page, details of the physical host URL where the gateways are running are visible. If the host URLs are to be accessed via HTTP proxies, the proxies' URLs can be specified from this page.

Of special interest, is the polling intervals information which is available on the top-right-hand side of the section.

This information is important as it informs how often gateways are supposed to phone-home and when was the last time it occurred. When troubleshooting, this is an important page to look at.
Gateways page–nodes section

Deployments section

The Deployments section page lists APIs that have been deployed to the logical gateway. The page is equivalent to the API deployments section; however, all APIs deployed to the logical gateway are listed as opposed to a single API. Therefore, it is a useful page if actions are required in more than one API (that is, undeploying more than one API):

Gateways page–deployments section

Grants section

The Grants section works in a similar way to the API grants section but in the context of the logical gateway. Of special interest is that grants specific to system users for the operation of the logical gateway (node service accounts) and also deployment grants to the logical gateway, can be managed from this page. Especially the deployment grants management for a logical gateway can be very useful as users can be granted rights to deploy APIs to a logical gateway as opposed to of providing grants on an API by API basis:

Gateways page–grants section

The analytics section

The Analytics pages are similar to the API analytics page in the way stats and dashboards are presented and how it stats be filtered, however in the context of all APIs running in the gateway as opposed to just an individual API. For operators of the platform, this page is especially important to monitor overall performance and health for a logical gateway and all nodes within it. It can also be handy to identify if a specific API is being problematic:

Gateways page–analytics section

The services page

From the Services page backend services can be registered and managed.

A backend service is basically an unmanaged REST endpoint fronted by the API Platform's API Gateway.

A service registered in this page can be referenced from the API implementation page that way preventing a backend endpoint URLs to be manually typed every time an API is created.

This page is only available but from version 17.3.x onwards.
Management portal–services page

Once a service is created, it can be edited just clicking over it. This will take the user to the service settings page described subsequently.

The settings section

From the Settings section, it is possible to edit a REST endpoint name and its corresponding URL. Although in version 17.3.x only one endpoint can be entered per service, in future versions it will be possible to assign multiple endpoints, which will be useful as each environment (for example, dev, test) can have its own endpoint.

From this same section it is also possible to assign a Service Account which is useful if the backend REST endpoint requires some form of authentication.

Refer to next section Service accounts for further information on authentication types supported.
Services page–settings section

The grants section

Services grants can also be accessed from this page by clicking on the grants icon (icon with shape of a key located on the left-hand side of the screen).

Services grants work in a similar to API grants (explained in the API section) however in the context of an Services.

Service accounts page

The Service Accounts page is used to effectively store authentication secrets that can be used by service (registered in the services page) when calling backend endpoint URLs that require some form of authentication and authorization. In version 17.3.x, two authentication types are supported, HTTP Basic Authentication and OAuth 2.0.

Note that this page is only available but from version 17.3.x onwards.
Management portal–services accounts page

Once a service account is created, it can be edited just clicking over it. This will take the user to the service accounts settings page described subsequently.

The settings section

From the settings section it is possible to change the authentication type used in the service accounts, along with its relevant details (for example, username and password in the case of Basic Authentication):

Services page–settings section

The grants section

Service accounts grants can also be accessed from this page by clicking on the grants icon (icon with shape of a key located on the left-hand side of the screen).

Service accounts grants work in a similar to API grants (explained in the API section) however in the context of a services account.

The roles page

The roles page lists all the available user roles to which different users and grants can be assigned to.

This page is only available but from version 17.3.x onwards.
Management portal–roles page

To better understand users and roles of in Oracle APIP CS, the following diagram illustrates some of the main roles available in the platform (including in Apiary) and how they relate to the different components of the platform:

Management portal–roles
  1. API manager: People responsible for managing the API lifecycle, which includes designing, implementing, and versioning APIs. Also responsible for managing grants and applications, providing API documentation, and monitoring API performance.
  2. Service manager: People responsible for managing resources defining backend services. This includes for example managing service accounts.
  3. Application developer: API consumers granted self-service access rights to discover and register APIs, view API documentation, and manage applications using the developer portal.
  4. API Designers: This role does not exist in the API platform, but rather to represent API managers and/or application developers that have access to Apiary and therefore can either produce API designs, participate in the API design process and/or associate Apiary documentation to a specific API in the APIs page.
That as of version 17.3.x of the platform, users are not integrated with Apiary. Therefore, Apiary has its own user store.
  1. Gateway manager: Operations team members responsible for deploying, registering, and managing gateways. They may also manage API deployments to their gateways when issued the deploy API grant by an API manager.
  2. Administrator: System administrators responsible for assigning people roles in the system. Administrators possess the rights of all other roles and rights to all objects in the system.
  3. Gateway runtime: This role indicates a service account used to communicate from the gateway to the portal.

As previously described, grants are available in multiple pages of the portal, like the APIs page, applications page and gateway page. In Oracle APIP CS certain grants are assign by default to the different roles available as it has been illustrated in the following diagram:

Oracle APIP CS-roles to grants mapping

Similarly, the following diagram provides grants centric view, where each grant and the group it belongs to is described and then also mapped to the corresponding user roles for which the grant is available by default:

Oracle APIP CS–grants to roles mapping

Users and groups

In versions 17.2.x, 17.3.x, and of the API platform, users and roles are still managed via the WebLogic Management Console which is accessible through the same URL as the management console but with the URI /console instead.

Therefore, when handling users and groups in Oracle APIP CS, it is critical to understand that each role has a corresponding WebLogic user group. And therefore, when creating users in WebLogic console, they should be assigned to the corresponding WebLogic group that matches the Oracle APIP CS role to which the user is to belong to.

Weblogic Group

Oracle APIP CS Role

APIManagers

API Manager

APPDevelopers

Application Developer

APIGatewayManagers

Gateway Manager

APICSAdministrators

Administrator

APIGatewayRuntimeUsers

Gateway Runtime

ServiceManagers

Service Managers

Platform settings page

From the Platform Settings page, general management, and developer portals properties can be set, such as, time zone settings, contact information, base URLs and others.

There are two main sections.

General settings section

In this section, the Time Zone Settings for the platform can be set:

Management portal – platform general settings

Developer portal settings section

As the name suggests, from this section, properties specific to the developer portal can be set. For example, enabling or disabling the portal, defining its base URL, and also enabling or disabling the display of the application keys once in the portal, all can be managed via this section:

Management Portal – Developer Portal Settings

Development portal

The API Developer Portal is a web-based application meant to be used by application developers and/or API implementers in general (that is, API managers, designers) to discover and subscribe to available APIs. The developer portal can also be used to manage applications:

Oracle APIP CS–developer portal

The landing page after a developer has signed in into the developer portal is the API catalog. From here, all APIs a developer has been granted access to, are listed and can be searched upon based on different criteria:

Developer Portal – APIs page

From this page, a developer can access an API's documentation by just clicking on any of the listed APIs. This action will take the user to the API page.

The API page

The API page is the one-stop-shop for all API related documentation. It consists of two main sections. The landing section displaying the API overview documentation and the API documentation section that displays the API Blueprint or Swagger document created in Apiary for the API.

Creating comprehensive API overview and Apiary documentation (API Blueprint or Swagger) is extremely important as this is what application developers will be looking at when consuming an API.

The better the documentation, the more usage the API will receive. If the API is poorly documented, application developers will avoid its use by finding workaround which could even imply creating new APIs.
Developer Portal – API page

From this page, the API documentation can be accessed (icon with shape of a document located on the left-hand side of the section) as well as a subscription for the API can be created.

The API documentation section

The API documentation section displays the Apiary document associated with the API:

API page – documentation
An overview of Apiary will be covered later in the chapter.

API subscription

When a developer clicks on the Subscribe button, the subscription page opens. From here a developer can select which client application is to be subscribed to use the API. Note that for this to work, an application has to be created by the developer. If the relevant application hasn't already been created, a new application can be created directly from this page or from the My Applications page-covered in the next section:

API page–subscription

My applications page

From this page, developers can create and manage applications that consume APIs. Properties such as application keys, API subscriptions and grants can be managed from this page. Also, analytics information related to the application can be visualized.

As briefly described earlier, In Oracle APIP CS an application represents the consumer of one or more APIs. Applications are uniquely identified with application keys which in turn can be used by policies such as key validation and application rate limiting to restrict access to the API.
My Applications page

The overview section

When a developer clicks in any of the listed applications, the Overview section opens. From this section metadata details associated with the application can be detailed, but most importantly the application key can be visualized and also re-issued:

My Applications page–overview section

Subscribed APIs section

The subscription section lists all of the APIs that the application is subscribed to. From here it is also possible to unsubscribe any of the APIs:

My Applications page–subscriptions section

The grants section

The Grants section allows for the creator of the application to also share management rights to other users and roles:

My Applications page–the Grants section

The analytics section

Lastly, the Analytics section provides an application-centric view of the usage of those APIs the application is subscribed to. This view can be very useful for developers looking to analyze API usage by any given application:

My Applications page-analytics section

Management service REST APIs

Oracle APIP CS was created following an API-first approach. What this means in practice is that all of the functionality available via the portals, in fact more, is also available via the management service REST APIs.

The following diagram illustrates the different resources available through the Oracle APIP CS management service APIs:

Oracle APIP CS–management REST APIs
In order to consume the management REST APIs, a user must belong to the administration role.

Oracle classifies the following management REST APIs:

  • Administration service: Accessed through the /apiplatform/administration endpoint, this resource delivers platform administration capabilities, such as configuration of platform preferences and management of users and roles.
Further information available from the following URL:
http://docs.oracle.com/en/cloud/paas/api-platform-cloud/apfrp/index.html
  • Management service: Accessed through the /apiplatform/management endpoint, this resource delivers equivalent and additional capabilities to those available via the management portal.
Further information available from the following URL:
http://docs.oracle.com/en/cloud/paas/api-platform-cloud/apfrm/index.html
  • Developer portal: Accessed through the /apiplatform/developers endpoint, this resource delivers equivalent and additional capabilities to those available via the developer portal.
Further information available from the following URL:
http://docs.oracle.com/en/cloud/paas/api-platform-cloud/apfrd/index.html
  • Gateway controller: Accessed through the /apiplatform/gatewaynode endpoint, this resource delivers gateway administration and monitoring capabilities. This resource is used by the gateway nodes during the registration and join process when installing a gateway.
Further information available from the following URL:
http://docs.oracle.com/en/cloud/paas/api-platform-cloud/apfrg/index.html
  • Analytics: Accessed through the /apiplatform/analytics endpoint, this resource can be used to retrieve analytics metrics for APIs, applications and gateways.
Further information available from the following URL:
http://docs.oracle.com/en/cloud/paas/api-platform-cloud/apfra/index.html
  • Life cycle management: accessed through the /instancemgmt/ endpoint, delivers Oracle APIP CS instance provisioning and management capabilities.
Further information available from the following URL:
http://docs.oracle.com/en/cloud/paas/api-platform-cloud/apfrl/index.html

Now that the management APIs have been described, it is equally important to understand in what use cases they could be use.

For example, the management APIs /apiplatform/ and /instancemgmt/ could be used in any of the following use cases:

  1. Configuration management: Using the /management/ resource to version control APIs (that is, in a GIT) and manage releases (that is, in Nexus).
  2. Continuous integration/continuous delivery (CICD): Although related to the previous point, this use case is about using /management/ resources along with CI tool (that is, Jenkins, Hudson, Circle CI) to automate the software development lifecycle (that is, promotion of APIs across environments, regression testing, API contract validations with Dredd).
  3. Infrastructure as code: A relatively new discipline, infrastructure as code is all about taking infrastructure provisioning automation and management by adopting practices originated in software engineering. By using Oracle Public Cloud (OPC) PaaS APIs (/instancemgmt) it is possible to also automate the actual provisioning of Oracle APIP CS instances. Then combined with the use of other resources in /apiplatform/ robust automation solutions can be achieved.
  4. Developer portal extensions: In some scenarios, it might be required to either extend the developer portal, embedded some developer portal functionality within other corporate intranet portals or simply create custom portal front-ends (that is, for individual APIs). All of this is available by using the /developers/ resources.

API plans

Starting from the release 18.1.5 a new feature is introduced to the API Platform called Plans.

As illustrated in the following diagram, plans are used to handle entitlements to one or many APIs such as client applications can subscribe to a given plan and through it, gain access to all APIs associated with it:

Oracle APIP CS–API plans

In releases prior 18.1.5, API managers have to first publish each API to the developer portal before developers can discover and subscribe them to client applications.

From release 18.1.5 onwards, a plan can be created in the management portal that entitles (grants access) to any given API. Once this is done, an API manager can publish the plan to the developer portal (as opposed to just the individual API) so sub-sequentially, developers can discover and subscribe to the plan via the developer portal.

Because plans effectively act as a unit-of-visibility to all APIs associated with it, they provide a great mechanism to apply common quality-of-service controls, like for example, limit the total number of calls that can, within a given timeframe, be collectively made to APIs within the plan:

Plans also play an important role in enabling the so-called API economy. If properly implemented, a plan can act as act as an accounting log of who/when/which/how many times any given API within the plan was consumed. With such information at hand, monetizing on APIs (term known as API monetization) becomes more a business strategy question as the core technology building blocks would be in placed to enable such business capability.

This section was courtesy of Ricardo Ferreira from the Oracle A-Team and Black Belt instructor for the Oracle API Platform.

Apiary

Apiary is a cloud-based platform specialized in the delivery robust API-design first, API documentation, API mocking and API unit testing capabilities. Apiary is also a great tool for team collaboration as it offers the ability to create feedback loops between API designers and API consumers very early in the development life cycle.

The following diagram illustrates the capabilities available in Apiary:

Apiary overview
It is worth noting that although Oracle acquired Apiary in January 2017, the partnership between both companies started way before that. For this reason, the integration of both products was already in place prior acquisition and launch of Oracle APIP CS.

This integration is explained in far more detail in Chapter 3, Designing the API as it shows from design to publication how Apiary and the Oracle API Platform are used together seamlessly.

The Apiary account

The first step to access Apiary is by opening an account. There are 3 different options to select from. Free, Standard, or Pro:

Comparison of Apiary plans

For teams that are just getting started with API-first design and Apiary, the recommendation is to sign up for a free account to start with. As the skills of the team mature and more product features are needed, at this point upgrading to a paid plan is probably a good idea.

Apiary views

Apiary offers two views: personal view and team view. Each view provides a different set of navigation options. Personal view focuses on API projects whereas team view in the management of team assets and people.

Apiary personal view

When an API designer selects to be in personal view mode, navigation options relevant for creating, editing, and managing API projects become visible. Following a description of the options available in this view.

Apiary editor

The landing page after an API designer signs in, from this page an API Blueprint or Swagger file for an API project can be edited. There are a few features available in the editor that are worth highlighting.

As a designer works on the API design, the right-hand side of the screen dynamically renders to show the specification in styled HTML 5. Just as regular API consumers (that is, app developers) would look at it. From this same page, it is possible to test API resources again just like API consumers would-Apiary comes with a mock-up engine that automatically generates API mockups on the fly. Moreover, as the API design takes place, inline conventions and pattern validation also occurs thus ensuring that the design is consistent with the team-specified styles (described later in the chapter). This and more features will be covered in Chapter 3, Designing the API in greater detail.

Personal view–editor

From this same page, on the top-right hand side, it is possible to search existing API projects, open a project, or create a new one either in API Blueprint or Swagger:

Personal view-create/search API project

When a user clicks on Create New API Project, then the New API window appears. From here the user can decide to create an API only accessible by its creator, a Personal API, or an API that can be viewed and edited by the entire team, a Team API:

Personal view–create/search API project

A concept worth understanding up-front when creating a new API project is the notion that an API belongs to either a person or a team. When an API belongs to the person, only the user that created the API can see it and edit it. However, when a project belongs to the team, the entire team can see it and those with designated rights can also edit it.

Inspector

As the design of the API progresses and developers start trying the API and start to provide feedback, from the Inspector section it is possible to also see what tests are being executed and what resources are being called. This is very useful as if issues occur it is also possible to drill down into each call and check requests and response payloads and HTTP headers:

Personal view–inspector

Documentation

From this page, a user (designer or developer) can visualize a rendered API design in styled HTML5 and also try the different resources. Pretty much the same is page shown on the right-hand side of the editor.

Testing with Apiary

One of the best and most important features of Apiary is the ability to verify that the implementation of an API is actually consistent with its design, for example, an API blueprint. This is critical because in many occasions developers might deviate from the actual design and without the ability to test this, issues could occur later in the lifecycle whereby API consumers don't get the API they expected.

To prevent this issue from materializing, the Test your API feature of Apiary allows for a utility call Dredd to be download and installed. Dredd can then be used to automatically verify that a service endpoint matches a given API definition:

Personal view–tests
Note that the use of Dredd for API unit testing is covered extensively in Chapter 3, Designing the API.

Apiary settings

The project settings page is where properties specific to the API project are defined. There are different options available from this page, worth highlighting:

  1. Define API Domain–used to uniquely determine an URL to access the API documentation.
  2. Enable/disable cross-origin requests headers (CORS).
  3. Enable/disable a Proxy so instead of using the mock-up engine of Apiary, route the calls to the implemented API endpoints.
  4. Remove the API project.
  1. Transfer ownership of the API to the team.
  2. Make the project private or public.
  3. Link the project to a GitHub account. If one doesn't exist, it can be configured.
Personal view–project settings

People

The main purpose of this page is to enable API designers to define who can edit and view the API:

Personal view–people

Apiary team view

As the name suggests, when the team view is selected, navigation options related to the management of the team become available. From here it is possible to manage users, APIs that belong to the team and most importantly the styles that apply to all API projects within the team.

APIs

From this page, APIs that belong to the team can be searched upon and accessed. This page is very useful as members of the team can discover API designs that already exist, which can help avoid duplication, but also ensures that members of the team can learn from each other:

Team view–APIs

Styles

Styles in Apiary are a set of pre-defined modeling patterns and conventions that are used to validate that API designs within the entire team are consistent.

The styles feature is only available in the Pro plan.

This page can only be accessed by admin users and is broken down into 3 sections.

The Dashboard section provides a summary of the validation outcomes for all APIs within the team. This is extremely useful especially in large teams so admin users can get quick feedback on the status of API designs being created.

Styles–dashboards

From the Assertions section, assertions can be enabled, disabled, modified or created (for the last two options a user needs to switch to Advanced Mode). Assertions are the actual rules tested against the API designs in real time from the editor:

Styles – assertions

And the Playground section, as the name suggests, can be used to test assertions. Either existing ones that are being modified, or new ones:

Styles–assertions

People

From the people page of the team view, admin users can manage the team. For example, new users can be invited to join the team and/or existing users can be made admins or regular users.

Note that in terms of user roles, Apiary is quite straightforward. There are only two types of users:

  1. Regular: Non-admin users that have access to personal view and limited access to team view pages.
  1. Admin: Administrative users that have access to all full views. Only admin users have access to the people, style and billing pages of the team view:
Team view - people

Settings

From this page, some basic default settings can be specified by admin users. The Team Project Template property is worth highlighting as it allows to specify an API design to use as a template when creating a new project:

Team view–settings

Billing

The main purpose of this page is to allow admin users to manage the account billing information and the Apiary plan the team is subscribed to. From here it is possible to cancel the existing plan or upgrade to a new one.

Account settings

The account settings page can be accessed from any of the views and allows for personal account settings to be managed as well as linking the user account to a GitHub account. From here the user can also choose to leave a team:

Account settings
You have been reading a chapter from
Implementing Oracle API Platform Cloud Service
Published in: May 2018
Publisher:
ISBN-13: 9781788478656
Register for a free Packt account to unlock a world of extra content!
A free Packt account unlocks extra newsletters, articles, discounted offers, and much more. Start advancing your knowledge today.
Unlock this book and the full library FREE for 7 days
Get unlimited access to 7000+ expert-authored eBooks and videos courses covering every tech area you can think of
Renews at $19.99/month. Cancel anytime
Banner background image