Learning Tableau Desktop basics
You must learn the basics of Tableau before exploring the application. To complete the Tableau Desktop Specialist certification, fundamental knowledge of the correct terminology will provide a strong basis for further development. In future chapters, we will deep dive into each relevant component of the application in more detail.
Application basics (as of April 2022)
Here are the elementary items that will help you understand Tableau’s accessibility, pricing, release cadence, and what data it can support:
- A desktop application with a separate application for Windows and Mac.
- The desktop application includes a 2-week free trial but is $70 per month thereafter.
Pro tip
Download the Tableau Public application at https://public.tableau.com/app/discover. It will have all the features you will need to understand the concepts for the Tableau Desktop certification and is free.
- The user interface and supporting documentation are available in the following languages: English, French, German, Italian, Spanish, Brazilian Portuguese, Japanese, Korean, Traditional Chinese, and Simplified Chinese.
- The release cadence is quarterly but is backward compatible.
- Supports many data sources.
- Capable of handling millions of rows of data.
- Can support code and scripts, but is mostly utilized with drag-and-drop functionality with the ability to create maps, field hierarchies, dimensional groups and sets, calculations (from simple to very complex), and parameters. It can also utilize extensions that are not part of the out-of-the-box functionality.
To begin developing data visualizations, you need data. The next section will cover the basics of connecting to data.
Connecting to data
To use Tableau, a user needs to connect to data. The number of data sources you can connect to is ever-growing, with a multitude of connectors developed by companies in association with Tableau to ensure scalable connectivity. Here is a screenshot of the data connection page:
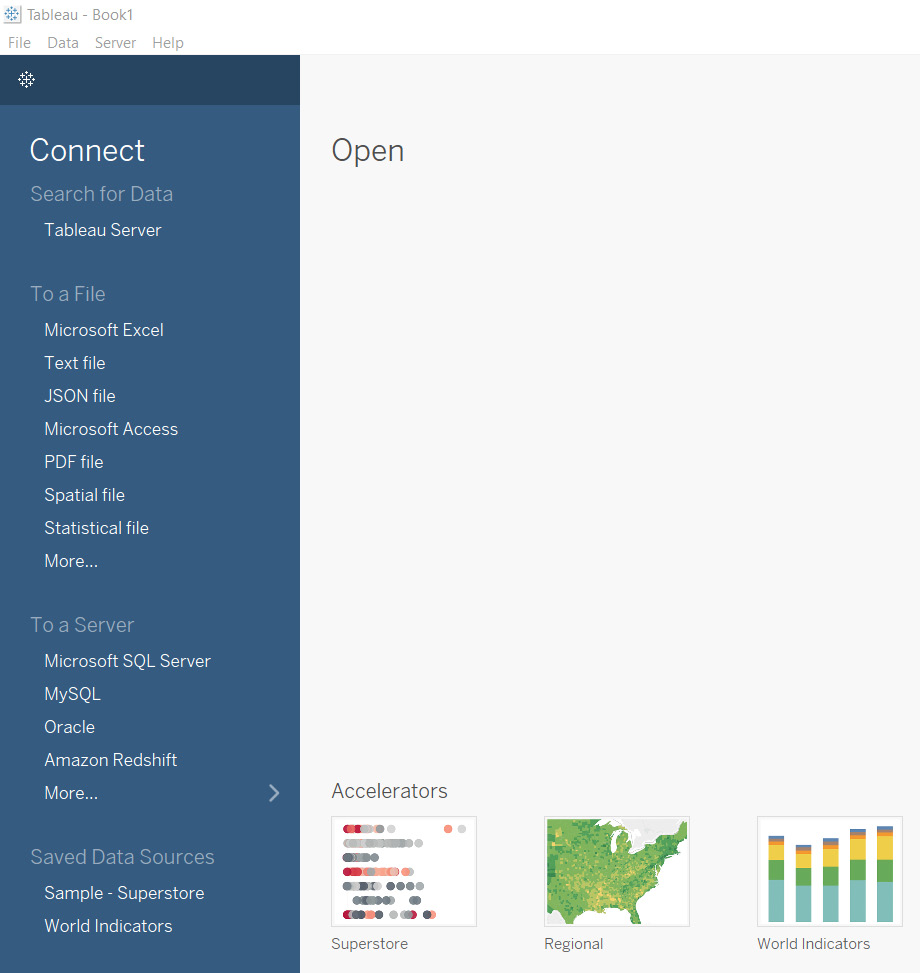
Figure 1.2 – Connect to Data from Tableau 2021.4
With Tableau, you can connect from the following services:
- Tableau Server (or Tableau Online): Tableau Server data sources are data sources published in the Tableau environment. They can be sourced from any supported file and server but hosted and formatted for usage in Tableau Server.
- A file: Tableau supports a significant section of files that may potentially be used, from CSV (referred to as a part of a text file) to PDFs to statistical and spatial files.
- A non-Tableau Server: So long as a user has credentials, many servers have dedicated connectors. Even if your server is not inherently supported through dedicated connectors, there are ad hoc JDBC and ODBC database connectivity options.
Unlike many other data visualization tools, Tableau supports an extensive and ever-growing list of data sources. In every release, it’s very likely to see even more supported and named connection options.
Worksheets
Worksheets are the next order of the application. Once connected to a data source, Tableau highlights Sheet 1 (default name) so that you can explore the data further. The following screenshot shows an example of this:
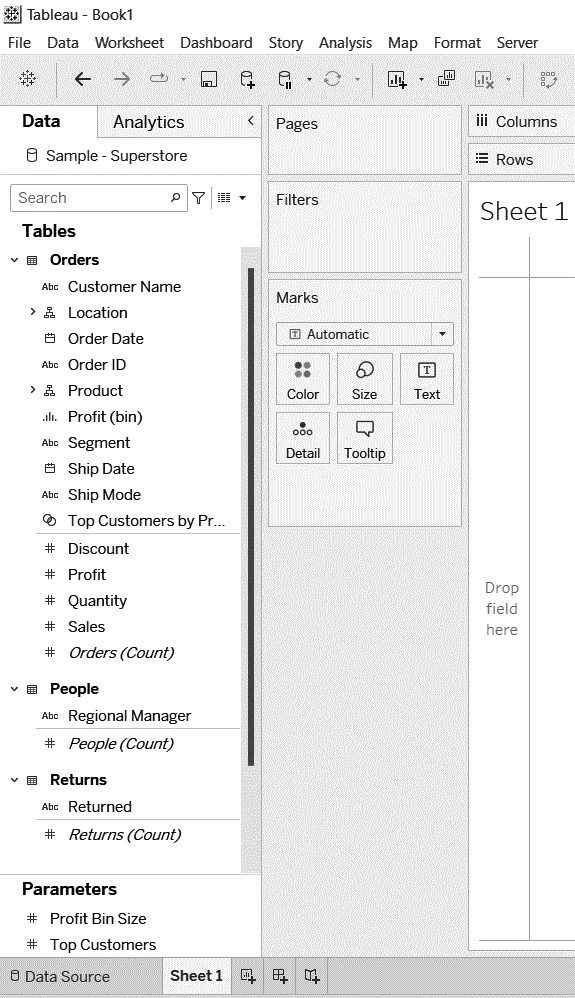
Figure 1.3 – Worksheet using Tableau’s default Sample – Superstore data
After connecting to a data source, the application will direct you to a sheet, as shown in the preceding screenshot. On the left, there will be a Data pane. This hosts your dimensional fields and measurement fields. To work with those fields, you can drag and drop them onto one of the following areas shown on the right-hand side of Figure 1.3:
- Columns: Stacks data dimensions from left to right in a visualization
- Rows: Displays data dimensions vertically in a visualization
- Marks: A section that adds context, dimensions, and context to the visualization
You have learned how to connect to data and the basics of its structure. I will begin sharing more about the visualization application in the next section.
Worksheets, dashboards, and stories
At the bottom of the application, some icons identify access to additional worksheets, dashboards, and stories. The following screenshot shows those icons:

Figure 1.4 – Worksheet, dashboard, and story icons (respectively)
Let’s learn more about the preceding screenshot. Tableau has a hierarchical structure for dashboard building, as follows:
- Worksheets are at the lowest level and the one item people will spend the most time using to create visualization elements (charts, tables, and so on)
- Dashboards can contain one or typically multiple worksheets so that you can create an interactive visualization
- Stories hold at least one dashboard
Selecting any of these icons will launch that function. Most end users will see a dashboard when they use the tool as stories are not utilized frequently unless they’re used for demonstration purposes (as there are more modern options, which will be covered later). Worksheets can be displayed on their own, but dashboards have more functionality and design applications.
Worksheet Data pane basics
The Data pane is the developer’s working section. Here, they can see the tables and fields associated with the data source and get a preview of what is available to work with. Figure 1.5 provides an example of how that looks:
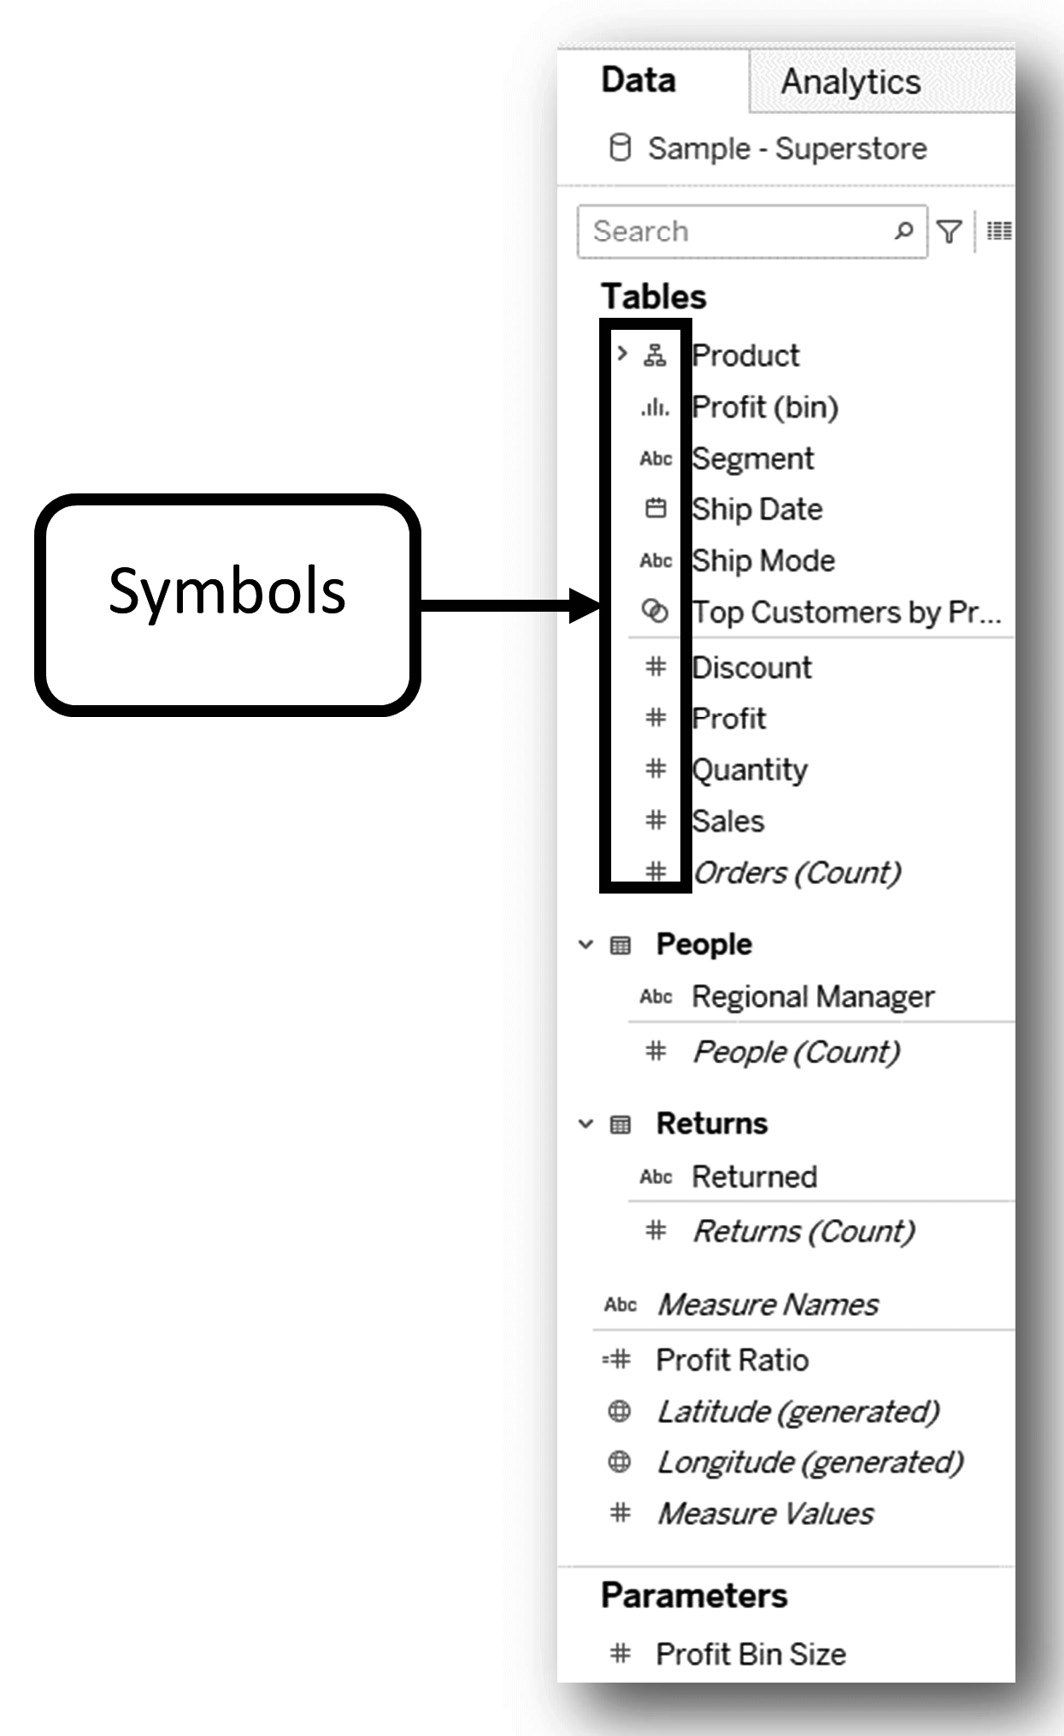
Figure 1.5 – Worksheet data pane
A lot is going on in Figure 1.5. The following list details some of the basics associated with it:
- Tableau displays a faint line between dimensions (or qualitative data) and measures (or quantitative data). This faint line is a visual indicator to help users determine what can be used as a dimension and what can be used as a measure as each has a very different purpose for data visualization. This can be seen in the People table between the Regional Manager and People (Count) fields.
- Tableau provides various symbols left of the field by table name to show whether it’s a string (abc, as seen in Segment), a number (#, as seen in Discount), geography (a globe, as seen in Latitude (generated)), a date (calendar, as seen in Ship Date), a hierarchy (hierarchy icon, as seen in Product), a bin (bar graph or bin symbol, as seen in Profit (bin)), or sets (overlapping circles, as seen in Top Customers…). These symbols are there to help users quickly scan data to see what they have to work with and how it can be utilized.
- Any field with an equals sign to the left of it (as seen in Profit Ratio) means it’s a calculation that’s been made in Tableau.
- Beneath the table fields, the available parameters are displayed. Although parameters can only be created in the same way as a calculated field can, they do not have equals signs in front of them like calculated fields.
Columns and rows
Beyond the Data pane, you can explore Columns and Rows. Adding measures to rows or columns creates a quantitative axis where a dimension to a row or column generates a header:
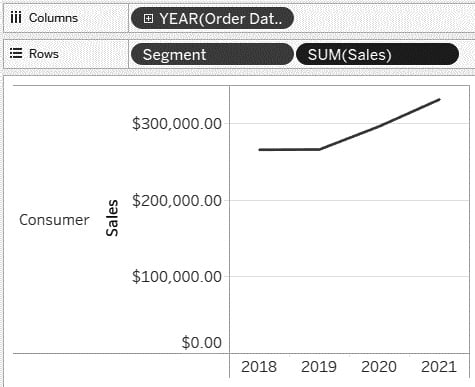
Figure 1.6 – Columns and Rows (Sample – Superstore)
With just a few drags and drops, you can create a useful chart. For example, as shown in the preceding screenshot, we can drag and drop Order Date to Columns (which displays as a discrete date – that is, Year), and then Segment (dimensional string) and Sales (a measure that defaults to Sum, resulting in a sum of sales) to Rows.
Marks
The Marks card is used to make updates to the default visualization. It is responsible for showing additional dimensionality and adding color and labels. It can be utilized to update charts, add colors, mark labels, add reference paths, shapes, use window calculations, enhance tooltips, and for sizing (all of which will be covered later), and additional options. The following is a visual representation of the Marks card:
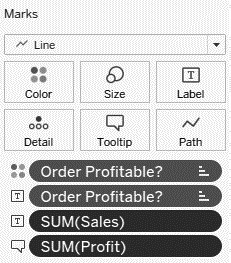
Figure 1.7 – Marks card
In Figure 1.8, I have the same structure in Columns and Rows as in Figure 1.6 but modified the chart using the adjustments I made in Figure 1.7 in the Marks section:
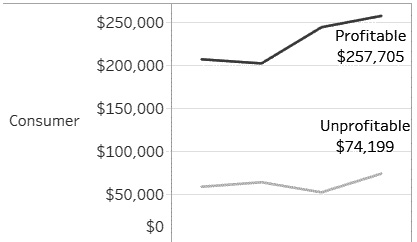
Figure 1.8 – Updated visual
In the chart in Figure 1.8, I wanted to see what sales came from profitable versus unprofitable orders. I colored by whether an item was profitable (top mark with the four dots). This coloring created a separate dimension for whether the order was profitable. In Figure 1.8, I can see that most of my sales came from Profitable orders in the Consumer segment. In the text of the line charts (Figure 1.8), I wanted to show which line represented what was profitable and the most recent sales (or what the sales for each were in 2021).
Note
Calculations will be demonstrated in future chapters, beginning with Chapter 5.
Filters
The following screenshot shows how a basic filter can impact what is displayed to a user:
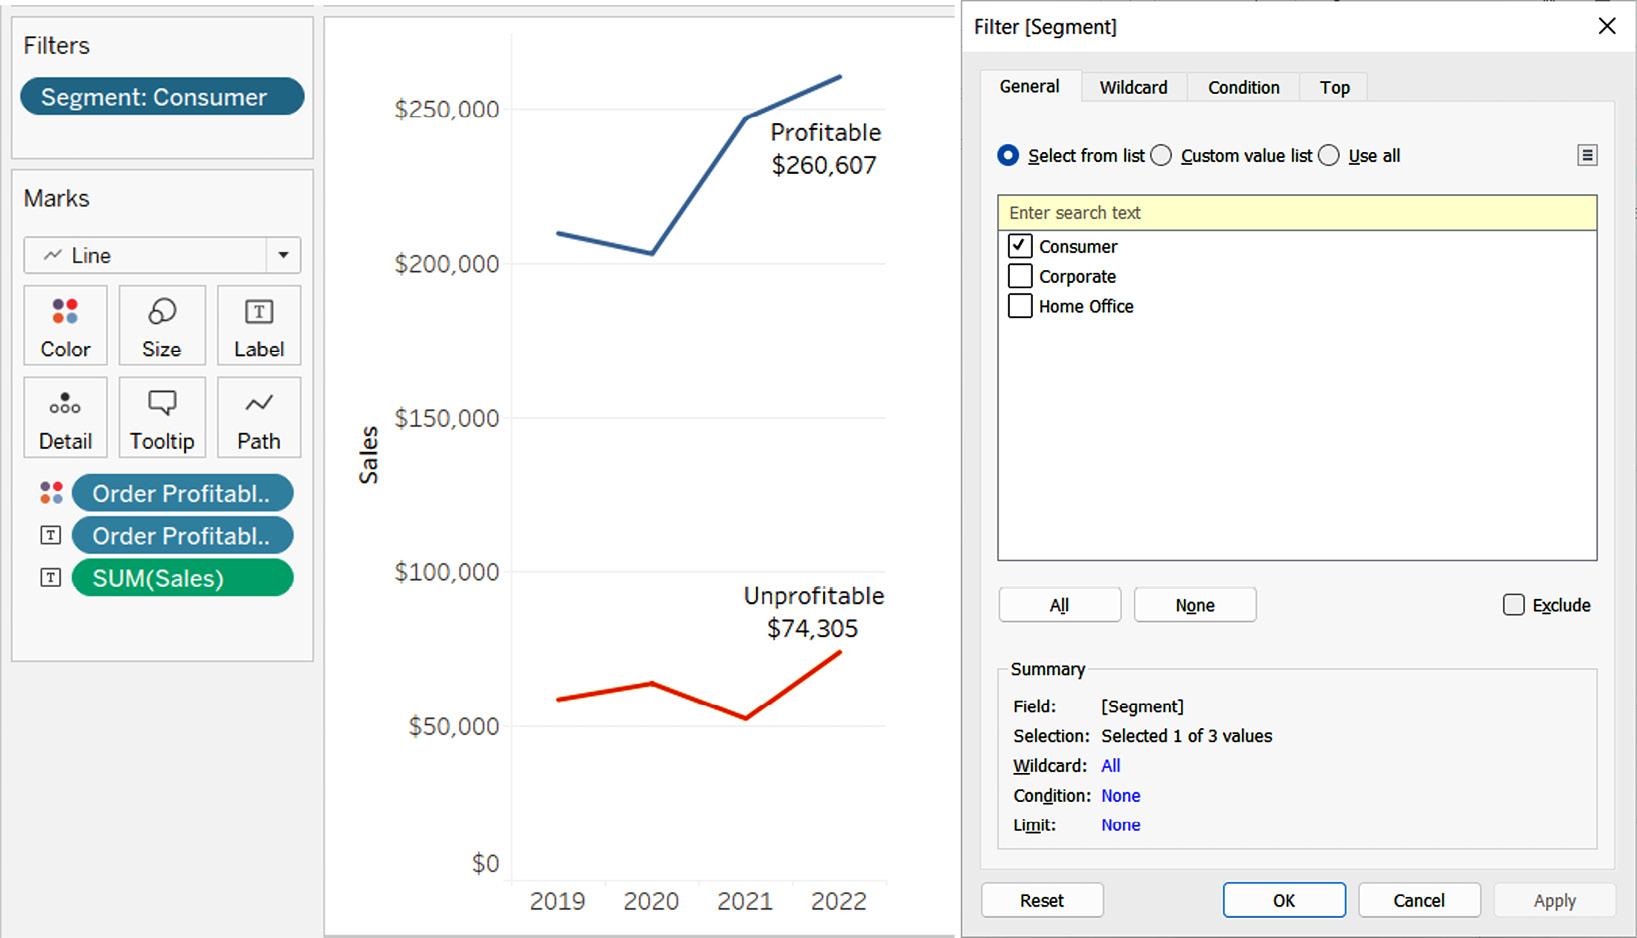
Figure 1.9 – Filter on Segment
Filters provide a developer or end user more flexibility to see what they need to see and ignore the rest. The preceding visualization only includes the Consumer segment. However, it is simple to show and/or hide a filter to determine whether you want end users to access the filters on a dashboard.
Quick measure adjustments
Tableau provides quick updates to measures. It’s vital to be able to display your data in the way that's intended. Figure 1.10 shows an example of this with additional information:
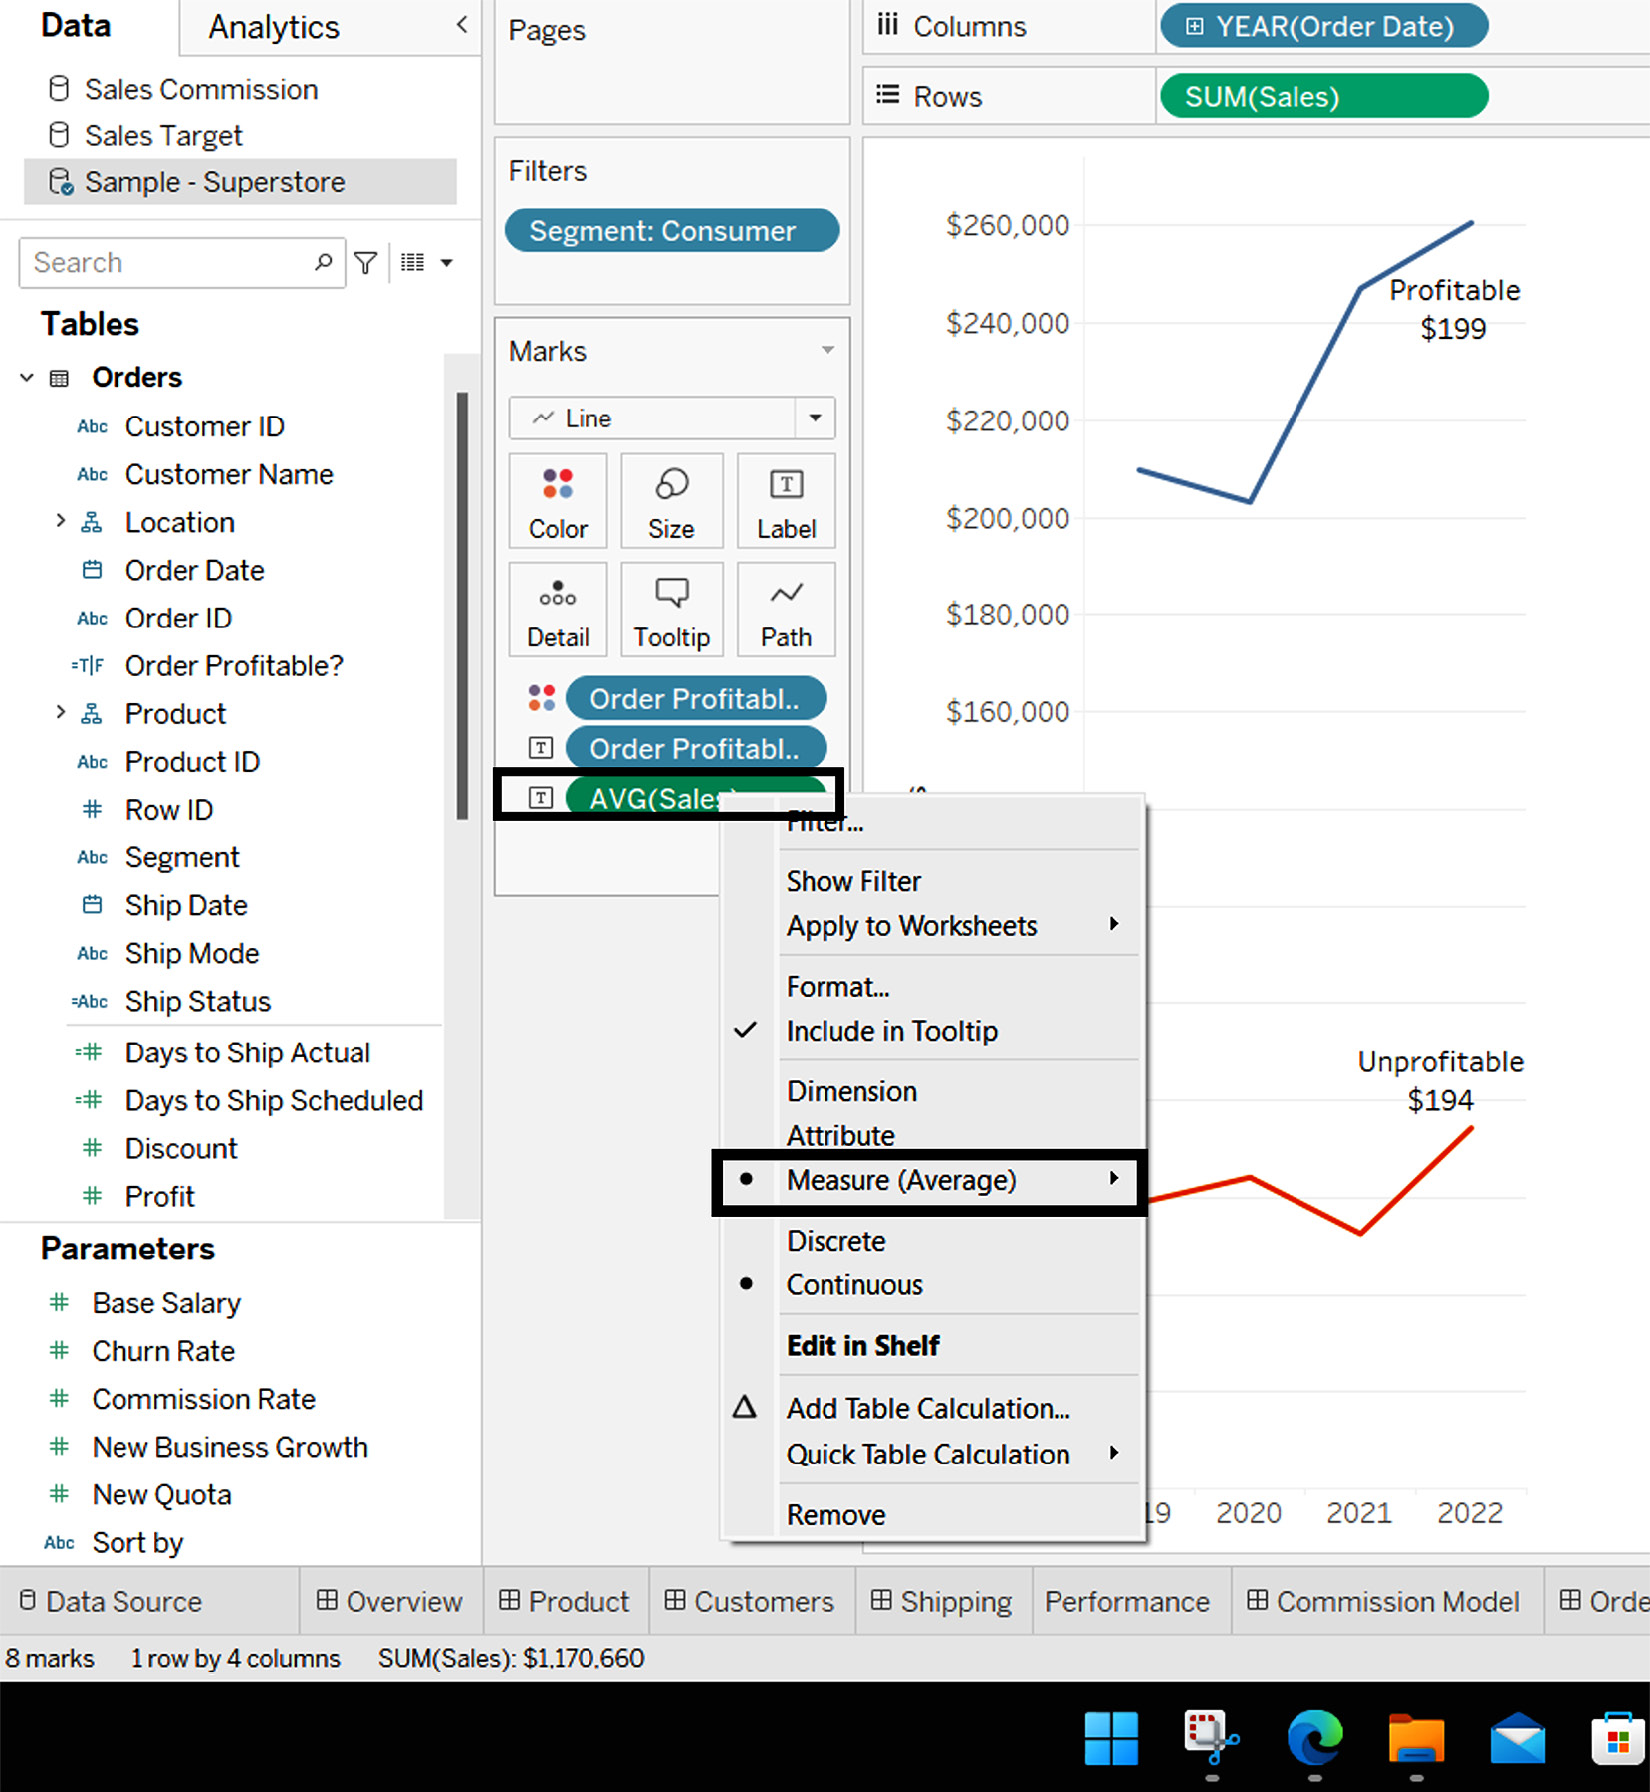
Figure 1.10 – Quick measure adjustment (Sales)
With a couple of clicks, a user can quickly adjust the chart’s measurements and the text of those measurements by adjusting the measure. In this instance, the end user did not want to see the total sales of what was profitable, but rather the average sales of orders profitable versus not profitable to determine any trends or whether they should consider a cut-off point. What they saw immediately is that there was very little difference when looking at average sales by year when considering profitable orders; in fact, the average sales of profitable orders declined rapidly over the past couple of years.
There are many more features and items to uncover with Tableau, but this gives you a brief introduction to some of the power of its very basic core functions.
With that, we have previewed a couple of the quick charts and adjustments we can make using columns, rows, marks, and filters.


