Decoupling components with DynamicComponent
Decoupling is a design principle that enhances the flexibility and maintainability of your applications. It comes down to reducing direct dependencies between various parts of your code. Blazor offers an elegant solution for rendering components dynamically. In this recipe, we’ll explore the strategic use of DynamicComponent. It allows you to render components dynamically at runtime based on certain conditions or parameters. You’re not required to specify the component type in the markup at compile time explicitly. Heads up – most compilation validators won’t apply here.
Let’s implement the fully decoupled and dynamic prompting of success and failure notifications when the user adds a ticket to the cart, based on that ticket’s availability.
Getting ready
Before you dive into implementing DynamicComponent, do the following:
- Create a
Recipe09directory – this will be your working directory - Copy the
OfferandGridcomponents from the Making components generic recipe or copy their implementation from theChapter01/Recipe08directory of this book’s GitHub repository - Copy the
Chapter01/Datadirectory, which contains theSamplesandTicketViewModelobjects required in this recipe, next to the working directory
How to do it...
Follow these steps to learn how to create more modular and independent components using DynamicComponent:
- Add a new
Alertsdirectory to your project. - Within the
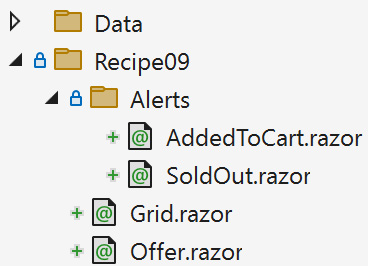
Alertsdirectory, create theAddedToCartandSoldOutcomponents:

Figure 1.9: Project structure with newly added alert components and sample objects
- Navigate to the
AddedToCartcomponent and add a successful alert markup:<div class="alert alert-success" role="alert"> Added to cart successfully. </div>
- Navigate to the
SoldOutcomponent. Declare aTariffparameter and add a danger alert markup by using theTariffvalue:<div class="alert alert-danger" role="alert"> Ticket @Tariff is sold out! </div> @code { [Parameter] public string Tariff { get; set; } } - Navigate to the
Offercomponent and, in the@codeblock, declare additionalAlertTypeandAlertParamsvariables:protected Type AlertType; protected Dictionary<string, object> AlertParams;
- Inside the
@codeblock ofOffer, replace theAdd()method’s implementation to validate ticket availability and display a designated notification:public void Add(TicketViewModel ticket) { AlertType = ticket.AvailableSeats == 0 ? typeof(Alerts.SoldOut) : typeof(Alerts.AddedToCart); AlertParams = new(); if (ticket.AvailableSeats == 0) { AlertParams.Add( nameof(ticket.Tariff), ticket.Tariff ); } } - In the
Offermarkup, below the existingGridinstance, add a conditional rendering ofDynamicComponentwhile leveraging the resolved values of theAlertTypeandAlertParamsvariables:@if (AlertType is null) return; <DynamicComponent Type="@AlertType" Parameters="@AlertParams" />
How it works...
In step 1, we added an Alerts directory where we could place different alert components. In step 2, we created the AddedToCart and SoldOut components, representing success and failure notifications when adding a ticket to the cart. In step 3, we focused on implementing the AddedToCart component, which renders an alert-success class with an Added to cart successfully message. In step 4, we implemented the SoldOut component, which renders an alert-danger class and renders the sold-out ticket tariff.
In step 5, we added two critical variables that DynamicComponent leverages. The first is AlertType, of the Type type, which determines the type of component to render. The second is AlertParams, a dictionary that allows us to dynamically pass parameter values to the loaded component. In step 6, we resolved the state of the requested ticket. We checked seat availability and decided whether to use the SoldOut or AddedToCart component. When seats are unavailable, we conditionally add the Tariff parameter to our dynamic collection of parameters. Finally, in step 7, we embedded the DynamicComponent component in the Offer markup. If the AlertType value is unset, we skip rendering it. Otherwise, we append the dynamically resolved markup.
Notice that we utilized the built-in typeof() and nameof() functions to declare the type and parameters of the current notification. If you want or need to take decoupling even further, you can initialize them purely from string variables. That’s especially powerful when you’re working in architecture such as micro-frontends.


