Google Colab
Google Colab Jupyter Notebook with Python is one of the popular options for developing AI and ML projects. All you need is a Gmail account.
Colab can be found at https://colab.research.google.com/. The free Colab version is sufficient for the code in this book; the Pro+ version enables more CPU and GPU RAM.
After logging in to Colab, you can retrieve this book’s Python Notebooks from the following GitHub URL: https://github.com/PacktPublishing/data-augmentation-with-python.
You can start using Colab by using one of the following options:
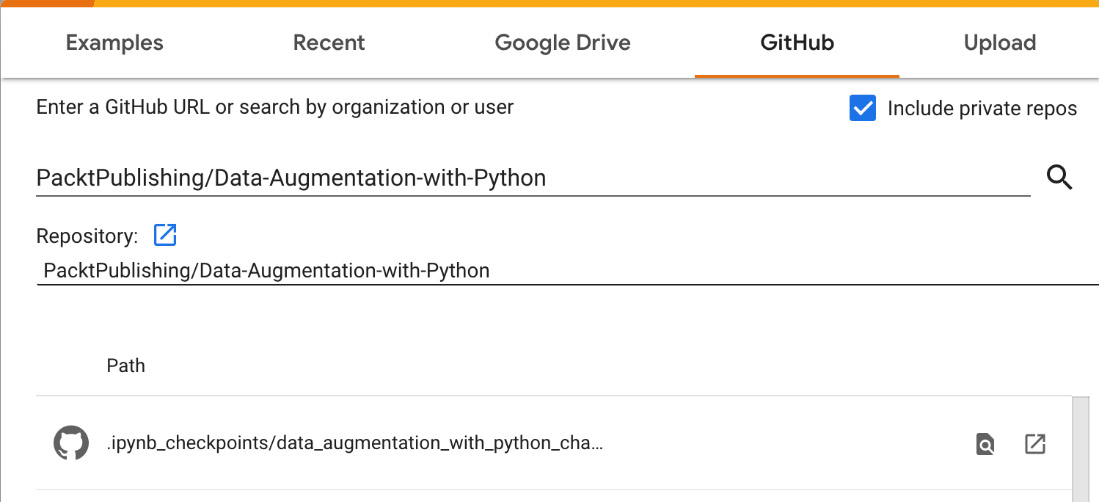
- The first method of opening a Python Notebook is copying it from GitHub. From Colab, go to the File menu, choose Open Notebook, and then click on the GitHub tab. In the Repository field, enter the GitHub URL specified previously; refer to Figure 1.2. Lastly, select the chapter and Python Notebook (
.ipynb) file:

Figure 1.2 – Loading a Python Notebook from GitHub
- The second method of opening a Python Notebook is auto-loading it from GitHub. Go to the GitHub link mentioned previously and click on the Python Notebook (
ipynb) file. Click the blue-colored Open in Colab button, as shown in Figure 1.3; it should be on the first line of the Python Notebook. It will launch Colab and load in the Python Notebook automatically:

Figure 1.3 – Loading a Python Notebook from Colab
- Ensure you save a copy of the Python Notebook to your local Google Drive by clicking on the File menu and selecting the Save a copy in Drive option. Afterward, close the original and use the copy version.
- The third method of opening a Python Notebook is by downloading a copy from GitHub. Upload the Python Notebook to Colab by clicking on the File menu, choosing Open Notebook, then clicking on the Upload tab, as shown in Figure 1.4:

Figure 1.4 – Loading a Python Notebook by uploading it to Colab
Fun fact
For a quick overview of Colab’s features, go to https://colab.research.google.com/notebooks/basic_features_overview.ipynb. For a tutorial on how to use a Python Notebook, go to https://colab.research.google.com/github/cs231n/cs231n.github.io/blob/master/jupyter-notebook-tutorial.ipynb.
Choosing Colab follows the same rationale as selecting an IDE: it is based mainly on your preferences. The following section describes additional Python Notebook options.
Additional Python Notebook options
Python notebooks are available in free and paid versions from many online companies, such as Microsoft, Amazon, Kaggle, Paperspace, and others. Using more than one vendor is typical because a Python Notebook behaves the same way across multiple vendors. However, it is similar to choosing an IDE – once selected, we tend to stay in the same environment.
You can use the following feature criteria to select a Python Notebook:
- Easy to set up. Can you load and run a Python Notebook in 15 minutes?
- A free version where you can run the Python Notebooks in this book.
- Free CPU and GPU.
- Free permanent storage for the Python Notebooks and versioning.
- Easy access to GitHub.
- Easy to upload and download the Python Notebooks to and from the local disk drive.
- Option to upgrade to a paid version for faster and additional RAM in terms of CPU and GPU.
The choice of Python Notebook is based on your needs, preferences, or familiarity. You don’t have to use Google Colab for the lessons in this book. This book’s Python Notebooks will run on, but are not limited to, the following vendors:
- Google Colab
- Kaggle Notebooks
- Deepnote
- Amazon SageMaker Studio Lab
- Paperspace Gradient
- DataCrunch
- Microsoft Notebooks in Visual Studio Code
The cloud-based options depend on having fast internet access at all times, so if internet access is a problem, you might want to install the Python Notebook locally on your laptop/computer. The installation process is straightforward.
Installing Python Notebook
Python Notebook can be installed on a local desktop or laptop for Windows, Mac, and Linux. The advantages of the online version are as follows:
- Fully customizable
- No limit on runtime – that is, no timeout on the Python Notebook during long training sessions
- No rules or arbitrary limitations
The disadvantage is that you have to set up and maintain the environment. For example, you must do the following:
- Install Python and Jupyter Notebook
- Install and configure the NVIDIA graphic card (optional for data augmentation)
- Maintain and update dozens of dependency Python libraries
- Upgrade the disk drive, CPU, and GPU RAM
Installing Python Notebook is easy, requiring just one console or terminal command, but first, check the Python version. Type the following command in the terminal or console application:
>python3 --version
You should have version 3.7.0 or later. If you don’t have Python 3 or have an older version, install Python from https://www.python.org/downloads/.
Install JupyterLab using pip, which contains Python Notebook. On a Windows, Mac, or Linux laptop, use the following command for all three OSs:
>pip install jupyterlab
If you don’t like pip, use conda:
>conda install -c conda-forge jupyterlab
Other than pip and conda, you can use mamba:
>mamba install -c conda-forge jupyterlab
Start JupyterLab or Python Notebook with the following command:
>jupyter lab
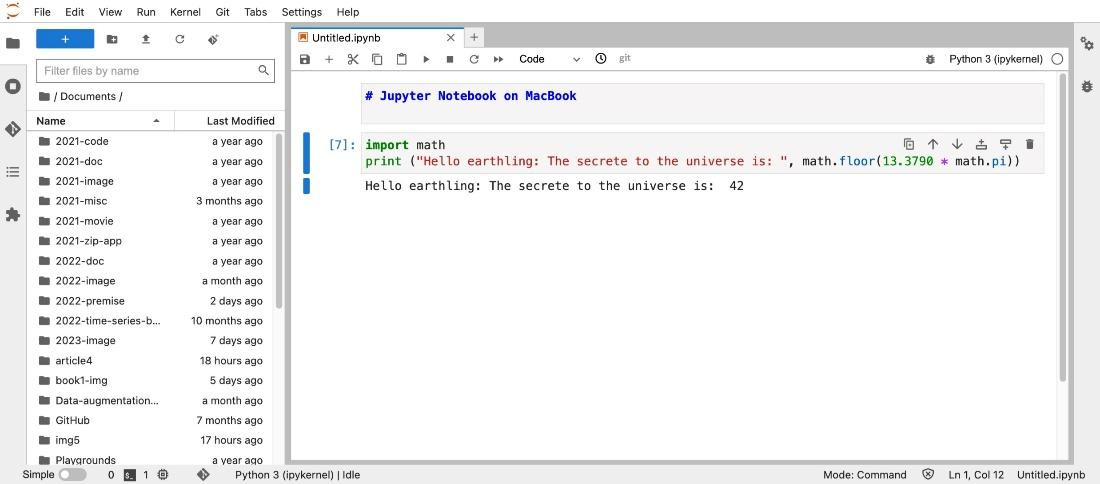
The result of installing Python Notebook on a Mac is as follows:

Figure 1.5 – Jupyter Notebook on a local MacBook
The next step is cloning this book’s Python Notebook from the respective GitHub link. You can use the GitHub desktop app, the GitHub command on the terminal command line, or the Python Notebook using the magic character exclamation point (!) and standard GitHub command, as follows:
url = 'https://github.com/PacktPublishing/Data-Augmentation-with-Python'
!git clone {url}
Regardless of whether you choose the cloud-based options, such as Google Colab or Kaggle, or work offline, the Python Notebook code will work the same. The following section will dive into the Python Notebook programming style and introduce you to Pluto.


