Exploring the building blocks of Compose UIs
We've only had a brief look at the Text and Button composables so far. That's why, in this section, we will not only understand how activities can render composables instead of XML and how we can preview them, but we will also have a better look at the most important and commonly used composable functions: from the ones we've seen, such as Text and Button, to new ones such as TextField, Image, Row, Column, and Box.
To summarize, this section will cover the following topics:
- Setting content and previewing composables
- Exploring core composables
- Customizing composables with modifiers
- Layouts in Compose
Let's jump in and understand how to render composable functions on the screen.
Setting content and previewing composables
We had a quick look at some composable functions, but we didn't quite touch on the aspect of making the application display Compose UIs.
Setting the composable content can easily be achieved and is encouraged to be done in your Activity class by simply replacing the traditional setContentView(R.layout.XML) call with setContent() and passing a composable function to it:
import androidx.activity.compose.setContent
class MainActivity : ComponentActivity() {
   override fun onCreate(savedInstanceState: Bundle?) {
       super.onCreate(savedInstanceState)
       setContent {
           Text("Hello world")
       }
   }
}
Because Compose no longer needs the AppCompat API for backward compatibility, we made our MainActivity inherit the base ComponentActivity class.
In the previous example, we called the setContent method in the onCreate callback of MainActivity and passed a Text composable function to it. If we run the app, we will see the "Hello world" message.
The setContent method is an extension function for ComponentActivity that composes the given composable into the given activity. It only accepts a @Composable function as a trailing lambda. The input composable function will become the root view of the activity and act as a container for your Compose hierarchy.
Note
You can add composable functions into fragments or activities that have an XML UI already defined with the help of the ComposeView class, but we will not go into too much detail as far as interoperability goes.
As XML provided us with a preview tool, a good question would be whether Compose also has one. Compose brings an even more powerful preview tool that allows us to skip running the application on the emulator or real devices every time we want to see how our UI evolves.
Previewing your composable is easy; just add the @Preview annotation to it:
@Preview(showBackground = true)
@Composable
fun FriendlyMessage() {
   Text(text = "Greetings!")
}
The IDE will automatically pick up that you want to preview this composable and show it on the right-hand side of the screen. Make sure that you rebuild your project and have the Split option enabled:
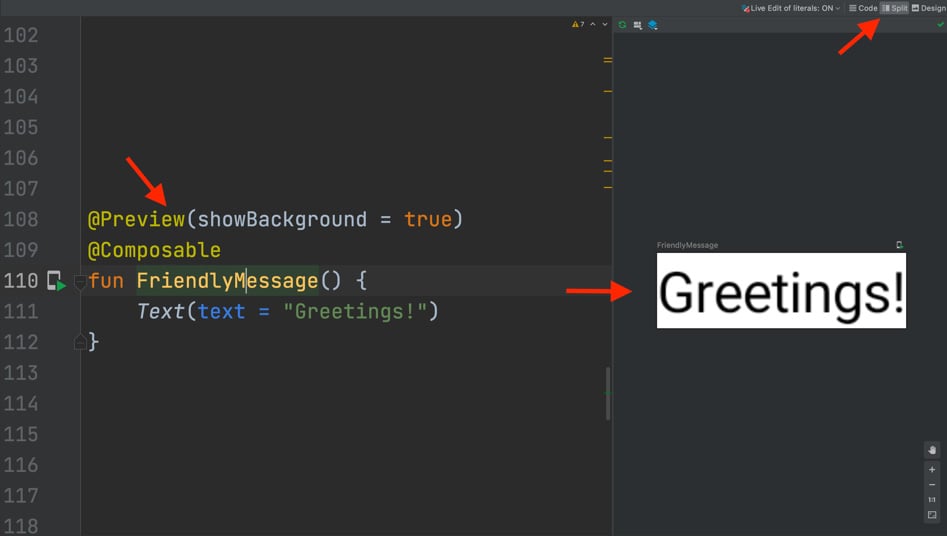
Figure 1.9 – Previewing composable functions in Android Studio
Optionally, you can specify for the preview to show a background for better visibility by passing the showBackground parameter with a value of true.
Note
Make sure that the composable function you are trying to preview has no input parameters. If it has, supply the default values for them so that the preview tools can work.
Yet this preview tool is much more powerful than this as it supports Interactive mode, which allows you to interact with the UI, and Live Edit of literals, which, if enabled, causes the preview to reload every time you change widths, heights, or others, just like a real UI would. You can see these two options in the following screenshot:
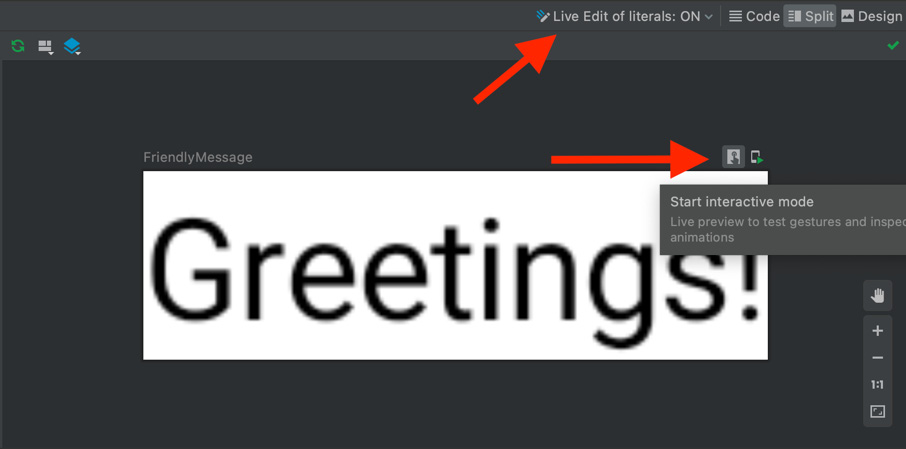
Figure 1.10 – Using the Preview feature in Compose
Note
To enable Interactive mode on Android Studio Arctic Fox, go to File | Settings | Experimental (Windows) or Android Studio | Preferences | Experimental (macOS).
Additionally, you can have multiple previews simultaneously if you annotate each function with the @Preview annotation. You can add names for each preview through the name parameter and even tell the preview tool which device it should display it on through the device argument:
@Preview(
    name = "Greeting preview",
    showSystemUi = true,
    device = Devices.PIXEL_2_XL
)
@Composable
fun FriendlyMessagePreview() { Text(text = "Greetings!") }
@Preview(
        showSystemUi = true,
        device = Devices.NEXUS_5)
@Composable
fun FriendlyMessagePreview2() { Text(text = "Goodbye!") }
Make sure that you also set showSystemUi to true to see the entire device.
Note
@Preview functions should have different names to avoid preview conflicts.
Now that we have learned how to set and preview Compose UI, it's time to explore new composables.
Exploring core composables
We've already had a quick look at some of the most basic composable functions: Text, Button, and Image. In this subsection, we will spend a bit more time exploring not only those composables but also new ones such as TextField.
Text
Text is the Compose version of our old and beloved TextView. Text is provided by Compose and achieves the most basic and yet important functionality in any application: the ability to display a piece of text. We've already used this composable in several examples:
Text(text = "Greetings $name!")
You might be wondering how we can customize it. Let's check out the source code or the documentation for Text to find the most basic and commonly used arguments for it:
textis the only required argument. It expects aStringand sets the output text.colorspecifies the color of the output text and expects aColorobject.fontSizeof typeTextUnit,fontStyleof typeFontStyle,fontFamilyof typeFontFamily, andfontWeightof typeFontWeightall allow you to customize the look and appearance of your text.textAlignspecifies the horizontal alignment of the text. It expects aTextAlignobject.maxLinesexpects anIntvalue that sets the maximum number of lines in the output text.styleexpects aTextStyleobject and allows you to define and reuse styles through themes.
Instead of going through all the arguments for Text, let's check out an example where we can customize the look of our Text composable function:
@Composable
fun MyAppText() {
   Text(
       text = stringResource(id = R.string.app_name),
       fontStyle = FontStyle.Italic,
       textAlign = TextAlign.Center,
       color = Color.Magenta,
       fontSize = 24.sp,
       fontWeight = FontWeight.ExtraBold)
}
Instead of passing some hardcoded text, we passed a string resource with the help of the built-in stringResource function and obtained the following result:

Figure 1.11 – Exploring a customized Text composable
Now that we've learned how to display text with the Text composable, let's move on to buttons.
Button
Displaying text is essential in any application, yet having clickable buttons allows it to be interactive. We've used the Button composable (previously known in the View System as Button too) before and its main characteristic was the onClick callback function, which notified us when the user pressed the button.
While Button features plenty of customizing arguments, let's check out the most used parameters:
onClickis a mandatory parameter and it expects a function that will be called whenever the user presses the button.colorsexpects aButtonColorsobject that defines the content/background colors.shapeexpects a custom/Material themeShapeobject that sets the shape of the button.contentis a mandatory parameter that expects a composable function that displays the content inside thisButton. We can add any composables here, includingText,Image, and more.
Let's try to build a Button function that makes use of these core arguments:
@Composable
fun ClickableButton() {
   Button(
       onClick = { /* callback */ },
       colors = ButtonDefaults.buttonColors(
           backgroundColor = Color.Blue,
           contentColor = Color.Red),
       shape = MaterialTheme.shapes.medium
   ) { Text("Press me") }
}
We've also passed a predefined MaterialTheme shape. Let's preview the resulting composable:

Figure 1.12 – Exploring a customized Button composable
With that, we've seen how easy it is to create a custom button with the Button composable. Next up, let's try to play around with another composable function – TextField.
TextField
Adding buttons is the first step toward having an interactive UI, but the most important element in this area is the TextField composable, previously known in the View System as EditText. Just like EditText did, the TextField composable allows the user to enter and modify text.
While TextField has many arguments, the most important ones that it features are as follows:
valueis a mandatoryStringargument as it's the displayed text. This value should change as we type inside it by holding it in aStateobject; more on that soon.onValueChangeis a mandatory function that triggers every time the user inputs new characters or deletes existing ones.labelexpects a composable function that allows us to add a descriptive label.
Let's have a look at a simple usage of a TextField that also handles its own state:
@Composable
fun NameInput() {
   val textState = remember { mutableStateOf("") }
   TextField(
        value = textState.value,
        onValueChange = { newValue ->
            textState.value = newValue
        },
        label = { Text("Your name") })
}
It achieves this by defining a MutableState that holds the text displayed by TextField. This means that textState doesn't change across recompositions, so every time the UI updates because of other composables, textState should be retained. Moreover, we've wrapped the MutableState object in a remember block, which tells Compose that across recompositions, it should not revert the value to its initial value; that is, "".
To get or set the value of a State or MutableState object, our NameInput composable uses the value accessor. Because TextField accesses a MutableState object through the value accessor, Compose knows to retrigger a recomposition every time the textState value changes – in our case, in the onValueChange callback. By doing so, we ensure that as we input text in our TextField, the UI also updates with the new characters that have been added or removed from the keyboard.
Don't worry if these concepts about state in Compose don't make too much sense right now – we will cover how state is defined in Compose in more detail in Chapter 2, Handling UI State with Jetpack ViewModel.
Note:
Unlike EditText, TextField has no internal state. That's why we've created and handled it; otherwise, as we would type in, the UI would not update accordingly.
The resulting NameInput composable updates the UI correctly and looks like this:

Figure 1.13 – Exploring a TextField composable
Now that we've learned how to add input fields within a Compose-based app, it's time to explore one of the most common elements in any UI.
Image
Displaying graphical information in our application is essential and Compose provides us with a handy composable called Image, which is the composable version of the ImageView from the View System.
While Image features plenty of customizing arguments, let's check out the most used parameters:
painterexpects aPainterobject. This argument is mandatory as it sets the image resource. Alternatively, you can use the overloaded version ofImageto directly pass anImageBitmapobject to itsbitmapparameter.contentDescriptionis a mandatoryStringthat's used by accessibility services.contentScaleexpects aContentScaleobject that specifies the scaling of the picture.
Let's add an Image composable that displays the application icon using painterResource:
@Composable
fun BeautifulImage() {
    Image(
        painter =
           painterResource(R.drawable.ic_launcher_foreground),
        contentDescription = "My app icon",
        contentScale = ContentScale.Fit
    )
}
Finally, let's preview the BeautifulImage function and then move on to the next section:

Figure 1.14 – Exploring the Image composable
We've also tried displaying images with Compose, yet you may still be wondering, how can we customize all these composable functions?
Customizing composables with modifiers
All the composables we've covered so far feature an argument that we haven't covered yet: modifier. This expects a Modifier object. In simple terms, modifiers tell a composable how to display, arrange, or behave within its parent composable. By passing a modifier, we can specify many configurations for a composable: from size, padding, or shape to background color or border.
Let's start with an example by using a Box composable and specifying a size modifier for it:
@Composable
fun ColoredBox() {
   Box(modifier = Modifier.size(120.dp))
}
We will cover the Box composable later but until then, you can think of it like a container that we will use to draw several shapes on the screen. What's important here is that we passed the Modifier.size() modifier, which sets the size of the box. It accepts a dp value that represents both the width and the height of the composable. You can also pass the width and height as parameters within the size() modifier or separately with the help of the height() and width() modifiers.
Specifying only one modifier for composables is usually not enough. That's why modifiers can be chained. Let's chain multiple modifiers by adding several other configurations to our Box:
@Composable
fun ColoredBox() {
   Box(modifier = Modifier
           .size(120.dp)
           .background(Color.Green)
           .padding(16.dp)
           .clip(RoundedCornerShape(size = 20.dp))
           .background(Color.Red))
}
As we mentioned previously, chaining modifiers is simple: start with an empty Modifier object and then chain new modifiers one after the other. We've chained several new modifiers, starting with background, then padding, clip, and finally another background. The modifiers, when combined, produce an output consisting of a green rectangle that contains a nested rounded corner rectangle that's red:
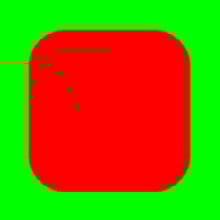
Figure 1.15 – Exploring chained modifiers
Note
The order of the modifiers in the chain matters because modifiers are applied from the outer layer to the inner layer. Each modifier modifies the composable and then prepares it for the upcoming modifier in the chain. Different modifier orders yield different results.
In the previous example, because modifiers are applied from the outermost layer to the innermost layer, the entire rectangular box is green because green is the first color modifier that's applied. Going inner, we applied a padding of 16 dp. Afterward, still going inner, the RoundedCornerShape modifier is applied. Finally, in the innermost layer, we applied another color modifier – this time, of the color red – and we got our final result.
Now that we've played around with the most common composables, it's time to start building actual layouts that make use of multiple composable functions.
Layouts in Compose
Often, building even a simple screen cannot be achieved by following the previous examples since most of them feature only one composable. For simple use cases, composable functions contain only one composable child.
To build more complex pieces of UI, layout components in Compose give you the option to add as many children composables as you need.
In this section, we will cover those composable functions that allow you to place children composables in a linear or overlayed fashion, such as the following:
Rowfor arranging children composables in a horizontal fashionColumnfor arranging children composables verticallyBoxfor arranging children composables on top of each other
Following these definitions, let's envision the layout composables with the following diagram:
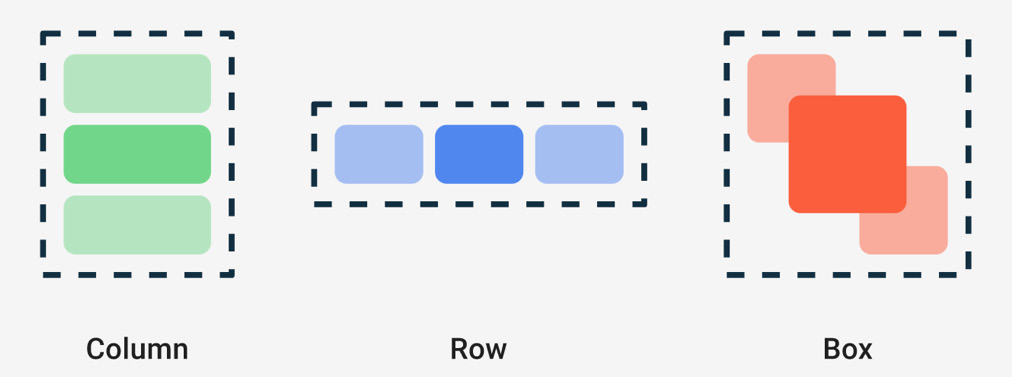
Figure 1.16 – Exploring Column, Row, and Box
It's clear now that arranging children composables in different ways can easily be achieved with Column, Row, and Box, so it's time to look at them in more detail.
Row
Displaying multiple widgets on the screen is achieved by using a Row composable that arranges its children composables horizontally, just like the old LinearLayout with horizontal orientation did:
@Composable
fun HorizontalNumbersList() {
   Row(
       horizontalArrangement = Arrangement.Start,
       verticalAlignment = Alignment.CenterVertically,
       modifier = Modifier.fillMaxWidth()
   ) {
       Text("1", fontSize = 36.sp)
       Text("2", fontSize = 36.sp)
       Text("3", fontSize = 36.sp)
       Text("4", fontSize = 36.sp)
   }
}
We've set Row to only take the available width and added several Text functions as children composables. We specified a horizontalArrangement of Start so that they start from the left of the parent but also made sure that they are centered vertically by passing a CenterVertically alignment for the verticalAlignment argument. The result is straightforward:

Figure 1.17 – Exploring the Row composable
Largely, the essential arguments for a Row composable are related to how children are arranged or aligned:
horizontalArrangementdefines how the children are positioned horizontally both relative to each other and within the parentRow. Apart fromArragement.Start, you can also passCenterorEndorSpaceBetween,SpaceEvenly, orSpaceAround.verticalAlignmentsets how the children are positioned vertically within the parentRow. Apart fromAlignment.CenterVertically, you can passToporBottom.
Now that we've arranged the children composables horizontally, let's try to arrange them vertically.
Column
Displaying a vertical list on the screen can be achieved by using a Column composable that arranges its children composables vertically, just like the old LinearLayout with vertical orientation did:
@Composable
fun NamesVerticalList() {
   Column(verticalArrangement = Arrangement.SpaceEvenly,
       horizontalAlignment = Alignment.CenterHorizontally,
       modifier = Modifier.fillMaxSize()
   ) {
       Text("John", fontSize = 36.sp)
       Text("Amanda", fontSize = 36.sp)
       Text("Mike", fontSize = 36.sp)
       Text("Alma", fontSize = 36.sp)
   }
}
We've set Column to take all the available space and added several Text functions as children composables. This time, we specified a verticalArrangement of SpaceEvenly so that children are spread out equally within the parent, but we also made sure they are centered horizontally by passing a CenterHorizontally alignment as horizontalAlignment:
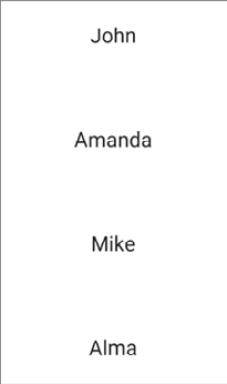
Figure 1.18 – Exploring the Column composable
Similar to Row, the essential arguments for a Column are also related to how children are arranged or aligned. This time, though, the arrangement is vertical instead of horizontal, and the alignment is horizontal instead of vertical:
verticalArrangementdefines how the children are vertically positioned within the parentColumn. The values are the same as the row'shorizontalArrangement.horizontalAlignmentdefines how the children are aligned within the parentColumn. Apart fromAlignment.CenterHorizontally, you can passStartorEnd.Note
If you're feeling brave, this is a great time for you to explore different alignments and arrangements and see how the UI changes. Make sure that you preview your composable functions with the
@Previewannotation.
Box
So far, we've learned how to arrange children horizontally and vertically, but what if we want to place them on top of each other? The Box composable comes to our rescue as it allows us to stack children composables. Box also allows us to position the children relatively to it.
Let's try to build our own Floating Action Button (FAB) with the help of Box. We will stack two composables inside Box:
- One green circle, which will be created with the help of
Surface. TheSurfacecomposable allows you to easily define a material surface with a certain shape, background, or elevation. - One plus sign (
+) added as text inside theTextcomposable, which is aligned in the center of its parentBox.
This is what the code will look like:
@Composable
fun MyFloatingActionButton() {
   Box {
       Surface(
           modifier = Modifier.size(32.dp),
           color = Color.Green,
           shape = CircleShape,
           content = { })
       Text(text = "+",
            modifier = Modifier.align(Alignment.Center))
   }
}
The Surface composable is defined with a mandatory content parameter that accepts another composable as its inner content. We don't want to add a composable inside of it. Instead, we want to stack a Text composable on top of it, so we passed an empty function to the content parameter.
The result is similar to the FAB we are all used to:
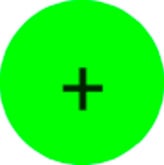
Figure 1.19 – Exploring the Box composable
To take advantage of Box, you must keep the following in mind:
- The order in which composables are added within
Boxdefines the order in which they are painted and stacked on top of each other. If you switch the order ofSurfaceandText, the+icon will be painted beneath the green circle making it invisible. - You can align the children composables relative to the
Boxparent by passing different values for each of the child's alignment modifiers. That's why, apart fromAlignment.Center, you can also position children composables withCenterStart,CenterEnd,TopStart,TopCenter,TopEnd,BottomStart,BottomEnd, orBottomCenter.
Now that we covered the basics, it's time to roll up our sleeves and create our first Compose project!


