Search icon CANCEL
Subscription
0
Cart icon
Your Cart (0 item)
Close icon
You have no products in your basket yet
Arrow left icon
Explore Products
Best Sellers
New Releases
Books
Videos
Audiobooks
Learning Hub
Free Learning
Arrow right icon
Arrow up icon
GO TO TOP
Mastering QuickBooks 2025

You're reading from   Mastering QuickBooks 2025 Bookkeeping for small businesses with US QuickBooks Online

Arrow left icon
Product type Paperback
Published in Dec 2024
Publisher Packt
ISBN-13 9781836649977
Length
Edition 6th Edition
Arrow right icon
Toc

Table of Contents (20) Chapters Close

Preface 1. Part 1: Setting Up Your Company File
2. Getting Started with QuickBooks Online FREE CHAPTER 3. Company File Setup 4. Customizing QuickBooks for Your Business 5. Managing Customer, Vendor, and Products and Services Lists 6. Part 2: Recording Transactions in QuickBooks Online
7. Managing Sales Tax 8. Recording Sales Transactions in QuickBooks Online 9. Recording Expenses in QuickBooks Online 10. Part 3: Managing Employees and Contractors
11. Managing Employees and 1099 Contractors in QuickBooks Online 12. Part 4: Closing the Books and Handling Special Transactions
13. Closing the Books in QuickBooks Online 14. Handling Special Transactions in QuickBooks Online 15. Part 5: Integrating E-Commerce Platforms and Advanced Inventory Management
16. Integrating E-Commerce Platforms with QuickBooks Online 17. Advanced Inventory Management 18. Part 6: Online Bonus Content
19. Index

Writing checks

So far, we have discussed how to pay expenses by entering them as bills and paying them at a later date, and how to set up recurring expenses. A third way in which you can record expenses for your business is by writing checks. The benefit of writing checks directly in QuickBooks is that you don’t have to waste time manually writing a check.

Instead, you can create checks and print them directly from QuickBooks. This is ideal for vendors that typically don’t accept debit or credit card payments.

Follow these steps to write checks in QBO:

  1. Click on the + New button and select Check in the Vendors column, as indicated below:

Figure 7.21: Navigating to Check

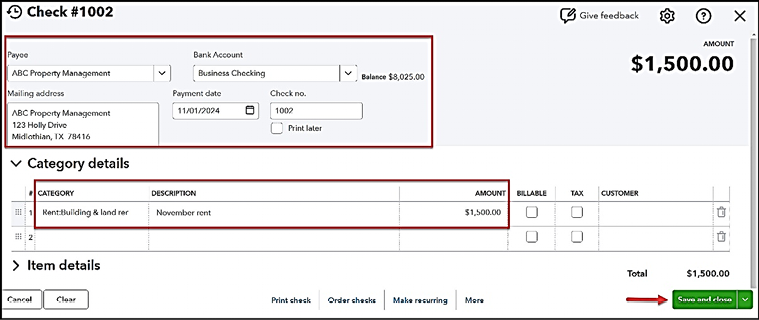
  1. The following screenshot shows the fields of information to be completed in the Check form:
A screenshot of a computer

Figure 7.22: Completing the Check form

  1. The following is a brief description of the information in the Check form:
    • Payee: From the drop...
lock icon The rest of the chapter is locked
Register for a free Packt account to unlock a world of extra content!
A free Packt account unlocks extra newsletters, articles, discounted offers, and much more. Start advancing your knowledge today.
Unlock this book and the full library FREE for 7 days
Get unlimited access to 7000+ expert-authored eBooks and videos courses covering every tech area you can think of
Renews at $19.99/month. Cancel anytime
Banner background image