Search icon CANCEL
Subscription
0
Cart icon
Your Cart (0 item)
Close icon
You have no products in your basket yet
Arrow left icon
Explore Products
Best Sellers
New Releases
Books
Videos
Audiobooks
Learning Hub
Free Learning
Arrow right icon
Arrow up icon
GO TO TOP
3D Character Rigging in Blender

You're reading from   3D Character Rigging in Blender Bring your characters to life through rigging and make them animation-ready

Arrow left icon
Product type Paperback
Published in Apr 2024
Publisher Packt
ISBN-13 9781803238807
Length 164 pages
Edition 1st Edition
Tools
Concepts
Arrow right icon
Author (1):
Arrow left icon
Jaime Kelly Jaime Kelly
Author Profile Icon Jaime Kelly
Jaime Kelly
Arrow right icon
View More author details
Toc

Table of Contents (14) Chapters Close

Preface 1. Part 1: An Introduction FREE CHAPTER
2. Chapter 1: Introduction to Rigs and Terminologies 3. Chapter 2: Starting with Bones 4. Part 2: Rigging
5. Chapter 3: Using Weighting Tools to Give Life to a Mesh 6. Chapter 4: Beginning the Rigging Process 7. Chapter 5: Getting Started with Weight Painting 8. Part 3: Advanced Techniques
9. Chapter 6: Using IK and Rig Controls 10. Chapter 7: Getting Started with Shape Keys 11. Chapter 8: Beyond the Basics 12. Index 13. Other Books You May Enjoy

Adding the IK constraint

In this first IK setup, we will cover the configuration of a very basic single IK constraint on the hands. A constraint is just a function in Blender that limits/modifies how an element might behave. In our case, we will be working with bone constraints.

Head into Pose Mode with our armature selected, select either of the hands and head on over to the Bone constraints tab, pictured in Figure 6.5. Then, add an Inverse Kinematics bone constraint.
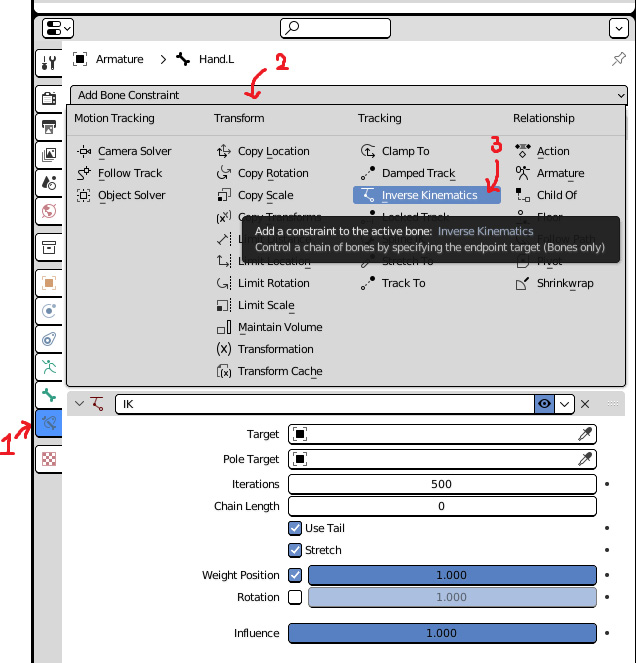
Figure 6.5 – IK constraint added

Figure 6.5 – IK constraint added

The steps to add the constraint are shown in Figure 6.5, but the navigation should be somewhat familiar by now. With this IK constraint added you will see plenty of boxes for us to fill. We will cover each box in descending order, starting with the Target field.

Target:

  1. Click the box next to Target and select the armature. There should only be one armature in the scene.
  2. A new box appears directly below asking for a bone. Click this...
lock icon The rest of the chapter is locked
Register for a free Packt account to unlock a world of extra content!
A free Packt account unlocks extra newsletters, articles, discounted offers, and much more. Start advancing your knowledge today.
Unlock this book and the full library FREE for 7 days
Get unlimited access to 7000+ expert-authored eBooks and videos courses covering every tech area you can think of
Renews at $19.99/month. Cancel anytime
Banner background image