Search icon CANCEL
Subscription
0
Cart icon
Your Cart (0 item)
Close icon
You have no products in your basket yet
Arrow left icon
Explore Products
Best Sellers
New Releases
Books
Videos
Audiobooks
Learning Hub
Free Learning
Arrow right icon
Arrow up icon
GO TO TOP
Game Development with Rust and WebAssembly

You're reading from   Game Development with Rust and WebAssembly Learn how to run Rust on the web while building a game

Arrow left icon
Product type Paperback
Published in Apr 2022
Publisher Packt
ISBN-13 9781801070973
Length 476 pages
Edition 1st Edition
Languages
Arrow right icon
Author (1):
Arrow left icon
Eric Smith Eric Smith
Author Profile Icon Eric Smith
Eric Smith
Arrow right icon
View More author details
Toc

Table of Contents (16) Chapters Close

Preface 1. Part 1: Getting Started with Rust, WebAssembly, and Game Development
2. Chapter 1: Hello WebAssembly FREE CHAPTER 3. Chapter 2: Drawing Sprites 4. Part 2: Writing Your Endless Runner
5. Chapter 3: Creating a Game Loop 6. Chapter 4: Managing Animations with State Machines 7. Chapter 5: Collision Detection 8. Chapter 6: Creating an Endless Runner 9. Chapter 7: Sound Effects and Music 10. Chapter 8: Adding a UI 11. Part 3: Testing and Advanced Tricks
12. Chapter 9: Testing, Debugging, and Performance 13. Chapter 10: Continuous Deployment 14. Chapter 11: Further Resources and What's Next? 15. Other Books You May Enjoy

Sprite sheets

Creating a game where every sprite is its own individual file is certainly possible, but it would mean making the player wait for every file to load individually when the game started. One common way to organize sprites for a game is a sprite sheet, which is made up of two parts. The first is an image file with many sprites in it, like this one:

Figure 2.4 – The top of the sprite sheet

Figure 2.4 – The top of the sprite sheet

The second part is a map of coordinates and metadata that lets us "cut out" each image we need, like a cookie cutter. For instance, if we want to show the first sprite in the preceding figure (which happens to be named Dead (7).png), we'll need to know its location and dimensions:
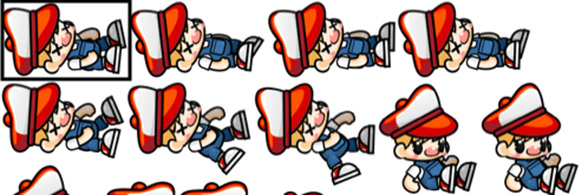
Figure 2.5 – One sprite in the sheet

Figure 2.5 – One sprite in the sheet

I've drawn a box marking the frame you'd want to "cut out" of the image when you want to draw Dead (7).png. When you want to draw a different file, say Slide (1).png...

lock icon The rest of the chapter is locked
Register for a free Packt account to unlock a world of extra content!
A free Packt account unlocks extra newsletters, articles, discounted offers, and much more. Start advancing your knowledge today.
Unlock this book and the full library FREE for 7 days
Get unlimited access to 7000+ expert-authored eBooks and videos courses covering every tech area you can think of
Renews at $19.99/month. Cancel anytime
Banner background image