In this section, we will look at how easy and effortless it is to execute a simple Lambda function using both the AWS Management Console, as well as the AWS CLI, and in the process learn a few necessary components and configurable items along the way.
Getting started with AWS Lambda
Using the AWS Management Console
The AWS Management Console is by far the simplest way to getting started with AWS Lambda. Now I'm going to assume that you already have a valid AWS account and some basic hands-on knowledge with the core AWS services and products such as EC2, IAM, S3, and so on. If not, then you can always create a new account with AWS and leverage the awesome one-year Free Tier scheme as well.
The following are the steps to create a new Lambda function:
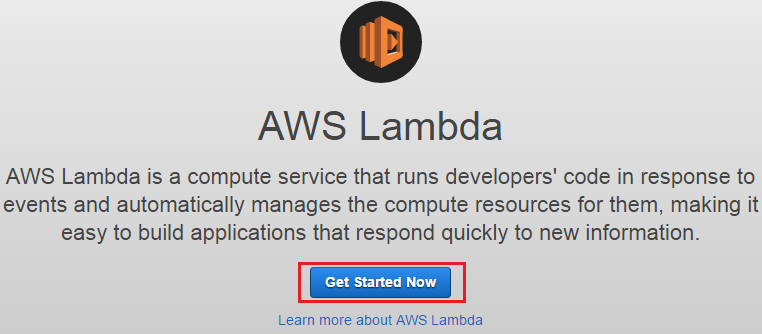
- Log in to your AWS Management Console using your IAM credentials and from the AWS Services filter, type in Lambda to get started. You should see the AWS Lambda dashboard, as shown in the following screenshot.
- Click on the Get Started Now option to create a new Lambda function:
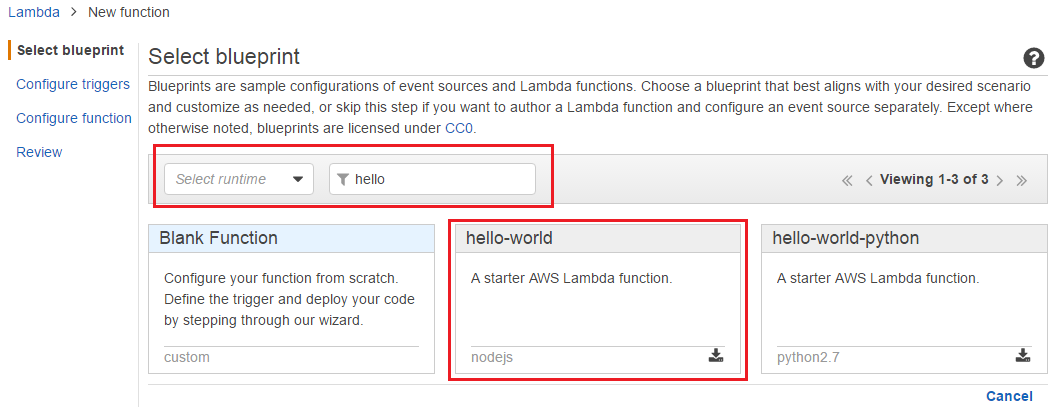
Creating a Lambda function is a straightforward four-step process and it begins with the selection of a function blueprint. Just the way we have AMIs for easy and fast deployments of EC2 instances, the same applies for a Lambda function as well. Blueprints are nothing more than sample code that you can use as starting points to writing your very own functions. AWS provides a cool 70-odd blueprints that you can select from, this can help you integrate S3, DynamoDB, and Kinesis with Lambda for to perform specific tasks. For this section, we are going to be using a very simple hello-world Lambda function blueprint from the catalog. We can do so by following the given steps:
- First, simply type in the keyword hello in the filter provided. You can optionally even select the runtime for your function as Node.js from the Select runtime drop-down list provided to narrow your search.
- Select the hello-world blueprint, as shown here:
The second stage of creating your own Lambda function involves the configuration of the function's trigger mechanism. This is an optional page, however, it's worth paying attention to. Here, you can select a particular service that will trigger the Lambda function's invocation by selecting the highlighted box adjoining the Lambda function icon, as shown. To select a particular service, you will be required to populate some necessary fields pertaining to that service.
For example, if you happen to select S3 as the service, then you will be prompted with fields where you will need to provide the particular bucket name, the event type (whether to trigger the function based on an object's creation or deletion), and so on:
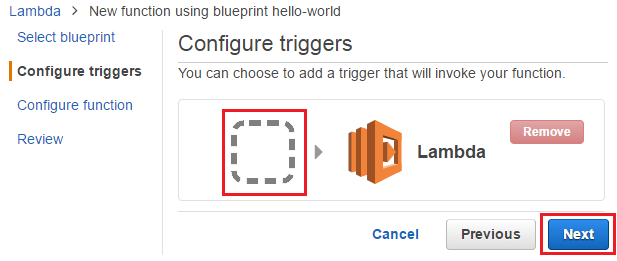
- Select Next to continue with the wizard. The next page that shows up is the function's configuration page. Using this page, you can provide your function's basic configurable items, such as Name, Description, and Runtime.
- Provide a suitable Name for your Lambda function. The Description field is optional, however, it is always a good practice to provide one. The Runtime for this scenario is already auto populated to Node.js 4.3. At the time of writing this book, the following runtimes are supported:
- Node.js 4.3
- Edge Node.js 4.3
- Java 8
- Python 2.7
- C# (.NET Core 1.0)
- Post the runtime. You will also notice your Lambda code prewritten and ready for execution, shown as follows:
        'use strict';
        console.log('Loading function');
        exports.handler = (event, context, callback) => {
          //console.log('Received event:',JSON.stringify(event, null,
          2));
          console.log('value1 =', event.key1);
          console.log('value2 =', event.key2);
          console.log('value3 =', event.key3);
          callback(null, event.key1);
          // Echo back the first key value
          //callback('Something went wrong');
        };
The code itself can be broken up into three distinctive parts: the first is the invocation of the function. The function, in this case, is called handler, which gets exported from your Node.js code. This handler is then invoked by calling the function's file name (which in this case is index), followed by the function's name in this format: index.handler. The rest of the parameters go as follows: event is the variable where you get your function's event-related data; context is used to get some contextual information about your Lambda function, such as the function's name, how much memory it consumed, the duration it took to execute, and so on, callback is used to send back some value to your caller, such as an error or result parameter: callback(error,result).
You can either edit your code inline using the code editor provided in the console or even upload a packaged code in the form of a ZIP file either from your local workstation or even from S3. We will be exploring these options later in the next chapter, for now let us continue moving forward.
The next section on the function configuration page is the Lambda function handler and role as shown in the following screenshot. Here you provide the Handler* for your code along with the necessary permissions it needs to run in the form of IAM roles. You have three options to select from the Role* drop-down list. The first in the list is, Choose an existing role that basically allows you to select an IAM role from a list of predefined one. For this scenario, I've gone ahead and selected the role lambda_basic_execution which as the name suggests, provides basic execution rights to your Lambda function:

The other two options are Create a custom role or Create a role from a template. You can use either of these options to create new roles based on your requirements.
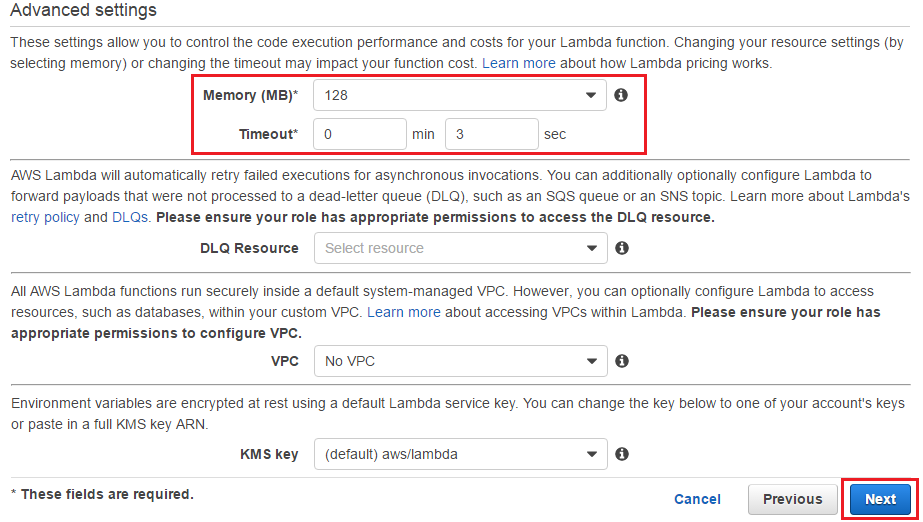
The final section on the function configuration page is the Advanced settings section. Here you can configure your function's resource requirements along with a few necessary items as well. Let us have a quick look at each one:
-
- Memory (MB): Select the appropriate amount of memory for your function to run. There is no provision for selecting the CPU resources for your function however the more RAM that you provide to your instance, the better CPU cycle it will get as well. For instance, a 256 MB function will generally have twice the CPU than that of a 128 MB function.
- Timeout: The Timeout field is used to specify your function's maximum execution time. Once the timeout is breached, AWS will automatically terminate your function's execution. You can specify any value between 1 second and 300 seconds.
- DLQ Resource: This feature is quite new, but a very useful feature when it comes to building fault tolerant asynchronous applications. By default, AWS automatically queues the various asynchronous events that the function has to invoke on. It can automatically retry the invocation twice before that particular event is discarded. If you do not wish the event to be discarded, you can now leverage either AWS SQS or SNS to push those stranded events to the dead letter queue. Selecting SNS prompts for a valid SNS Topic name and selecting SQS prompts you to enter a valid SQS Queue name:
-
- VPC: By default, your Lambda functions are created and deployed in an AWS managed VPC. You can optionally toggle this setting and provide your own VPCs for the functions to run out of.
- KMS key: Lambda provides you to develop functions by passing environment variables as well. By default, when you create environment variables, AWS encrypts them using the KMS service. You can use this default service key or even create your own custom key using the IAM console.
- With the Advanced settings out of the way, click Next to proceed. On the Review page, make sure you go through the items that you have configured during this section.
- Once done, click on Create function to launch your first Lambda function.
You should see your Lambda function successfully deployed as shown in the following screenshot. You can use this dashboard to edit your function's code inline, as well as change a few necessary parameters and even test it. Let's take a quick look at the tabs for a better understanding:
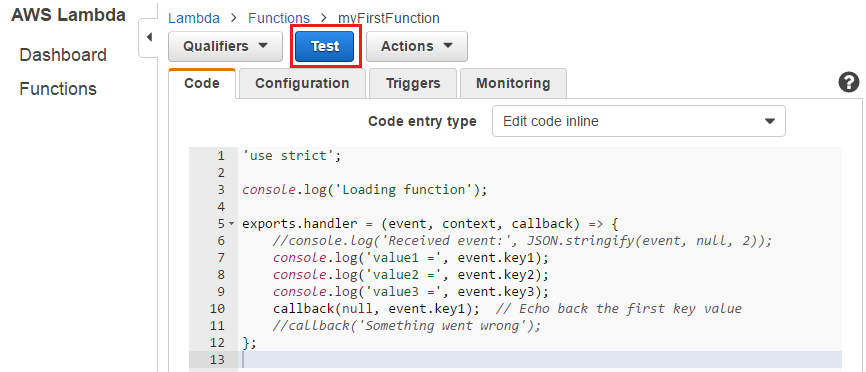
The tabs in the screenshot above are explained as follows:
-
- Code: Using this particular tab, you can edit the deployed code inline as well as upload a newer version of your code using either your local workstation or from S3. Once you have made changes to your code you will be prompted to Save and test the same.
- Configuration: This tab provides you with the same configurable items as described earlier in this very section. You mostly will use this tab to reconfigure your function's resources or change its execution duration.
- Triggers: Use this tab to configure your function's triggering mechanism. For this section, this would be blank anyways.
- Monitoring: This tab will display the function's invocation count, its duration, and whether any errors or throttling events occurred.
For now, let us run a quick and simple test to verify whether our function is working or not:
-
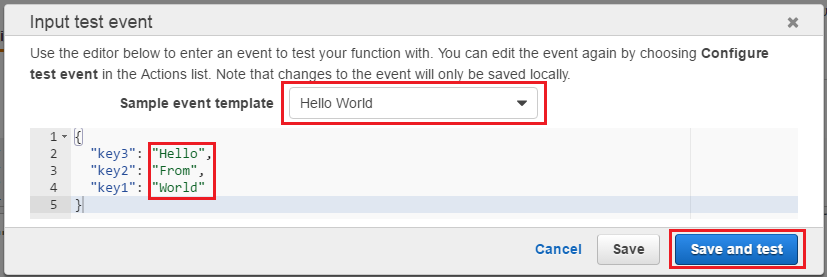
- To do so, select the Test option. Here, you can select from a list of few a predefined test sample events using Sample event template, as shown in the following screenshot.
- Select the template Hello World:
-
- The function processes incoming events in the following format. Replace the value field with your own string values and click on Save and test to view the results of your function's execution:
                {
                  "key3": "value3",
                  "key2": "value2",
                  "key1": "value1"
                }
-
- If the execution goes well, you should see the following displayed on your dashboard. The first thing you need to notice here is the result of your code's execution, followed by the Summary of your function's execution. The Summary section displays the Duration the function took to execute, Billed duration, along with other important details such as the function's Resources configured and Max memory used. You can always use these details to fine-tune the amount of resources you provide to your function to execute the next time:
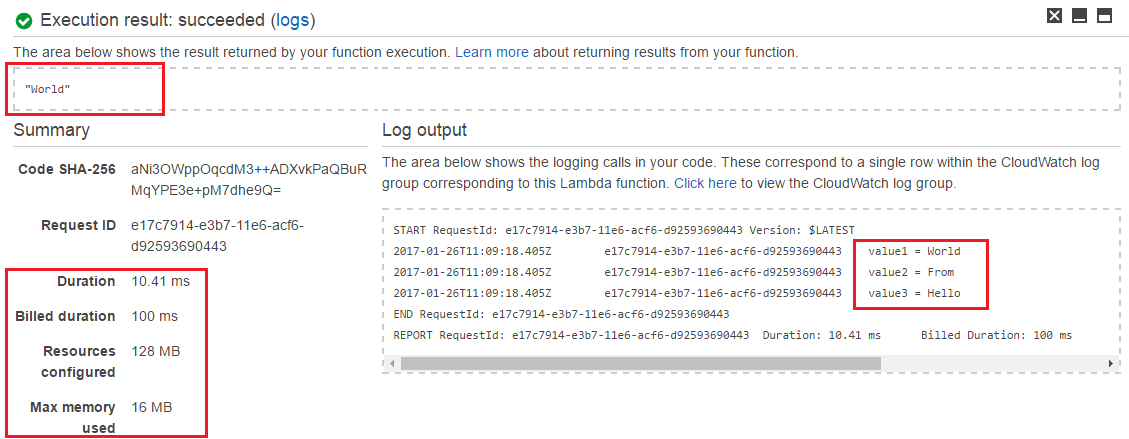
The second important part is Log output, which displays a part of the function's execution logs. You can use these logs to rectify code errors and make performance improvements as well.
So, with just a few simple clicks we were able to create, run, and test our first Lambda function, and all the while we did not bother about setting up the development platform nor managing the underlying infrastructure! That's exactly what serverless architecture is all about! There are still quite a few options available from the dashboard that we can use, however, we will keep them aside for the next chapter. For now, let us explore how the AWS CLI can be leveraged to spin up and manage Lambda functions as well.
Using the CLI
As you may be well aware of, AWS provides a rich and easy to use CLI as well for managing your cloud resources. In this section, we will be using the AWS CLI to create, package, and invoke a simple Lambda function:
- To begin with, make sure your AWS CLI is set up and ready for use. You can install the CLI on most major Linux OSes, as well as macOS, and Windows. You can go through the following guide for the installation, as well as the configuration steps: http://docs.aws.amazon.com/cli/latest/userguide/installing.html.
- Next, create a new folder (in this case, I created a folder named lambda) and copy the following contents into a new file:
        console.log('Loading function');
        exports.handler = function(event, context) {
          var date = new Date().toDateString();

          context.succeed("Hello " + event.username +
           "! Today's date is " + date);
        };
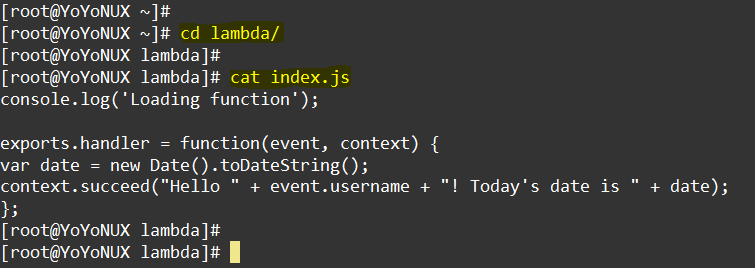
The following screenshot shows the output of the preceding file:
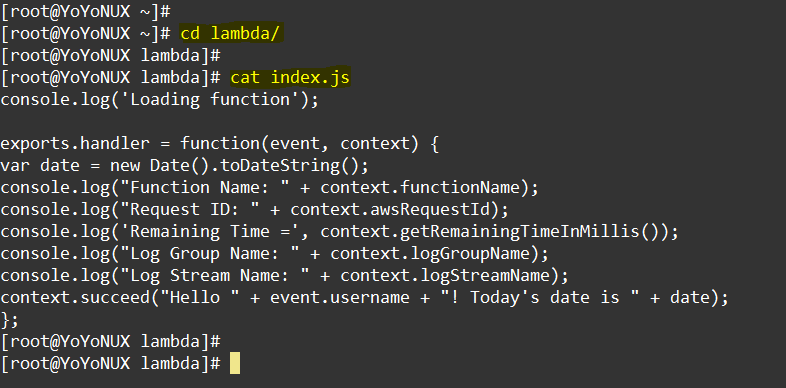
- Name the file index.js and save it. This particular code is fairly straightforward. It logs the current date and prints a user-friendly message with the user's name passed as the event.
- Now, in order for the Lambda function to execute, we need to create a minimalistic IAM role that Lambda can assume for executing the function on our behalf. Create a file named policy.json and paste the following content into it:
        {
          "Version": "2012-10-17",
          "Statement": [
            {
              "Effect": "Allow",
              "Principal": {
                "Service": "lambda.amazonaws.com"
              },
              "Action": "sts:AssumeRole"
            }
          ]
        }
- To create an IAM Role, we need to make use of the create-role command, as shown:
        # aws iam create-role
        --role-name basic-lambda-role
        --assume-role-policy-document file://policy.json
From the output of the preceding command, copy the ARN that and keep it handy. We will be requiring the same in the coming steps.
- With the role created, we can now go ahead and create our function. First, zip the index.js file using the following zip command. This is going to be our deployment package that will be uploaded to an S3 bucket and executed as a function by Lambda itself:
# zip -r mySecondFunction.zip index.js
- Next, we use the create-function command to create our Lambda function. Type in the following command:
        # aws lambda create-function
        --region us-west-2
        --function-name mySecondFunction
        --zip-file fileb://mySecondFunction.zip
        --role arn:aws:iam::00123456789:role/basic-lambda-role
        --handler index.handler
        --runtime nodejs4.3
        --memory-size 128
Let us explore a few of the options that we just passed with the create-function command:
-
- --function-name: The name of the function that you will be uploading. You can optionally even provide a description for you function by passing the --description option.
- --zip-file: This is the path of the deployment package that we are uploading.
- --role: The ARN of the IAM role that Lambda will assume when it has to execute the function.
- --handler: The function name that Lambda will call to begin the execution of your code.
- --runtime: You can provide the runtime environment for the code that you will be executing. There are a few pre-defined values here that you can use, namely: nodejs, nodejs4.3, nodejs4.3-edge, java8, python2.7, and dotnetcore1.0.
- --memory-size: The amount of RAM you wish to allocate to your Lambda function. You can optionally set the timeout value as well by using the --timeout option.
The full list of options can be found here https://docs.aws.amazon.com/cli/latest/reference/lambda/create-function.html.
Once you have created the function, you should get a response similar to the one shown in the following screenshot. This means we are now ready to invoke our function:

- To invoke the function from the command line, we need to call the invoke command, as shown:
        # aws lambda invoke
        --invocation-type RequestResponse
        --function-name mySecondFunction
        --region us-west-2
        --log-type Tail
        --payload '{"username":"YoYo"}'
        output.txt
Let us explore a few of the options from the invoke command:
-
- --invocation-type: The type of invocation your Lambda will undertake. By default, the RequestResponse invocation is invoked. You can also choose between event meant for asynchronous executions or the dryrun invocation if you want to verify your function without running it.
- --log-type: Used to display the log of your function's execution. Do note, however, that the Tail parameter only works when the --invocation-type is set to RequestResponse.
- --payload: The data you wish to send to your Lambda function in JSON format.
- output: The file where you want to log the output of your function's execution.
The full specification can be found here https://docs.aws.amazon.com/cli/latest/reference/lambda/invoke.html.
- Once you have successfully invoked the function, check the output of the execution in the output.txt file:

There you have it! You have now successfully created and launched a Lambda function using the AWS CLI. There are a few other important commands that you should also keep in mind when working with the CLI, here's a quick look at some of them:
-
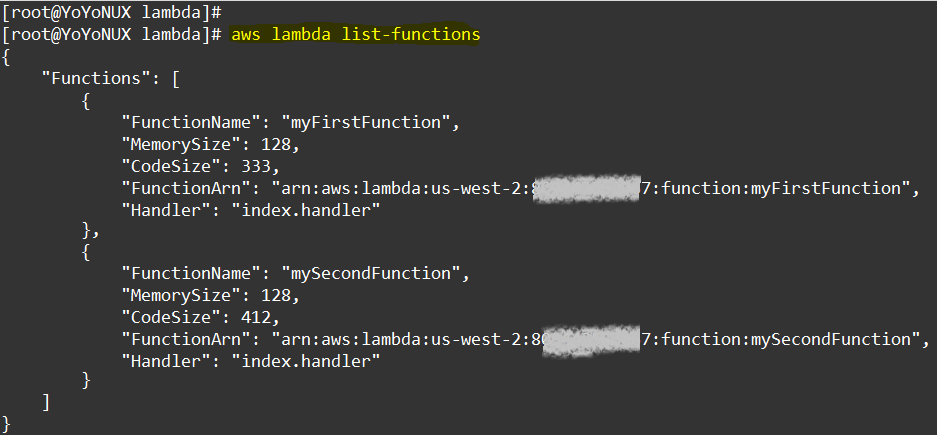
- list-functions: A simple command to list your published Lambda functions. You can invoke it by using the following command:
# aws lambda list-functions
You can optionally use other parameters, such as --max-items, to return a mentioned number of functions at a time:

-
- get-function and get-function-configuration: As the name suggests, both commands return the configuration information of the Lambda function that was created using the create-function command. The difference being that the get-function command also provides a unique URL to download your code's deployment package (ZIP file). The URL is pre-signed and is valid for up to 10 minutes from the time you issue the get-function command:
                    # aws lambda get-function <FUNCTION_NAME>
                    (or)
                    # aws lambda get-function-configuration
                    <FUNCTION_NAME>
The following screenshot shows the output for the preceding command:
To get a complete list of the CLI supported commands, click here http://docs.aws.amazon.com/cli/latest/reference/lambda/.


