Using expanding lists (iOS 14+)
Expanding lists can be used to display hierarchical structures within a list. Each list item can be expanded to view its contents. The expanding ability is achieved by creating a struct that holds some information and an optional array of items of the same type as the struct itself. Let's examine how expanding lists work by creating an app that displays the contents of a backpack.
Getting ready
Create a new SwiftUI app and name it UsingExpandingLists.
How to do it…
We start by creating the Backpack struct that describes the properties of the data we want to display. We'll then create a number of Backpack constants and display the hierarchical information using a List view containing a children property.
The steps are as follows:
- At the bottom of the
ContentView.swiftfile, define aBackpackstruct that has anid,name,icon, andcontentproperty. Thecontentproperty's type should be an optional array ofBackpackstructs:struct Backpack: Identifiable { let id = UUID() let name: String let icon: String var content: [Backpack]? } - Below the
Backpackstruct declaration, create three variables: two currency types and an array of currencies:let dollar = Backpack(name: "Dollar", icon: "dollarsign. circle") let yen = Backpack(name: "Yen",icon: "yensign.circle") let currencies = Backpack(name: "Currencies", icon: "coloncurrencysign.circle", content: [dollar, yen])
- Create a
pencil,hammer,paperclip, andglassconstant:let pencil = Backpack(name: "Pencil",icon: "pencil. circle") let hammer = Backpack(name: "Hammer",icon: "hammer") let paperClip = Backpack(name: "Paperclip",icon: "paperclip") let glass = Backpack(name: "Magnifying glass", icon: "magnifyingglass")
- Create a
bin Backpackconstant that containspaperclipandglass, as well as atoolconstant that holdspencil,hammer, andbin:let bin = Backpack(name: "Bin", icon: "arrow.up.bin", content: [paperClip, glass]) let tools = Backpack(name: "Tools", icon: "folder", content: [pencil, hammer,bin])
- Going back to the
ContentViewstruct, add an instance property;items, which contains an array of two items, thecurrenciesandtoolsconstants defined earlier:struct ContentView: View { let items = [currencies,tools] … } - Within the
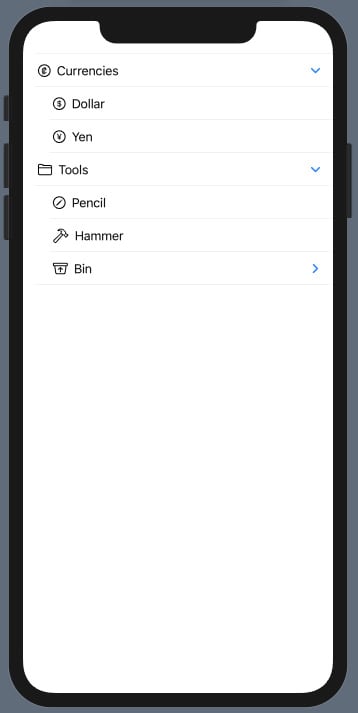
bodyvariable, replace theTextview with aListview that displays the content of theitemsarray:var body: some View { List(items, children: \.content){ row in Image(systemName: row.icon) Text(row.name) } }The resulting Xcode live preview should look as follows when expanded:

Figure 2.16 – Using expanding lists
Run the Xcode live preview and click on the arrows to expand and collapse the views.
How it works…
We start by creating a struct of the proper format for expanding lists. Expanding lists require one of the struct properties to be an optional array of the same type as the struct itself. Our Backpack content property holds an optional array of Backpack items:
struct Backpack: Identifiable {
    let id = UUID()
    let name: String
    let icon: String
    var content: [Backpack]?
}
The UUID() function generates a random identifier and stores it in the id property. We can manually provide the name, icon, and content variables for the items we add to the backpack.
We create our first hierarchical structure by creating the Dollar and Yen variables:
let dollar = Backpack(name: "Dollar", icon: "dollarsign.  circle")
let yen = Backpack(name: "Yen",icon: "yensign.circle")
Observe that no content property has been provided for both variables. This is possible because the content is an optional parameter.
We then create a currencies constant that that has name and icon. The Dollar and Yen variables created earlier are added to its content array.
We use a similar composition to add elements to our tool constant.
After setting up the data we want to display, we create an item property in our ContentView struct that holds an array of Backpack constants created earlier:
let items = [currencies,tools]
Finally, we replace the Text view in the ContentView body with a List view that iterates over the items. The list is made expandable by adding the children parameter, which expects an array of the same time as the struct passed to the List view.
There's more…
The tree structure used for expandable lists can also be generated on a single line, as follows:
let tools = Backpack(name: "Tools", icon: "folder", content:
   [Backpack(name: "Pencil",icon: "pencil.circle"),
    Backpack(name: "Hammer",icon: "hammer"),
    Backpack(name: "Bin", icon: "arrow.up.bin", content:
        [Backpack(name: "Paperclip",icon: "paperclip"),
         Backpack(name: "Magnifying glass", icon:           "magnifyingglass")
           ])
       ])
The SwiftUI List view provides out-of-the-box support for OutlineGroup in iOS 14. OutlineGroup computes views and disclosure groups on demand from an underlying collection.
See also
Refer to the WWDC20 video on stacks, grids, and outlines at https://developer.apple.com/videos/play/wwdc2020/10031/.
Refer to the Apple documentation on OutlineGroup at https://developer.apple.com/documentation/swiftui/outlinegroup.


